background image

Troubleshoot a problem 

110 

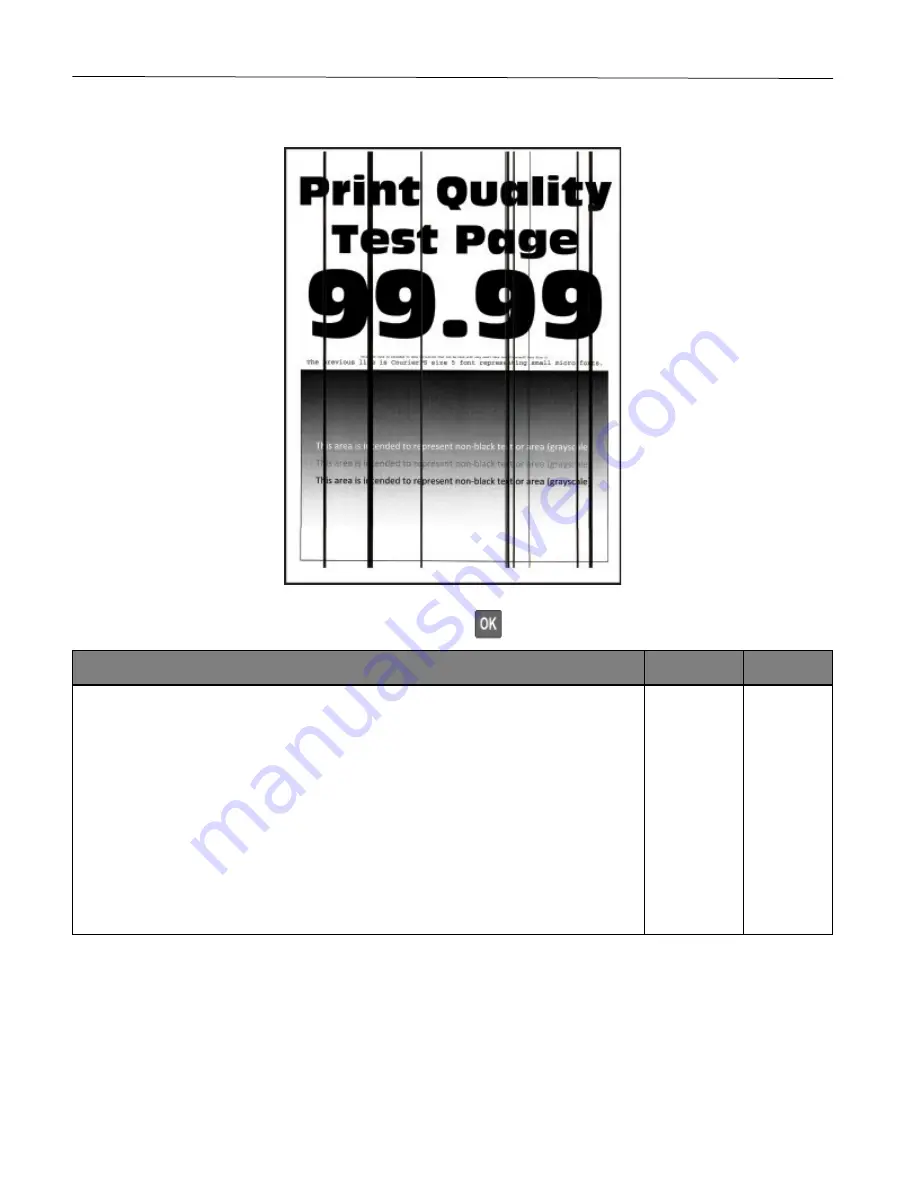
Vertical dark lines 


Note:

 Before solving the problem, print the Print Quality Test Pages. From the control panel, navigate to 

Settings


Troubleshooting

 > 

Print Quality Test Pages

. Press 

  to navigate through the settings. 

Action


Yes


No


Step 1


Depending on your operating system, specify the paper type from the Printing 

Preferences or Print dialog. 

Notes:


  Make sure that the setting matches the paper loaded. 

  You can also change the setting on the printer control panel. Navigate to 

Settings


Paper

 > 

Tray Configuration

 > 

Paper Size/Type

Print the document. 

  
Do vertical dark lines appear on prints? 

Go to step 2.  The 

problem is 

solved. 

Summary of Contents for P C200W

Page 1: ...ty Information section before using the product Notices Troubleshoot a problem Maintain the printer Use printer menus Print Secure the printer Set up install and con gure Learn about the printer Safet...

Page 2: ...18 Set up install and configure 19 Selecting a location for the printer 19 Attaching cables 20 Loading paper and specialty media 22 Setting the paper size and type 22 Configuring Universal paper sett...

Page 3: ...ice using Mopria Print Service 33 Printing from a mobile device using AirPrint 33 Printing from a mobile device using Wi Fi Direct 34 Configuring confidential jobs 34 Printing confidential and other h...

Page 4: ...nagement 72 Login Restrictions 73 Confidential Print Setup 73 Erase Temporary Data Files 74 Miscellaneous 74 Reports 76 Menu Settings Page 76 Device 76 Print 76 Network 76 Troubleshooting 77 Maintain...

Page 5: ...print 122 The printer is not responding 124 Network connection problems 125 Cannot open Embedded Web Server 125 Cannot connect the printer to the Wi Fi network 127 Issues with supplies 128 Replace car...

Page 6: ...148 Exposure to radio frequency radiation 148 Innovation Science and Economic Development Canada 148 Innovation Sciences et D veloppement conomique Canada 148 European Community EC directives conform...

Page 7: ...Contents 7 United Kingdom UK conformity 151...

Page 8: ...IAL INJURY Do not use this product with extension cords multioutlet power strips multioutlet extenders or UPS devices The power capacity of these types of accessories can be easily overloaded by a las...

Page 9: ...nding optional trays or output options attached to it then disconnect them before moving the printer If the printer has a caster base then carefully roll it to the new location Use caution when passin...

Page 10: ...ibed in the user documentation to a service representative This product uses a printing process that heats the print media and the heat may cause the media to release emissions You must understand the...

Page 11: ...Learn about the printer 11 Learn about the printer Printer configurations 1 Control panel 2 Standard bin 3 Manual feeder 4 Standard 250 sheet tray 1 2 3 4...

Page 12: ...umeric value of a setting 3 Stop or Cancel button Stop the current job 4 Indicator light Check the status of the printer 5 Select button Select a menu option Save the changes in a setting 6 Back butto...

Page 13: ...unless they are specifically designed for electrophotographic printing Paper characteristics The following paper characteristics affect print quality and reliability Consider these factors before prin...

Page 14: ...od This content provides the paper with a high degree of stability resulting in fewer paper feeding problems and better print quality Paper containing fibers such as cotton can negatively affect paper...

Page 15: ...carton or wrapper only when you are ready to load it in the printer The carton and wrapper help keep the paper clean dry and flat Selecting preprinted forms and letterhead Use grain long paper Use onl...

Page 16: ...55 6 mm 8 5 x 14 in Folio 215 9 x 330 2 mm 8 5 x 13 in Universal2 3 98 4 x 148 mm 3 86 x 5 83 in to 215 9 x 355 6 mm 8 5 x 14 in Universal2 3 25 4 x 25 4 mm 1 x 1 in to 215 9 x 297 mm 8 5 x 11 69 in X...

Page 17: ...tted for 215 90 x 355 60 mm 8 5 x 14 in unless specified by the software application 3 Load narrow paper with the short edge entering the printer first 4 The standard 250 sheet tray supports up to 5 e...

Page 18: ...t paper 60 74 9 g m2 grain long 16 19 9 lb bond Plain paper 75 90 3 g m2 grain long 20 24 lb bond Heavy paper 90 3 100 g m2 grain long 24 1 26 lb bond Card stock 105 1 162 g m2 grain long 28 1 43 lb b...

Page 19: ...product and easily accessible CAUTION SHOCK HAZARD To avoid the risk of electrical shock do not place or use this product near water or wet locations Make sure that airflow in the room meets the lates...

Page 20: ...e or telephone during a lightning storm CAUTION POTENTIAL INJURY To avoid the risk of fire or electrical shock connect the power cord to an appropriately rated and properly grounded electrical outlet...

Page 21: ...tall and configure 21 Printer port Function 1 Ethernet port Connect the printer to a network 2 USB printer port Connect the printer to a computer 3 Power cord socket Connect the printer to an electric...

Page 22: ...onfiguring Universal paper settings 1 From the control panel navigate to Settings Paper Media Configuration Universal Setup Press to navigate through the settings 2 Configure the settings Loading tray...

Page 23: ...erhead faceup with the header toward the back of the tray for one sided printing Load letterhead facedown with the header toward the front of the tray for two sided printing Do not slide paper into th...

Page 24: ...tch the size of the paper that you are loading 5 Insert the tray If necessary set the paper size and paper type from the control panel to match the paper loaded Loading the manual feeder 1 Adjust the...

Page 25: ...ng Load letterhead with the printable side facedown and the top edge entering the printer last for two sided printing Load envelope with the flap side down and against the right side of the paper guid...

Page 26: ...the printer to the computer using a USB cable For more information see Attaching cables Note The USB cable is sold separately For Windows users 1 From a computer install the print driver Note For mor...

Page 27: ...If you are using a proxy server then temporarily disable it to load the web page correctly 2 Click Settings Device Update Firmware 3 Do either of the following Click Check for updates I agree start u...

Page 28: ...et up the Wi Fi network appears during initial setup Connecting the printer to a wireless network using Wi Fi Protected Setup WPS Note This feature is available only in some printer models Before you...

Page 29: ...d then save the changes Configuring Wi Fi Direct Wi Fi Direct is a Wi Fi based peer to peer technology that allows wireless devices to connect directly to a Wi Fi Direct enabled printer without using...

Page 30: ...dy installed then Windows downloads the appropriate driver For Macintosh users 1 Click the wireless icon and then select the printer Wi Fi Direct name Note The string DIRECT xy where x and y are two r...

Page 31: ...nectivity 1 Print the Network Setup Page From the control panel navigate to Settings Reports Network Network Setup Page Press to navigate through the settings 2 Check the first section of the page and...

Page 32: ...ct Restore all settings Statement of Volatility Your printer contains various types of memory that can store device and network settings and user data Type of memory Description Volatile memory Your p...

Page 33: ...it in the mobile device 1 From your Android mobile device launch a compatible application or select a document from your file manager 2 Tap Print 3 Select a printer and then adjust the settings if nec...

Page 34: ...gs Security Confidential Print Setup 2 Configure the settings Using the Embedded Web Server 1 Open a web browser and then type the printer IP address in the address field Notes View the printer IP add...

Page 35: ...rs Using AirPrint 1 With a document open choose File Print 2 Select a printer and then from the drop down menu following the Orientation menu choose PIN Printing 3 Enable Print with PIN and then enter...

Page 36: ...ollowing Open the printers folder and then select your printer From the System Preferences in the Apple menu navigate to your printer 2 Select the job to cancel Adjusting toner darkness 1 From the con...

Page 37: ...ation Network Ports Network Overview Wireless Wi Fi Direct Ethernet TCP IP SNMP IPSec 802 1x LPD Configuration HTTP FTP Settings USB Restrict external network access Security2 Login Methods Certificat...

Page 38: ...Text 1 Custom Text 2 Specify the information to appear on the home screen Paper Sizes U S Metric Specify the unit of measurement for paper sizes Note The country or region selected in the initial setu...

Page 39: ...a value indicates the factory default setting Remote Operator Panel Menu item Description External VNC Connection Don t Allow Allow Connect an external Virtual Network Computing VNC client to the rem...

Page 40: ...seconds Reply Address Always use SMTP default Reply Address Off Use SSL TLS Disabled Require Trusted Certificate On SMTP Server Authentication No authentication required Device Initiated E mail None D...

Page 41: ...atic reboot Error Prevention Auto Reboot Auto Reboot Counter Show a read only information of the reboot counter Error Prevention Display Short Paper Error Auto clear On Set the printer to show a messa...

Page 42: ...minutes 15 Set the idle time before the printer begins operating in Sleep mode Timeouts Hibernate Timeout Disabled 1 hour 2 hours 3 hours 6 hours 1 day 2 days 3 days 1 week 2 weeks 1 month Set the ti...

Page 43: ...r USB Configuration USB Speed Full Auto Set the USB port to run at full speed and disable its high speed capabilities Tray Configuration Tray Linking Automatic Off Set the printer to link the trays th...

Page 44: ...ports Menu Settings Page Event Log Event Log Summary Print reports about printer menu settings status and event logs Supply Usage And Counters Clear Supply Usage History Reset the supply usage history...

Page 45: ...he high frequency screens are used when printing font data For example if the value is 24 then all fonts sized 24 points or less use the high frequency screens Device Operations Quiet Mode Off On Set...

Page 46: ...calibration Toner patch sensor setup Print TPS information page Print a diagnostic page that contains toner patch sensor calibration Note An asterisk next to a value indicates the factory default set...

Page 47: ...lank Pages Print Do Not Print Print blank pages that are included in a print job Collate Off 1 1 1 2 2 2 On 1 2 1 2 1 2 Keep the pages of a print job stacked in sequence particularly when printing mul...

Page 48: ...r page orientation Pages per Side Orientation Auto Landscape Portrait Specify the orientation of a multiple page document when using Pages per Side Pages per Side Border None Solid Print a border arou...

Page 49: ...s are being printed Resource Save Off On Determine what the printer does with downloaded resources such as fonts and macros when it receives a job that requires more than the available memory Notes Wh...

Page 50: ...ight Normal Dark Determine the lightness or darkness of text images Halftone Normal Detail Enhance the printed output to have smoother lines with sharper edges RGB Brightness 6 to 6 0 Adjust the brigh...

Page 51: ...olor conversions applied to each object on the printed page Color Correction Content is available only when Color Correction is set to Manual Color Adjust Calibrate the printer to adjust color variati...

Page 52: ...ach font name Note A symbol set is a set of alphabetic and numeric characters punctuation and special symbols Symbol sets support the different languages or specific programs such as math symbols for...

Page 53: ...ed 90 Set the printer to end a print job after it has been idle for the specified amount of time in seconds Note Print Timeout Time appears only in some printer models Print Timeout Time 1 255 90 Note...

Page 54: ...54 Menu item Description Orientation Portrait Landscape Reverse Portrait Reverse Landscape Specify the orientation of text and graphics on the page Note An asterisk next to a value indicates the facto...

Page 55: ...r size Letter A4 prints an A4 size document on letter when loading letter and letter size jobs on A4 paper size when loading A4 All Listed substitutes Letter A4 Note An asterisk next to a value indica...

Page 56: ...s shorter than the maximum width supported Note An asterisk next to a value indicates the factory default setting Media Types Menu item Description Plain Paper Card Stock Recycled Glossy Labels Bond E...

Page 57: ...IPv6 addresses Reset Print Server Start Reset all active network connections to the printer Note This setting removes all network configuration settings Network Job Timeout Disabled Enabled Set the ti...

Page 58: ...int wireless router are pressed within a given time Start PIN Method connects the printer to a wireless network when a PIN on the printer is entered into the wireless settings of the access point Comp...

Page 59: ...ireless security through 802 1x standard Note This menu item appears only if Wireless Security Mode is set to 802 1x Radius IPv4 Enable DHCP On Off Enable Dynamic Host Configuration Protocol DHCP Note...

Page 60: ...itch automatically to PCL emulation when a print job requires it regardless of the default printer language Note If PCL SmartSwitch is off then the printer does not examine incoming data and uses the...

Page 61: ...wner IP Address Specify the IP address of the group owner Auto Accept Push Button Requests Off On Accept requests to connect to the network automatically Note Accepting clients automatically is not se...

Page 62: ...address Note This menu item appears only in some printer models IPv6 Address Prefix 0 128 64 Specify the address prefix IPv6 All IPv6 Addresses Show all IPv6 addresses IPv6 All IPv6 Router Addresses...

Page 63: ...from the Ethernet network Note An asterisk next to a value indicates the factory default setting TCP IP Note This menu appears only in network printers or printers attached to print servers Menu item...

Page 64: ...TP to assign a printer IP address Restricted Server List Specify an IP address for the TCP connections Notes This menu item appears only in some printer models Use a comma to separate each IP address...

Page 65: ...TLS connections Note An asterisk next to a value indicates the factory default setting SNMP Note This menu appears only in network printers or printers that are attached to print servers Menu item Des...

Page 66: ...No Privacy Authentication Privacy Privacy Algorithm DES AES 128 Configure SNMP version 3 to install and update the printer security Note An asterisk next to a value indicates the factory default setti...

Page 67: ...pecify the encryption and authentication methods to connect to a network securely Note These menu items appear only when Base Configuration is set to Compatibility Proposed Authentication Method SHA1...

Page 68: ...Page Off On Print a banner page for all LPD print jobs Note A banner page is the first page of a print job used as a separator of print jobs and to identify the originator of the print job request LPD...

Page 69: ...figure the HTTP and FTP server settings Note HTTP Proxy IP Address and FTP Proxy IP Address appear only in the Embedded Web Server FTP Proxy IP Address HTTP Default IP Port 1 65535 80 HTTPS Device Cer...

Page 70: ...et to On the printer processes raw binary PostScript print jobs from computers using the Macintosh operating system When set to Auto the printer processes print jobs from computers using either Window...

Page 71: ...nt Control access to the printer functions Manage Permissions Administrative Menus Security Menu Network Ports Menu Paper Menu Reports Menu Function Configuration Menus Supplies Menu SE Menu Device Me...

Page 72: ...ess Controls Function Access Administrative Menus Device Management Admin Function Access Administrative Menus Device Management Control group or user access to the printer functions applications and...

Page 73: ...tes the factory default setting Confidential Print Setup Menu item Description Max Invalid PIN 2 10 0 Set the number of times an invalid PIN can be entered Notes A value of zero turns off this setting...

Page 74: ...jobs for printing later Require All Jobs to be Held Off On Set the printer to hold all print jobs Keep duplicate documents Off On Allow the storage of documents with the same file name Note An asteri...

Page 75: ...per is located beside a lock icon on the controller board Enable Guest access gives anyone access to all aspects of the printer No Effect may make access to the printer impossible when the required se...

Page 76: ...onts PostScript Fonts Print samples and information about the fonts that are available in each printer language Print Demo Demo Page Print a demo page that is used as a diagnostic tool for print probl...

Page 77: ...Use printer menus 77 Troubleshooting Menu item Description Print Quality Test Pages Print sample pages to identify and correct print quality defects...

Page 78: ...Device Notifications 3 From the Supplies menu click Custom Supply Notifications 4 Select a notification for each supply item 5 Apply the changes Setting up e mail alerts Configure the printer to send...

Page 79: ...SO IEC 19798 standard Extremely low print coverage for extended periods of time may negatively affect actual yield To order a print cartridge contact the place where you purchased the printer Ordering...

Page 80: ...Maintain the printer 80 2 Pull out the print cartridge tray 3 Remove the used print cartridge...

Page 81: ...he print cartridge to direct light Extended exposure to light may cause print quality problems Warning Potential Damage Do not touch the underside of the print cartridge Doing so may affect the qualit...

Page 82: ...r 82 Replacing the waste toner bottle 1 Remove the used waste toner bottle Note To avoid spilling the toner place the bottle in an upright position 2 Unpack the new waste toner bottle 3 Insert the new...

Page 83: ...leaners or detergents as they may damage the finish of the printer Make sure that all areas of the printer are dry after cleaning 5 Connect the power cord to the electrical outlet and then turn on the...

Page 84: ...POTENTIAL INJURY To avoid the risk of fire or electrical shock use only the power cord provided with this product or the manufacturer s authorized replacement CAUTION POTENTIAL INJURY When moving the...

Page 85: ...the link below it to read problem solving steps Blank or white pages Dark print Ghost images Gray or colored background Incorrect margins Light print Missing colors Mottled print and dots Paper curl P...

Page 86: ...rol panel navigate to Settings Troubleshooting Print Quality Test Pages Press to navigate through the settings Action Yes No 1 Open the front door and then firmly push it down 2 Pull out the print car...

Page 87: ...l panel navigate to Settings Troubleshooting Print Quality Test Pages Press to navigate through the settings Action Yes No Step 1 1 Perform Color Adjust From the control panel navigate to Settings Pri...

Page 88: ...ded You can also change the setting on the printer control panel Navigate to Settings Paper Tray Configuration Paper Size Type 2 Print the document Is the print too dark Go to step 4 The problem is so...

Page 89: ...paper type 2 Print the document Do ghost images appear on prints Go to step 2 The problem is solved Step 2 1 Depending on your operating system specify the paper type from the Printing Preferences or...

Page 90: ...ument Do ghost images appear on prints Go to step 4 The problem is solved Step 4 1 Open the front door and then firmly push it down 2 Pull out the print cartridge tray 3 Remove and then insert the pri...

Page 91: ...el navigate to Settings Troubleshooting Print Quality Test Pages Press to navigate through the settings Action Yes No Step 1 1 Perform Color Adjust From the control panel navigate to Settings Print Qu...

Page 92: ...ush it down 2 Pull out the print cartridge tray 3 Remove and then insert the print cartridges 4 Insert the print cartridge tray and then close the door 5 Print the document Does gray or colored backgr...

Page 93: ...for the paper loaded 2 Print the document Are the margins correct The problem is solved Go to step 2 Step 2 1 Depending on your operating system specify the paper size from the Printing Preferences or...

Page 94: ...st From the control panel navigate to Settings Print Quality Advanced Imaging Color Adjust 2 Print the document Is the print light Go to step 2 The problem is solved Step 2 1 Depending on your operati...

Page 95: ...ocument Is the print light Go to step 4 The problem is solved Step 4 Check if paper has texture or rough finishes Are you printing on textured or rough paper Go to step 5 Go to step 7 Step 5 1 Replace...

Page 96: ...nd then firmly push it down 2 Pull out the print cartridge tray 3 Remove and then insert the print cartridges 4 Insert the print cartridge tray and then close the door 5 Print the document Is the prin...

Page 97: ...wn 2 Pull out the print cartridge tray 3 Remove and then insert the print cartridge of the missing color 4 Insert the print cartridge tray and then close the door 5 Print the document Are some colors...

Page 98: ...have texture or rough finishes Do the settings match Go to step 4 Go to step 3 Step 3 1 Depending on your operating system specify the paper size and paper type from the Printing Preferences or Print...

Page 99: ...and then firmly push it down 2 Pull out the print cartridge tray 3 Remove and then insert the print cartridges 4 Insert the print cartridge tray and then close the door 5 Print the document Is the pri...

Page 100: ...tray to the correct position for the paper loaded 2 Print the document Is the paper curled Go to step 4 The problem is solved Step 4 1 Depending on your operating system specify the paper size and pap...

Page 101: ...original wrapper until you are ready to use it 2 Print the document Is the paper curled Contact customer support The problem is solved Print crooked or skewed Note Before solving the problem print the...

Page 102: ...until you are ready to use it 2 Print the document Is the print crooked or skewed Go to step 3 The problem is solved Step 3 1 Check if the paper loaded is supported Note If paper is not supported the...

Page 103: ...the print cartridge tray and then close the door 5 Print the document Is the printer printing solid color or black images Contact customer support The problem is solved Text or images cut off Note Bef...

Page 104: ...that the setting matches the paper loaded You can also change the setting on the printer control panel Navigate to Settings Paper Tray Configuration Paper Size Type 2 Print the document Are text or i...

Page 105: ...ate through the settings Action Yes No Step 1 1 Depending on your operating system specify the paper type from the Printing Preferences or Print dialog Notes Make sure that the setting matches the pap...

Page 106: ...2 Print the document Does toner easily rub off Go to step 3 The problem is solved Step 3 1 Load paper from a fresh package Note Paper absorbs moisture due to high humidity Store paper in its original...

Page 107: ...st Pages Press to navigate through the settings Action Yes No 1 Open the front door and then firmly push it down 2 Pull out the print cartridge tray 3 Remove and then insert the print cartridges 4 Ins...

Page 108: ...specify the paper type from the Printing Preferences or Print dialog Notes Make sure that the setting matches the paper loaded You can also change the setting on the printer control panel Navigate to...

Page 109: ...artridges 4 Insert the print cartridge tray and then close the door 5 Print the document Do dark lines appear on prints Go to step 4 The problem is solved Step 4 1 Perform Color Adjust From the contro...

Page 110: ...ugh the settings Action Yes No Step 1 1 Depending on your operating system specify the paper type from the Printing Preferences or Print dialog Notes Make sure that the setting matches the paper loade...

Page 111: ...he document Do vertical dark lines appear on prints Go to step 3 The problem is solved Step 3 1 Open the front door and then firmly push it down 2 Pull out the print cartridge tray 3 Remove and then i...

Page 112: ...p appearing on your prints then see the Repeating defects topic Action Yes No Step 1 1 Depending on your operating system specify the paper type from the Printing Preferences or Print dialog Notes Mak...

Page 113: ...Insert the print cartridge tray and then close the door 5 Print the document Do horizontal white lines appear on prints Go to step 3 The problem is solved Step 3 1 Perform Color Adjust From the contro...

Page 114: ...ugh the settings Action Yes No Step 1 1 Depending on your operating system specify the paper type from the Printing Preferences or Print dialog Notes Make sure that the setting matches the paper loade...

Page 115: ...ertical white lines appear on prints Go to step 3 The problem is solved Step 3 1 Open the front door and then firmly push it down 2 Pull out the print cartridge tray 3 Remove and then insert the print...

Page 116: ...blem 116 Repeating defects Note Before solving the problem print the Print Quality Test Pages From the control panel navigate to Settings Troubleshooting Print Quality Test Pages Press to navigate thr...

Page 117: ...in 44 mm 1 73 in Do the repeating defects match any of the measurements Take note of the distance and then contact customer support Take note of the distance and then contact customer support Print j...

Page 118: ...ame with the printer 2 Print the document Is the document printed The problem is solved Go to step 4 Step 4 1 Turn off the printer wait for about 10 seconds and then turn on the printer 2 Print the do...

Page 119: ...inter is not in Quiet Mode From the control panel navigate to Settings Device Maintenance Config Menu Device Operations Quiet Mode Press to navigate through the settings 2 Print the document Is the pr...

Page 120: ...aper narrower than letter A4 and legal may print more slowly 2 Print the document Is the printer printing slow Go to step 5 The problem is solved Step 5 1 Make sure that the printer settings for textu...

Page 121: ...Yes No Step 1 1 Check if you are printing on the correct paper 2 Print the document Is the document printed on the correct paper Go to step 2 Load the correct paper size and paper type Step 2 1 Depend...

Page 122: ...ents do not print Action Yes No Step 1 1 From the control panel check if the documents appear in the Held Jobs list Note If the documents are not listed then print the documents using the Print and Ho...

Page 123: ...Hold tab click Use Print and Hold and then click Keep duplicate documents 3 Enter a PIN and then save the changes 4 Send the print job For Macintosh users 1 Save and name each job differently 2 Send...

Page 124: ...witch or breaker Turn on the switch or reset the breaker Go to step 3 Step 3 Check if the printer is on Is the printer on Go to step 4 Turn on the printer Step 4 Check if the printer is in Sleep or Hi...

Page 125: ...he printer on Go to step 2 Turn on the printer Step 2 Make sure that the printer IP address is correct Notes View the IP address on the home screen An IP address appears as four sets of numbers separa...

Page 126: ...ter and print server are secure For more information see the documentation that came with the printer Are the cable connections secure Go to step 6 Secure the cable connections Step 6 Check if the web...

Page 127: ...ome routers may share the default SSID Are you connecting to the correct Wi Fi network Go to step 4 Go to step 3 Step 3 Connect to the correct Wi Fi network For more information see Connecting the pri...

Page 128: ...g components All life indicators are designed to function with supplies and parts from the printer manufacturer and may deliver unpredictable results if third party supplies or parts are used Imaging...

Page 129: ...move a tray while the printer is printing Do not load too much paper Make sure that the stack height is below the maximum paper fill indicator Do not slide paper into the tray Load paper as shown in t...

Page 130: ...weights or types in the same tray Make sure that the paper size and type are set correctly on the computer or printer control panel Store paper according to manufacturer recommendations Identifying j...

Page 131: ...per jam in the standard tray 1 Open door B CAUTION HOT SURFACE The inside of the printer might be hot To reduce the risk of injury from a hot component allow the surface to cool before touching it 2 R...

Page 132: ...Troubleshoot a problem 132 4 Remove the tray and the manual feeder 5 Remove the jammed paper Note Make sure that all paper fragments are removed 6 Insert the manual feeder and the tray...

Page 133: ...oubleshoot a problem 133 Paper jam in the standard bin Remove the jammed paper Note Make sure that all paper fragments are removed Paper jam in the manual feeder 1 Remove the tray and the manual feede...

Page 134: ...ual feeder and the tray Paper jam in door B 1 Open door B CAUTION HOT SURFACE The inside of the printer might be hot To reduce the risk of injury from a hot component allow the surface to cool before...

Page 135: ...Troubleshoot a problem 135 Fuser area Below the fuser area...

Page 136: ...high moisture content can seal the flaps 2 Send the print job Does the envelope seal when printing Go to step 2 The problem is solved Step 2 1 Make sure that paper type is set to Envelope From the co...

Page 137: ...e document Is the document collated correctly The problem is solved Go to step 2 Step 2 1 From the document that you are trying to print open the Print dialog and then select Collate 2 Print the docum...

Page 138: ...s occur frequently Go to step 2 The problem is solved Step 2 1 From the control panel navigate to Settings Paper Tray Configuration Paper Size Type Press to navigate through the settings 2 Set the cor...

Page 139: ...Color Correction menu select Manual Color Correction Content 3 Choose the appropriate color conversion setting Object type Color conversion tables RGB Image RGB Text RGB Graphics Vivid Produces brigh...

Page 140: ...on tables Color is translated into the appropriate amounts of cyan magenta yellow and black toner used to produce the color you want The object information determines the application of color conversi...

Page 141: ...or CMYK combinations If the software program does not specify colors with RGB or CMYK combinations then the Color Samples pages are not useful Additionally some software programs adjust the RGB or CMY...

Page 142: ...2 Contacting customer support Before contacting customer support make sure to have the following information Printer problem Error message Printer model type and serial number Visit the place where yo...

Page 143: ...are and Commercial Computer Software Documentation as such terms are used in 48 C F R 12 212 or 48 C F R 227 7202 as applicable Consistent with 48 C F R 12 212 or 48 C F R 227 7202 1 through 227 7207...

Page 144: ...011 which prohibit use of lead mercury hexavalent chromium polybrominated biphenyls or polybrominated diphenyl ethers in concentrations exceeding 0 1 by weight and 0 01 by weight for cadmium except fo...

Page 145: ...on the product or on a start up screen is certified to comply with Environmental Protection Agency EPA ENERGY STAR requirements as of the date of manufacture Temperature information Operating tempera...

Page 146: ...onsumption characteristics of the product Note Some modes may not apply to your product Mode Description Power consumption Watts Printing The product is generating hard copy output from electronic inp...

Page 147: ...ng the Hibernate Timeout Using the Schedule Power modes Factory default Hibernate Timeout for this product in all countries or regions 3 days The amount of time the printer waits after a job is printe...

Page 148: ...pment Canada license exempt RSS standards Operation is subject to the following two conditions 1 this device may not cause interference and 2 this device must accept any interference including interfe...

Page 149: ...ing antenna gain is 20dBm for both bands United Kingdom UK conformity This product is in conformity with the protection requirements of the Radio Equipment Regulations 2017 A declaration of conformity...

Page 150: ...ration between the equipment and receiver Connect the equipment into an outlet on a circuit different from that to which the receiver is connected Consult your point of purchase or service representat...

Page 151: ...irements of the Directives may be obtained at http www ricoh com products ce_doc2 This product satisfies the Class B limits of EN 55032 and safety requirements of EN 62368 1 United Kingdom UK conformi...

Page 152: ...2021 Ricoh Co Ltd M995 7042A AU EN US EN GB EN...

Reviews: