background image

2.General Operations For Servicing 

55 

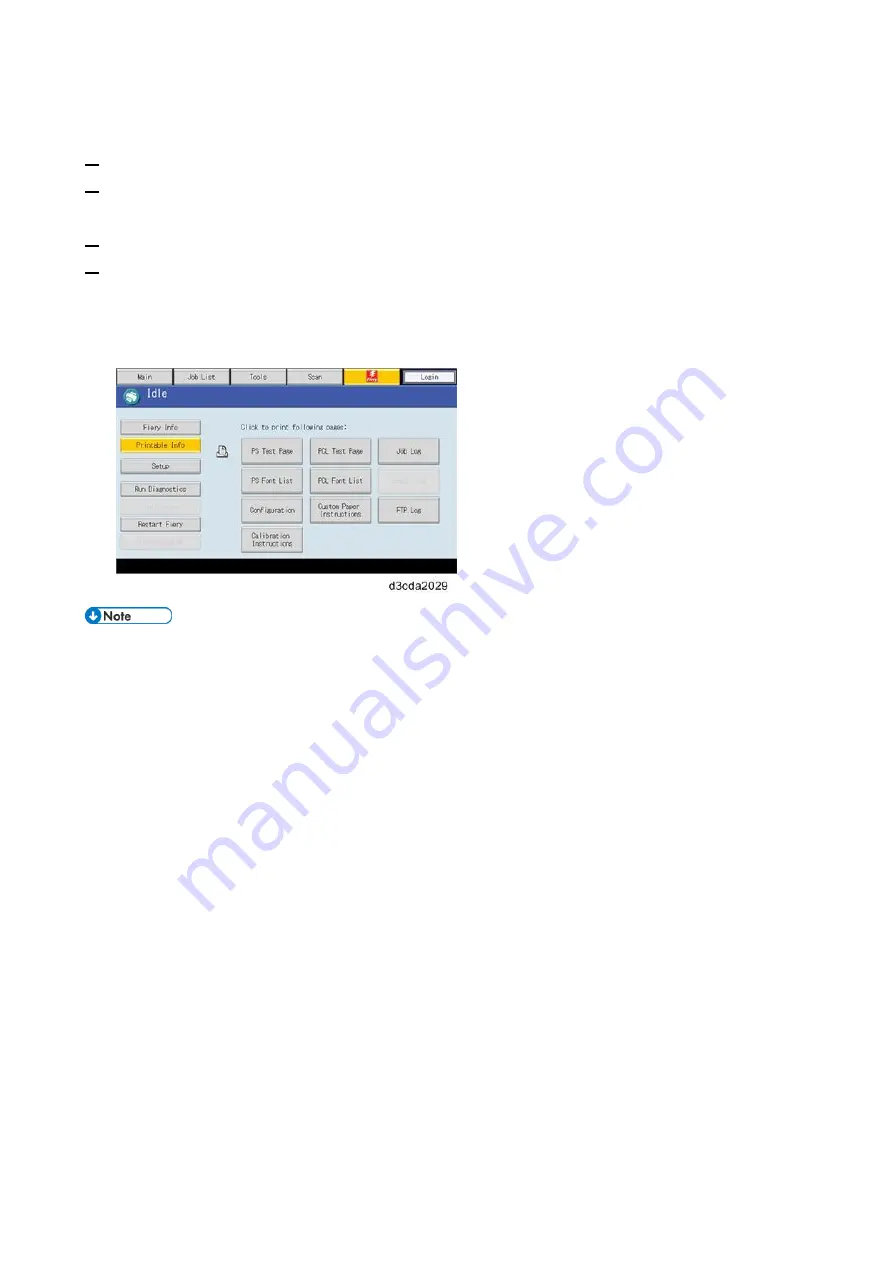
Printing the Configuration Page or Test Sheets 

1. 

Make sure that the E-25C is not in use. 

2. 

Press the Home button on the operation panel of the copier and then touch the Fiery icon to 

access the Fiery menu screen. 

3. 

Move to the Fiery tab. 

4. 

Touch “Printable Info”, then touch the desired key. 


Configuration Page 


PS Test Page 


PCL Test Page 


The configuration sheet can also be saved as a PDF or TXT file from the Command 

WorkStation. 


Procedure: Launch Command WorkStation, login as Administrator, go to Server > Device 

Center > GENERAL > Server Configuration > Save As. 

Summary of Contents for D3GF

Page 1: ...Color Controller E 25C Machine Code D3GF Field Service Manual Ver 1 0 Latest Release December 2018 Initial Release December 2018 c 2018 Ricoh Co Ltd ...

Page 2: ......

Page 3: ...riginals loss of valuable data and to prevent damage to the machine This information provides tips and advice about how to best service the machine General Safety Instructions For your safety please read this manual carefully before you use this product Keep this manual handy for future reference Safety Information Always obey the following safety precautions when using this product Safety During ...

Page 4: ... 8 Do not use flammable sprays or solvent in the vicinity of the machine Also avoid placing these items in the vicinity of the machine Doing so could result in fire or electric shock 9 To avoid fire or explosion never use an organic cleaner near any part that generates heat 10 Never remove any safety device unless it requires replacement Always replace safety devices immediately 11 Never do any pr...

Page 5: ...rger numbers or not sealing them apart may lead to chemical reactions and heat build up The danger of explosion exists if a battery of this type is incorrectly replaced Replace only with the same or an equivalent type recommended by the manufacturer Discard used batteries in accordance with the manufacturer s instructions Batteries Always replace a battery with the same type of battery prescribed ...

Page 6: ......

Page 7: ...ifying Connection to the Network 21 Enabling System Updates and Automatic Backup 22 Installing Optional Features 23 Optional Features for E 25C 23 Installing Software for EFI Impose Compose 23 Activate Optional Features 23 2 General Operations For Servicing 50 Start Up Shut Down and Reboot 50 Starting the Copier and the E 25C 50 Shutting Down the Copier and the E 25C 50 Shutting Down the E 25C Onl...

Page 8: ...ce 82 General Notes and Cautions 82 Clearing the Queued Print Jobs in the E 25C 86 Restoring the Default Fiery Settings Operation Panel 88 Restoring the Factory Default System Image File from the E 25C HDD Recovery Folder 89 System Software Installation Procedure 91 Overview 91 What You Will Need 94 Downloading the System Software 96 Preparing the USB Flash Drive For Installation via USB Flash Dri...

Page 9: ...rs and Suggested Actions 145 LED Codes 145 Start Up Problems 147 System Problems 149 System Software Installation Network Port Method 150 System Software Installation USB Method 151 Backup and Restore 154 Network 155 Scanning 156 Printing 157 Checking the Network 162 Printing to the E 25C 163 Test the Voltage Supplies 165 Collecting Troubleshooting Information 166 Creating a Job Error Report E 25C...

Page 10: ...sed to cool air from an air conditioner 3 Directly exposed to heat from a heater 6 Do not place the machine where it will be exposed to corrosive gases 7 Do not install the machine at any location over 3 048 m 10 000 feet above sea level 8 Place the controller on a strong and level base 9 Do not place the machine where it may be subjected to strong vibrations 10 Do not connect the machine to a pow...

Page 11: ...irmly the plug in the outlet Avoid using an outlet extension plug or cord Ground the machine Avoid using a 3 pronged adapter in a 2 hole ungrounded outlet Use the supplied AC power cord with this product 1 Input voltage level 100 240V 50 60Hz 3A 2 For Norway this product is also designed for an IT power distribution system with phase to phase voltage 230V 3 Do not put anything on the AC power cord...

Page 12: ...administrator that the network is functioning before you attach the E 25C Make sure that the configuration requirements specified in Configuration and Setup part of the user documentation set have been met for remote computers and the network ...

Page 13: ...1 Installation 7 Installation Flow Chart Recommended installation steps are as follows ...

Page 14: ...es on E 25C Installation Once you install and connect the E 25C with the copier IM C3000 IM C3500 IM C4500 IM C5500 IM C6000 E 25C will be configured as follows during the initial boot up Compatibility table S Supported NS Not Supported Execute Factory Default to support the copier ...

Page 15: ... configured E 25C is connected to an incompatible copier model NS in the above table at a later time Invalid engine configuration error appears on the operation panel as shown below Printing is not possible at this state To enable printing re configure the E 25C with the copier in use execute the Factory Default Restoring the E 25C to Factory Defaults and follow the installation procedure once aga...

Page 16: ...ter available during the installation The appropriate software should already be installed Documentation for the networked computer and the network operating software should be available The site administrator should install the user software onto the networked PCs and Mac OS computers that will print to the E 25C The user software can be downloaded from WebTools or printer driver download site Fo...

Page 17: ...a sheet describing the instructions on how and from where the customer can procure the user software printer driver and user manuals 4 Take the remaining components out of the top container 5 Remove the top container and any packing materials 6 Carefully lift the E 25C out of the box Front and Rear Panels After unpacking the E 25C familiarize yourself with the front and rear panels before you conn...

Page 18: ... Push Button B Front Panel USB Port C Power Indicator D HDD Access Indicator Rear Panel A LAN Port For customer use B Rear Panel USB Ports 2 0 C Not used monitor port D Rear Panel USB Ports 2 0 E Rear Panel USB Ports 3 0 F Gigabit Ethernet Port ...

Page 19: ... the E 25C to the copier before you connect it to the network This is to confirm that there are no problems with the hardware and controller itself Preparing the Copier Before doing the following steps turn OFF the controller main power switch and copier main power switch and disconnect the power cords 1 Remove the rear cover A 2 Remove the controller box cover A Red Circle Remove Blue Circle Loos...

Page 20: ...he standard 2GB DIMM A 4 Insert the 4GB DIMM into SDRAM socket Push the release latches A until they slip into the notch on the edge of the SDRAM 5 Reattach the controller box cover and rear cover Connecting the E 25C to Copier 1 Remove the slot cover A ...

Page 21: ...the Gigabit Ethernet controller A and fasten it knob screw x 2 3 Connect the interface cable to the copier Gigabit Ethernet connector If the cable is too long wind it into a circle Make sure that the radius 1 is 100 mm or longer ...

Page 22: ...6 Connect the appropriate AC power cord B to the power connector at the rear of the E 25C 7 Attach the Fiery Decal A to the copier front cover Startup and Initial Setup 1 Make sure that the power cord of the copier is connected to a power outlet and turn ON the copier main power switch 2 Enter SP mode 3 Change the setting of SP5193 001 from 0 to 1 ...

Page 23: ...l of the E 25C 11 Confirm that the diagnostic LED on the rear panel is lit and showing some digits 12 Wait for 10 15 minutes When the diagnostic LEDs remain at 00 go to the copier operation panel and press the Home button During the 10 15 minutes the diagnostic LED may remain displaying FF for several times but this does not indicate an error 13 Touch the Fiery icon Please Wait may be shown on the...

Page 24: ...glish Metric Simplified Chinese Czech Dutch French German Italian Polish Brazilian Portuguese Russian Spanish Turkish Korean Traditional Chinese PS Setting Default Paper Sizes US Metric PCL Setting Paper Size Letter A4 Paper Size System Pages US Metric If you selected English at the language selection screen you are prompted to select the Measurement Units Select either US or Metric and then touch...

Page 25: ...The system date time and time zone can be adjusted from the Configure menu Link to Adjusting the System Date and Time Disabling the GW Scanner Customization The GW Scanner feature can still be used when a Fiery controller is installed However if the customer wants to disable the GW Scanner feature customization request it can be disabled by the following procedure 1 Change the setting of SP5895 00...

Page 26: ...u screen 5 Move to the Fiery tab 6 Touch the Printable Info button 7 Print the following pages Configuration Page PS Test Page PCL Test Page 8 Examine the quality of the test pages All patches should be visible but it is acceptable if they are very faint in the 5 and 2 ranges Each patch set should show uniform gradation from patch to patch as the shade lightens from 100 to 0 Poor image quality may...

Page 27: ...e power switch on the E 25C rear panel 6 Press and release the soft power push button on the front panel of the E 25C 7 Allow startup to proceed without interruption while you watch the diagnostic LED on the rear panel of the E 25C When the diagnostic LEDs show 00 go to the copier operation panel 8 Press the Home button on the operation panel of the copier and wait for a few minutes until the Fier...

Page 28: ...t Make sure to obtain agreement from your customer in advance as the E 25C must not be rebooted or powered off while these functions operate Feature Name System Updates Automatic Backup Detailed Information Link to Enabling the System Updates Link to Scheduled Automatic Backups with Fiery System Restore Description Patches are downloaded and applied to the controller automatically at the scheduled...

Page 29: ...to Activate Optional Features C Needs software installation and activation in a unique way Please refer to the manual included in the software package Installing Software for EFI Impose Compose To use the features of EFI Impose Compose install and activate the software in the following order 1 Install Command WorkStation Utility manual 2 Activate Impose Compose Link to Activate Optional Features 3...

Page 30: ...ious models etc it can be used with E 25C Important Notes for Activation 1 If you have multiple Fiery options to activate you must activate them one at a time It is not possible to activate several options at once 2 If the keychip Server Options or PC Client Options becomes defective the following s are needed as evidence in order to get recovered Defective key chip LAC Option Name Serial Number o...

Page 31: ...E 25C and the EFI licensing website using another PC that is connected to the Internet 1 A PC that can access to the E 25C with web browser 2 Another PC that can connect to the internet with web browser is needed The above two PCs can be as same single PC by switching the roles by changing the location connection Client Options If the PC where the optional feature will be installed your PC is not ...

Page 32: ...onfiguration and Setup http help efi com ricoh docs Click the Home tab and confirm the installed options 3 Confirm from Command WorkStation Launch Command WorkStation and click Server Device Center GENERAL General Info Options Packages to confirm Client Options Activated options for the client can be confirmed by accessing the License Activation window in the Command WorkStation There are two ways...

Page 33: ... Installation 27 2 Access from Impose Compose menu Right click a job and select Impose or Compose If you are prompted to activate or not click Yes Activation Procedure The License Activation window opens ...

Page 34: ...cedure to access the Options window differs between Server Options and Client Options Server Options procedure There are two ways to access to the Manage Fiery Options window 1 Access from the WebTools Launch the web browser and enter the IP address of E 25C in the URL column to execute the Web Tools If a message about untrusted connections appears or you are asked whether you want to proceed you ...

Page 35: ...evice Center GENERAL General Info Options Packages and click Manage Client Options procedure There are two ways to access to the License Activation window after you launch the Command WorkStation 1 Access from Fiery Preview s Help Right click a job and select Preview and then select Help Manage License ...

Page 36: ...nd select Impose or Compose If you are prompted to activate or not click Yes Activation Procedure Automatic Activation Procedure 1 In the Manage Fiery Options window click Activate Manage Fiery Options window for Server Options License Activation window for Client Options ...

Page 37: ...ation Code type the LAC and Server Options click Activate Client Options click Continue If the E 25C needs a proxy server to connect to Internet the following screen may appear In such case click the link of use a proxy server and fill in the necessary information for proxy server then click Apply Then click Continue ...

Page 38: ...1 Installation 32 4 If the Fiery option name is correct click Activate 5 The Fiery option is activated Server Option Client Option ...

Page 39: ...5C click Restart to restart now or click Finish to activate more options before restarting If the activation does not require a restart of the E 25C just click Finish If activation requires a restart Server Option If activation does not require a restart Server Option ...

Page 40: ... and keep it for the case that the key chip becomes defective Link to Printing the Configuration Page or Test Sheets Manual Activation Procedure 1 In the Manage Fiery Options window click Activate Manage Fiery Options window for Server Options License Activation window for Client Options ...

Page 41: ... Installation 35 2 To agree to the terms and conditions of the license agreement click Continue 3 For License Activation Code type the LAC and Server Options click Activate Client Options click Continue ...

Page 42: ...ck Create Request File and save the file 6 Copy the request file to a PC that is connected to the Internet It is also possible that you use the same PC by changing the location connection 7 On the PC that is connected to the Internet open a browser and go to licensing efi com ...

Page 43: ...icense file is generated 10 Click Download License File and save the file 11 Copy the license file to the PC where you first entered the License Activation Code 12 Return to the Generate License window and click Yes If you had closed that window restart from step 1 open the Manage Fiery Options window and click Activate to reach to the following window ...

Page 44: ...1 Installation 38 13 Click Browse select and open the license file and then click Activate 14 The Fiery option is activated Server Option ...

Page 45: ...restart of the Fiery print controller click Restart to restart now or click Finish to activate more options before restarting If the activation does not require a restart of the Fiery print controller just click Finish If activation requires a restart Server Option ...

Page 46: ...1 Installation 40 If activation does not require a restart Server Option Client Option ...

Page 47: ...Activation Code LAC for the option available again You can activate the license on another PC using the LAC The deactivation process depends on whether your PC is connected to the Internet If your PC is connected to the Internet Use Automatic deactivation If your PC is not connected to the Internet Use Manual deactivation After deactivation is complete you can View deactivation status and LAC of a...

Page 48: ...ou want to deactivate If there is no Deactivate button next to the option the option is activated by a dongle 2 Click Deactivate to confirm the deactivation The Client Option is deactivated The LAC is available for reuse ...

Page 49: ...ctivate to confirm the deactivation 3 Click Continue to proceed with the manual process 4 Click Create Request File and save the file The Client Option is deactivated and the LAC is displayed 5 Click Finish 6 Copy the request file to a PC that is connected to the Internet 7 On the PC that is connected to the Internet open a browser and go to licensing efi com 8 Click Choose File select the request...

Page 50: ...tion If your PC is not connected to the Internet Use Manual reactivation Automatic Reactivation Procedure 1 In the License Activation window under Activated Options click Reactivate next to the option that you want to reactivate The Client Option is activated 2 Click Finish Manual Reactivation Procedure 1 In the License Activation window under Activated Options click Reactivate next to the option ...

Page 51: ... the Advanced Settings icon Restore The Client Options are restored 2 If you have no additional options to activate click OK Otherwise to activate additional options click Continue Manual Restore Procedure 1 In the License Activation window click the link in the message about restoring licenses 2 Click Continue to proceed with the manual process 3 Click Create Request File and save the file 4 Copy...

Page 52: ...ible The licensing record for Fiery options might not be available This can happen when reinstalling the system software on the PC or revert to an earlier system state To restore licenses from the EFI licensing server 1 Click the Advanced Settings icon in the License Activation window 2 Click Restore A license was deactivated manually but licensing efi com does not make the LAC available If upload...

Page 53: ...nical support There is a problem with the license file Try repeating the activation process from the beginning If the error occurs again restore the options and try to activate again If the error still occurs contact technical support and provide the error code shown in the message OFA0060 Error number Proxy configuration is incorrect or proxy server is down There is no Internet connection Check t...

Page 54: ...e information Try to restore Fiery options and reactivate again If the error still occurs contact technical support OFA00115 None of the options could be restored No previously activated licenses were found for this computer If you had licenses that were previously activated contact technical support Error messages and recommended actions From the EFI licensing server Message ID Error message Acti...

Page 55: ...is not supported as shown in the list Obtain a new LAC that has only features that are supported If you continue you will not be able to use any unsupported features and you cannot use the LAC again EBIS0008 Some features of this option are already activated Do you want to continue The LAC activates multiple features and one or more features is already activated as shown in the list Obtain a new L...

Page 56: ...l of the copier and then touch the Fiery icon The Fiery menu screen will appear on the copier operation panel Shutting Down the Copier and the E 25C 1 Make sure that the E 25C is not receiving processing or printing any jobs If Printing appears on the operation panel the E 25C is processing You must wait until the system finishes and reaches Idle before restarting or shutting down If the system ha...

Page 57: ...h the Fiery icon The Fiery menu screen appears 3 Move to the Fiery tab 4 Touch Restart Fiery 5 Touch Shut Down then touch OK The E 25C enters into the shut down sequence The diagnostic LEDs on the rear panel of the E 25C will turn off 6 If the E 25C is being taken out of service turn OFF the E 25C using its main power switch For example if someone needs to move the E 25C disconnect cables or open ...

Page 58: ...nd becomes idle Rebooting the E 25C Use this procedure to reboot the system OS for example after downloading a patch 1 Make sure that the E 25C is not in use 2 Press the Home button on the operation panel of the copier and then touch the Fiery icon The Fiery menu screen appears 3 Move to the Fiery tab 4 Touch Restart Fiery ...

Page 59: ...2 General Operations For Servicing 53 5 Touch Restart System 6 Wait until the E 25C reboots and becomes idle ...

Page 60: ...ou want to cancel the current print job do the following 1 Press the Home button on the operation panel of the copier and then touch the Fiery icon to access the Fiery menu screen 2 Move to the Job list tab 3 From the Job List touch the job that you want to cancel 4 Touch Cancel ...

Page 61: ...then touch the Fiery icon to access the Fiery menu screen 3 Move to the Fiery tab 4 Touch Printable Info then touch the desired key Configuration Page PS Test Page PCL Test Page The configuration sheet can also be saved as a PDF or TXT file from the Command WorkStation Procedure Launch Command WorkStation login as Administrator go to Server Device Center GENERAL Server Configuration Save As ...

Page 62: ...ssword when you must get access to the Setup menu To Access the Setup Menu 1 Make sure that the E 25C is not in use 2 Press the Home button on the operation panel of the copier and then touch the Fiery icon to access the Fiery menu screen 3 Move to the Fiery tab 4 Touch Setup 5 You may be asked to enter an administrator password Ask the site administrator to enter the password The default password...

Page 63: ...ox 31 0 or later Chrome 37 0 or later In addition Microsoft Edge is supported for client computers that are running Windows 10 not supported for other versions of Windows Mac OS Safari 7 or later Firefox 31 0 or later Chrome 37 0 or later Microsoft releases frequent updates to Internet Explorer Because support cannot be guaranteed for all versions use the specified version for best results On Mac ...

Page 64: ...r name is to be used instead of the IP address replace the term IP address with server name in the procedure Either the IP address or the server name hostname can be used not both Please consult with your customer in deciding which to use 1 Start an Internet browser and type the IP address of the E 25C 2 Click Continue to this website not recommended 3 Click the Configure tab 4 If prompted log on ...

Page 65: ...dialog box select Trusted Root Certification Authorities then click OK 13 Click Next 14 When a pop up indicates the completion of the certificate import wizard click Finish 15 If a security warning displays click Yes 16 When a pop up indicates the import was successful click OK 17 To confirm reopen WebTools using the IP address of the E 25C The URL now begins with https the lock icon is green rath...

Page 66: ...o confirm that the E 25C is set to the correct time zone At installation After replacing the motherboard After replacing the lithium battery on the motherboard 1 Access to Configure Link to Accessing Configure 2 Select Fiery Server Regional Settings 3 Confirm correct Time Zone Date and Time If not adjust the settings and click Save 4 Click Reboot on the bar at the top for the changes to take effec...

Page 67: ...he HDD Before you remove or install an HDD allow it to reach room temperature Avoid magnets Keep magnets and magnetic sensitive objects away from electronic components especially the HDD Electrostatic discharge When you work with electronic components electrostatic discharge is a concern since it can destroy circuits or damage them reducing their life span The area around the printer is most likel...

Page 68: ... you open the E 25C unplug the E 25C Keep the power cable away from foot traffic Do not place objects on the power cable Do not plug the E 25C into a 2 hole ungrounded power outlet by means of a 3 prong adapter Do not plug the E 25C into a circuit connected to heating or refrigeration equipment including a water dispenser Do not plug the E 25C into a switchable power outlet Do not pull the cable t...

Page 69: ...hillips head screwdrivers Needlenose pliers E 25C documentation including the customer media pack and any related service bulletins The E 25C contains hazardous moving parts When servicing the Fiery Color Server keep away from moving fan blades Avoid touching magnetic tools to storage media such as HDDs Contact between magnetic tools and magnetic storage media may result in data corruption ...

Page 70: ...the main power switch and unplug E 25C power supply cable before attempting any of the procedures in this section Before accessing internal components position the E 25C so that it is resting on its right hand side on a flat anti static surface ...

Page 71: ...3 Replacement 65 Cover Removal Side Cover for the E 25C 1 Remove the side cover A ...

Page 72: ...3 Replacement 66 Unit Removal Video Board 1 Remove the Video board with bracket A 2 Pull the Video board B 3 Remove the bracket A ...

Page 73: ...d save any custom simulation and output profiles If possible print the following Configuration pages Provide records of any installed options and the customer s current Setup configuration Font List Lists the fonts currently on the HDD Along with the fonts provided the customer may have installed additional fonts 1 Remove the video board Link to Video Board 2 Remove the HDD with bracket A ...

Page 74: ...e to the SATA0 connector on the motherboard System Software is not included on replacement HDDs After installing a new HDD be sure to install system software Link to System Software Installation Procedure and patches Link to Updates and Patches Installation Procedure If there is a backup file of the same E 25C unit which was formally created with the Fiery System Restore feature with bootable opti...

Page 75: ... power supply unit A For reassembling Connect B to the PWRCONN1 connector on the motherboard Connect C to the PWR connector on the motherboard Fans 1 Remove the video board Link to Video Board 2 Remove the fan cables C and D C For fan A D For fan B ...

Page 76: ...memory DIMM Keychip and the CPU holder bracket from the old board to the new board The Keychip contains the license information of the E 25C controller and the activated optional features which is very expensive When you replace the motherboard do not forget to move the key chip from the old board to the new board You need to re configure the system date time and time zone Link to Adjusting the Sy...

Page 77: ...2 4 Power LED PIN6 8 Soft Switch Bottom chassis fan cable connector REAR FAN G DIAG connector EFI GPIO Header H 3 Remove the Motherboard 4 Remove the Memory Link to Memory 4 GB DIMM E 25C 5 Remove the CPU Cooling Assembly Link to CPU and Cooling Assembly 6 Remove the CPU Link to CPU and Cooling Assembly 7 Remove the Keychip A from socket J23 on the old motherboard Pull the chip straight out of the...

Page 78: ...the motherboard A The CPU holder bracket is attached to the motherboard with two strips of double sided tape In order to prevent the motherboard from being damaged put a small screwdriver between the bracket and the motherboard as shown below and twist the screwdriver to detach the CPU holder bracket A new motherboard comes with a protective cover A on the CPU slot Remove it before using the mothe...

Page 79: ...otherboard For reassembling Make sure of where to connect the connectors for each cable Make sure that all connectors are inserted firmly in the sockets Also do not put the connectors in the sockets the wrong way around Connector Location A 4 pin power PWRCONN1 ...

Page 80: ... and activity LED cables J11 1 For HDD LED 2 For Power LED 3 For Soft Switch K Bottom chassis fan REAR FAN L DIAG cable EFI GPIO Header When Installing the Keychip 1 Install the Keychip A in socket J23 on the new motherboard Be sure to align the small notch in the Keychip with the notch in the outline that appears inside socket J23 If you install the Keychip incorrectly you may corrupt the Keychip...

Page 81: ...f the socket Always attach the DIMM B to the DIMM A0 socket Gently slide the DIMM straight down into the socket and press so that the levers lock the DIMM into place Make sure that the levers close securely around the ends of the DIMM DIMMs fit in the socket only one way CPU and Cooling Assembly Overview You can replace the following parts Cooling Assembly only ...

Page 82: ...tant because the thermal pad that is attached to a new heat sink will make a good contact between the CPU and the heat sink when heated If you attach a used cooling assembly to a new CPU by mistake the heat sink will not contact the CPU properly and this will cause the CPU to overheat When replacing the CPU holder bracket on the back side of the motherboard remove the release paper from the double...

Page 83: ... See the illustration below Be careful not to bend the pins when you insert the CPU into the socket Set the CPU in the socket completely and without forcing it Lithium Battery There is danger of explosion if the battery is replaced with the incorrect type Replace with only with the same lithium battery supplied as a spare part Discard the used motherboard battery in accordance with the manufacture...

Page 84: ...thium battery A For Re assembling You need to re configure the system date time and time zone Link to Adjusting the System Date and Time Gigabit Ethernet Controller 1 Pull out the interface cable from the copier Gigabit Ethernet port ...

Page 85: ...Ethernet controller is inserted straight Cables Connected to the Front Panel 1 Remove the side cover Link to Side Cover for the E 25C 2 Remove the video board Link to Video Board 3 Remove the Power LED cable A from J11 4 Remove the HDD LED cable B from J11 5 Remove the front panel USB port cable C from J13 ...

Page 86: ...ble C from front panel 10 Remove the center panel E from the front panel D For Re assembling Make sure of where to connect the connectors for each cable Make sure that all connectors are inserted firmly in the sockets Also do not put the connectors in the sockets the wrong way around Soft Power Push Button 1 Remove the side cover 2 Remove the video board Link to Video Board ...

Page 87: ... 3 Remove the soft power push button cable A from J11 4 Remove the front panel A 5 Remove the soft power button cable A from the front panel For Re assembling Make sure of where to connect the connectors for each cable ...

Page 88: ... Restore It is recommended to store the factory backup image on an external device such as a USB device System Software Reinstallation Upgrade Reinstalls the E 25C system software either from a USB flash drive or a Windows Computer over network All Setup configurations as well as all custom files jobs logs and templates stored on the E 25C HDDs are deleted Backup Restore Backs up the customized E ...

Page 89: ...turn to Default Patches Fiery system Not Deleted Not Deleted Not Deleted Deleted Deleted Patches OS Security Not Deleted Not Deleted Not Deleted Deleted Deleted Sever Configuration Unchanged All settings return to default except for Scan Settings and Regional Settings such as Server Language Time Zone Default Paper Sizes in Configure Fiery Server Regional Settings All settings return to default Yo...

Page 90: ...nchanged Unchanged Unchanged Deleted or return to default Deleted or return to default Upgrade in System Software Reinstallation Upgrade refers to the act of upgrading the software to newer versions and does not refer to application of patches Applying patches will not delete any data Before you use any of the above features make sure to inform the site administrator that the following data and se...

Page 91: ... the system software installation Any fonts not listed after installation will need to be reinstalled For more information about managing fonts see Command WorkStation Help Configuration page Before you reinstall a new version of system software print the Configuration page The Configuration page provides a record of the customer s current Setup configurations Backing up and restoring the configur...

Page 92: ...E 25C is not in use 2 Press the Home button on the operation panel of the copier and then touch the Fiery icon to access the Fiery menu screen Link to Running the E 25C Setup 3 Move to the Login tab 4 You are asked to enter an administrator password The default password is Fiery 1 5 Move to Fiery tab 6 Touch Clear Server Then touch Clear Server again 7 When you are prompted Clear all jobs from all...

Page 93: ...4 System Maintenance 87 Command WorkStation For details refer to the Command WorkStation help ...

Page 94: ...the E 25C to turn off 7 Wait for 10 15 minutes When the diagnostic LEDs remain at 00 go to the copier operation panel and press the Home button During the 10 15 minutes the diagnostic LED may remain displaying FF for several times but this does not indicate an error 8 Touch the Fiery icon Please Wait may be shown on the copier operation panel for a while 9 Within a few minutes the language selecti...

Page 95: ...matted and deleted of the data 1 Perform the shut down procedure from the copier operation panel Link to Shutting Down the E 25C Only 2 When the E 25C power is down that is when the diagnostic LEDs are off turn the main power switch of the E 25C to OFF 3 Set the E 25C service switches as shown below 1 OFF 2 ON 4 Turn the main power switch of the E 25C to ON then press and release the soft power pu...

Page 96: ...E 25C System with Fiery System Restore WebTools 10 Optional If a backup of the configuration settings is available restore the configuration settings as described in this document Link to Restoring Backup Files This can be useful if the backup of the configuration is more current than the backup of the system for example when restored to the factory default or if the configuration backup includes ...

Page 97: ... 3 methods for installing the E 25C system software Restoring image file from E 25C HDD Network Installation Using a Network Cable USB Installation Using a USB flash drive All of these methods will format the HDD before the system software is reloaded Fiery Installer Builder System Software files Restoring image file from the E 25C HDD The factory default system files of E 25C already exist in the...

Page 98: ...ite is easier than Using the Network described above The USB flash drive must have a 16GB 32GB capacity About Methods for Downloading System Software from the Internet The system software for E 25C is loaded on the EFI cloud server To download the system software you will need the Fiery Installer Builder utility software Windows PC and a login account ID password There are two methods to download ...

Page 99: ...aded You can download a different version of the system software for E 25C but not those for different models Using the EFI Sales Portal Account Using the EFI Sales Portal account you can download system software for various models versions for RICOH products Comparison of the Installation Procedure First decide the method of system software installation via network or USB and confirm the outline ...

Page 100: ...ing the System Software Preparing the USB Flash Drive For Installation via USB Flash Drive Only 3 Preparing the USB Flash Drive Preparation at the Customer Site 4 Preparation at the Customer Site Installing the System Software 5 Installing the System Software Network Installation USB Installation After Installing or Updating the System Software 6 After Installing or Updating the System Software Wh...

Page 101: ...EFI Sales Portal You will need your company email address to create the EFI Sales Portal account Free webmail accounts like Yahoo or Google or Hotmail are unaccepted Install the Fiery Installer Builder to the Windows PC The following operation should be performed one time only on your Windows PC 1 Access the E 25C firmware download site and download the Fiery Installer Builder The Fiery Installer ...

Page 102: ...lect location window appears Specify the folder that you want to use to store the system software files You can browse or enter the folder location that is located on the local HDD or in the network The Fiery Installer Builder keeps this folder location so that you do not have to enter the folder location again next time you start the Fiery Installer Builder You can change the storage location in ...

Page 103: ... select Color Controller E 25C 1 0 and click Next 8 At the Select a Build window select the latest build and click Next 9 At the Summary window click Terms of Use and Privacy Policy links to read the software license terms and conditions 10 Click the check box if you agree with the terms and conditions and click Accept to start the download A status bar appears to show the progress Wait until the ...

Page 104: ... the data on the USB flash drive will be lost when you format the USB flash drive Make sure that no valuable data is stored on the device It will take approximately 30 to 40 minutes to format the USB flash drive and load the files on to the drive Do not interrupt the operation 7 Safely disconnect the USB flash drive from the PC You can now use this USB flash drive to install the system software Pr...

Page 105: ...nd hibernation settings Stop all File Transfer Protocol FTP and Trivial File Transfer Protocol TFTP services Disable all anti virus and anti spyware programs Make sure that the PC is configured to obtain its IP address automatically DHCP Disable all wireless network connections It is also recommended to disable the network adapter s on the client PC that will not be used for the connection to the ...

Page 106: ...ower push button on the front of the E 25C Wait approximately 15 seconds for the E 25C to start up and show 00 on the diagnostic LEDs 12 In the Select a Network Adapter window of the Fiery Installer Builder select the network connection that is corresponding to the network port that you attached the network cable to then click Next A message appears that indicates that the installation has started...

Page 107: ...the Fiery icon Please Wait may appear on the copier operation panel for a while Within a few minutes the language selection screen appears If it does not appear press the Home button on the operation panel of the copier and touch the Fiery icon again 21 Continue the initial setup For details see Link to After Installing or Updating the System Software USB Installation via a USB Flash Drive 1 Compl...

Page 108: ...s on the E 25C If dust covers are attached to the USB Type A ports remove one dust cover using needle nosed pliers When using a USB 3 0 flash drive make sure to attach the USB flash drive to one of the USB 3 0 ports which are located on the rear of the E 25C Otherwise installation time will take considerably longer than expected A USB 2 0 ports ...

Page 109: ...sition Not ON 11 Reconnect all cables that you removed earlier from the E 25C rear panel After Installing or Updating the System Software 1 Turn ON the copier main power switch 2 Turn the main power switch on the E 25C rear panel to ON 3 Press and release the soft power push button on the front panel of the E 25C 4 Wait for 10 15 minutes When the diagnostic LEDs remain at 00 go to the copier opera...

Page 110: ... not displayed switch screens using the buttons The default settings for the E 25C depend on the language selection as follows Selected Language Measurement Unit English US English Metric Simplified Chinese Czech Dutch French German Italian Polish Brazilian Portuguese Russian Spanish Turkish Korean Traditional Chinese PS Default US Metric ...

Page 111: ...bout a few minutes until the Fiery menu screen appears 9 Press the Fiery tab to access Setup and press Setup at the Fiery menu screen 10 You are asked to enter the administrator password The default password is Fiery 1 11 Input the customer s settings from the Configuration pages that you printed earlier If there exists some backup file created from the same E 25C unit restore it after the network...

Page 112: ...stem with the patch files System Updates Scheduled Automatic Update Fiery Updates feature on Command WorkStation Manual Patch Installation System Updates Scheduled Automatic Update Recommended Patches are downloaded and applied to the controller automatically at the scheduled date and time when the controller is connected to the internet To use this function make sure E 25C is connected to the int...

Page 113: ...C Download and installation are performed automatically Updates are performed from Client PC with internet connection E 25C does not have to be connected to the internet Manual Patch Installation Download the individual patch es to the PC from the firmware download site visit the customer site and install the patch es one by one by using the WebTools or Command WorkStation The patch installation p...

Page 114: ...iodically on a schedule basis for example every day or every week and works silently in the background full automatic 3 Time can be set on an hourly basis only It is not possible to set the feature to work immediately 4 For the following reasons it is recommended to schedule the updates when the controller will not be in use for example at midnight and during weekends During the installation proce...

Page 115: ...feature Setup Procedure for Scheduled Automatic Updates 1 Make sure that the clock date and time of the controller is correctly set with the controller Date and time can be confirmed by printing a configuration sheet Date and time can be adjusted from Configure Fiery Server Regional Settings 2 Access the Configure menu Link to Accessing Configure 3 Choose Configure Fiery Server System Updates 4 Ch...

Page 116: ...llers on their own at the desired time on demand and in reducing service visits cost This feature is unnecessary for E 25C when the System Updates is enabled To use this feature System Updates must be disabled The computer running Command WorkStation must Be connected to the Internet Be able to communicate with E 25C via LAN Items Provided by the Fiery Updates Command WorkStation Ver 6 x includes ...

Page 117: ...in the Job Center and Home screens User Friendly Interface for operation via Command WorkStation with Administrator privileges Updates and patch installation is done from Client PC with internet connection The E 25C does not have to be connected to the internet Only patches that are not applied to the system appear on the list Selecting a patch from the list will automatically select its pre requi...

Page 118: ...dates 3 On the message screen below click Continue This will automatically disable System Updates Updates To view and install the available updates for Fiery API click Updates under Fiery Updates then click Update in the right pane for each update you choose to install ...

Page 119: ... are also automatically selected if any For example selecting Patch 7 will automatically select its pre requisite Patches 3 6 Click Update 3 Click Continue in the confirmation message screen below Various stages of the update process and a progress bar appear in the Disconnect screen as follows Initializing Downloading Updates Transferring Installing ...

Page 120: ...r to reconnect to the E 25C While your PC is reconnected to the E 25C with Command WorkStation if the update is still in progress you may observe the below message on the Command WorkStation screen Do not operate the Command WorkStation until this message disappears History After the system reboots automatically for a number of times necessary according to the updates installed reconnect to your F...

Page 121: ...dates tab The user can click on this Updates available badge to be taken directly to the Device Center Fiery Updates Patches tab Manual Patch Installation Patches are provided via the firmware download site The patch installation procedure may vary depending on the patch the download destination queue or system rebooting procedure may be different Some patches may require prerequisite patches Ther...

Page 122: ...administrator at the customer site may operate this function from WebTools or Command WorkStation For service technician only The procedure requires service switch operation The E 25C HDD will be reformatted before restoring the image file 1 Backing up Restoring the System Settings and Selected Options Only You can backup restore the system settings and the selected options with a single backup fi...

Page 123: ... the internal HDD at the scheduled date time Manual Backup Backs up the current customized system image and stores on the internal HDD or an external USB flash drive You can also create a backup of the factory default image and store it on the internal HDD or an external USB flash drive Creating a backup on the internal HDD Link to Backing Up the E 25C System with Fiery System Restore WebTools Cus...

Page 124: ... via WebTools Link to Restoring the E 25C System with Fiery System Restore WebTools Customized System Image File Factory Default Image File Restoring a backup created on a USB flash drive via WebTools Link to Restoring the E 25C System with Fiery System Restore WebTools Customized System Image File Factory Default Image File Restoring a backup created on the internal HDD Link to Restoring the E 25...

Page 125: ...e Factory Default Image File 3 Backing up Restoring the System Image File with Fiery Clone Tool Link to Backing Up Restoring E 25C System with Fiery Clone Tools Backs up the customized image file and the factory default image file and stores it on a USB flash drive When restored the customized image file is written to the main folder and the factory default image to the recovery folder Backup imag...

Page 126: ...ack up job logs and VDP FreeForm resources Link to Backing Up Restoring the System Configuration and Selected Settings Only A bootable image on an external USB flash drive allows recovery in case the Fiery System Restore menu WebTools cannot be accessed due to system corruption or an empty HDD after replacement etc If the E 25C needs to be restored using a bootable image in such cases the site adm...

Page 127: ... and restore with Fiery System Restore WebTools Link to Backing Up the E 25C System with Fiery System Restore WebTools Backup Restore Feature Comparison Backup Method Configure Fiery Server Backup Fiery System Restore WebTools Fiery System Restore tab Fiery Clone Tool Schedule Backup Enable automatic backup Backup Now Internal HDD Backup Now USB Fiery factory image Backup Now USB New image Operati...

Page 128: ... Clone Tool Schedule Backup Enable automatic backup Backup Now Internal HDD Backup Now USB Fiery factory image Backup Now USB New image USB Flash Drive Jobs in the Queues Archived Jobs Job Logs 1 VDP Resources FreeForm 1 Fiery System Settings 1 3 Color Settings 1 Scan Settings 1 Paper Catalog 1 Virtual Printers 1 Server Presets 1 ...

Page 129: ... image Fonts 1 Operating System Linux E 25C Software with System Patch es applied 2 E 25C Software with Factory Default Image Bootable Files 3 1 Restore Method 4 A B B C B C D Restore to another E 25C unit 5 Prohibited Prohibited 1 Optional 2 When restored timestamps that indicate the date time the system patches were installed that appear on the configuration sheet will change to the date time of...

Page 130: ...the E 25C System Directly with a USB Flash Drive and Service Switch D Restoring the E 25C system with Fiery Clone Tool Link to Restore Transferring Clone Image Files to E 25C 5 The backup reference file fbf and Backup data file DAT are restored however the following items are reset to default All IPv4 and IPv6 Network settings WINS and DNS settings Server Name Server Domain Backing Up Restoring th...

Page 131: ...d time Link to Adjusting the System Date and Time 2 Go to Configure Link to Accessing Configure 3 Choose Fiery Server 4 Click Backup 5 Select the items to backup 6 Specify the backup filename It is recommended to select the Add date to filename option 7 Click Backup Make sure that two files fbf and DAT are generated Both files are required to restore the Fiery 8 Backup will start When completed th...

Page 132: ...estore 6 When Restore Completed is indicated click Reboot Backing Up Restoring the E 25C System with Fiery System Restore Fiery System Restore allows you to create a backup of the E 25C system from WebTools for quick recovery from problems The E 25C system includes the operating system E 25C software and the E 25C configuration settings You can restore the E 25C either from image files stored on t...

Page 133: ...dule the backups so that it is run when the E 25C is Idle The files from the automatic backup are saved on the internal HDD and can be accessed only through Fiery System Restore Only one automatic backup file is retained each new automatic backup overwrites the previous backup Ensure that the E 25C remains powered up during the scheduled backup times allowing enough time for the backup to complete...

Page 134: ...e automatically reads the USB flash drive as a bootable 1 drive The USB flash drive will be formatted FAT32 and any existing data on the device will be deleted 1 Bootable means that the E 25C can boot or start up from the USB flash drive This is essential for recovery in case of a system corruption or failure or if the HDD has been replaced and is currently empty When creating a backup on the inte...

Page 135: ...d settings including any customizations made to the E 25C configuration To create a non bootable customized image select New image This creates a non bootable image that contains the current software updates and settings including any customizations made to the E 25C configuration 7 Follow the on screen prompts to complete the backup For a backup using USB 3 0 it will take 10 20 minutes to complet...

Page 136: ... after you click Continue 5 Follow the on screen prompts to complete the restoration For restoration using USB 3 0 it will take 10 20 minutes to complete the restoration When the restoration is complete the E 25C will automatically reboot and enter Idle 6 Optional After restoring the E 25C run System Updates to ensure the latest E 25C software version is installed 7 Optional If a backup of the con...

Page 137: ...h of the E 25C to OFF 3 Set the E 25C service switches as shown below 1 ON 2 OFF 4 Connect the USB device to a port on the E 25C For the fastest restoration use a USB 3 0 flash drive Make sure to connect the flash drive to the USB 3 0 port at the rear side of the E 25C 5 Turn the main power switch of the E 25C to ON then press and release the soft power push button on the front of the E 25C 6 Allo...

Page 138: ...tware version is installed 15 Optional If a backup of the configuration settings is available restore the configuration settings as described in this document Link to Restoring Backup Files This can be useful if the configuration backup is more current than the system image backup for example when restored to the factory default or if the configuration backup includes the job log and VDP FreeForm ...

Page 139: ...ash drive at backup completion Restore C0 To restore the E 25C with the image file When you start the restore process the diagnostic LEDs flash C1 C2 C3 in one second intervals and repeats the cycle to indicate restore is in progress When the restore process is complete the diagnostic LEDs cycle CC 00 in one second intervals and repeats to indicate completion status Remove the USB flash drive at r...

Page 140: ...llation requirements If the PC does not already have Net framework installed click Accept to accept the terms of the license agreement that appears on the screen Wait up to 10 minutes as the Net framework files are installed 5 At the next screen accept or change the destination location and then click Next 6 When prompted click Install to begin the installation Wait while the application is instal...

Page 141: ...nts of the software are being copied Click Finish to exit Fiery USB Setup Tool 4 Confirm on the Windows PC that the USB flash drive has now the following files included dlinux sys may not be visible when the Show hidden files folders and drives option is not enabled on the Windows PC Copying these files to an empty USB flash drive will not substitute Steps 3 1 through 3 3 Always do Steps 3 1 throu...

Page 142: ...he bootable USB flash drive created with the Fiery USB Setup Tool containing the Fiery Clone Tools to an available USB port on the E 25C 5 Set the service switches as shown below 1 ON 2 OFF 6 Turn the main power switch of the E 25C to ON then press and release the soft power push button on the front of the E 25C 7 Allow the E 25C to boot from the USB flash drive to start Fiery Clone Tool 8 Wait un...

Page 143: ...h EE then the error code in half second intervals Link to LED Error Codes Related To the Fiery Clone Tools Fiery System Restore 11 While the diagnostic LEDs are flashing bC then 00 repeatedly return the service switches to the normal position 1 OFF 2 OFF 12 Remove the USB flash drive from the USB port 13 Press and release the power switch on the front panel of E 25C The controller will automatical...

Page 144: ...her storage location Make sure to keep the fci file in the folder Use a descriptive and consistent approach when renaming folder names 18 Remove the USB flash drive in a safe way from the PC Do not leave the USB flash drive connected to the Windows PC If the Windows PC starts up or reboots with the USB flash drive connected system corruption may occur Restore Transferring Clone Image Files to E 25...

Page 145: ...he Fiery Clone Tool selects the most recently created file among all files regardless of the unit The Fiery Clone Tool does not distinguish the units on which the clone images were created To prevent restoration with the wrong file make sure the USB flash drive contains clone images created on the same unit 2 Remove the USB flash drive in a safe way from the PC Do not leave the USB flash drive con...

Page 146: ...es Related To the Fiery Clone Tools Fiery System Restore 10 Remove the USB flash drive from the USB port 11 Press and release the power switch on the front panel of E 25C E 25C will automatically move to the shutdown procedure 12 When the E 25C power is down that is when the diagnostic LEDs are off turn the main power switch of the E 25C to OFF 13 Reboot the E 25C 14 Optional After restoring the E...

Page 147: ...riting to the USB 1 Run Windows Disk Error Check on the USB flash drive 2 Prepare the USB flash drive again using the Fiery USB Setup Tool 09 Missing HDD Check the Fiery Controller to verify HDD installation 0F Backup Failed to write to USB flash drive or error reading from HDD 1 Run Windows Disk Error Check on the USB flash drive 2 Prepare the USB flash drive again using the Fiery USB Setup Tool ...

Page 148: ...rect cloned image file that match the same feature set for the Fiery Controller 42 Restore Cloned image file is for the correct product but HDD is too small Make sure to install the HDD that has the default factory size for storage meets the minimum HDD space requirement for Fiery Clone Tool or greater 43 Restore Failed to format HDD Replace the HDD 44 Restore The USB flash drive may have a corrup...

Page 149: ...ge file used duration and error codes The History Log helps EFI identify the source of the error and may lead to a quicker problem resolution The History Log is saved on the USB flash drive as fcte_history log and can be viewed with a text reader for example the WordPad ...

Page 150: ... if the diagnostic LEDs on the rear panel of E 25C stop on a particular diagnostic code Link to Errors and Suggested Actions 6 Check that all cables connectors and replacements are present appear undamaged and are correctly installed and connected Link to Replacement 7 Try to solve the problem by performing Clear Server or Factory Defaults Inform the site administrator that the data stored in the ...

Page 151: ...ive minutes to see if the E 25C reaches Idle 5 If the problem persists make sure that you have reseated internal cable connections and verified system components 6 If the problem persists see the code symptom and suggested actions in the following pages LED code 00 Possible cause When the E 25C is Idle and in Operational mode the LED display shows 00 If the LED display shows 00 but the system is n...

Page 152: ...t a time 7 Check and reseat the CPU cooling assembly 8 Replace the CPU cooling assembly Link to CPU and Cooling Assembly 9 Replace the CPU Link to CPU and Cooling Assembly 10 Replace the HDD data cable 11 Replace the HDD Link to Hard Disk Drive HDD 12 Replace the motherboard Link to Motherboard LED code A7 A8 Possible cause Possibly one of the following Faulty motherboard Faulty or missing CPU Sug...

Page 153: ...ed action 1 Replace the motherboard Link to Motherboard 2 Replace the CPU Link to CPU and Cooling Assembly FF shown after the E 25C becomes Idle or shortly at the startup does not indicate an error status LED code Any other code that the system hangs on before reaching the idle state Possible cause Faulty motherboard Suggested action 1 Make sure that you reseated the internal cable connections and...

Page 154: ...han 10 minutes Possible cause One of the following Copier system and or engine firmware has been upgraded and a system reboot is required Faulty connection between the E 25C and the copier Suggested action 1 Reboot the copier and wait for the copier and the E 25C to start up and reach Idle 2 Verify that the E 25C and the copier have the same time and date information If the time and date informati...

Page 155: ...ive HDD 7 Check the DIMM s and reseat them to remove any oxidation on the connectors 8 Replace the motherboard Link to Motherboard 9 Replace the CPU Link to CPU and Cooling Assembly Start Up Problem 4 Symptom User authentication feature of the copier does not work Possible cause Faulty copier interface connections Suggested action Check connections of the Gigabit Ethernet PCB and replace associate...

Page 156: ...on on the connector 3 Reseat the cables to the HDD 4 Replace the HDD cable 5 Replace the HDD Link to Hard Disk Drive HDD 6 Make sure that the CPU on the motherboard is present and firmly seated and that the fan cable is connected 7 Replace the CPU Link to CPU and Cooling Assembly 8 Replace the motherboard Link to Motherboard System Problem 3 Symptom Chassis fan is noisy or is not spinning Possible...

Page 157: ...maged replace it 3 If the problem persists retry the installation using a different PC System Software Installation Network Port Method 2 Symptom Installation stalls for 5 minutes or longer while downloading Possible cause The service switches are set to normal mode Incorrect or defective RJ 45 cable Motherboard defective Suggested action 1 Make sure the E 25C service switches are set to service m...

Page 158: ...llow the installation to resume 4 Retry the installation using a different USB flash drive 5 Reseat the cables to the HDD 6 Replace the HDD cable 7 Replace the HDD Link to Hard Disk Drive HDD 8 Replace the motherboard Link to Motherboard 9 Replace the CPU Link to CPU and Cooling Assembly System Software Installation USB Method 2 Symptom During installation the LED on the USB flash drive remains OF...

Page 159: ...sted action Product information is found but the installer does not support this product System Software Installation USB Method 5 Symptom The LED on the E 25C shows error codes EE 09 EE 09 Possible cause HDD is missing Suggested action Check the E 25C to verify the HDD installation System Software Installation USB Method 6 Symptom The LED on the E 25C shows error codes EE 43 EE 43 Possible cause ...

Page 160: ...d action 1 Use another computer with an external connection to format the HDD if the installer cannot write to the HDD 2 If the above actions do not work replace the HDD Link to Hard Disk Drive HDD Backup and Restore Backup and Restore 1 Symptom The LED on the E 25C shows error codes EE 21 EE 21 Possible cause Failed to mount HDD partition Suggested action The E 25C is not properly installed Reins...

Page 161: ...nting errors For additional information see Configuration and Setup which is part of the user documentation set Network 1 Symptom Unable to connect to the network or neither LED on the 10 100 1000BaseT network port is lit Possible cause One of the following Wrong cable Do not use a crossover cable Wrong port Do not use the printer port The printer port is reserved for the copier and for installing...

Page 162: ...n the designated network port is lit on the E 25C check the cable connection to the E 25C and the network Make sure that the cable is the correct type 3 If the network cable is the correct type and is properly connected to the E 25C connect a new network cable to the E 25C 4 Request that the network administrator check other devices on the network If other devices are not functioning there could b...

Page 163: ... the connection between the E 25C and the copier Suggested action 1 Make sure that the E 25C LED is lit If not press the power switch to turn ON the E 25C 2 Turn the copier OFF then ON 3 Make sure the network and scanning options are available from the copier operation panel 4 Check again that the copier interface cable is present and properly connected to the E 25C and the copier 5 Check again th...

Page 164: ... to Yes Check for error messages on the E 25C output Printing 6 Symptom E 25C appears in the list of printers on the customer s workstation but certain jobs do not print Possible cause Application problem Suggested action 1 Print a job from a different application to determine if the problem is associated with a particular application 2 Make sure that the connection between the E 25C and the works...

Page 165: ... copier OFF then ON Printing 9 Symptom A print job stalls or stops after one or a few pages Possible cause Missing incorrect or faulty DIMM s or faulty DIMM connections Suggested action 1 Turn OFF the E 25C check for missing DIMMs and reseat the DIMMs to remove any oxidation on the connectors 2 Replace the motherboard Printing 10 Symptom Color quality is not consistent Possible cause Problem with ...

Page 166: ...lt Measurements and then click Yes to confirm If resetting to default calibration does not solve the problem you may need to service the copier 2 If restoring default measurements fixes the color quality the custom calibration may have been the cause of the problem Request that the site administrator recalibrate the E 25C For details see Color Printing which is part of the user documentation set 3...

Page 167: ...tion setting is causing the problem reset the calibration setting to its default measurements In Command WorkStation Device Center General Tools click Manage Calibrator opens In Calibrator select the calibration setting that you suspect is causing the problem and then click View Measurements Click Reset to Default Measurements and then click Yes to confirm If resetting to default calibration does ...

Page 168: ...k request that the site administrator do the following Check all components of the network including cables connectors terminators network adapter boards and network drivers Activate the network and use it to communicate with other copiers Confirm that the applicable network settings in Setup such as AppleTalk zone IP address subnet mask and gateway address match the settings used in the network E...

Page 169: ...rk settings in Setup such as AppleTalk zone IP address subnet mask and gateway address match the settings used in the network When you make a service call check the E 25C connector panel to make sure that the appropriate network connection is in place Print quality problems are difficult to trace Before you try to troubleshoot print quality problems print a Test Page to make sure that the copier d...

Page 170: ...mage is printed on the reverse side of the paper Reload the paper in the paper tray upside down Multiple pages are fed through the copier at once Remove all the pages from the paper tray and fan them gently before reloading Paper misfeeds occur frequently Check the paper size settings Use the recommended paper Avoid using curled folded wrinkled perforated or glossy paper It takes too long to compl...

Page 171: ...t The following table lists the power connectors REF D PIN NO SIGNAL WIRE COLOR P1 1 3 3V ORANGE 2 3 3V ORANGE 3 COM BLACK 4 5V RED 5 COM BLACK 6 5V RED 7 COM BLACK 8 PW OK GRAY 9 5Vab PURPLE 10 12V YELLOW 11 12V YELLOW 12 3 3V ORANGE 13 3 3V ORANGE 3 3VS BROWN 14 12V BLUE 15 COM BLACK 16 PS ON GREEN 17 COM BLACK 18 COM BLACK 19 COM BLACK 20 21 5V RED 22 5V RED 23 5V RED 24 COM BLACK P2 1 COM BLAC...

Page 172: ...tion c When changing settings from Command WorkStation If the customer is using more than two E 25C units whether or not the same symptom can be observed with more than one unit Environmental information Client OS version Printer Driver version if applicable Command WorkStation version if applicable Application software version if applicable Configuration sheets of E 25C The configuration sheet wi...

Page 173: ...rred The Job Error Report and the Device Logs must be collected at the same time to improve the possibility of successful problem diagnosis The error log entries included in the Job Error Report and Device Logs are overwritten after a period of time To ensure the error logs contain the relevant information capture these items as soon as possible after the error is observed Also for smooth and effi...

Page 174: ...lectable only for RIPped jobs Original source files Files formatted in the original application such as a Word doc or InDesign file Any file format can be attached and multiple files can be attached The Engineering log entries are overwritten after a period of time To ensure the Engineering logs contain the relevant information create the Job Error Report as soon as possible after the error is obs...

Page 175: ...bout the job error a Enter any comments and additional details in the Comments field If possible write in English It is recommended to include the following information Date and time error occurred Observed error codes if any Description of expected result Description of incorrect result Steps for how error occurred Frequency of error Such as single event rarely sometimes frequently always Whether...

Page 176: ...click on the job and from the short cut menu select Archive do not select Server Internal c Optional To include the specific color profile select Color Profile When the color profiles are included in the Job Error Report there is also a report txt file created and included This shows the names of the profiles that were used for the job The color profile may be useful to include if the issue occurs...

Page 177: ...ional files 6 If the customer considers any print jobs to be confidential remove the job files before sending the zip file to technical support If the customer does not wish to provide the original file then the original file should not be selected or should be removed from the zip file If the customer does not wish to provide the print job then the archived job automatically saved when creating t...

Page 178: ...s as a set with the Job Error Report Items that is recommended to collect from the copier HDD for E 25C issues Type Storage Timing to HDD 1 Destination maximum storage capacity Controller device log including operation log Saved at all times When the data gets over 4 0 GB the older data is deleted Engine device log When an engine SC occurs When paper feeding output stops because of a jam When the ...

Page 179: ...out log Auto log out log Obtaining the Device Logs and SMC with an SD card Preparation 1 Check the date and time that the issue occurred Later when providing the device logs to your technical support inform the date and time so that the engineers can find the area of the logs to investigate 2 Prepare an SD card and format it For the recommended SD card please refer to the copier service manual If ...

Page 180: ...e SD card SP Collectable Information and or Logs SP5 858 111 All of the device information and device logs that are collected by executing the SPs from SP5 858 121 to SP5 858 145 and SMC SP5 858 121 Configuration page 2 SP5 858 122 Font page 2 SP5 858 123 Print settings list 2 SP5 858 124 Error log 2 SP5 858 131 Fax information whether the fax destinations are included or not depends on the settin...

Page 181: ...ted due to an error an error code will be displayed Error Code Description 1 Other 2 No SD card is inserted in the service slot or in the SD slot on the side of the operation panel In this case insert an SD card into either of the SD slots 3 The SD card is locked and is not possible to write any data In this case unlock the SD card 9 Wait for the information and or logs to be copied to the SD card...

Page 182: ... the SD card is not formatted If failed appears on the touch panel display turn the power OFF and then recover from step 1 again 12 Confirm that the LogTrace folder is created in the SD card with sub folders with the following names 13 Zip the LogTrace folder to provide it to your technical support ...

Page 183: ...etailed Section Descriptions Block Diagram and Functions Components Component Type Configuration Processor Intel Pentium Processor G4400 3 3GHz HDD Serial ATA 500GB SDRAM DDR4 4 GB 288 pin BIOS ROM Flash 16 MB EEPROM EEPROM 1Kbit Networking ...

Page 184: ...air UTP Shielded Twisted Pair UTP Straight through or crossover cable Straight through patch cable Crossover Video Board The Video Board functions include High speed data transmission High speed data decompression Engine output at maximum rated output speed The video interface controls such aspects of the print job as Hardware decompression Print quality enhancement technologies HDD The HDD is use...

Page 185: ...esponsible for spooling the job if appropriate and for feeding jobs to the correct PDL interpreter The PDL interpreters are responsible for turning page descriptions into rendered pages and for parsing job management comments The compression subsystem manages compressed pages in memory The page manager coordinates pages for sending to the engine for the most efficient printing finishing and access...

Page 186: ...se Russian Spanish Turkish Korean Traditional Chinese Print Resolution 1200 600dpi 2bit 600dpi 4bit Gradation 1 bit pixel 2 bits pixel 4 bits pixel Scan Resolution Max 600 dpi Scan Source Automatic Document Feeder Exposure Glass Scan Sides Simplex Duplex Scan Destination Hold Queue MailBox Email FTP Server Windows SMB Client PC Disk E 25C Remote Scan only Scan Format PDF TIFF JPEG Printing Speed I...

Page 187: ...7 Specifications 181 H 4 9 x 14 3 x 11 6 Weight 5 5 kg 12 2 lb ...

Reviews: