background image

Modes

Resolution

Refresh rate (Hz)

H-frequency

(kHz)

Clock (MHz)

1366 x 768

60

47.74

85.50

1920 x 1080-RB

60

66.60

138.50

1920 x 1080-EIA

60

66.60

148.50

1024 x 600

60

37.30

50.40

(3) HDMI Analog - Video Signal

480i

720 x 480

(1440 x 480)

59.94 (29.97)

27.00

-

480p

720 x 480

59.94

31.47

-

576i

720 x 576

(1440 x 576)

50 (25)

27.00

-

576p

720 x 576

50

31.25

-

720p

1280 x 720

60

45.00

-

720p

1280 x 720

50

37.50

-

1080i

1920 x 1080

60 (30)

33.75

-

1080i

1920 x 1080

50 (25)

33.75

-

1080p

1920 x 1080

60

67.50

-

1080p

1920 x 1080

50

56.25

-

1080p

1920 x1080

24/23.98

27.00

-

Configurations of Terminals

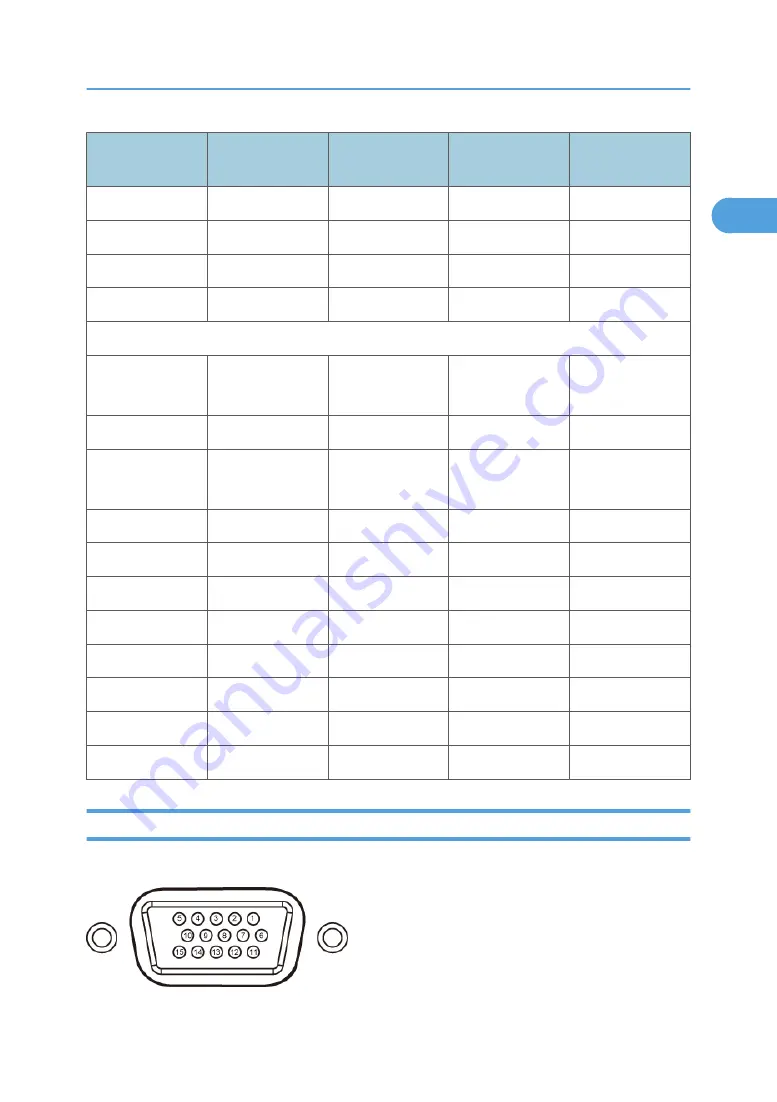
Terminal : Analog RGB (Mini D-sub 15 pin)

General Specifications

9

1

Summary of Contents for Antares-PJ1 Series

Page 1: ...Model Antares PJ1 Machine Codes Y020 Y021 Y022 Field Service Manual 26 August 2011...

Page 2: ......

Page 3: ...strong light from the lamp may cause damage to your eyesight 3 Do not place anything in front of the lens while the projector is operating Things placed in front of the lens may overheat and burn or s...

Page 4: ...ce with the instructions may cause harmful interference to radio communications This product contains a chemical known to the state of California to cause cancer birth defects or other reproductive ha...

Page 5: ...DISPOSED OF ACCORDING TO LOCAL STATE OR FEDERAL LAWS Notice Canadian users This Class B digital apparatus complies with Canadian ICES 003 Remarque l intention des utilisateurs canadiens Cet appareil...

Page 6: ...ng fluid contacts skin wash the fluid off immediately with clean water and consult a doctor If the fluid spills on an instrument avoid contact and wipe it off using tissue paper Then dispose of the us...

Page 7: ...quences for the environment and human health For more detailed information about the collection and recycling programmes available in your country please contact your local city office or the shop whe...

Page 8: ...1 Product Information Specifications 9 Overview 10 Names of the Terminals on the Rear Panel 11 2 Installation Precautions 13 Do 15 Do not 15 3 Replacement and Adjustment Equipment Needed Product Over...

Page 9: ...cement 39 4 System Maintenance Service Mode 45 How to enter the Service Mode 45 Service Mode Settings 45 Functional Tests 49 Equipment Needed 49 Video Performance 49 Others 51 Firmware Update 53 Syste...

Page 10: ...8...

Page 11: ...1 Product Information Specifications See Appendices for the following information General Specifications 9 1...

Page 12: ...iew 1 Control panel 2 Zoom ring 3 Ventilation inlet 4 Speaker 5 Focus ring 6 Ventilation outlet 7 Infrared remote sensor 8 Lens 9 Lens cap 10 Connection ports 11 Adjustable feet 1 Product Information...

Page 13: ...R from video equipment 3 S VIDEO IN terminal Input for S video signals from video equipment 4 VIDEO IN terminal Input for video signals from video equipment 5 SERVICE Port Use this port to update the...

Page 14: ...1 Product Information 12 1...

Page 15: ...l not turn back on until the lamp module has been replaced To replace the lamp follow the procedures listed under Replacing the Lamp DO NOT REMOVE THE CABINET COVER OR YOU MAY BE EXPOSED TO DANGEROUS...

Page 16: ...ould break please handle with care to avoid injury This product incorporates glass components including a lens and a lamp If these should break please handle with care to avoid injury and contact your...

Page 17: ...of this manual are subject to change without prior notice In no event will the company be liable for direct indirect special incidental or consequential damages as a result of handing or operating thi...

Page 18: ...2 Installation 16 2...

Page 19: ...crew driver 107 Screw driver 107 Hex Sleeves 5 mm Tweezers Projector Before you start This process requires protection level II Operators should wear antistatic clothing If you need to replace the mai...

Page 20: ...Part Replacement Lamp Cover 1 Loosen 2 screws red circles on the Lamp Cover 2 Remove the Lamp Cover and tear off the aluminum foil Lamp Module 3 Replacement and Adjustment 18 3...

Page 21: ...1 Loosen 2 screws red circles on the Lamp Module 2 Take off the Lamp Module Top Cover 1 Unscrew 2 screws red circles from the Bottom Cover Part Replacement 19 3...

Page 22: ...reen circles from the IO Cover 3 Pressing the Top Cover s sides as shown unhook the catches and remove the Top Cover 4 Unplug the connector purple square of the Keypad Board Keypad Board 3 Replacement...

Page 23: ...1 Unscrew 4 screws red circles from the Top Cover 2 Remove the Keypad Board Zoom Ring Module 1 Unscrew 3 screws red circles from the Top Cover 2 Remove the Zoom Ring Module Part Replacement 21 3...

Page 24: ...Top Shielding 1 Unscrew 9 screws red circles 2 Remove the Top Shielding IO Cover 3 Replacement and Adjustment 22 3...

Page 25: ...enons yellow squares and open the IO Cover 3 Unscrew 2 screws green circles 4 Remove the IO cover Take care of the tenons when you remove the unit Main Board Before you remove the main board make a no...

Page 26: ...3 screws red circles 2 Unplug the connector green square of the Color Wheel 3 Unplug 6 connectors yellow squares Please refer to the table below for details of each connector 3 Replacement and Adjust...

Page 27: ...nd green wire tube 3 pin C Blower J6 Red Black White wire white connector and blue wire tube 3 pin D Photosensor J17 Red Black White wire red connector and black wire tube 3 pin E IR J9 Red Black Whit...

Page 28: ...4 Unplug 1 connector yellow square 5 Remove the Main Board Main Board Shielding 1 Unscrew 2 screws red circles 2 Remove the Main Board Shielding 3 Replacement and Adjustment 26 3...

Page 29: ...Unscrew 1 screw red circle 2 Unfasten 2 tenons yellow squares 3 Remove the Front Cover 4 Unfasten 2 tenons green squares to remove the IR Sensor Board and IR Cover Take care of the tenons when you rem...

Page 30: ...Optical Engine 1 Unscrew 4 screws yellow circles to remove the Optical Engine Color Wheel Module 3 Replacement and Adjustment 28 3...

Page 31: ...ircles to remove the Color Wheel Module Avoid touching the glass parts of the color wheel Fan and Thermal Switch 1 Unscrew 3 screws red circles 2 Unplug the connector green square of the Thermal Switc...

Page 32: ...3 Unscrew 1 screw red circle 4 Remove the sponge and aluminum stickers 5 Take off the Fan 3 Replacement and Adjustment 30 3...

Page 33: ...le circles to remove the Fan Shielding and Fan 7 Unscrew 1 screw green circle to remove the Thermal Switch When you hold the fan do so as shown in the figure on the left not the one on the right Blowe...

Page 34: ...1 Unscrew 3 screws red circles to remove the Blower 2 Separate the Blower and Blower Rubber LVPS 3 Replacement and Adjustment 32 3...

Page 35: ...1 Unscrew 6 screws red circles 2 Unplug 3 connectors green squares 3 Remove the black sticker from the LVPS holder Part Replacement 33 3...

Page 36: ...AC inlet bracket C 4 LVPS to MB cable D 5 Remove the LVPS AC inlet bracket and LVPS to MB cable When you assemble the unit you must do the actions as shown below 1 Use a clamp to fix the Lamp Driver...

Page 37: ...Interlock Switch 1 Unscrew 1 screw red circle to remove the Interlock Switch Make sure the interlock switch cable can be wedged as shown Lamp Driver Part Replacement 35 3...

Page 38: ...ew 1 screw red circle to remove the Lamp Driver Module 2 Unscrew 4 screws yellow circles 3 Unplug 3 connectors green squares 4 Remove the Lamp Driver and Lamp Driver holder 3 Replacement and Adjustmen...

Page 39: ...Bottom Shielding 1 Unscrew 3 screws red circles 2 Remove the aluminum sticker 3 Remove the Bottom Shielding Part Replacement 37 3...

Page 40: ...Speaker 1 Unscrew 2 screws yellow circles to remove the Speaker Bottom Cover 1 Unscrew 3 nuts red circles to remove the Adjustment Feet 3 Replacement and Adjustment 38 3...

Page 41: ...ration v v Reset Lamp Hours v Re write Lamp Hours v OSD Reset v v Rod Adjustment v Waveform Download v Fan RPM Calibration v v v If color appears abnormal after changing the main board please do the C...

Page 42: ...e screen Horizontal and vertical position of the video should be adjustable to the screen frame Criteria If there is noise on the screen the product is considered as defective The screen must appear n...

Page 43: ...t buttons to set the lamp hours Full Mode to 0 4 Select Lamp Hours low then use the Left or Right buttons to set the lamp hours Eco Mode to 0 5 Select Return to Service Menu to confirm the setting By...

Page 44: ...fter 3 to 5 seconds the projector will power on 4 After the logo disappears the message Warning Factory Fan RPM Calculation now please wait will be shown on the screen 5 After 70 seconds please get in...

Page 45: ...or wheel Color Wheel Index should be done 1 Get into Service Mode 2 Select Optical Settings 3 Select Color Wheel Index then use the Left or Right button to adjust the color balance of the projected im...

Page 46: ...djusted first and then screw B Adjust until the yellowish or bluish parts disappear Image inspection There should be no abnormal color visible to the naked eye at the edges of the image Avoid over adj...

Page 47: ...e 1 Turn on the projector 2 Press the Power Left Left and Menu buttons sequentially You can use the remote controller for this Service Mode Settings Here is a summary of common terms Term What It Mean...

Page 48: ...ode Lamp Hour low Shows the working hours of the projector in eco mode Factory Reset DFU Burn in Test DFU Failure Log Records the times of the failure of power on of the projector such as excessive te...

Page 49: ...Degamma DFU Lamp Power Gain DFU Other Settings Setting Item Description System Hours Adjust Use this to change operating hours of the projector Lamp Hours Adjust Use this to change the working hours o...

Page 50: ...Degree DFU Dust Chamber Test DFU Read SNID DFU Color wheel index Use this to adjust the R G B value to improve the image when the color reproduction is not correct Factory blower RPM DFU Extended mode...

Page 51: ...DTV Source 720P 1080P 1080i Video Performance CVBS Procedure Test equipment DVD player Test signal CVBS Inspection item Video performance test Inspection Distance 1 8M 2 8M Criteria Check for abnormal...

Page 52: ...d from the speaker Plug the audio cable into the audio in port and check whether Volume is normal Adjust the volume from 0 20 by using the remote controller Check the sound from the speaker Check whet...

Page 53: ...e projector and to verify the Plug Play function Acoustic High pitched sound from the cooling fan or color wheel is unacceptable Check points for exterior and print pattern Check item Check point Text...

Page 54: ...Check item Check point Connector All interface connectors should be complete and workable Adjustable foot Should be able to adjust this smoothly 4 System Maintenance 52 4...

Page 55: ...e Equipment needed Software DLP Composer Lite Use DLP Composer Lite 10 3 for example Firmware img Library file Hardware Projector Power Cord USB Cable mini USB to USB A PC or Laptop DLP Composer Lite...

Page 56: ...lick DLP Composer Lite V10 3 Setup 2 Click Next 3 Read License Agreement 4 Select I accept and agree to be bound by all the terms and conditions of this License Agreement 5 Click Next 4 System Mainten...

Page 57: ...6 Click Next 7 Click Next 8 Click Next The program is being installed Firmware Update 55 4...

Page 58: ...e power cord 2 Connect the Projector and PC with a mini USB cable 3 From the Start menu point to All Programs point to DLP Composer TM Lite and then click Install DLP Device USB Driver 4 Press any key...

Page 59: ...round 10 seconds then release the Power button In the FW mode all LEDs light up If you plug in the power cord while pressing the Power button the Power LED alternately flashes red and blue for a few s...

Page 60: ...into firmware update mode 2 Connect the Projector and PC with a mini USB cable The Found New Hardware Wizard appears 3 Select No not this time 4 Click Next 5 Select Install the software automatically...

Page 61: ...6 Click Next 7 Click Finish Firmware Update procedure 1 Get into firmware update mode Firmware Update 59 4...

Page 62: ...te 10 3 3 Click Edit and then click Preferences 4 Click Library 5 Click Browse and navigate to the directory where you put the DLP Composer installation files in Select XXX Library folder and then cli...

Page 63: ...6 Click Communications 7 Select USB for USB update model 8 Click OK 9 Click Flash Loader 10 Click Browse to search for the firmware file img Firmware Update 61 4...

Page 64: ...mplete Image Download 13 Select Skip Boot Loader Area and then select 32 KB 14 Click Reset Bus to erase the flash memory 15 If the firmware is ready click Start Download to execute the firmware update...

Page 65: ...rade process is completed and Download completed appears on the screen 17 Unplug the mini USB cable and power cord 18 Plug in the power cord then restart the projector and get into Service Mode to che...

Page 66: ...4 System Maintenance 64 4...

Page 67: ...Mode Red Red Red Lamp Ignited Flash Blue 0 5 second H On 0 5 second L Off Cooling Down Flash Red 0 5 second H On 0 5 second L Off Warning for Temperature High On Event Blue Red Warning for Temperatur...

Page 68: ...r Wheel fail Striking Lamp Fail On Event Blue Flash Red 0 5 second H ON 0 5 second L OFF Error for Color Wheel fail Striking Lamp Fail On Standby Red Flash Red 0 5 second H ON 0 5 second L OFF Burn In...

Page 69: ...Main Procedures Main Procedures 67 5...

Page 70: ...A No Power Troubleshooting 5 Troubleshooting 68 5...

Page 71: ...B Power Troubleshooting Mark sure all connectors are connected properly Check LED indicator If temp LED lights Main Procedures 69 5...

Page 72: ...If temp LED flashes 5 Troubleshooting 70 5...

Page 73: ...If lamp LED lights Main Procedures 71 5...

Page 74: ...If lamp LED flashes 5 Troubleshooting 72 5...

Page 75: ...Only power LED light red Main Procedures 73 5...

Page 76: ...C Image Troubleshooting 1 1 Does the PC image show on the screen 5 Troubleshooting 74 5...

Page 77: ...1 2 Does video image show on the screen Main Procedures 75 5...

Page 78: ...1 3 Does HDMI image show on the screen 5 Troubleshooting 76 5...

Page 79: ...1 4 Is audio output normal Main Procedures 77 5...

Page 80: ...1 5 Is focus ok 5 Troubleshooting 78 5...

Page 81: ...1 6 Is color ok Main Procedures 79 5...

Page 82: ...1 7 Have line bar 5 Troubleshooting 80 5...

Page 83: ...1 8 Is there noise in the image Main Procedures 81 5...

Page 84: ...1 9 Is uniformity ok 5 Troubleshooting 82 5...

Page 85: ...D Remote Control Troubleshooting Main Procedures 83 5...

Page 86: ...5 Troubleshooting 84 5...

Page 87: ...Model Antares PJ1 Machine Codes Y0020 Y021 Y022 Appendices 24 October 2011...

Page 88: ......

Page 89: ...TABLE OF CONTENTS 1 Appendix Specifications General Specifications 3 List of General Specifications 3 Separately sold product 4 List of Supported Signals 4 Configurations of Terminals 9 INDEX 11 1...

Page 90: ...2...

Page 91: ...40 F 20 to 60 C 20 to 80 humidity non condensing Projection System Y022 Y021 Single DLP 0 55 chip Y020 Single DLP 0 65 chip Resolution Y022 800 600 pixels SVGA Y021 1024 768 pixels XGA Y020 1280 800 p...

Page 92: ...tiple use This model complies with the above specifications Designs and specifications are subject to change without notice This model may not be compatible with features and or specifications that ma...

Page 93: ...00 1024 768 75 60 02 78 75 1024 768 85 68 67 94 50 SXGA 1152 864 119 804 98 80 1152 864 70 63 80 94 50 1152 864 75 67 50 108 00 1280 x 1024 85 77 10 121 50 1280 x 1024 60 63 98 108 00 1280 x 1024 72 7...

Page 94: ...xtended Wide WXGA 1280 x 768 60 47 78 79 50 1280 x 768 75 60 29 102 25 1280 x 768 85 68 63 117 50 1280 x 720 60 44 80 74 25 1280 x 800 60 49 60 83 50 1440 x 900 60 55 90 106 50 1680 x 1050 60 65 30 14...

Page 95: ...l Same as DVI VGA 640 x 480 60 31 47 25 18 640 x 480 72 37 86 31 50 640 x 480 75 37 50 31 50 640 x 480 85 43 27 36 00 640 x 480 119 51 61 61 800 x 600 56 35 20 36 00 SVGA 800 x 600 60 37 88 40 00 800...

Page 96: ...PowerBook G4 800 x 600 60 37 88 40 00 PowerBook G4 1024 x 768 60 48 36 65 00 PowerBook G4 1152 x 870 75 68 68 100 00 PowerBook G4 1280 x 960 75 75 20 126 00 i Mac G3 1024 x 768 75 60 30 80 00 HDMI Dig...

Page 97: ...480 1440 x 480 59 94 29 97 27 00 480p 720 x 480 59 94 31 47 576i 720 x 576 1440 x 576 50 25 27 00 576p 720 x 576 50 31 25 720p 1280 x 720 60 45 00 720p 1280 x 720 50 37 50 1080i 1920 x 1080 60 30 33...

Page 98: ...utput 3 Blue B Cb Input B Output 4 ICP download NC 5 Ground Horiz sync 6 Ground Red 7 Ground Green 8 Ground Blue 9 DDC 5V NC 10 Ground Ver sync 11 ICP download 12 DDC Data NC 13 Horiz sync Input Outpu...

Reviews: