


Installation
© Rice Lake Weighing Systems
●
All Rights Reserved
3
2.0
Installation
The following sections describe the correct installation procedures for the Summit 3000 floor scale.
2.1 Scale Location
The scale must never be loaded beyond its capacity, even momentarily.
• Select a site where overweight loads can maneuver easily without crossing the platform.
• Avoid areas where damage could occur from side impacts of wheels or forklift tines.
• Avoid areas where falling objects could cause shock damage.
• Avoid areas where water may damage a scale not meant for a wash-down environment.
• The scale must be level within 1/4'' (6.35 mm). Choose a site where the floor is level to this standard to avoid excessive
shimming. The floor may require modification if unable to select and area up to standard.
• For systems where the scale is connected to a 120V AC circuit, the instrument must be directly connected to an earth
ground with a ground interface cable of no more than 3
resistance throughout its length.
2.2 Unpack Scale
Remove all packing material and inspect scale for visible damage caused during shipment. Report any damage to the shipping
company and Rice Lake Weighing Systems immediately.
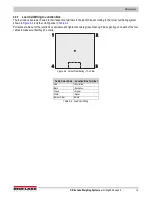
Figure 2-1. Proper Lifting Technique
Lift the scale only with a properly designed spreader bar. Lifting force must be vertical to avoid bending the eye
bolt.
Eye bolts must be inserted in the top of the scale. Lifting should always occur with the top plate facing up and
the eye bolts securely attached through the nuts welded to the bottom of the top plate. Lifting from the bottom of
the plate could cause nuts to break loose and the scale to fall.
IMPORTANT
(5
'
x 5
'
or smaller and/or 10,000 lb or less capacity).
Use one 1/2-20NF
eye bolt inserted into the
center of
top plate for lifting.
IMPORTANT
WARNING