


User Manual
Reference number: 4111A-RADAR4600-GBD-R1.1
Date: 27 February 2018
Page 81 of 149
3.6.15
Alarm Zone for automatic acquiring targets
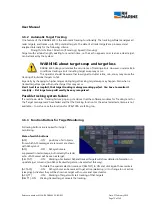
To be warned for all kinds of approaching radar targets, an Alarm Zone must be set. It is simultaneously an
automatic acquiring zone. Up to 8 different zones can be set.
As soon as a target enters such a zone an alarm will be initiated and the target is marked red with a target
number as an acquired target. Clicking onto an alarming target stops the alarm and the target marking
colour changes to blue. When moving data of target are calculated, it changes to a tracked target and the
regarding vector is shown. If it is a dangerous target it is shown in red and the CPA/TCPA alarm starts.
An Alarm Zone may be an angled sector or a complete circle, surrounding own ship.
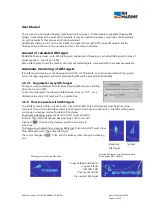
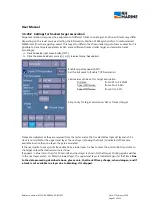
To set an Alarm zone:
Click button [AZ] to open menu 'Acquisition / Activation Zones.
Click menu head cell or click [<] or [>] and select one of the eight available zones.
This example shows setting menu for ‘Zone ‘2’. Not activated zones are shown with dashed lines.
Now the needed values may be set:
‘RNG 1’ is the outer circle,
‘RNG 2’ the inner circle,
‘BRG 1’ the upper (or left) sector line,
‘BRG 2’ the downside (or right) line.
After settings are made, click the box of ‘Activate, to set a tick mark.
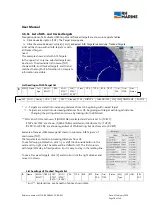
Now the alarm zone
gets a full line and all
targets, which enters
the activated zone,
initiates an alarm.
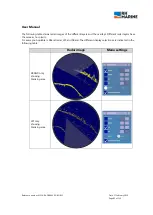
Target 4 entered the zone, but is
actually not calculated and not
acknowledged.
Target 2 is calculated, tracked and
acknowledged.
Target symbols can be deleted, but
within the Alarm Zone they are
reactivated as alarm target after short
time. When deleted outside of Alarm
Zone, only the normal target will be
shown whole time it is recognized.
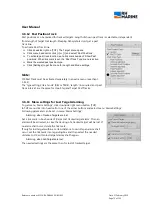
Target has passed
the Alarm zone, but
it was not
acknowledged.
Therefore it stays in
alarm status, until it
is acknowledged.
Outside of guard
zone it may be
deleted. Then only
the normal target is
shown.


