background image

Getting Started 

Quick Start 

21 


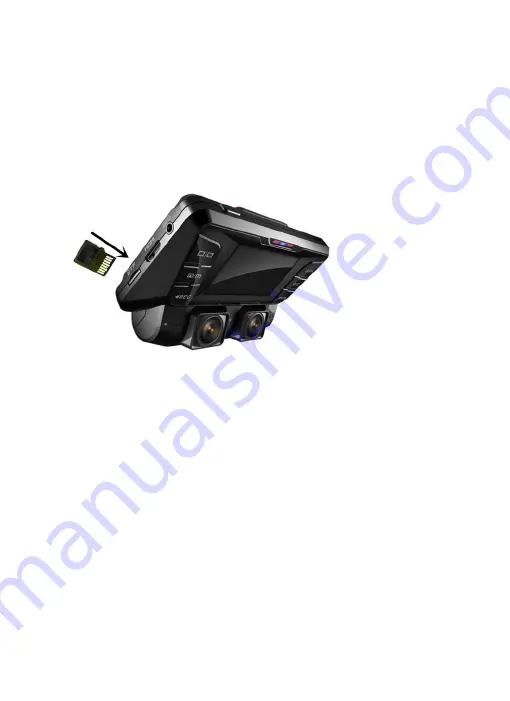
2. Inserting the Memory Card 

The V2 accepts Micro SD memory cards (class 10 or higher) with a maximum 

capacity of 256GB. 


Inserting a memory card 

a. If the device is powered on, press and hold the

 POWER

 button to power 

down.   

b. Insert the card in the orientation shown.   

c. Push the card into the slot, listening for a click sound signaling the card is 

securely inserted. 

Removing the Memory Card 

Before removing a memory card from your V2, you must first dismount it for 

safe removal.  

Summary of Contents for V2

Page 1: ...USER MANUAL V2 All brand and product names are trademarks or registered trademarks of REXING INC The information in this manual is subject to change without notice www rexingusa com 8 2019Rev3 ...

Page 2: ... damages resulting from the user s misuse of the camera Do not use damaged power cords or plugs or loose electrical sockets Faulty connections can cause electric shock or fire Do not touch the car charger with wet hands or disconnect the charger by pulling the cord Doing so may result in electrocution Do not use a bent or damaged car charger Doing so may cause electric shock or fire Do not touch y...

Page 3: ...at are not approved by Rexing Do not drop the charger or device or subject them to impact Handle and dispose of the charger and device with care Never crush or puncture the device Never dispose of the device in a fire Never place the device in or on heating devices such as microwave ovens stoves or radiators The device may explode if overheated Follow all local regulations when disposing of a used...

Page 4: ...e serious injury or death Do not use your device near other electronic devices Most electronic devices use radio frequency signals Your device may interfere with other nearby electronic devices Do not use your device near other devices that emit radio signals such as sound systems or radio towers Radio signals from these may cause your device to malfunction Do not expose the device to heavy smoke ...

Page 5: ...e to the device or cause the battery to explode Your device is recommended for use within a temperature range of 10 C to 70 C and a humidity range of 10 to 80 If your device becomes overheated allow it to cool down before use Prolonged exposure of skin to an overheated device may cause low temperature burn symptoms such as red spots or areas of darker pigmentation Install mobile devices and equipm...

Page 6: ...vicing take it to an authorized Rexing Service Center Clean your device and charger by wiping with a towel or eraser Do not use chemicals or detergents Doing so can discolor or corrode the outside of the device and may result in electric shock or fire Do not distribute copyright protected material Doing so without the permission of the content owners may violate copyright laws The manufacturer is ...

Page 7: ...siness users should contact their supplier and check the terms and conditions of the purchase contract This product and its electronic accessories should not be mixed with other commercial wastes for disposal Disclaimer Some content and services accessible through this device belong to third parties and are protected by copyright patent trademark and or other intellectual property laws Such conten...

Page 8: ...N WITH ANY INFORMATION CONTAINED IN OR AS A RESULT OF THE USE OF ANY CONTENT OR SERVICE BY YOU OR ANY THIRD PARTY EVEN IF ADVISED OF THE POSSIBILITY OF SUCH DAMAGES Third party services may be terminated or interrupted at any time and Rexing makes no representation or warranty that any content or service will remain available for any period Content and services are transmitted by third parties by ...

Page 9: ...f this manual refer to the Rexing website at www rexingusa com Available features and additional services may vary by device and software Applications and their functions may vary by country region or hardware specifications Rexing is not liable for performance issues caused by applications from any provider other than Rexing Rexing is not liable for performance issues or incompatibilities caused ...

Page 10: ...box 14 Camera Overview 15 Buttons 17 Status Icons 18 Getting Started 20 Installation 20 1 Mount the Front Camera to the Windshield 20 2 Inserting the Memory Card 21 Removing the Memory Card 21 3 Formating a Memory Card 22 4 Connect the car charger to the car s 12V DC outlet 24 Basic Operating 25 1 Automatic Recording 25 2 Playback 26 3 Wi Fi connect 29 ...

Page 11: ... Resolution 31 Loop Recording 31 WDR Wide Dynamic Range 32 Exposure 32 Recording Audio 32 Date Stamp 33 Gravity Sensing 33 Plate Number 33 Infrared light 33 System Settings 34 Wi Fi 34 Date Time Setup 34 Auto Power Off 34 Beep Sound 34 Language 35 TV Mode 35 ...

Page 12: ...ency 35 Auto Display Off 35 Delayed Shutdown 35 Daylight Saving 36 GPS Speed Unit 36 Set Time Zone 36 Format 36 Default Setting 36 Version 36 Photo Settings 37 Capture Mode 37 Resolution 37 Quality 37 Sharpness 37 White Balance 37 Color 38 ISO 38 ...

Page 13: ...iew of your V2 Dashboard Camera 13 Exposure 38 Anti Shaking 38 Quick Review 38 Date Stamp 38 Updating Firmware 40 Product Specifications 41 Warranty Support 42 Warranty 42 Support 42 Your opinion matters 42 ...

Page 14: ...epending on the region Appearances and specifications are subject to change without prior notice Availability of all accessories is subject to change depending entirely on manufacturing companies All supplied items are designed for use only with this device and may not be compatible with other devices Malfunctions resulting from the use of unapproved accessories are not covered by the warranty ser...

Page 15: ... Button 3 Menu Button 4 Up Navigation Button Record Button 5 Front Camera 6 Cabin Camera 7 OK Confirm Button Emergency Lock Button 8 Mode Button 9 Down Navigation Button Mute Unmute Button 10 GPS Module Port 11 HDMI Port 12 MicroSD Card Slot 13 USB Charging Port 14 AV Out 15 Reset Button ...

Page 16: ...Overview of your V2 Dashboard Camera 16 ...

Page 17: ...in Settings Mode Recording Mode Hot Key Record Press to start stop recording Press to navigate DOWN through options in Settings Mode Hold to reorient the rear camera Recording Mode Hot Key Mute Press to mute un mute the microphone during recording MODE Select Press to toggle between Recording Photo Playback modes SCREEN Press to switch screen to Front Rear Picture in Picture R Press and hold for 4...

Page 18: ...ra 18 Status Icons Icon Meaning Video Resolution Blinking Recording Wide Dynamic Range Charging Battery Power Level Microphone Mute Microphone On Video Recording Mode Video Playback Mode Photo Mode Loop Recording Memory Card Inserted ...

Page 19: ...Unpacking your V2 Dashboard Camera 19 White Balance License plate number Current video file locked ...

Page 20: ...unt the Front Camera to the Windshield Make sure that you mount the front camera in a safe appropriate location where it won t obstruct the driver s view Clean your windshield before applying the mount Wait at least 20 minutes after applying the mount to the windshield before attaching the camera ...

Page 21: ...nserting a memory card a If the device is powered on press and hold the POWER button to power down b Insert the card in the orientation shown c Push the card into the slot listening for a click sound signaling the card is securely inserted Removing the Memory Card Before removing a memory card from your V2 you must first dismount it for safe removal ...

Page 22: ... the Camera You must always connect the V2 to a power source while operating the camera Connect the camera to your vehicle via the included car charger cable Connect the larger end of the car charger cable to your car s cigarette lighter 12V DC power outlet and connect the other Mini USB end to the Mini USB port on the device Connecting the charger improperly may cause serious damage to the device...

Page 23: ... button to stop recording b Press the MENU button twice to enter the Setup Menu c Use the REC and MIC navigation buttons to navigate to the Format option d Press OK to confirm your selection e You will be notified that all data will be deleted Scroll down to OK and press the OK button to confirm f If you followed the instructions above you should see a blue box asking you to please wait while the ...

Page 24: ... or Off Press and hold the POWER button for a few seconds to turn on the device A welcome message will be displayed onscreen To turn off the device again press and hold the POWER button for a few seconds A goodbye message will be displayed onscreen The V2 will switch on or off automatically if you keep it connected using the car charger The camera will automatically start recording when it is powe...

Page 25: ...button will turn on or off the LCD screen your display setting won t affect the way recordings are captured Locking Videos While recording you can hold the OK button to manually lock the current video clip This will ensure that Loop Recording won t overwrite the clip when the memory card is full You can also lock videos after recording by using the Protect function in the Playback Menu Locked vide...

Page 26: ... button to navigate through the stored video files 4 Press OK to start playback for the selected video 5 Press OK again to pause playback 6 Press MODE to stop playback 7 FAST FORWARD While video is playing press the UP button one or more times to set fast playback speed 2X 4X 8X 8 FAST REWIND While video is playing press the DOWN button one or more times to set reverse playback speed 2X 4X 8X Dele...

Page 27: ...Press OK once to view delete options for Current MOV file or ALL files Select ALL and press OK 6 Press OK again to delete all files Computer Playback Minimum System Requirements Windows Media Player QuickTime Media Player OR any media player compatible with MOV files Accessing Video Files Insert the SD card into your computer or plug your camera into the computer USB port and select Mass Storage t...

Page 28: ...upport videos for a tutorial video Opening a GPS video file a Once you ve opened the application navigate to the top menu bar and click File Open to browse through your files b Navigate to the video file you want to add to the playback queue select it and click Open to load it into the application You may also select multiple videos at once c After a brief loading period the first video should beg...

Page 29: ...Fi connect Use your mobile device to download the Rexing Connect app from the App Store or Google Play Store After you ve done this follow the instructions below 1 Dash cam In Video Recording Mode access the Wi Fi function by holding this can also be done by enabling the Wi Fi feature in the Setup Menu 2 Mobile device Navigate to your device s Wi Fi settings and connect to the Wi Fi name that s sh...

Page 30: ...age Using the Rexing Connect app you can view a live preview of the dash cam screen start stop recording as well as view and save your captures with your mobile device To exit Wi Fi hold the button to return to Video Recording Mode For further instruction regarding the Wi Fi Connect feature please visit www rexingusa com wifi connect ...

Page 31: ...1440P 30fps single channel FHD P60 1080P 60fps single channel FHD P30 1080P 30fps single channel HD P120 720P 120fps single channel HD P60 720P 60fps single channel HD P30 720P 30fps single channel Loop Recording Recommend setting 1 Minute With Loop Recording Mode enabled the device will continuously erase older video as it records new video keeping only the images captured over a user selected ti...

Page 32: ...WDR Wide Dynamic Range Recommend setting On When enabled this feature automatically adjusts exposure settings to improve recording quality in particularly bright or dim environments providing balanced lighting and clearer recorded video Exposure Recommend setting 0 0 Adjust the camera exposure value for brighter or darker recorded video according to your preference Recording Audio Recommend settin...

Page 33: ...amera itself In the event that such forces are detected the device will perform an automatic file lock Locked video files cannot be erased during Loop Recording they remain on the memory card until manually deleted or the card is reformatted Plate Number Enable this feature to enter your vehicle plate number for video recording The plate number will stamp in the video UP Down Change value OK Move ...

Page 34: ...Setup Use this setting to change the device s time and date UP Down Change value OK Move to next segment MENU Save Settings Note If the battery remains fully discharged or is removed from the device the time and date will be reset Auto Power Off Recommend setting Off When enabled this option allows the device to shut down automatically if Recording Mode is not engaged Beep Sound Recommend setting ...

Page 35: ... This option should be set according to the power supply specification used in your country or geographical region U S users should select the 60Hz option Auto Display Off Recommend setting off Select a time duration for the screen to stay lit after recording starts Alternatively you can use a hot key shortcut for this feature During Recording Mode press and hold to turn the LCD screen on or off D...

Page 36: ... Logger required Set Time Zone This feature need GPS Logger connected select a time zone to enable automatic update time of GPS Format Performing this operation will format memory card Note any files in the memory card will be lost Default Setting Performing this operation will reset all your device s settings to their original values Note any user customized settings will be lost Version Device f...

Page 37: ...is option allows you to set the pixel resolution for captured images Quality Recommend setting Fine This option allows you to set the quality level of captured images Lower quality images take up less space on the memory card Sharpness Recommend setting Normal This feature will automatically enhance captured images for a clearer more distinct picture White Balance Recommend setting Auto This setti...

Page 38: ... The higher the number the greater the light sensitivity Exposure Recommend setting 0 0 This setting allows you to adjust the brightness level of captured images Anti Shaking Recommend setting On This feature enables the image stabilizer function to reduce blurring of captured images Quick Review Enabling this feature will allow you to immediately view each captured image for a few seconds before ...

Page 39: ...Operating your V2 Dashboard Camera Settings 39 This feature will automatically apply a date and or time stamp to captured images ...

Page 40: ... is necessary for enabling all available features on your device 1 Download the firmware file to your computer 2 Unzip the file 3 Format your memory card in your computer or unit 4 Copy the firmware files to the root of your memory card 5 Put card into camera 6 Power camera on make sure the camera is plugged in 7 The camera will update automatically The screen will stay off but the status light wi...

Page 41: ... Low Medium High OFF Shutter Electronic White Balance Auto Exposure Auto ISO TV Interface None Battery 320mAh 3 7V rechargeable lithium ion battery Video Format MOV Video Resolution 1920x1080P30 1920x1080P30 1280x720P30 1280x720P30 2880x2160P24 2560x1440P30 1920x1080P60 1280x720P120 Languages English Chinese French Spanish Portuguese German Italian Russian Japanese USB USB 2 0 Loop Recording 3 min...

Page 42: ...Support If you have any questions regarding your product please do not hesitate to contact us at care rexingusa com or call us at 203 800 4466 Queries are typically answered within 12 24 hours Your opinion matters Rexing is firmly committed to always improving our products services and user experience If you have any thoughts on how we can do even better we welcome your constructive feedback and s...

Reviews: