Revo RESPTZ37-SERIES User Manual Download Page 1


REVO America 
700 Freeport  Parkway Suite 100 
Coppell, TX 75019 
1-800-6250-REVO (7386) 


Copyright © 2013 REVO America Inc. All rights reserved. 
REVO and its logo are trademarks of REVO America Inc. 


User Manual 


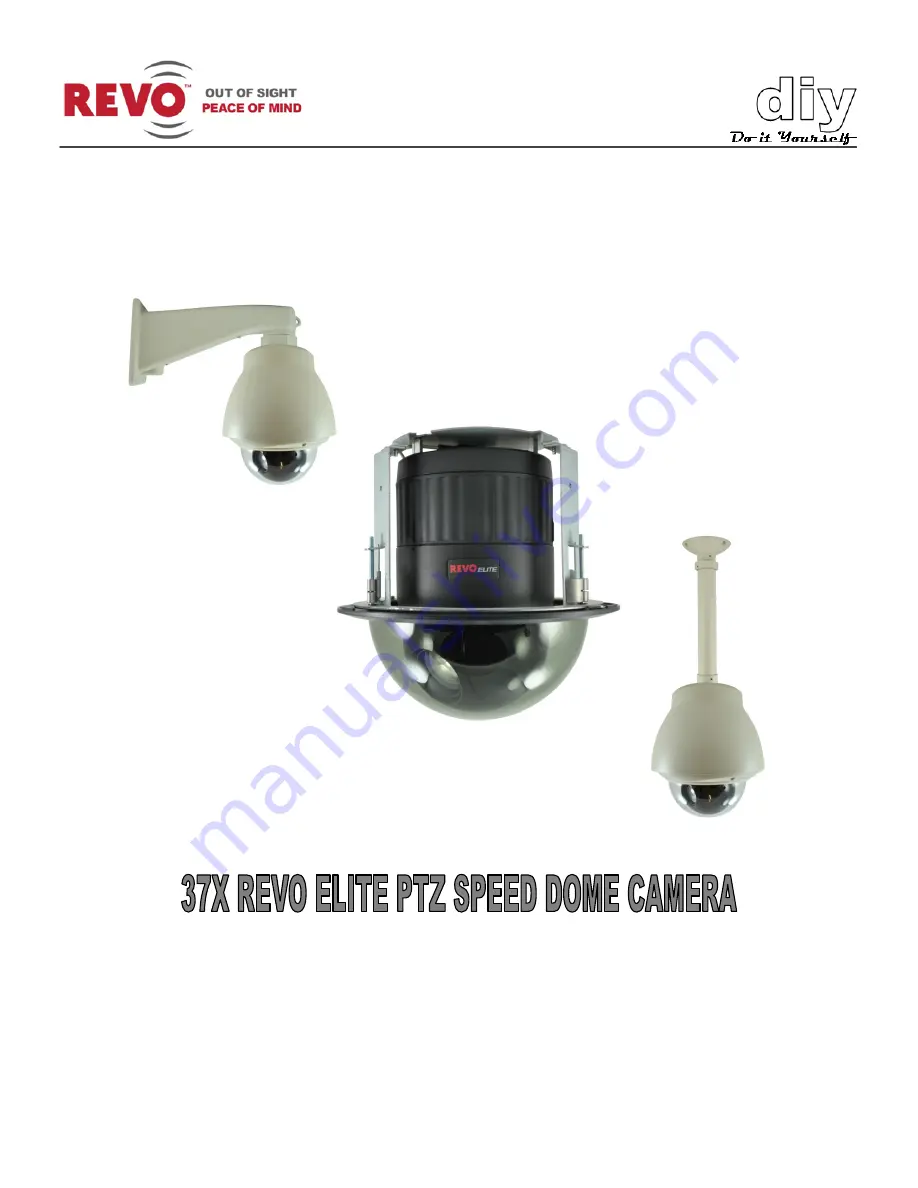
Model RESPTZ37-SERIES 

24 VAC @ 60 Hz, 12W NTSC 


Publication No. RESPTZ37-10B 

Summary of Contents for RESPTZ37-SERIES

Page 1: ...Suite 100 Coppell TX 75019 1 800 6250 REVO 7386 Copyright 2013 REVO America Inc All rights reserved REVO and its logo are trademarks of REVO America Inc User Manual Model RESPTZ37 SERIES 24 VAC 60 Hz 12W NTSC Publication No RESPTZ37 10B ...

Page 2: ...tall in accordance with the manufacturer s instructions 6 Do not install near any heat sources such as radiators heat registers stoves or other apparatus including amplifiers that produce heat 7 Do not defeat the safety purpose of the polarized or grounding type plug A polarized plug has two blades with one wider than the other A grounding type plug has two blades and a third grounding prong The w...

Page 3: ...his or her own expense CAUTION Changes or modifications not expressly approved by the party responsible for compliance could void the user s authority to operate the equipment This Class A digital apparatus complies with Canadian ICES 003 Cet appareil numérique de la classe a est conforme à la norme NMB 003 du Canada CE Compliance WARNING This is a Class A product In a domestic environment this pr...

Page 4: ...g Camera Address 9 Figure 4 Setting Camera Addresses 10 Setting Camera Protocol Video Standard Baud Rate and Parity Optional 10 Dimensions 13 Installation 14 Considerations 14 Tools Required 14 Installing the Camera 15 Wiring 15 Camera Configuration 18 Getting Started 18 Understanding the Dome Menu 20 Camera 21 Dome Setup 27 Specifications 38 Troubleshooting 39 Glossary 41 ...

Page 5: ... Night Shot feature Built in motion detection 8 Alarm inputs and 4 Alarm outputs Easy to use menu system allows setup in minutes Wide optical range with PTZ provides coverage of large areas with just one camera Variable speeds for PTZ functions Slow Normal and Turbo enable you to customize camera operation Titling so you can identify up to 16 camera locations IP66 rated for durability vandal resis...

Page 6: ...TZ37 SERIES 4 W Wh ha at t s s i in n t th he e B Bo ox x The RELPTZ37 Series consists of three models that are preconfigured as follows Model RESPTZ37 1 Indoor Flush Mount Dome Camera Model RESPTZ37 1HSC Outdoor Ceiling Mount Dome Camera ...

Page 7: ...h model is provided with mounting hardware and installation guide Refer to the following manuals for installation and mounting instructions Model Manual RESPTZ37 1 Indoor Flush Mount Dome Camera HCS251 HV RESPTZ37 1HSC Outdoor Ceiling Mount Dome Camera RESPTZH 1 RESPTZ37 1HSW Outdoor Wall Mount Dome Camera ...

Page 8: ...s on the bottom of the camera Remove the camera from the box and the enclosure To access the switches you must remove the bottom cover as shown in Figure 1 TIP Use a small paper clip to set the DIP switches to ensure that you set each one correctly Figure 1 Removing Bottom Cover NOTE Setting DIP switches correctly is very important If you do not set them correctly there will be communication error...

Page 9: ...in a daisy chain arrangement as shown in Figure 3 All of the devices are set up in a line The last device in the line must be set so that the control device knows it is the last device Set this using DIP switch SW1 Figure 2 If this camera is to be the last device set SW1 DIP switches 1 and 2 to ON as shown below If it is not the last device set the switches to OFF SW1 1 2 Terminated ON ON Not term...

Page 10: ...vantage of the camera s capabilities It also provides a fail safe network by protecting the camera if any of the following conditions occur When the RS 485 circuit is open Break When the RS 485 circuit is shorted When RS 485 circuit is damaged When a non REVO device is used there also may be some problems with the communication between the camera and controller device To compensate for this set DI...

Page 11: ...knows which camera is at your back door and which camera is monitoring your driveway Think of the camera address as a telephone number In order for the video system to work with multiple cameras it has to know which one is which Switches S1 through S3 Figure 2 are used to set the camera address Apply the settings for each camera in your video system as shown in the following table Up to 999 camera...

Page 12: ...ity Optional If you are using a REVO America keyboard controller and using the camera in the United States or other NTSC standard country there is no need to change the default settings of switches S4 S5 and S6 Figure 2 You can use the default settings If you need to make changes see the setting options that follow The switches are set as follows DOME ID S3 S2 S1 1 0 0 1 2 0 0 2 1 2 3 4 5 6 78 9 0...

Page 13: ...o communicate with the video controller If you are using a keyboard controller or DVR other than REVO America check the protocol required and set switch S5 as follows D5 D6 D7 D12 PROTOCOL S5 1 S5 2 S5 3 S6 4 Off Off Off Off F2 REVO TRAX Pelco D Pelco P Default Off Off On Off F2 REVO TRAX Off On Off Off Sensormatic RS422 Off On On Off Pelco D Pelco P On Off Off Off Vicon On Off On Off Ernitec On O...

Page 14: ...AUD rate and Parity to match your keyboard controller set switch S5 4 and S6 as follows D8 D9 D10 BAUD RATE S5 4 S6 1 S6 2 Off Off Off 2400 bps Off Off On 4800 bps Off On Off 9600 bps Default Off On On 19200 bps On Off Off 38400 bps D11 PARITY BIT S6 3 Off None On Even ...

Page 15: ... Figure 5 are for the base camera unit To view the dimensions for your model refer to the following installation manuals Model Manual RESPTZ37 1 Indoor Flush Mount Dome Camera HCS251 HV RESPTZ37 1HSC Outdoor Ceiling Mount Dome Camera RESPTZH 1 RESPTZ37 1HSW Outdoor Wall Mount Dome Camera Figure 5 Dimensions ...

Page 16: ...to connect alarms or sensors other wiring Make sure that you can provide the wiring to the locations that you select and that power is available for the power supply Contact REVO America for all the accessories that you will need to install the camera Visibility The cameras should be mounted so there are no obstructions or blind spots Mounting The camera should be mounted in a sturdy location capa...

Page 17: ...Camera HCS251 HV RESPTZ37 1HSC Outdoor Ceiling Mount Dome Camera RESPTZH 1 RESPTZ37 1HSW Outdoor Wall Mount Dome Camera Wiring WARNING Never work with power on You should always disconnect electrical power prior to installation or removal of any equipment A typical system configuration is shown in Figure 6 Figure 7 shows the wiring connections Figure 6 Typical System Configuration ...

Page 18: ...REVO America www revoamerica com RESPTZ37 SERIES 16 Figure 7 Dome Camera Wiring ...

Page 19: ...nd Tx Rx of the RS485 control system If control system is RS 422 connect Rx Tx Rx Tx and Rx Rx of the dome camera to Rx Rx and Tx Tx of the control device respectively Alarm Inputs and Outputs 4 pin Alarm Input AL1 thru AL8 and GND You can use up to 8 external devices to trigger the dome camera to react to an event such as a door that has an alarm on it being opened Mechanical or electrical switch...

Page 20: ...and operation of the camera will be initiated using a REVO America keyboard controller This is the ideal setup and offers the greatest flexibility and ease of operation However a REVO America DVR may also be used to control the camera as well as non REVO America keyboard controllers or DVRs which may be used providing you set the protocols correctly See the Settings section Refer to the applicable...

Page 21: ...ler The DOME MENU displays DOME MENU AUTO SCAN PRESET TOUR PATTERN ALARM AREA TITLE PRIVACY ZONE CAMERA DOME SETUP FUNCTION RUN EXIT ESC TO EXIT You can make selections on the menu by using the keyboard controller shortcut keys DVR or non REVO device depending on the device Function Keyboard Controller Key Call the on screen menu utility MENU Navigate through the menu items Joystick up or down Go ...

Page 22: ...door while another may be a window in the same room Think of a preset as if you had a camera in your hand and were taking photos of various objects in a room Up to 240 Presets may be programmed for this camera Advanced Features manual Tour This menu provides the options for creating tours which are a programmed sequence of Presets Auto Scans Patterns and even other Tours Up to 8 tours may be progr...

Page 23: ... advanced features such as how the camera will return to programmed operation after being controlled manually Home Function Setup Function Run The Function Run Setup menu allows you to quickly execute a function such as Preset Pattern Tour or Scan Auto Scan from the menu using either a keyboard or a DVR Advanced Features manual Camera Select the Camera option from the Dome Menu to adjust the camer...

Page 24: ...ocal point to where the camera was set by the user to focus and stay there With manual focus the image that is being focused on can become out of focus due to wind or other factors Using Constant Manual will adjust the focus for these minor changes by keeping the desired image in focus FOCUS LIMIT This sets an approximate value that the camera will remain in focus from the setting value The option...

Page 25: ... GAIN B GAIN SAVE AND EXIT ESC TO CANCEL MODE AUTO INDOOR OUTDOOR AWB MANUAL AUTO Wide range automatic white mode Color range from 1700 to 11000 K INDOOR Indoor white balance mode Optimized for indoor use OUTDOOR Outdoor white balance mode Optimized for outdoor use AWB Automatically computes the white balance value output using color information from the entire screen automatically Color range fro...

Page 26: ... objects in the video scene are visible and rendered properly with respect to each other MANUAL User controlled iris and shutter settings IRIS PRIO Iris Priority sets the iris as the controlling factor in determining the shutter speed and exposure of a scene For example areas that are dark require wider iris openings to ensure that the scene is exposed SHUTTER PRIO Shutter Priority sets the shutte...

Page 27: ...ensation WDR and WDR ACE are only available when Auto or Iris Prio modes are selected WDR BLC LEVEL LOW MIDDLE HIGH NIGHT SHOT The camera uses an IR cutoff filter which blocks infrared light to accurately render color images The Night Shot feature removes the IR cutoff filter so that the camera can produce images in low light environments The settings are AUTO Camera automatically goes into B W mo...

Page 28: ...cture sharpness The higher the setting 0 64 the sharper the picture DIGITAL ZOOM OFF No digital zoom only optical 2X Zoom is extended up to 2X of digital range 4X Zoom is extended up to 4X of digital range 8X Zoom is extended up to 8X of digital range MAX Zoom is extended up to 16X of digital range IMAGE FLIP Reverses the video image both horizontally and vertically PRESET FREEZE ON OFF When set t...

Page 29: ...c are described in the Advanced Features manual RESPTZ37 10AF CONFIGURATION MENU LANGUAGE ENGLISH HOME FUNCTION SETUP OSD DISPLAY VIEW ANGLE SETUP INITIALIZE DATA ORIGIN OFFSET DOME RESET SYSTEM MENU SYSTEM INFORMATION SAVE AND EXIT ESC TO CANCEL LANGUAGE Selects the language that you want to use for the menu display English French German Italian Spanish Polish or Portuguese are options HOME FUNCT...

Page 30: ...20 seconds after manual control has stopped when Function Enable is set to ON If None is selected or Function Enable is set to OFF nothing will happen HOME FUNCTION None Tour Pattern Auto Scan Preset FUNCTION NUMBER The number of the Tour Pattern Auto Scan or Preset that you want to start WAITING TIME The amount of time the system will wait before starting the Home Function You can set it for 10 2...

Page 31: ...oes not display AREA TITLE ON OFF When set to ON the Area Title displays as the camera moves PRESET TITLE CONSTANT OFF 3 30 60 120 180 seconds Sets the Preset title display time FOCUS EXPOSURE ON OFF When set to ON the Focus and Exposure settings display For example Auto Focus AF and Auto Exposure AE OSD POSITION SETUP You can customize the appearance of the OSD menu using this function You will n...

Page 32: ...ys the following submenu PANNING RANGE SETUP CTRL KEY RIGHT LIMIT 000 0 LEFT LIMIT 000 0 ENABLE OFF SWAP OFF AUTO PAN ON SAVE AND EXIT ESC TO CANCEL To set the Panning Range proceed as follows 1 Set the RIGHT LIMIT to 90 degrees as a starting point 2 Press CTRL key on keyboard controller and set RIGHT LIMIT by pushing the Joystick to the right until desired right limit is achieved 3 Repeat the ope...

Page 33: ...orizontal image when zooming out wide angle ON In some installations it is desirable for the dome camera to be able to see above the horizon When this option is chosen the dome will tilt up over the horizon about 10 When the lens is zoomed out you can see the ceiling line When the lens is zoomed in the viewing angle is narrower and the ceiling line disappears Without Bubble This option will limit ...

Page 34: ...e made ERASE PROGRAMMED DATA Selecting this submenu will enable you to choose which of the data that has been stored on the camera s Flash ROM you wish to erase You will be asked to enter ON or OFF If you desire to erase all data then select ERASE otherwise press the ESC key on the keyboard controller to exit without erasing The erased data includes all stored data Auto Scan Preset and Tour except...

Page 35: ...ubmenu allows you to select the default focus mode of the camera The choices are AUTO MANUAL ONE PUSH PRESET FOCUS DEFAULT FOCUS AUTO SAVE AND EXIT ESC TO CANCEL ORIGIN OFFSET This feature is used to align a new dome camera to exactly the same position as the previously installed camera Note that the Initialize Data and Dome Reset functions will not override the Origin Offset values If you want to...

Page 36: ...FSET 000 0 ENABLE OFF SAVE AND EXIT ESC TO CANCEL DOME RESET This submenu is used to reset the dome camera If you select OK the dome will go through a reset procedure CAUTION Use care when accessing the Dome reset menu It will recalibrate the orientation of the dome DOME RESET ARE YOU SURE CANCEL OK ...

Page 37: ...E AND EXIT ESC TO CANCEL MOTOR SETUP You can set the dome pan and tilt motor speed with this submenu MOTOR SETUP PROPORTIONAL P T ON P T MODE NORMAL SLOW PAN MAXIMUM 40 SEC SLOW TILT MAXIMUM 40 SEC NORMAL PAN MAXIMUM 90 SEC NORMAL TILT MAXIMUM 90 SEC TURBO PAN MAXIMUM 360 SEC TURBO TILT MAXIMUM 100 SEC SAVE AND EXIT ESC TO CANCEL PROPORTIONAL P T ON OFF P T MODE SLOW NORMAL TURBO SLOW PAN MAXIMUM ...

Page 38: ...ts or characters The default password is 555555 When password enable is on the input password window displays to enter the menu To set a new password select the character or number with the joystick and press the CTRL key on the keyboard controller to use that character PASSWORD EDIT SETUP CTRL KEY INPUT PASSWORD PASSWORD A B C D E F G H I J K L M N O P Q R S T U V W X Y Z 0 1 2 3 4 5 6 7 8 9 SAVE...

Page 39: ...turns off OFF Menu displays constantly BLINK CURSOR ON OFF No blinking cursor DOME ANSWER ON OFF Does not acknowledge commands from the dome SYSTEM INFORMATION Displays the camera system information This is useful if service is required From this screen you can determine the camera type hardware and ROM versions SYSTEM INFORMATION CAMERA TYPE xxxxx xxxxxx H W VERSION Vx xx ROM VERSION Vx xx PROTOC...

Page 40: ...es Tilt Angle 10 190 Digital Flip Image Flip Yes Auto Calibration 0 1 6 Speed 0 1 to 380 sec proportional to zoom 380 sec maximum with CTRL key pressed Preset Speed 380 sec Panning Angle 360 continuous rotation Alarm 8 inputs NC NO 4 TTL outputs Auto Scan 1 Auto Pan 16 Auto Scans Preset 240 presets Pattern 8 patterns recording up to 500 sec Tour 8 tours 42 functions per tour Maximum Speed 380 sec ...

Page 41: ... everything is connected correctly check the following Problem Possible Solution No video Verify that power is connected to all pieces of equipment in the system Verify that the power switches are in the ON position Check the video connections Check video cable Poor video quality Check that the BNC connectors are inserted properly Check the voltage level of the dome camera Cable for video is shiel...

Page 42: ...O America www revoamerica com RESPTZ37 SERIES 40 Picture is torn when switching Check Line Lock setting and adjust phase of line lock CAUTION Do not open the camera or attempt repair of the internal parts ...

Page 43: ...gain is increased the picture noise is also amplified When AGC is enabled the value of the gain setting is based on feedback from the camera When AGC is disabled the camera uses the value set for the manual gain setting The trade off between picture level and noise may be adjusted when AGC is disabled On Screen Menu The text overlay menu system used for setting dome features The utility is accesse...

Page 44: ...clearer images may be obtained under low light conditions Line Lock Allows you to phase lock the video with the AC power line When line lock is enabled it prevents vertical video rolling when switching multiple cameras to a single monitor Sometimes text appears slightly tinted on color monitors Disabling the line lock may prevent this problem Normal Input State Describes the expected state of a de...

Page 45: ... in relation to the dome camera s pan tilt position In addition the apparent size of the Privacy Zone adjusts automatically as the lens zooms in or out Up to 4 Privacy Zones may be established Vector Scan Allows the camera to move from start point to end point including tilt and zoom simultaneously and linearly White Balance Adjusts in the color hue red and blue gain for a camera so that true whit...

Page 46: ...REVO America 700 Freeport Parkway Suite 100 Coppell TX 75019 1 800 6250 REVO 7386 Copyright 2013 REVO America Inc All rights reserved REVO and its logo are trademarks of REVO America Inc Issued 01 13 ...

Reviews: