background image

17

16

4. Using the ReLog

ReLog settings

Charging the ReLog

In the box in which you received the 

ReLog, you will also find a USB ca-

ble that you should use to connect 

the ReLog to a PC.

When you receive your ReLog unit, 

the charge level of the battery will 

be below 30%. As a result, if you 

plan to measure vibrations for a 

longer period of time, make sure 

that you give enough time to charge 

the ReLog properly.

In order to charge the ReLog as fast 

as possible, we recommend having 

the ReLog turned off and plugged in 

to a computer. When plugged in to a 

electrical outlet, the ReLog charges 

at a slower rate.

Depending on which version of the 

ReLog you have in your hands, the 

charge time to fully charge the 

battery will vary a bit as the 

different versions of the ReLog 

have different battery sizes. The 

maximum charging time should not 

exceed 9 hours for the largest 

battery size when plugged into a 

computer and being turned off. 

There are two ways of setting the 

sample rate and choosing acceler-

ometer for the ReLog:

Option 1 - 

Using VibInspect (recommended)

Having the ReLog plugged in to your 

PC, open VibInspect and press the 

“ReLog settings” button. Choose 

the ReLog root folder, which will be 

listed as a USB flash drive. Please 

note that the location of the USB/

External drives might vary depend-

ing on the settings of your comput-

er and whether other flash drives 

are connected.

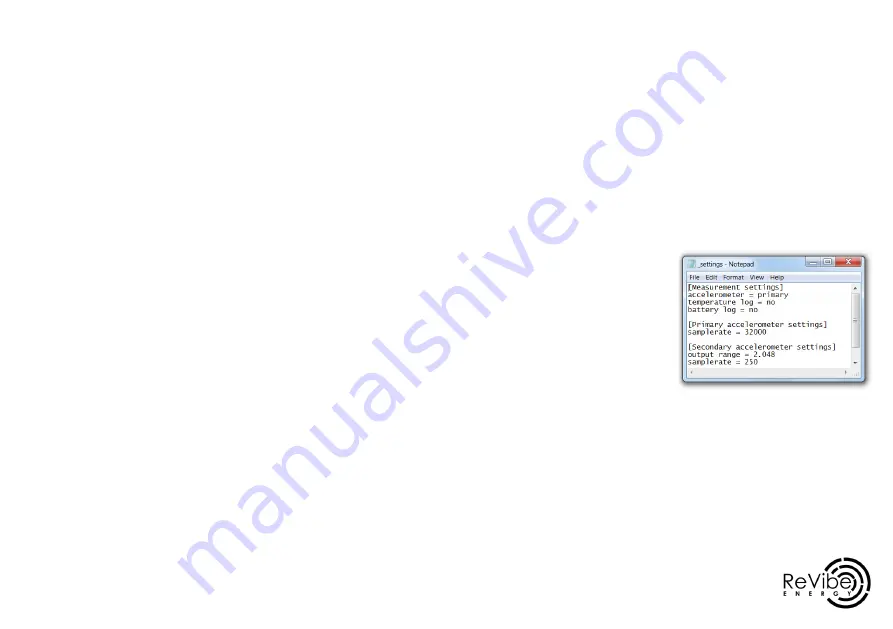
Option 2 - use the _settings file

When connecting the ReLog to a 

PC, you can find the settings file in 

the ReLog root folder (“_settings”). 

You can use any text editor to di-

rectly edit the measurement set-

tings in this file. The structure is 

that of an .ini file where key value 

pairs are separated with an equals 

sign. An example of the settings file 

Once completed, a new dialogue 

box will appear where you can set 

different measurement parame-

ters. First, you can choose to use 

either the primary or the second-

ary accelerometer depending on 

whether you are doing low-acceler-

ation and low-frequency measure-

ments or high-acceleration and 

high-frequency measurements. 

For the primary accelerometer, you 

can choose between the sample 

rates 32,000, 16,000, 8,000, and 

4,000 Hz, and for the secondary 

accelerometer, you can choose 

between 4,000, 2,000, 1,000, 500, 

250, and 125 Hz. The secondary 

accelerometer also has three se-

lectable measurement ranges: 

8.192, 4.094, and 2.048 g. Lastly, 

you can choose whether or not 

to log temperature and battery 

voltage by toggling yes/no in the 

corresponding box.  When you are 

pleased with the settings, press 

OK and a dialog box will tell you 

that the settings were successfully 

saved. 

At factory setting, the ReLog uses 

the primary accelerometer at 32 

kHz and logs both temperature 

and battery voltage.

The available values to each param-

eter is shown in bold in the previous 

paragraph “Option 1 -Using VibIn-

spect (recommended)”.

Summary of Contents for ReLog L

Page 1: ...ReLog vibration data logger User manual quick start guide for ReLog S ReLog M ReLog L...

Page 2: ...lified as ser vice personnel Do not remove and disconnect the li ion battery from its holder Important information Copyright ReVibe Energy AB 2020 All rights re served Manual version 002 Firmware vers...

Page 3: ...nd press ReLog Settings 4 Choose the ReLog s root folder from the browser window 5 Set the desired sample rate MOUNTING THE RELOG 1 Clean the surface object from dirt grease or similar 2 Choose a suit...

Page 4: ...time clock Yes Logging while charging over USB can be connected to power outlet Yes CE RoHS compliant Yes STORAGE Type of storage Internal SD card Transfer of data Via USB cable to PC Storage size ReL...

Page 5: ...15 6 g 8 192 g Noise density 25 g Hz Analog anti aliasing filter cutoff frequency 1 5 kHz Digital filter Sinc type Drift 0 15 mg C maximum 0 02 mg C typical 2 Technical specifications PRIMARY ACCELERO...

Page 6: ...L 3 400 mAh Minimum capacity ReLog S 2 500 mAh ReLog M 2 900 mAh ReLog L 3 300 mAh Operating temperature 20 C 60 C 4 F to 140 F Storage temperature 1 month 20 C 60 C 4 F to 140 F 3 months 20 C 45 C 4...

Page 7: ...61 44 Interface What is included in the box Interface legend When you receive your ReLog you will find the following items in the box 1 ReLog vibration data logger 1 Connecting USB cable for data tra...

Page 8: ...d flashing every 3 s Starting measure ment flashing Measuring flashing every 3 s Stopping measure ment flashing Update mode flashing 3 Product overview Battery LED indicator COLOUR BATTERY CHARGE STAT...

Page 9: ...gs of your comput er and whether other flash drives are connected Option 2 use the _settings file When connecting the ReLog to a PC you can find the settings file in the ReLog root folder _settings Yo...

Page 10: ...og to ensure that the unit is firmly at tached to the object Mounting methods Mounting by double sided tape This will most likely be the go to option for most users of the ReLog as it is likely that y...

Page 11: ...on once The LED indicator will flash in blue 3 times The ReLog is now measuring During measurement the LED indi cator flashes to indicate the battery status every 3 seconds Stop measurements To stop a...

Page 12: ...content in the signal The resolution of the FFT is direct ly proportional to the length of the measurement and the sample rate used PSD The PSD is based on the FFT algorithm but normalizes the values...

Page 13: ...de This is done by holding the Start stop button while inserting the USB cable into a PC A steady teal light indicates that the device has entered update mode Open VibIn spect and follow the instructi...

Page 14: ...a PC Please allow some time to pass up to 20 seconds as it sometimes might take some time for your com puter to properly read and accept the ReLog as an external device This issue could in particular...

Page 15: ...Copyright ReVibe Energy AB 2020...

Reviews: