background image

Manuale di uso e manutenzione – Sterilizzatrice a vapore mod. Sterilix Baby 

Rev. 03 del 18-04-02 - \\SERVER2012\oo\SETTORE DENTALE\BABY\MANUALI 
ISTRUZIONE\Baby GB- R00.doc 


Pag. 2 of 26 


Thanks you for having bought one of its products and asks you to read this manual. 
 
The  manual  contains  all  the  information  you  require  in  order  to  use  the  machine  you  have  purchased. 
Please carefully comply with the instructions given in the manual and carefully read all its parts.  
Keep the manual in a suitable place so that it remains in a perfect condition. 
 
Following improvements or variations  to  the appliances,  the contents of this  manual  may be liable to 
modification without prior notice or other obligations. 
 
This  manual  contains  an  installation  form  which  must  be  fully  filled  out  by  the  technician  when  he 
installs the machine. 
This form will be considered the reference certificate that validates the warranty. It must be sent back 
to us along with the printer coupon and warranty form. 
 
Duplication or translation of any part of this manual is forbidden unless prior written authorization has 
been obtained from the Manufacturer. 


Table of contents: 


1. INTRODUCTION

 ..................................................................................................................................................................... 3


2. TECHNICAL SPECIFICATIONS

 ........................................................................................................................................... 4


3. 


GENERAL RECOMMENDATIONS

 ............................................................................................................................... 6


3.1 


Regulations for the operator ........................................................................................................................................... 6


4. LOCATION OF THE CONTROLS

 .......................................................................................................................................... 7


5. STARTING AND SETTING AT WORK

 .................................................................................................................................. 9


5.2


Installation and preliminary inspections ....................................................................................................................... 10


6. GENERAL INSTRUCTIONS FOR USE

 ............................................................................................................................... 11


6.1  Method of use .................................................................................................................................................................... 11


6.2   End of work ...................................................................................................................................................................... 11


7.HOW TO ARRANGE THE INSTRUMENTS FOR THE STERILIZING PROCESS

 ......................................................... 12


7.1   Standard sterilizing ........................................................................................................................................................... 12


7.2   Sterilzing handpieces ........................................................................................................................................................ 12


7.3 Messaggi visualizzati dal display ....................................................................................................................................... 12


8. STERILIZING CYCLES

......................................................................................................................................................... 13


8.3 Sterilizing table .................................................................................................................................................................. 13


8.2 Notes and warnings ............................................................................................................................................................ 14


9. FAULTS

 .................................................................................................................................................................................. 15


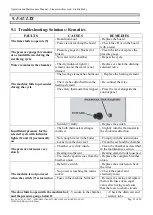
9.1  Troubleshooting: Solutions / Remedies ............................................................................................................................. 15


Summary of Contents for M 9010/56

Page 1: ...Cod 4073 Operation and maintenance manual STEAM AUTOCLAVE MODEL STERILX BABY GB...

Page 2: ...d out by the technician when he installs the machine This form will be considered the reference certificate that validates the warranty It must be sent back to us along with the printer coupon and war...

Page 3: ...uge warning lights and by the position of the controls SYMBOLS AFFIXED TO THE MACHINE WARNING IDENTIFIES A HEAT SOURCE A PART COULD BE DANGEROUSLY HOT WARNING IDENTIFIES A GENERIC DANGER THERE COULD B...

Page 4: ...Five minute final drying phase Switch to select the 121 or 134 cycle Fully visible water filling from the top Built in drying cycle with evaporation system Continuous venting of the air in the chambe...

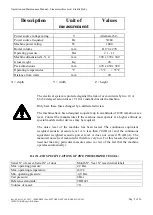
Page 5: ...ged by a skilled electrician The machines have been designed to operate up to an altitude of 1200 mm above sea level Contact the manufacturer if the machine must operate at a higher altitude as specia...

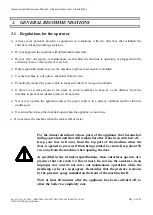
Page 6: ...ne to prevent accidental contact with hot parts Never ever operate the appliance unless the power cable is in a perfect condition and the structure undamaged It is advisable to keep the door half open...

Page 7: ...rticular preparations are required to operate the machines Just fit the plug into a 230 V power socket The power draw of the machines is 1500 Watt The control panel is elegantly designed easy to read...

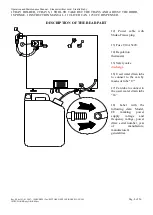
Page 8: ...MANUAL 1 10 LITER CAN 1 250 CC DISPENSER DESCRIPTION OF THE REAR PART 12 Power cable with Shuko France plug 13 Fuse T10A 5x20 14 Regolation thermostat 15 Safety valve discharge 16 Used water drain tu...

Page 9: ...iately notify our dealer if discrepancies are discovered Keep the packing materials for as long as the machine remains in use not just for the warranty period This is because the autoclave may need to...

Page 10: ...ll the autoclave in a well ventilated place well away from sinks heat sources grinders and from all other machines that create vibrations and or dust Place the autoclave delicately on to a perfectly f...

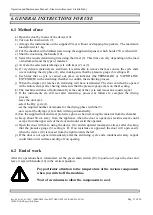
Page 11: ...er having made sure that the pressure gauge 6 is on the setting k The machine switches off automatically at the end of the cycle and issues an acoustic signal l If the instruments are still wet after...

Page 12: ...ruments must be sterilized it is advisable to cover the trays with a paper or fabric napkin to prevent direct contact with the tray surface do not place the instruments straight on to the trays 8 Scis...

Page 13: ...1 2 2 1 2 2 2 1 2 2 1 1 1 2 Drying minutes 5 5 5 5 5 Sterilizing minutes with machine hot 23 33 18 23 23 Sterilizing minutes with machine cold 25 35 20 25 25 Max load Kg 1 1 1 1 0 5 Materials metallic...

Page 14: ...mply with the sterilizing parameters indicated by the current standards in force If the autoclave is used to sterilize instruments contaminated by CREUTZFELDT JAKOB s disease use the 134 cycle and ste...

Page 15: ...has tripped Press the reset alongside the control panel Switch 7 faulty Replace the switch Insufficient pressure for the selected cycle with indicator lights 2 and 3 permanently on The bulb thermostat...

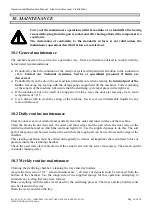
Page 16: ...leave the door ajar and store it at a room temperature of 8 C Use a damp cloth to clean the casing of the machine Never ever use inflammable liquids for any reason whatsoever 10 2 Daily routine maint...

Page 17: ...autoclave to operate in a regular way the manufacturer advises users to carry out a functional test to ensure that the temperature and pressure parameters of the machine comply with the standards req...

Page 18: ...Operation and Maintenance Manual Steam sterilizer mod Sterilix Baby Rev 00 del 03 01 2007 SERVER2012 oo SETTORE DENTALE BABY MANUALI ISTRUZIONE Baby GB R00 doc Pag 18 of 26 ELECTRICAL SYSTEM...

Page 19: ...Operation and Maintenance Manual Steam sterilizer mod Sterilix Baby Rev 00 del 03 01 2007 SERVER2012 oo SETTORE DENTALE BABY MANUALI ISTRUZIONE Baby GB R00 doc Pag 19 of 26 HYDRAULIC PLANT...

Page 20: ...mostato automatico 1 25 3968 Porta tray 1 9 3937 Resistenza 500W 1 24 1730 Manometro 40 1 8 3862 Fusibile 20x4 F1A 1 22 0339 Micro interruttore 1 7 4787 Termostato bimetallico 1 21 2853 Pressostato 2...

Page 21: ...by fax to the number 0039 522 875579 and please wait the authorization for the shipment that must be with your agent at your charge 2 Unauthorized or not agreed shipments won t be accepted 3 Empty bo...

Page 22: ...with all the conditions ensuring that the appliance is correctly installed in compliance with sect 5 1 of the instruction manual The installer also declares that he has duly trained the user to opera...

Page 23: ...possessing manufacturing defects with the exclusion of expenses for Transfers Call rights Mileage reimbursement Shipment Replaced parts shall be returned free port The ordering party shall be charged...

Page 24: ...ATURE AND STAMP Via Don Luigi Sturzo 6 42021 BARCO DI BIBBIANO Reggio Emilia ITALY THIS PART OF THE CERTIFICATE MUST BE SENT BACK BY REGISTERED LETTER WITHIN 8 DAYS FROM THE DATE OF PURCHASE WARRANTY...

Page 25: ...TO WHOM THE SERIAL NUMBERS OF THE CONSIGNED AUTOCLAVES ARE ASSOCIATED IT MUST ALSO BE POSSIBLE TO TRACE THE AUTOCLAVES THE SERIAL NUMBER OF THE MACHINE MUST CORRESPOND TO THE END USER CUSTOMER EVEN WH...

Page 26: ...MACHINE POUR STERILISER A VAPEUR STEAM STERILIZER MACHINE ESTERILIZADORAS DE VAPOR DAMPFSTERILISATOREN Mod M9010 56 Art STERILIX BABY La Reverberi s r l dichiara sotto la propria responsabilit che i...

Reviews: