background image

13 

Technical parameters 

Product model 

WKSU4

6

-19 

Voltage/frequency 

220V

/60Hz 

Refrigerant/weight 

R600a/35g 

Effective volume 

129 L 

Loading capacity 

46 bottles 

Net weight 

47kg 

Unit dimension 
(WxDxH) 

595X570X865 mm 

Packing dimension 
(WxDxH) 

660×625×925 mm 

Remarks


1. The Net weight includes shelves and the Unit dimension is without

handle on the door.

2. The manufacturer reserves all the rights to change the above

parameters without prior notice. Please refer to the nameplate of your
appliance.

3. Loading capacity will vary in terms of different way of bottle

arrangement or different bottle sizes (standard Bordeaux with 750ml
is applied here).

Summary of Contents for WKSU46-19

Page 1: ... User manual Wine Cooler WKSU46 19 Inhalt im Lieferumfang nicht enthalten Content not included JCF 145S NEG Novex Großhandelsgesellschaft für Elektro und Haustechnik GmbH Chenover Str 5 D 67117 Limburgerhof fi220907atNEG www respekta info D GB ...

Page 2: ... dem Schutz des Benutzers und dem Gerät dienen und einem aktuellen technischen Standard entsprechen Sollten Sie trotz unserer eingehenden Qualitätskontrolle einmal etwas zu beanstanden haben so wenden Sie sich bitte an den Kundendienst Dieser wird Ihnen gerne weiterhelfen CE Konformitätserklärung Der Hersteller der des hierin beschriebenen Produkte s auf welche s sich diese Erklärung bezieht erklä...

Page 3: ...und es möglichen Geräte Folgebesitzern weitergeben können Sie haben ein gutes Gerät gewählt welches Ihnen bei sachgerechter Bedienung und Wartung viele Jahre dienen wird Unsere Geräte sind für den Gebrauch im Haushalt ausgelegt Dieses Symbol auf dem Produkt oder seiner Verpackung weist darauf hin dass dieses Produkt nicht als normaler Haushaltsabfall zu behandeln ist sondern an einem Sammelpunkt f...

Page 4: ... dürfen nicht von Kindern ohne Aufsicht durchgeführt werden Kinder im Alter von 3 bis 8 Jahren dürfen Kühlgeräte be und entladen Kinder sollten beaufsichtigt werden um sicherzustellen dass sie nicht mit dem Gerät spielen Dieses Gerät ist AUSSCHLIESSLICH FÜR DEN GEBRAUCH IM HAUSHALT und nicht für den gewerblichen oder industriellen Gebrauch bestimmt WARNUNG Halten Sie Lüftungsöffnungen im Gerätegeh...

Page 5: ...in Wasser auf das Gerät und waschen Sie das Gerät nicht indem Sie Wasser eingießen oder einfüllen Wenn die Isolierung beschädigt ist besteht Stromsch laggefahr Vorsicht vor Verletzungen Berühren Sie nicht die Oberfläche der Auskleidung im Inneren des Fachs insbesondere nicht mit nassen Händen es könnten Erfrierungsverletzung entstehen während das Gerät in Betrieb ist DieTür nicht für längere Zeit ...

Page 6: ...zkabel und treten Sie nicht absichtlich auf das Kabel Verlegen Sie das Netzkabel an der richtigen Stelle wenn Sie das Gerät bewegen Wenn das Netzkabel beschädigt ist Verwenden Sie kein beschädigtes Netzkabel und lassen Sie es sofort vom für das Gerät zuständigen Kundendienst oder von einem qualifizierten Elektriker ersetzen Verlängern Sie bei Bedarf das Netzkabel durch einen qualifizierten Elektri...

Page 7: ...n Der Griff wird in einer Verpackung zusammen mit den Schrauben im Gerätekarton geliefert 1 Legen Sie die zwei kleinen Löcher am Türrahmen von der Innenseite frei indem Sie die Türdichtung etwas herausziehen 2 Richten Sie den Griff auf die Löcher im Türrahmen führen Sie die Schrauben von innen ein und schrauben Sie sie mit einem Schraubendreher fest 3 Drücken Sie die Türdichtung wieder an um die S...

Page 8: ...en Sie die Tür langsam nach außen folgen Sie der Pfeilrichtung in Fig 2 um das untere Scharnier zu lösen und ziehen Sie die Tür langsam nach unten bis Sie sie vom oberen rechten Scharnier lösen können und nehmen Sie die untere Scharnierplatte aus dem Türachsenloch Fig 2 Oberes rechtes Scharnier rechtes unteres Scharnier vom Schrank abschrauben Bewahren Sie sie für den alfälligen Bedarf im Polybeut...

Page 9: ...rt Drehen Sie die Tür um 180 Grad auf den Kopf und führen Sie die untere Scharnierplatte an das untere Türachsenloch Bringen Sie das obere Türachsenloch am oberen linken Scharnier an und setzen Sie die untere Scharnierplatte langsam auf das linke untere Scharnier und halten Sie die Tür stabil Verschrauben Sie das linke untere Scharnier mit der Platte Die Türumkehr ist beendet ...

Page 10: ...erte Schaumstoffpolster 酒柜结 构及安装示意图 Stellen Sie das Gerät nicht an einem nassen Ort auf StellenSie das Gerät nicht an einem Ort auf an welchem Gefriertemperaturen vorkommen können Setzen Sie das Gerät nich direkter Sonneneinstralung oder Ragen aus Das Gerät ist so konzipiert dass es entweder unter der Theke eingebaut oder freistehend auf dem Boden aufgestellt werden kann Unterbaumasse Weinflaschen...

Page 11: ...rohr gut angeschlossen ist Einzelheiten finden Sie unter Pflege und Reinigung 2 Gerät aufstellen Stellen Sie das Gerät vor dem Einschalten mindestens 30 Minuten lang auf einen festen und trockenen Boden 3 Einschalten Das Gerät nimmt nach dem Einschalten den Betrieb auf und kühlt nach 1 Stunde im Inneren ab ansonsten sollten Sie die Stromverbindung überprüfen ...

Page 12: ...7HPSHUDWXU 7HPSHUDWXU UK KXQJ U FNHQ 6LH GLH 7DVWH HLQPDO GDV Q HLJH EOLQNW UHJHOPl LJ XQG HLJW GLH DNWXHOO HLQJHVWHOOWH 7HPSHUDWXU DQ U FNHQ 6LH ZHLWHU XP GLH HLQJHVWHOOWH 7HPSHUDWXU DQ XSDVVHQ HLQPDO GU FNHQ XP đ X HUK KHQ 5HJHOPl LJHV OLQNHQ ZLUG QDFK 6HNXQGHQ EHHQGHW ZHQQ NHLQ U FNHQ HUNDQQW ZLUG XQG GLH QHX HLQJHVWHOOWH 7HPSHUDWXU ZLUG JHVSHLFKHUW LH Q HLJH NHKUW XU FN XP GLH WDWVlFKOLFKH 7HP...

Page 13: ...WHUH RQH NDQQ GLH KOWHPSHUDWXU YRQ đ đ HLQJHVWHOOW ZHUGHQ EHU GLH 7HPSHUDWXU GHU XQWHUHQ RQH LVW JOHLFK RGHU K KHU DOV GLH GHU REHUHQ RQH ODUPWRQ HQQ HLQH 6 VWHPVW UXQJ DXIWULWW XQG HLQ ODUPWRQ HUW QW GU FNHQ 6LH HLQH EHOLHELJH 7DVWH DXI GHP HGLHQIHOG XP GHQ ODUPWRQ DE XEUHFKHQ XVIDOO GHV 7HPSHUDWXUVHQVRUV HQQ GHU 7HPSHUDWXUVHQVRU DXVIlOOW ZLUG HLQ HKOHUFRGH DQJH HLJW I U HHUODXI I U XU VFKOXVV ...

Page 14: ... ausgelegt Mehr als 2 Lagen Flaschenanordnung auf einem Regal werden nicht empfohlen Jedes Regal mit Gleitrolle kann teilweise herausgezogen werden um Weinflaschen einfach einzulagern Öffnen Sie die Tür weit genug bevor Sie Regale herausziehen Wenn der Weinkühlschrank längere Zeit nicht belastet wird wird empfohlen ihn auszuschalten sorgfältig zu reinigen und die Tür zum Lüften zu öffnen Die folge...

Page 15: ...ellung anpassen Halten Sie das Gerät von Sonnenlicht oder Hitze fern Bitte öffnen Sie die Tür nicht zu häufig Unangenehme Gerüche im Schrank Ein leichter Plastikgeruch bei neu gekauften Geräten ist normal und verfliegt nach kurzer Zeit Fach reinigen und einige Stunden lüften Kondenswasser an der Glastür Bitte öffnen Sie die Tür nicht häufig oder für längere Zeit Bitte stellen Sie die Temperatur ni...

Page 16: ...fällen die notwendigen Maßnahmen um Ihren Wein zu schützen Lange Zeit außer Betrieb Entfernen Sie alle Flaschen aus dem Gerät schalten Sie es aus tauen Sie es ab reinigen Sie es trocknen Sie es und lassen Sie die Tür offen um Schimmelbildung im Gerät zu vermeiden Nach Beendigung eines Stromausfalls müssen Sie mindestens fünf Minuten warten bevor Sie das Gerät wieder einschalten Bewegen des Geräts ...

Page 17: ...T 925 x 660 x 625 mm Bemerkungen 1 Das Gewicht beinhaltet Einlegeböden und die Gerätetefe ist ohne Griff an der Tür angegeben 2 Der Hersteller behält sich alle Rechte vor die oben genannten Parameter ohne vorherige Ankündigung zu ändern Bitte beachten Sie das Typenschild Ihres Gerätes 3 Die Ladekapazität variiert je nach Flaschenanordnung oder unterschiedlichen Flaschengrößen obige Angaben beziehe...

Page 18: ...in der Abbildung markierten Schrauben mit denen die LED Platine befestigt ist ersetzen Sie die defekte LED Lampe und installieren Sie LD Platine wieder a Lösen Sie die 4 Befestigungsschrauben der oberen Abdeckplatte der mittleren Trennplatte und nehmen Sie die obere Abdeckplatte ab Hinweis Die obere Abdeckplatte sollte in der höchsten Position herausgezogen werden da sie sonst durch die Rahmenleis...

Page 19: ...Für Leuchtmittel wird in keinem Fall Garantie gewährt Der Garantieanspruch ist vom Käufer durch Vorlage der Kaufquittung nachzuweisen Die Garantiezusage ist gulping innerhalb der Bundesrepublik Deutschland WARRANTY CONDITIONS for household big appliances The manufacturer does not take any responsibility for damage caused by the buyer This device has been manufactured and tested according to the la...

Page 20: ...manufacturer reserves the right to make any necessary model modifications to the device types that are designed to provide user friendliness and protection for the user and the device and that comply with a current technical standard Should you ever have anything to complain about despite our thorough quality control please contact the customer service He will be glad to help you Declaration of co...

Page 21: ...ss it on to any owners You have chosen a good appliance which will give you many years of excellent service if properly operated and maintained Our appliances are not intended for commercial usage They are designed only for domestic use This symbol on the product or its packaging indicates that this product is not to be treated as normal domestic waste but must be disposed of through a special col...

Page 22: ...ed from 3 to 8 years are allowed to load and unload refrigerating appliances Children should be supervised to ensure that they do not play with the appliance This appliance is intended for HOUSEHOLD USE ONLY and not for commercial or industrial use Keep ventilation openings in the appliance enclosure or in the built in structure clear of obstruction Do not use mechanical devices or other means to ...

Page 23: ...tment or touch metal components at rear of the appliance in case of possible injury Keep away from water Do not spray water on the appliance or wash the appliance by pouring or filling water in case of invalid insulation and possible electric shock Be careful of freezing Do not touch surface of the liner inside the compartment especially with wet hand in case of frozen injury while the appliance i...

Page 24: ...Do not damage the power cord Do not disconnect the appliance by pulling power cord rather than pulling the plug Do not set the appliance above the power cord or step on the cord intentionally Put the power cord at right place when moving the appliance When the power cord is damaged Do not use damaged power cord and get it replaced immediately by manufacturer service agent or by qualified electrici...

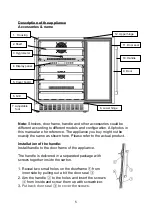
Page 25: ...of the handle Install handle to the door frame of the appliance The handle is delivered in a separated package with screws together inside the carton 1 Reveal two small holes on the doorframe from inner side by pulling out a bit the door seal 2 Aim the handle to the holes and insert the screws from inside and screw them up with screwdriver 3 Put back door seal to cover the screws 1 Housing 2 Shelf...

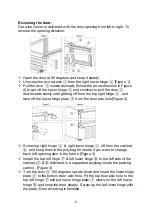
Page 26: ...te from the door axis hole Figure 2 Screw top right hinge right lower hinge off from the cabinet and keep them in the polybag for needs if you want to change back left opening door in the future Figure 3 Install the top left hinge left lower hinge to the left side of the cabinet delivered in a separated polybag inside the packing carton Figure 4 Turn the door 180 degrees upside down and insert the...

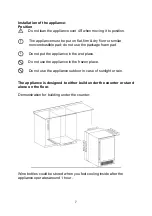
Page 27: ...e foam pad 酒柜结构及安装示意图 Do not put the appliance in the wet place Do not use the appliance in the frozen place Do not use the appliance outdoor in case of sunlight or rain The appliance is designed to either build under the counter or stand alone on the floor Demonstration for building under the counter Wine bottles could be stored when you feel cooling inside after the appliance operates around 1 h...

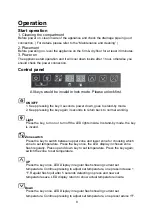
Page 28: ...n back to normal working Light Press the key turn on or turn off the LED lights inside In stand by mode the key is invalid Zone switch Press the key to switch between upper zone and lower zone for choosing which zone to set temperature Press the key once the LED display in chosen zone flash regularly Press up and down key to set temperature Press the key again switch the zone to set temperature UP...

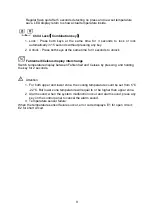
Page 29: ...hrenheit Celsius display interchange Switch temperature display between Fahrenheit and Celsius by pressing and holding the key for 2 seconds Attention 1 For both upper and lower zone the cooling temperature could be set from 5 22 But lower zone temperature will equal to or be higher than upper zone 2 Alarm sound when the system malfunction occur and alarm sound press any key on the control panel t...

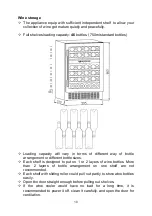
Page 30: ...ottle arrangement or different bottle sizes Each shelf is designed to put on 1 or 2 layers of wine bottles More than 2 layers of bottle arrangement on one shelf are not recommended Each shelf with sliding roller could pull out partly to store wine bottles easily Open the door straight enough before pulling out shelves If the wine cooler would have no load for a long time it is recommended to power...

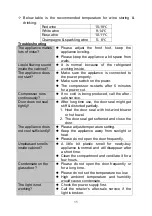
Page 31: ...vice Door does not seal tightly After long time use the door seal might get stiff distorted partially 1 Heat the door seal with hot wind blower or hot towel 2 The door seal get softened and close the door The appliance does not cool sufficiently Please adjust temperature setting Keep the appliance away from sunlight or heat Please do not open the door frequently Unpleasant smells inside cabinet A ...

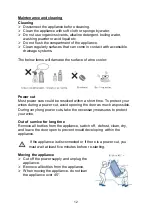
Page 32: ...be resolved within a short time To protect your wines during a power cut avoid opening the door as much as possible During very long power cuts take the necessary measures to protect your wine Out of service for long time Remove all bottles from the appliance switch off defrost clean dry and leave the door open to prevent mould developing within the appliance If the appliance is disconnected or if...

Page 33: ... dimension WxDxH 660 625 925 mm Remarks 1 The Net weight includes shelves and the Unit dimension is without handle on the door 2 The manufacturer reserves all the rights to change the above parameters without prior notice Please refer to the nameplate of your appliance 3 Loading capacity will vary in terms of different way of bottle arrangement or different bottle sizes standard Bordeaux with 750m...

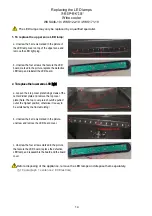
Page 34: ...one LED lamp a Unscrew the 3 screws marked in the picture of the LED lamp cover on top of the upper zone and remove the LED light plug b Unscrew the four screws that secure the LED board marked in the picture replace the defective LED lamp and reinstall the LED board 2 To replace the lower zone LED light a Loosen the 4 top cover plate fixing screws of the center divider plate and remove the top co...

Page 35: ...Für Leuchtmittel wird in keinem Fall Garantie gewährt Der Garantieanspruch ist vom Käufer durch Vorlage der Kaufquittung nachzuweisen Die Garantiezusage ist gulping innerhalb der Bundesrepublik Deutschland WARRANTY CONDITIONS for household big appliances The manufacturer does not take any responsibility for damage caused by the buyer This device has been manufactured and tested according to the la...

Reviews: