background image

22

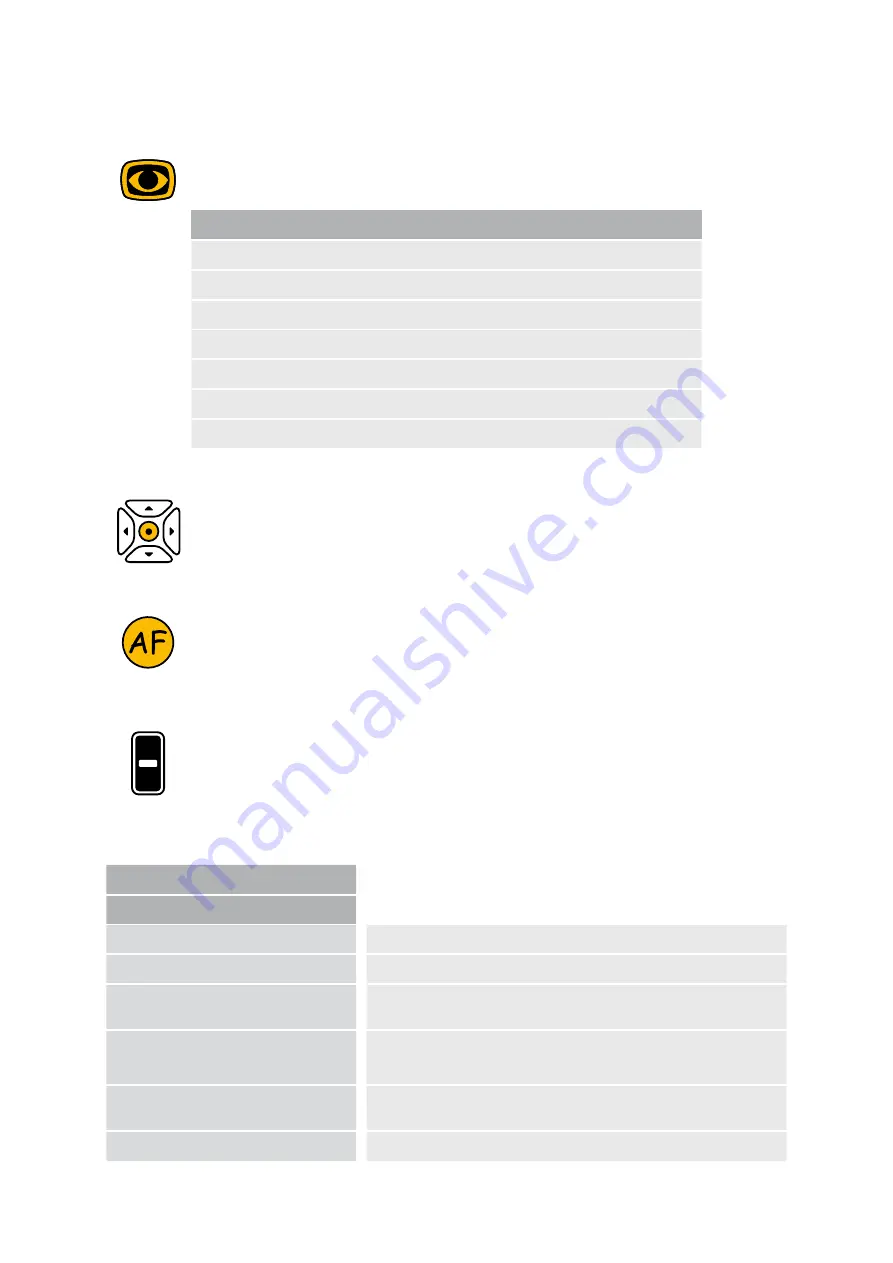
Menu settings distance camera

Opening menu

Press the control button for approx. 5 sec. until the menu window appears 

on the screen. 


Select options


Use the up/down arrow buttons to move the cursor to the option you like 

to change.

Change menu option and confirm

Confirm the selected option with the „Auto-focus“ button. 

Then change the value with the arrow keys „up/down“. 

Then confirm the entry with the „Auto-focus“ control button. 

Change menu option

Alternatively, you can change the selected option directly with the  

„Line marker/shadowing“ control button. 

Menu options

Extended Menu
Image Settings...

Image Rotation

 | 

+90°

 | 

180°

 | 

-90°

Detail enhancement

Adjustment range from 0 to 24

Max. Digital Zoom False

OFF

 | 

Adjustment range from 1,5x to 15,0x

Max. Digital Zoom Real RHC

AF 

Continuous

 | 

Semi-automatic

 | 

Semi-autom. + 

Zoom

 | 

Continuous / Zoom

Return

Extended Menu

Image Settings...
Color Settings...
Preset Settings...
OSD-Messages

          ON

Language

          English

User Menu...
Exit

Summary of Contents for mezzo EDU

Page 1: ...mezzo EDU EN User manual Please read this user manual carefully prior to installation use and maintenance for your own safety and in order to avoid damages at your system ...

Page 2: ...2 ...

Page 3: ...h Hähnlein Email info reineckervision de www reineckervision de VEOVOX VEOVOT24 20 03 2018 Wir erklären in alleiniger Verantwortung für alle unsere Systeme dass diese mit den folgenden Normen oder normativen Dokumenten übereinstimmen We declare under our sole responsibility that the systems which have been brought into the market by us meet the requirements of the following directives Richtlinie 9...

Page 4: ... 8 Power supply 8 Safety instructions to avoid damage 9 II Instructions for the reading system mezzo EDU 10 Delivery content 10 Available Options 10 Cameras 10 Focus camera FullHD camera with digital zoom and comfort auto focus 10 Distance camera FullHD camera with optical and digital zoom 10 Starting with mezzo EDU 10 Mains operation 10 Power ON 10 Power OFF 11 Automatic saving of device settings...

Page 5: ...ng vertical 17 5 button control panel distance camera control 17 Navigation of the distance camera 17 Down 17 Right 17 Saving the position of the distance camera 18 Recall saved positions 18 Function Last position 18 Menu settings mezzo EDU 19 Opening the menu 19 Select menu options 19 Change menu options and confirm 19 Menu options 20 Menu settings distance camera 22 Opening menu 22 Change menu o...

Page 6: ...e avoided the operator of these devices has to be informed that it is necessary to observe the performance of the system to control the conventional use of the system in the chosen set up Electronic devices are sensitive towards electric discharge and towards high frequency electromagnetic fields Attention In order to avoid high frequency disturbances the operator should respect a minimum distance...

Page 7: ...eby legal requirements and determine for formal reasons a period of three years after date of first purchase Note The mentioned life span does not reflect the complete life span of the mezzo EDU It is rather an indication on when the product might be obsolete and substitution might be recommended due to new product developments Safety advice The device has to be installed in closed and dry rooms o...

Page 8: ...he system with a slightly damp cloth and a mild household detergent Interior of device must NOT come in contact with liquids Special advice for transport and storage For reasons of safety the unit must only be transported and stored in the original packing The unit must be stored in dry and closed rooms in the original packing The following conditions for transport and storage have to be respected...

Page 9: ...ry hot or cold environment as this would harm the picture quality 6 Do not operate this device below 5 C or above 40 C 7 No liquids must reach the interior of the system Only operate the device in a dry environment 8 The device may not be operated next to medical devices patients environment 9 Do not lean on the screen touch the screen with any object or lay heavy objects on the device This may ca...

Page 10: ...om approx 2 1 to 24x at monitor 16 class factory settings extended magnification range adjustable in the menu Technology high quality pictures with virtually no picture noise Distance camera FullHD camera with optical and digital zoom Starting with mezzo EDU Mains operation For mains operation make sure that the enclosed power supply unit is connected to the power supply and to the power supply so...

Page 11: ...one by a specialist or by Reinecker Vision GmbH Important note to the use of power supply Please only use the power supply included in the delivery Use of any other power supply will void the warranty Installation of the system Unpack your mezzo EDU carefully and place it on a solid horizontal surface If you have not purchased an optionally available stand that fits to the product you must provide...

Page 12: ... the upright position until the interlock release snaps in Bring the distance camera up until the sub contruction of the distance camera is held by the magnet Operation buttons on the base plate AC input Distance camera Camera internal ...

Page 13: ...itor Due to the monitor s technology contrast and brightness change depending on the angle of view The highly flexible monitor arm enables you to adjust the monitors height and angle according to your best ergonomic position LED light Control bar ...

Page 14: ...switching ON the green power LED above the toggle switch lights up When the device will be turned OFF the latest used settings are saved automatically When switching ON again the latest used settings are recalled Attentions If the base plate is not lit up after switching ON the device please check if the LED light is ON please see next paragraph Light adjustment 50 OFF 100 Press the toggle switch ...

Page 15: ...enu settings ON OFF Press the control button in distance or document mode for approx 5 seconds to access the respective menu settings of the active camera In document mode internal camera you will access the menu of the internal camera In distance viewing mode you will access the menu of the distance camera If you want to leave the menu settings confirm the menu item Exit or hold the control butto...

Page 16: ...ntrol button the screen view is gradually reduced When the control button is pressed continuously the screen view is con tinuously reduced Zoom IN By briefly pressing the control button the screen view is gradually enlarged When the control button is pressed continuously the screen view is continuously enlarged Auto focus ON OFF By briefly pressing and releasing the central zoom button the auto fo...

Page 17: ...f the screen the shadowing will appear from above and below symmetrical Line marker Shadowing vertical Use the plus button to move the line marker to the left Use the minus button to move the line marker to the right As soon as the line marker passes the lower edge of the screen the shadowing will appear from the left and the right symmetrical 5 button control panel distance camera control The 5 b...

Page 18: ...osition press and hold it Pos 1 4 Recall saved Positions Alternative 1 Press the yellow control button quickly one after the other and release it at the desired memory position Pos 1 4 The distance camera then moves to the saved camera position Alternative 2 First press the yellow control button briefly and then quickly press the desired position button Pos 1 4 The distance camera then moves to th...

Page 19: ...ou like to change Change menu options and confirm Confirm the selected option with the Auto focus button Then change the value with the arrow keys up down Then confirm the entry with the Auto focus control button Main Menu Color saturation 50 Language English AF Modus auto Min Magnification Standard Max Magnification Standard Mains Frequency 50Hz Monitor Brightness 80 Reset to Factory Settings Adv...

Page 20: ... Confirm selection to enter advanced settings please see overview Exit Overview Advanced Settings Color Combination Setup Color Ruler Mask Transparency OSD Messages Reflection Filter Save User Settings Recall User Setting Change factory Setup Return Main Menu Advanced Settings Color Combination Setup Color Combinations 1 6 Mode Disabled Full Colour Greyscale False Colour Foreground Black Red Green...

Page 21: ... colour 2 Blue Adjustment range from 0 to 31 Return Main Menu Ruler Mask Settings Color Ruler Red Adjustment range from 0 to 31 Green Adjustment range from 0 to 31 Blue Adjustment range from 0 to 31 Return Main Menu Advanced Settings Mask Transperancy 50 25 0 OSD Messages ON OFF Anti Reflecion Mode ON OFF Save user Settings Press button Auto focus to save the user settings Recall User Settings Pre...

Page 22: ...n Then confirm the entry with the Auto focus control button Change menu option Alternatively you can change the selected option directly with the Line marker shadowing control button Menu options Extended Menu Image Settings Image Rotation 0 90 180 90 Detail enhancement Adjustment range from 0 to 24 Max Digital Zoom False OFF Adjustment range from 1 5x to 15 0x Max Digital Zoom Real RHC AF Continu...

Page 23: ...t Settings Function 1 Zoom Tele Zoom Wide Auto Focus Focus Near Focus Far Mask ON OFF Function 2 Zoom Tele Zoom Wide Auto Focus Focus Near Focus Far Mask ON OFF Function 3 Zoom Tele Zoom Wide Auto Focus Focus Near Focus Far Mask ON OFF Restore Default Settings Confirm to recall standard settings Use Alternative Settings Confirm to recall alternative settings Return Extended Menu OSD Messages ON OF...

Page 24: ...om 50 to 50 Color Saturation Adjustment range from 50 to 50 Ruler Mask OFF Line marker and shadowing disabled Ruler Line marker active Mask Shadowing active Return Main Menu Ruler Mask Ruler Mask OFF Line marker and shadowing disabled Line marker Line marker active Shadowing Shadowing active Ruler position 0 to 100 Line marker is adjustable Mask position 0 to 100 Shadowing reducable Ruler Mode Hor...

Page 25: ... all of the monitor Mask Transparency 50 25 0 Return Main Menu Ruler Mask Ruler Color Red Adjustment range from 0 to 31 Green Adjustment range from 0 to 31 Blue Adjustment range from 0 to 31 Return Main Menu AF Mode Continuous Semi automatic Semi autom Zoom Continuous Zoom Reset to factory settings Confirm selection to the reset to factory settings Reset to User Settings Confirm selection to the r...

Page 26: ...Red Green Blue Yellow Magenta Cyan White User 1 User 2 Background Black Red Green Blue Yellow Magenta Cyan White User 1 User 2 Swap Fore Background Confirm selection to change viewing mode Return Advanced Settings Color Combination Setup User Colors User Color 1 Red Adjustment range from 0 to 31 User Color 1 Green Adjustment range from 0 to 31 User Color 1 Blue Adjustment range from 0 to 31 User C...

Page 27: ...dvanced Settings Sharpness Settings Real Color Sharpness Adjustment range from 0 to 24 False Color Sharpness Adjustment range from 0 to 24 Return Advanced Settings OSD Messages ON OFF Special Settings Confirm selection to go to special settings see overview Zurück Overview Special Settings Zoom Extension Ein Max Digital Zoom 3 5x Customize Buttons Store User Settings Recall User Settings Reset to ...

Page 28: ... Focus Near Fokus Far Auto Exposure 2nd Up Disabled Zoom Tele Zoom Wide Brightness Brightness False colour 2 Layer Overview mode Auto focus Focus Near Fokus Far Auto Exposure 2nd Down 2nd Left 2nd Right Return Special Settings Store User Settings Confirm selection to save user settings Recall User Settings Confirm selection to recall user settings Reset to Factory Settings Confirm selection to res...

Page 29: ...om camera settings Crosshair OFF ON Speed Left Adjustment range from 1 to 100 Speed Right Adjustment range from 1 to 100 Speed Up Down Adjustment range from 1 to 100 Zoom dependance Adjustment range from 0 to 150 Speed Blackb Scan Adjustment range from 1 to 99 Line Height Blackb Scan Adjustment range from 1 to 99 Reinitialize Head Confirm selection to initialize distance camera Return ...

Page 30: ...aturation and camera lighting Battery does not charge or battery charging indicator does not light Check that the power supply is correctly connect ed to the mains socket and that the adapter cable is correctly connected to the mezzo EDU Technical details mezzo EDU 16 class monitor LED flat screen monitor 16 class monitor ca 41 cm 1366 x 768 pixel Weight approx 6 5 kg Measurements WxHxL expanded a...

Page 31: ...nvalidation of the warranty 4 Interventions from persons other than Reinecker Vision GmbH authorised specialists may lead to invalidity of warranty 5 Partial warranty is valid for light sources serving to illuminate the reading object batteries and other parts subject to wear and tear 6 If a warranty claim is necessary the system has to be returned to the manufac turer in Alsbach Hähnlein or to yo...

Page 32: ...Notes ...

Page 33: ......

Page 34: ......

Page 35: ...Type mezzo EDU MEZEDU01 Serial number Manufacturer Reinecker Vision GmbH Final examination Power supply 100 VAC 240 VAC 50 60 Hz With plug in power supply 12V DC 5000mA Power consumption max 80 watt ...

Page 36: ...e service is necessary please contact your authorized distributor Reinecker Vision GmbH Zentrale Vertrieb Kundenberatung Sandwiesenstraße 19 64665 Alsbach Hähnlein Kundendienst Erlenweg 3 64665 Alsbach Hähnlein Tel 49 6257 9311 0 Fax 49 6257 9311 8230 Email info reineckervision de www reineckervision com Bitte wenden Sie sich bei Fragen oder einem Servicefall direkt an unser Hauptwerk in Alsbach H...

Reviews: