P/N D91000146-001 Ver. 2.2 Rev. F
Quick Start Guide
Page 1
This Quickstart Guide provides instructions for basic setup of a
Mega
Plus
II
camera and
Mega
Plus
II
Central Control Software. For
additional information, please consult the
Mega
Plus
II
User’s
Manual.
Equipment Required for Setup
User Supplied items:
•
PC running: Windows XP, Windows 2000 Pro (SP2) or Windows
NT 4.0 or higher
•
Ethernet cable (for firmware updates)
Interface Option and Accessories A or B:
A.
IEEE-1394 Firewire interface OHCI compliant host
Controller, supporting 400 Mbps or S400 transfers,
4-pin to 4-pin or 4-pin to 6-pin Firewire cable that is 14 feet or
shorter
B.
CameraLink Framegrabber hardware and software,
CameraLink cable(s)
Optional: RS-232 serial for camera control only
Redlake Package Contents:
•
Camera Controller with one or four head connectors
•
Software Developers Kit (SDK)
•
NI-IMAQ IEEE 1394 Drivers version 2.0 or higher (download
upgrades from the NI website at http://www.ni.com)
•
CD with User’s Manual and
Mega
Plus
II
Central Software
•
Power Supply
•
Camera Head(s)
•
Camera Head cable(s)
Hardware Setup
Firewire
Before proceeding with the installation, make sure that your IEEE
1394 controller interface is installed and operating properly. You
can verify that the system has identified the controller by checking
in the Microsoft Windows Device Manager.
Caution: Make sure the
Mega
Plus
II
Camera Controller power
switch is turned to the OFF position before connecting the
cables!
1.
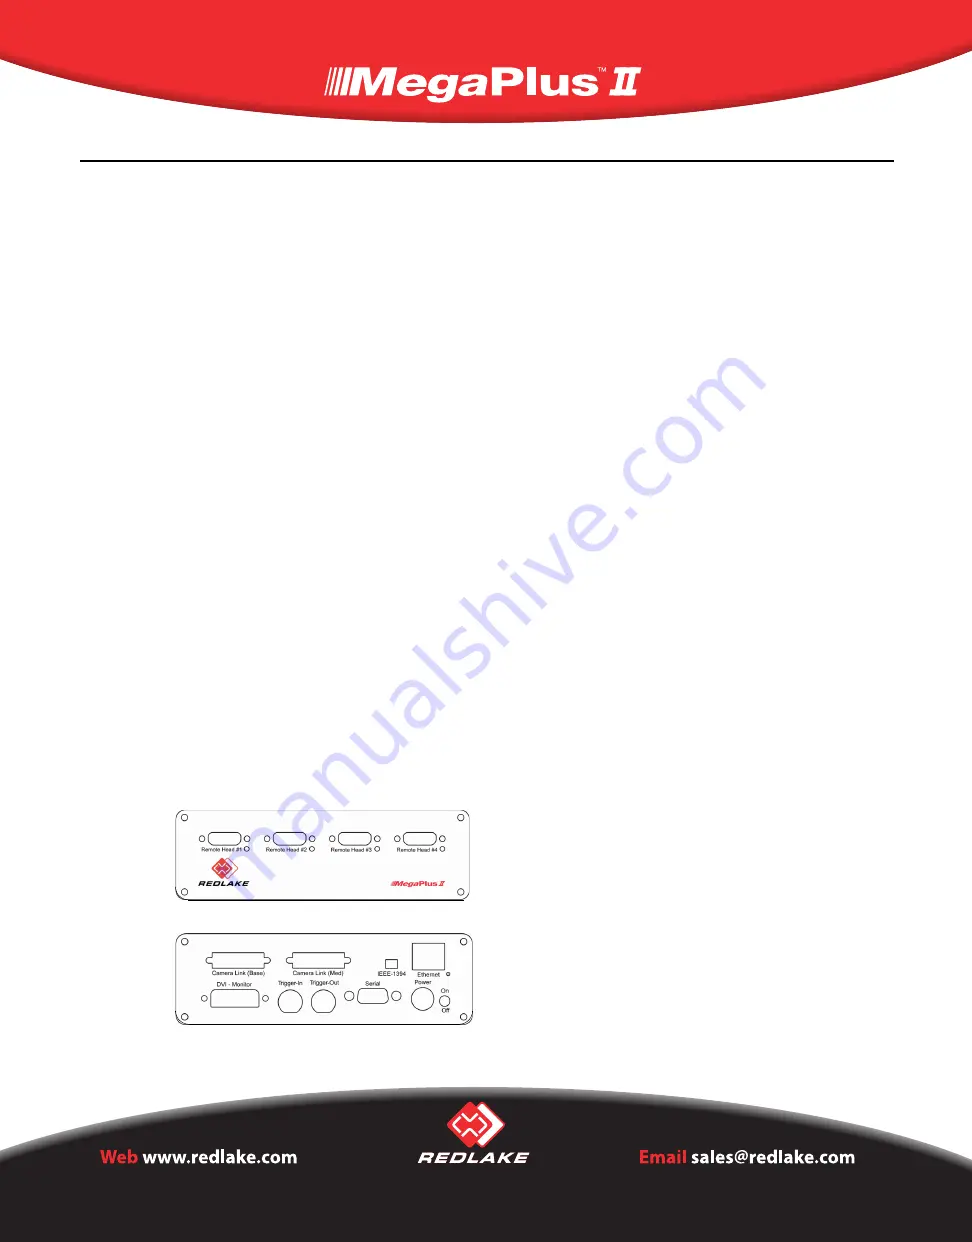
Connect
the cable
from the
Camera
Head to
the
camera
port
labeled
Remote
Head #1
on the
Camera
Controller.
Additional Camera Heads can be connected to consecutive
ports as needed. Do not combine EC11000 Camera Head(s) with
other Camera Head models on the same Camera Controller.
2.
If using a EC11000 Camera Head, connect the Camera Head to the
power supply.
3.
Connect an IEEE 1394 cable from the IEEE 1394
connector on the back panel of the Camera Controller to the host
computer.
4.
Connect the Camera Controller to the power supply.
CameraLink Framegrabber
Before proceeding, make sure that your CameraLink framegrabber
hardware and software are installed properly.
1.
Connect the cable from the Camera Head to the camera port
labeled Remote Head #1 on the Camera Controller. Additional
Camera Heads can be connected to consecutive ports as needed.
Do not combine EC11000 Camera Heads with other Camera Head
models on the same Camera Controller.
2.
If using a EC11000 Camera Head, connect the Camera Head to the
power supply.
3.
Connect a CameraLink cable from the CameraLink #1 connector
on the back panel of the Camera Controller to the #1 Connector
of your CameraLink framegrabber.
4.
If necessary, connect a second CameraLink cable from the
CameraLink #2 connector on the back panel of the Camera
Controller to the #2 Connector on the framegrabber.
5.
Connect the Camera Controller to the power supply.
Mega
Plus II firmware version 1.20 and greater, allow the user to
output video via the DVI port of the
Mega
Plus II Camera Controller.
First generation
Mega
Plus II Camera Controllers support only the
analog DVI interface. Later versions of the
Mega
Plus II Camera
Controllers support both the analog and digital interfaces (this
interface is compliant with the Digital Display Working Group, DDWG,
Digital Visual Interface specification, Revision 1.0). Adapters are
available to attach the DVI connector to the 15-pin Sub-D "VGA" port
found on many computer monitors. Software controls for DVI output
are available in
Mega
Plus Central version 1.30 and greater.
Caution: DO NOT use the DVI output option for extended periods
on Camera Controllers that are not equipped with an integrated
cooling fan. Using the DVI output option on a
Mega
Plus II Camera
Controller generates significant heat inside the console.
Software Installation
Firewire
1.
Install the NI-IMAQ for IEEE 1394 Cameras driver. Open the
Measurement and Automation Explorer (MAX) program and turn
on the camera to verify that the camera is properly identified by
the IEEE 1394 hardware and assigned to the proper system driver.
2.
Install the
Mega
Plus
II
Central software by inserting the
Mega
Plus
II
software CD into the computer’s CD-ROM drive. The menu
program should start automatically. If your system does not start
Figure 2: Camera Controller back panel
Figure 1: Camera Controller front panel
Continued on Page 2


