background image


RealWear Navigator 500™ User Guide


Page 21 of 148 


Version 1.1 

2


Features and Specifications 

2.1 

Device Features 

Device Features 

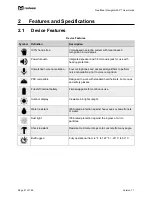
Symbol 

Definition 

Description 


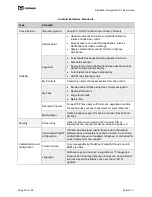
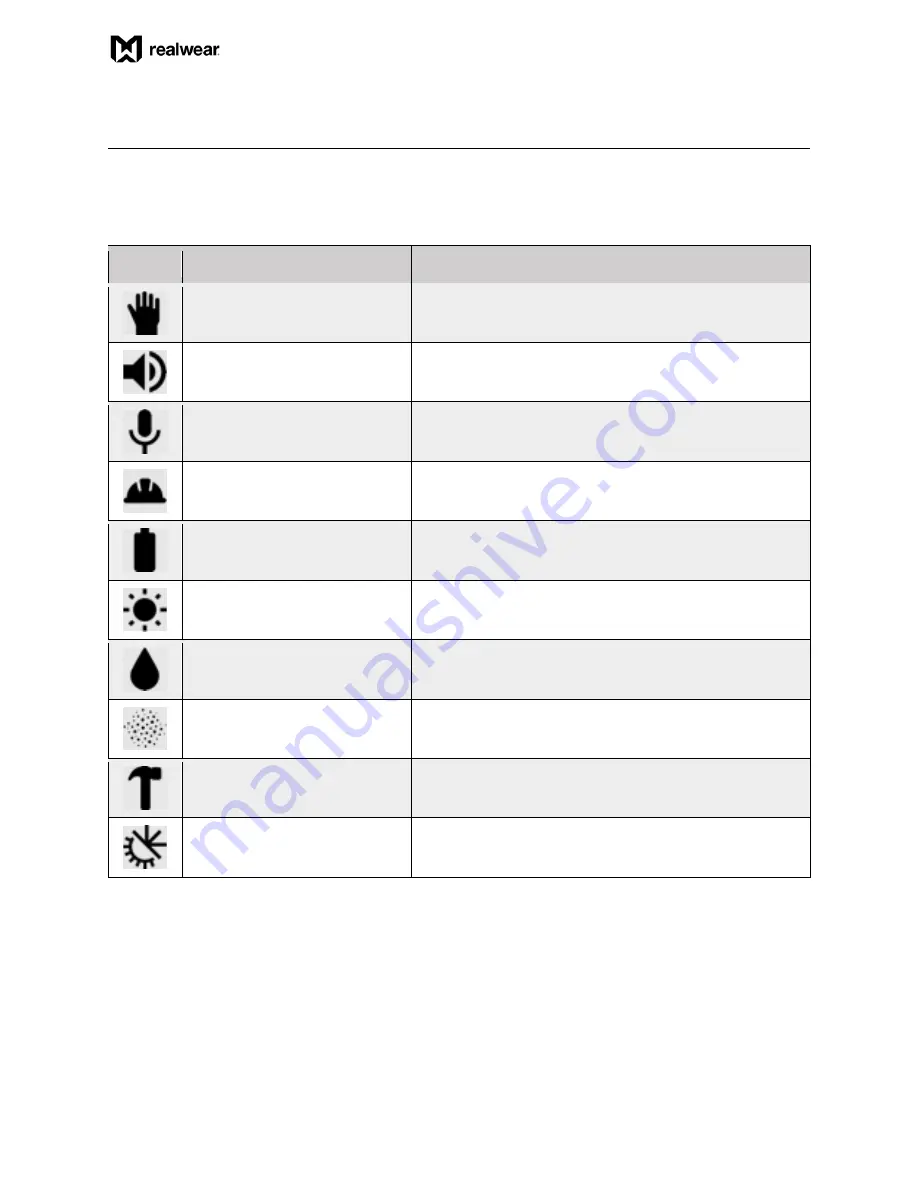
100% hands-free 

Voice-based operating system with local speech 
recognition in loud areas. 


Powerful audio 

Integrated speaker and 3.5mm audio jack for use with 
hearing protection. 


Unmatched noise cancellation 

Four microphones and advanced algorithms to perform 
noise cancellation prior to voice recognition. 


PPE compatible 

Designed to work with standard hard helmets, bump caps 
and safety glasses. 


Full-shift internal battery 

Field swappable for continuous use. 


Outdoor display 

Viewable in bright sunlight. 


Water resistant 

IP66-rated protection against heavy seas or powerful jets 
of water. 


Dust tight 

IP66-rated protection against the ingress of micro 
particles. 


Shock resistant 

Resistant to 2-meter drops onto concrete from any angle. 


Built rugged 

Fully operational from -4° F to 122° F / -20° C to 50° C. 

Summary of Contents for Navigator 500

Page 1: ...RealWear Navigator 500 User Guide Version 1 1 March 9 2022 ...
Page 2: ...500 User Guide Page 2 of 148 Version 1 1 Revision History Revision Date Summary of changes 1 0 December 9 2021 Initial release 1 1 March 9 2022 Warnings edits in chapter 10 page 135 Battery edits in chapter 4 pages 70 71 ...

Page 3: ... Pivot 17 1 2 1 8 Microphone Array 18 1 2 1 9 Speakers 18 1 2 1 10 Battery 19 1 2 1 11 USB C Port 19 1 2 1 12 Auxiliary Jack 20 1 2 1 13 Workband 20 2 Features and Specifications 21 2 1 Device Features 21 2 2 Device Specifications 22 2 3 Software Brief 24 2 3 1 Android Enterprise Support 24 2 4 Device Connectivity 27 2 4 1 Operating Frequency Bands 27 2 4 2 5 Gigahertz Wi Fi Connection Information...

Page 4: ...evice 49 4 1 WearHF Voice Control 49 4 1 1 Say What You See Speech Recognition 49 4 1 2 Anytime Access Help 50 4 1 3 Alternate Speech Recognition 50 4 1 4 Mute Microphone 51 4 2 Microphone Settings 52 4 3 Page Scrolling 53 4 4 Screen Orientation 53 4 5 Notifications 54 4 6 Action and Volume Buttons 55 4 7 Speech Keyboard 56 4 7 1 Remote Keyboard 58 4 7 1 1 Barcode Reader for Remote Keyboard 59 4 7...

Page 5: ... 80 6 2 2 Audio Playback 81 6 2 3 More Options 82 6 2 3 1 Audio Channel 83 6 2 3 2 Audio Quality 83 6 2 3 3 Recording Time 84 6 3 Barcode Reader App 84 6 4 Calculator App 86 6 5 Clock App 86 6 5 1 Alarm Clock 86 6 5 2 Timer 87 6 5 3 Stopwatch 88 6 6 Cloud Sync App 89 6 7 Configuration App 89 6 8 My Camera App 90 6 9 My Controls App 90 6 9 1 Action Button 91 6 9 2 Auto Rotate 92 6 9 3 Bluetooth 92 ...

Page 6: ...1 Accessibility Settings 105 6 13 12 RealWear Settings 106 6 13 13 System Settings 106 6 13 14 About Device 107 6 14 Tetrominos App 107 6 15 Web Apps App 108 6 16 Wireless Update App 108 7 My Camera 109 7 1 Take a Photo 109 7 1 1 Exposure Level 110 7 2 Record a Video 111 7 3 Photo and Video Preview 112 7 4 More Options 113 7 4 1 Aspect Ratio 114 7 4 2 Field of View 115 7 4 3 Frame Rate 115 7 4 4 I...

Page 7: ...ty Instructions 138 11 Device Care 139 11 1 Device Cleaning 139 11 1 1 Battery Cleaning 139 11 1 2 Hard Surface Cleaning 139 11 1 2 1 Display and Camera Cleaning 139 11 1 3 Fabric Cleaning 140 11 1 4 Accessories Cleaning 140 11 1 4 1 Hardhat Clips 140 11 1 4 2 Hearing Protection Ear Buds 140 11 1 4 2 1 Foam Tips 140 11 2 Device Storage 140 12 Ownership Information 141 12 1 Models Covered 141 12 2 ...

Page 8: ...bsorption Rate Information 146 12 4 1 United States Radiation Exposure Statement 146 12 4 2 Europe Radiation Exposure Statement 146 12 4 3 Canada Radiation Exposure Statement 146 12 4 4 Déclaration d exposition aux radiations 147 12 5 Limited Warranty and Software License 147 ...

Page 9: ...creen at arm s length It is an industrial dashboard there when you need it and out of your way when you don t RealWear Navigator works with a vast application ecosystem of over 200 leading apps from our solution partners each optimized for the micro display and voice controlled navigation That means using simple voice commands with no scrolling swiping or tapping Use it for digital workflow remote...

Page 10: ... light 8 Camera 2 Shoulder joint 9 Elbow joint 3 Flashlight 10 Action button 4 Display pod 11 Power button fingerprint sensor 5 Mic A1 Mic A2 on opposite side 12 Speaker 6 Mic B1 Mic B2 on opposite side 13 Side accessory clipping points 7 Boom arm 14 Action Button Action Button Note The display pod is upgradeable at an authorized RealWear Service Center 4 1 5 2 3 6 7 8 9 10 11 12 13 14 ...

Page 11: ...nd 2 Display window 7 Camera module 3 3 5mm audio jack 8 Battery status indicator 4 USB C charging port 9 Dust cover 5 Micro SD card slot cover Note The camera module is a removable modular component For camera removal and installation instructions go to section 1 2 1 4 1 Remove the Camera and section 1 2 1 4 2 Install the Camera respectively 4 1 5 2 3 6 7 9 8 9 ...

Page 12: ...1 2 Action Button The Action Button is the large square button in between the camera and left right buttons A single tap serves as a failsafe method of returning you to your home screen Three quick consecutive taps on the Action Button will toggle the microphone array between front and back configurations 1 2 1 2 1 Left and Right Buttons The left and right buttons next to the Action Button can be ...

Page 13: ...ert a FAT32 formatted micro SD card with a maximum capacity of 512 GB for portable storage Micro SD Card Door 1 2 1 4 Swappable Camera The swappable camera is located above the boom arm and can be pivoted up and down It can capture images photos up to 12MP photos and videos up to 1080p It also includes a built in flashlight that can be controlled with your voice Swappable Camera SD card door SD ca...

Page 14: ... RealWear Navigator The device will not work without a RealWear branded camera or camera cover installed To remove the camera do the following 1 Push the camera latch forward Camera Latch 2 With the camera latch pushed forward lift up on the camera tab Camera Tab 3 With the camera tab released gently pull the camera away from the device Camera tab Camera latch ...

Page 15: ... with the device 3 Press the camera tab down until it snaps securely into place 1 2 1 5 Boom Arm The Boom Arm allows the user to adjust the positioning of the Display Pod and allows for 6 degrees of freedom which means it can be adjusted up and down left and right and forward and back It is comprised of a Shoulder Elbow and Wrist joint imagine the human arm Its orientation can be inverted to allow...

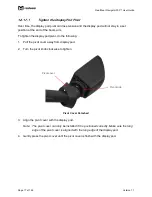
Page 16: ... so the user can see the display clearly The display is an 854 x 480p 24 bit color LCD display with 20 Field of View FOV and 1 meter focal depth Display Pod 1 2 1 7 Display Pod Pivot The display pod can pivot in multiple directions to allow you to view the RealWear Navigator display from the angle you need Display Pod Pivot ...

Page 17: ... pod pivot do the following 1 Pull the pivot cover away from display pod 2 Turn the pivot knob clockwise to tighten Pivot Cover Detached 3 Align the pivot cover with the display pod Note The pivot cover can only be installed if it is positioned correctly Make sure the long edge of the pivot cover is aligned with the long edge of the display pod 4 Gently press the pivot cover until the pivot cover ...

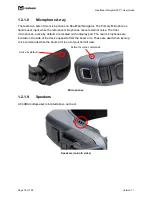
Page 18: ...ones cancel external noise The front microphones active by default are located on the display pod The rear microphones are located on the side of the device opposite from the boom arm These are used when issuing voice commands while the boom arm is out of your field of view Microphones 1 2 1 9 Speakers A 94dBA loudspeaker is located above each ear Speakers on both sides Active by default Active fo...

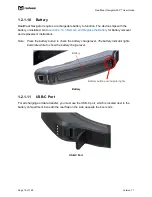
Page 19: ...or battery removal and replacement instructions Note Press the battery button to check the battery charge level The battery indicator lights illuminate white to show the battery charge level Battery 1 2 1 11 USB C Port For all charging and data transfer you must use the USB C port which is located next to the battery compartment beneath the rear flap on the side opposite the boom arm USB C Port Ba...

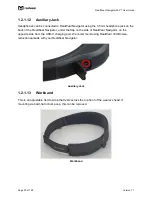
Page 20: ...alWear Navigator under the flap on the side of RealWear Navigator on the opposite side from the USB C charging port We recommend using RealWear 33 dB noise reduction earbuds with your RealWear Navigator Auxiliary Jack 1 2 1 13 Workband This is an adjustable Velcro strap that rests across the top front of the wearer s head If mounting via hard hat or bump cap this can be removed Workband ...

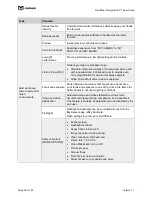
Page 21: ...ophones and advanced algorithms to perform noise cancellation prior to voice recognition PPE compatible Designed to work with standard hard helmets bump caps and safety glasses Full shift internal battery Field swappable for continuous use Outdoor display Viewable in bright sunlight Water resistant IP66 rated protection against heavy seas or powerful jets of water Dust tight IP66 rated protection ...

Page 22: ...e moved out of the way when not in use Operating temperature humidity 4 F to 122 F 20 C to 50 C to 95 relative humidity non condensing Included applications Document navigator camera with barcode reader audio recorder video recorder webpage viewer cloud sync media player calculator pedometer timer Languages and dialects supported Chinese Cantonese Simplified and Traditional Mandarin Czech Dutch En...

Page 23: ...th active noise cancellation Accurate voice recognition in noise up to 100 dBA Speaker Internal 94dbA loudspeaker Camera Specification Image 48 MP sensor PDAF with LED flashlight Video Up to 1080p at 60fps 6X zoom in HD video stabilization Codecs VP8 VP9 H 264 H 265 HEVC Compatibility Specification PPE Works with many hardhats protective eyewear masks and more Warranty Specification Warranty 1 yea...

Page 24: ...Navigator devices can be managed by either RealWear Foresight or by an EMM Enterprise Mobility Management system Android Enterprise standards allow for device management of RealWear Navigator by most EMM providers Go to http www realwear com support for information on currently supported EMM providers or contact your provider directly Enrolling your device is easy Use the Configuration app on Real...

Page 25: ...sing clear simple navigation Read full filenames Large thumbnails Delete files Document Viewer Access PDF files easily with full zoom pagination controls Create and use your own bookmarks for quick reference Media player Native playback support for audio and video files built into My Files Security Screen lock Option to secure your device with a custom PIN or fingerprint scan required at device wa...

Page 26: ...r far away subjects Wide Full width of camera view is captured Focus and exposure Switch between Autofocus or Manual Focus at any time Lock focus and exposure to one of 9 points in the frame for better photos in non ideal lighting conditions Image and video stabilization Automatic image and video stabilization allows more accurate remote mentoring compliance and inspections This feature is enabled...

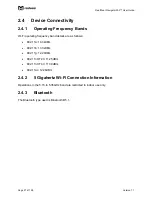
Page 27: ...ing frequency band details are as follows 802 11a 14 34dBm 802 11b 13 32dBm 802 11g 12 29dBm 802 11n HT20 11 25dBm 802 11n HT40 11 39dBm 802 11ac 12 26dBm 2 4 2 5 Gigahertz Wi Fi Connection Information Operations in the 5 15 to 5 35GHz band are restricted to indoor use only 2 4 3 Bluetooth The Bluetooth type used is Bluetooth 5 1 ...

Page 28: ...RealWear Navigator 500 User Guide Page 28 of 148 Version 1 1 THIS PAGE INTENTIONALLY LEFT BLANK ...

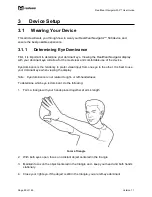
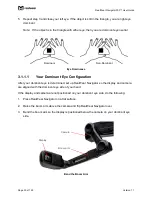
Page 29: ... use of the device Eye dominance is the tendency to prefer visual input from one eye to the other It is best to use your dominant eye when viewing the display Note Eye dominance is not related to right or left handedness To determine which eye is dominant do the following 1 Form a triangle with your hands placed together at arm s length Form a Triangle 2 With both eyes open focus on a distant obje...

Page 30: ...tion After your dominant eye is determined set up RealWear Navigator so the display and camera are aligned with the dominant eye side of your head If the display and camera are not positioned on your dominant eye side do the following 1 Place RealWear Navigator on a flat surface 2 Raise the boom arm above the camera and flip RealWear Navigator over 3 Bend the boom arm so the display is positioned ...

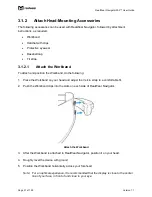
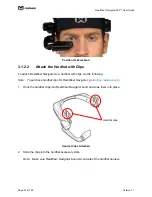
Page 31: ...on the Workband do the following 1 Place the Workband on your head and adjust the Velcro strap to a comfortable fit 2 Push the Workband clips into the slots on each side of RealWear Navigator Attach the Workband 3 After the Workband is attached to RealWear Navigator position it on your head 4 Roughly level the device with ground 5 Position the Workband horizontally across your forehead Note For an...

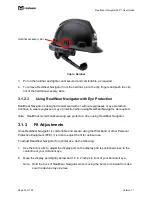
Page 32: ... hardhat with clips do the following Note To purchase hardhat clips for RealWear Navigator go to shop realwear com 1 Hook the hardhat clips into RealWear Navigator band and snap them into place Hardhat Clips Attached 2 Slide the clips into the hardhat accessory slots Note Make sure RealWear Navigator band sits outside of the hardhat harness Hardhat clips ...

Page 33: ...Navigator as required Note RealWear recommends wearing eye protection when using RealWear Navigator 3 1 3 Fit Adjustments Once RealWear Navigator is comfortable and secure using the Workband or other Personal Protective Equipment PPE it is time to adjust the fit for optimal use To adjust RealWear Navigator for optimal use do the following 1 Use the boom arm to adjust the display pod so the display...

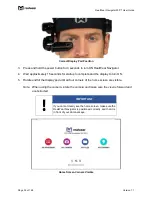
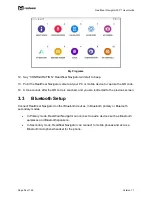
Page 34: ...rtup to complete and the display to turn ON 5 Rotate and tilt the display pod until all four corners of the home screen are visible Note When using the camera rotate the camera and make sure the view is forward and unobstructed IMPORTANT If you cannot clearly see the home screen make sure the RealWear Navigator is positioned correctly and that it is in front of your dominant eye Home Screen Corner...

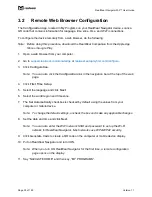
Page 35: ...tion link in the navigation bar at the top of the web page 4 Click First Time Setup 5 Select the language and click Next 6 Select the world region and time zone 7 The Set Automatically checkbox is checked by default using the values from your computer or mobile device Note To change the default settings uncheck the box and make any applicable changes 8 Set the date and time and click Next Note You...

Page 36: ...ds after the QR code is scanned and you are redirected to the previous screen 3 3 Bluetooth Setup Connect RealWear Navigator to other Bluetooth devices in Bluetooth primary or Bluetooth secondary modes In Primary mode RealWear Navigator can connect to audio devices such as Bluetooth earpieces and Bluetooth speakers In Secondary mode RealWear Navigator can connect to mobile phones and act as a Blue...

Page 37: ...following 1 Go to My Programs and say SETTINGS SETTINGS Command 2 Say PAGE DOWN until the RealWear setting is listed 3 Say REALWEAR or SELECT ITEM REALWEAR Command 4 Bluetooth Mode settings will appear Secondary is selected by default Say BLUETOOTH MODE to toggle between Primary and Secondary modes ...

Page 38: ...nnot be used 3 4 1 Screen Lock with PIN To set up screen lock with a Personal Identification Number PIN do the following 1 From the RealWear Navigator home page say MY PROGRAMS 2 Say SETTINGS 3 Say SECURITY or say SELECT ITEM 6 Note Some options can be selected by saying either the name of the option or the number that is displayed next to the name 4 Say SCREEN LOCK and then say PIN 5 In the Enter...

Page 39: ...ing 1 From the RealWear Navigator home page say MY PROGRAMS 2 Say SETTINGS 3 Say SECURITY or say SELECT ITEM 6 Note Some options can be selected by saying either the name of the option or the number that is displayed next to the name 4 Say FINGERPRINT 5 Say FINGERPRINT AND PIN 6 Repeat steps 5 through 7 in the Screen Lock with PIN Only section to set your PIN 7 Say one of the lock screen display o...

Page 40: ...ngerprint sensor to scan your fingerprint Note The fingerprint sensor is on the surface of the power button To scan your fingerprint lightly touch the power button Do not press the button 11 Follow the instructions on the screen to lift your finger and touch the fingerprint sensor again Lift Then Touch Again ...

Page 41: ...Version 1 1 12 Repeat step 9 until the Fingerprint added user message appears Say DONE Fingerprint Added 13 To add another fingerprint for a different user say ADD FINGERPRINT Fingerprint Window 14 Repeat steps 7 through 10 to scan another fingerprint ...

Page 42: ...vigator with a PIN do the following 1 Say UNLOCK 2 Say the word shown under each number of your PIN 3 Say ACCEPT 3 4 4 Screen Unlock with Fingerprint Scan To unlock RealWear Navigator with a fingerprint scan lightly touch the power button from the lock screen with the fingerprint saved on the device Lock Screen ...

Page 43: ... Chinese Cantonese Chinese Mandarin Chinese Traditional Czech Dutch English French German Indonesian Italian Japanese Korean Polish Portuguese Russian Spanish Thai To select the user interface language do the following 1 Press and hold the Action Button 2 The Language Menu appears 3 Press the Action Button again to select your language ...

Page 44: ...lWear Navigator into the USB C charger and charge your device to at least 30 to continue with any updates To download and install a wireless firmware update do the following 1 Make sure RealWear Navigator is connected to a Wi Fi network 2 From the home page say MY PROGRAMS 3 Say WIRELESS UPDATE Note If the user message Your device s software is currently up to date appears you have the latest upda...

Page 45: ... EIGHT HOURS LATER 3 7 Micro SD Card The micro SD card provides additional RealWear Navigator storage for media files and documents 3 7 1 Insert a Micro SD Card To insert a micro SD card into RealWear Navigator do the following 1 Use a Philips 00 screwdriver to loosen the two screws that secure the micro SD card slot cover 2 Remove the micro SD slot cover 3 Gently push down on the micro SD slot to...

Page 46: ...and slide it into place 7 Replace the micro SD slot cover 8 Use a Philips 00 screwdriver to secure cover with screws 3 7 2 Micro SD Card Setup When a new micro SD card is inserted into RealWear Navigator it is ready for use and does not require formatting To make sure that RealWear Navigator sees the micro SD card say SHOW NOTIFICATIONS SHOW NOTIFICATIONS Command ...

Page 47: ...Guide Page 47 of 148 Version 1 1 3 7 2 1 Set Micro SD Card as Default Storage To set the micro SD card as the default storage device do the following 1 Say MY CONTROLS MY CONTROLS Command 2 Say MORE SETTINGS MORE SETTINGS Command ...

Page 48: ...ote Say PAGE DOWN to scroll the page down until RealWear is shown on the display as required REALWEAR Command 4 Say STORAGE MODE to toggle between Local Storage and SD Card until the SD Card toggle is ON STORAGE MODE Command 5 The default storage is now set to the micro SD card ...

Page 49: ...he respective control RealWear Navigator devices use the latest technology for advanced noise cancellation and speech recognition which work even in the harshest noisy environments It can recognize many different languages and accents and can detect the command even if you speak in a low voice All the commands associated with the specific screen should be displayed clearly on the screen usually in...

Page 50: ...ontrol on the screen has no name is a scroll button without a label or is a file with an unpronounceable filename such as 3454 x pdf WearHF automatically proposes an alternative speech command and assigns a number This number is displayed next to the respective control on the screen To recall the specific control numbers for that screen say SHOW HELP To select a specific control use the number ass...

Page 51: ...MUTE MICROPHONE The device will not respond to your voice commands while the microphone is muted and the user message Press ACTION button to reactivate microphones appears in red MUTE MICROPHONE Command To restart the speech recognizer press the Action button on the side of the device The user message Start listening appears in green ...

Page 52: ...e display moved out of your line of sight you can use rear microphones built into the frame of RealWear Navigator To toggle between front and rear microphones press the Action Button three times quickly When the rear microphones are active an audio notification is played and a message is displayed on the screen When the front microphones are active another audio notification is played the message ...

Page 53: ...crolling Voice Commands Voice Command Action PAGE UP Navigates one page up PAGE DOWN Navigates one page down PAGE LEFT Navigates one page left PAGE RIGHT Navigates one page right SHOW HELP Displays a pop up window with help commands 4 4 Screen Orientation When RealWear Navigator rotates the display will automatically rotate by default This ensures your ability to use RealWear Navigator with either...

Page 54: ...re actionable messages sent from the operating system and applications To access notifications say SHOW NOTIFICATIONS The Notifications panel will display above the current screen To close the Notifications panel say HIDE NOTIFICATIONS Recent notifications are presented as items in a list SHOW NOTIFICATION Command ...

Page 55: ...gle press of the Action Button The Action Button control is present in My Controls and set to Home Screen mode Saying ACTION BUTTON while in My Controls will activate a selection for the RealWear Navigator user HOMESCREEN and NOISE CAPTURE are the two options and the text below the ACTION BUTTON command shows the current setting In the example above the current state is HOMESCREEN and the command ...

Page 56: ... text may be entered into a text field using RealWear Navigator When a text entry screen is brought into focus or selected the hands free keyboard is displayed overlaying part of the application Speech keyboard provides various input methods Remote Keyboard Dictation Secure Keyboard Voice Keyboard Barcode Reader Speech Keyboard ...

Page 57: ...ast text character entry DICTATION Activates dictation and allows user to enter text based on speech recognition LETTER Toggles to the Letter Keyboard LOWERCASE Toggles to lower case letters NUMBER Toggles to the Number Keyboard REMOTE KEYBOARD Toggles to Remote Keyboard mode SECURE KEYBOARD Toggles to Secure Keyboard mode SELECT Selects the highlighted character in Secure Keyboard mode SHOW HELP ...

Page 58: ...using your mobile device To use the Remote Keyboard do the following 1 Say REMOTE KEYBOARD 2 Make sure RealWear Companion is open and say OK IT S OPEN OK IT S OPEN Command 3 The Connect new device window opens while RealWear Navigator searches for your mobile device Note RealWear Navigator uses Bluetooth to pair with your mobile device Make sure RealWear Navigator and your mobile device both have ...

Page 59: ...ader as a remote keyboard do the following 1 Open the RealWear Companion app on your mobile device 2 Tap Remote Keyboard in the RealWear Companion app 3 Enter the desired text into the text field 4 Say BARCODE READER and point the camera at the QR code Make sure the entire QR code is within the white rectangle on the display Note Use the flashlight zoom and telephoto commands to better read the QR...

Page 60: ... say MY CONTROLS and then say DICTATION Go to www realwear com support for more information Note If the keyboard becomes hidden or accidentally closed use the SELECT ITEM command to select the text field again and the speech keyboard will reappear Note If entering a password for Wi Fi authentication simply say PASSWORD to activate the speech keyboard To use Dictation do the following 1 Say DICTATI...

Page 61: ...on 1 1 DICTATION COMMAND 2 After the countdown timer finishes RealWear Navigator listens for text Speak quickly and clearly Listening for Text 3 The text appears in the text field and the user message Dictation Complete appears at the bottom of the display ...

Page 62: ...try and close the text window 4 7 3 Secure Keyboard The Secure Keyboard allows only vertical and horizontal head movement to select letters numbers and symbols To use the Secure Keyboard do the following 1 Say SECURE KEYBOARD 2 Move your head to highlight the desired character and say SELECT SELECT Command ...

Page 63: ...ters numbers and symbols by saying the word associated with each character Say SPACE at any time to add a space between characters Note Only English is currently supported in this mode Other languages may work to varying degrees but are not optimized for this mode and could cause user issues To use the Voice Keyboard do the following 1 Say VOICE KEYBOARD 2 Say the word associated with the desired ...

Page 64: ...RealWear Navigator 500 User Guide Page 64 of 148 Version 1 1 LETTER Command Default NUMBER Command ...

Page 65: ...tions from any screen After a moment numbers appear in the upper right corner of each open app Use the PAGE DOWN and PAGE UP commands to scroll through open applications Select an app to open by speaking the name of the application or use the SELECT ITEM command referencing the number in the upper right corner To dismiss an app from the list say DISMISS ITEM To dismiss all say DISMISS ALL Recent A...

Page 66: ... the previous page of recent applications list RECENT APPLICATIONS Displays the list of all applications running in the background with the item number associated with each application SELECT ITEM Opens the application associated with the specified item number SHOW HELP Displays extra commands 4 9 Device Power 4 9 1 Power Options Power options allow you to access power management functions using v...

Page 67: ...fe of RealWear Navigator You can turn OFF RealWear Navigator either manually or hands free 4 9 2 1 Turn OFF Manually To turn OFF RealWear Navigator manually do the following 1 Press and hold the power button for 3 seconds 2 Release the power button after you hear the tone 3 A shutdown screen appears on the display momentarily during the power down sequence 4 The device turns OFF 4 9 2 2 Turn OFF H...

Page 68: ...ing the power down sequence 4 The device turns OFF 5 Press and hold the power button for 3 seconds 6 The device turns ON 4 9 3 2 Reboot Hands Free To reboot RealWear Navigator using hands free do the following 1 Say MY CONTROLS 2 Say POWER OPTIONS 3 Say REBOOT 4 The device restarts 4 9 4 Sleeping and Waking You can sleep and wake RealWear Navigator either manually or hands free 4 9 4 1 Sleep and W...

Page 69: ... battery do the following 1 Connect the USB C cable to the RealWear Navigator USB C port Note Go to section 1 2 1 11 USB C Port for the USB C port location 2 Connect the charging cable to the wall charger 3 Plug the wall charger into an electrical outlet 4 The LED next to the power button flashes during the charging cycle 5 The LED illuminates solid when charging is complete Battery Status Indicat...

Page 70: ...geable battery and requires the battery to power ON To remove the rechargeable battery do the following 1 Press the tab on the forward edge of the battery next to the power button 2 Pull the battery away from RealWear Navigator To replace the rechargeable battery do the following 1 Slide the battery into the battery compartment at a slight angle until the connections are seated and the battery is ...

Page 71: ...MPORTANT Replace the battery within 2 minutes to maintain the current state of the system 1 Remove the battery Note See section 4 10 3 Remove and Replace the Battery for battery removal instructions 2 The display stays ON and the power button blinks red 3 Replace the battery Note See section 4 10 3 Remove and Replace the Battery for battery replacement instructions 4 Resume normal RealWear Navigat...

Page 72: ...RealWear Navigator 500 User Guide Page 72 of 148 Version 1 1 THIS PAGE INTENTIONALLY LEFT BLANK ...

Page 73: ...ications while providing useful information such as time date Wi Fi and battery status To launch applications from the Home screen say the following commands My Programs go to chapter 6 My Programs App for more information My Camera go to chapter 7 My Camera App for more information My Files go to chapter 8 My Files App for more information My Training go to chapter 9 My Training App for more info...

Page 74: ... Commands Voice Command Action HIDE HELP Hides the Help Panel MY CAMERA Opens the My Camera app MY CONTROLS Opens the Control Panel for easy access to commonly used settings MY FILES Opens the My Files app to access documents videos and photos MY PROGRAMS Opens the My Programs app to access the installed applications MY TRAINING Opens the My Training app better familiarize the user with the device...

Page 75: ...RealWear Navigator 500 User Guide Page 75 of 148 Version 1 1 SHOW HELP Command SHOW NOTIFICATIONS Command ...

Page 76: ...RealWear Navigator 500 User Guide Page 76 of 148 Version 1 1 THIS PAGE INTENTIONALLY LEFT BLANK ...

Page 77: ...talled applications Say MY PROGRAMS from the Home screen to open the My Programs app My Programs App The following default applications are in My Programs About Device Audio Recorder Barcode Reader Calculator Clock Cloud Sync Configuration My Camera My Controls My Files My Training Pedometer Settings Tetrominos Web Apps Wireless Update ...

Page 78: ...hown in My Programs or say the number displayed in the upper right corner of the icon For example say CLOCK or say SELECT ITEM FIVE My Programs 6 1 About Device App The About Device app displays information about your RealWear Navigator device Say ABOUT DEVICE or SELECT ITEM ONE to open the app ABOUT DEVICE Command ...

Page 79: ...D USER LICENSE Opens the software license agreement VIEW OPEN SOURCE LICENSE Opens the open source license VIEW REGULATORY Opens the international regulatory information 6 2 Audio Recorder App The Audio Recorder app allows you to record and save audio files to your device Say AUDIO RECORDER or SELECT ITEM TWO to open the app AUDIO RECORDER Command ...

Page 80: ...ecording say STOP RECORDING To pause and then resume recording say PAUSE RECORDING and then say RESUME RECORDING respectively Recording Audio After you stop recording a Preview window opens on the right side of the display Say PREVIEW to play back the recorded audio See the table below for audio playback commands Audio Preview Window ...

Page 81: ...1 1 Recorded audio files are automatically saved to the Audio folder located in the My Media folder in the My Files app Audio Folder 6 2 2 Audio Playback Say SELECT ITEM to play an audio file See the table below for audio playback commands Playing Audio File ...

Page 82: ...e VIEW PREVIOUS and VIEW NEXT commands SELECT VOLUME 1 to 10 Sets the default volume level of the device For example to set the volume to 3 say SELECT VOLUME 3 SHOW HELP Opens the help menu VIEW NEXT Plays the next audio file VIEW PREVIOUS Plays the previous audio file 6 2 3 More Options Note Say MORE OPTIONS in the Audio folder to access the Sort Files and Edit Mode options Go to section 8 3 1 Mo...

Page 83: ...dio Channel Say AUDIO CHANNEL to toggle between mono and stereo AUDIO CHANNEL Command 6 2 3 2 Audio Quality Say AUDIO QUALITY to view the audio quality options Say LOW QUALITY MEDIUM QUALITY or HIGH QUALITY to change the quality of the playback audio AUDIO QUALITY Command ...

Page 84: ... say TEN SECONDS FIFTEEN SECONDS THIRTY SECONDS or ONE MINUTE as required RECORDING TIME Command 6 3 Barcode Reader App The Barcode Reader app allows you to scan barcodes Say BARCODE READER or SELECT ITEM THREE to open the app The app can scan the following types of barcodes Code 39 Code 128 Data matrix EAN 8 EAN 13 QR code UPC A UPC E You can also scan QR codes that contain RealWear bookmarks URL...

Page 85: ...commands to better read barcodes as required 2 When the barcode is scanned successfully a chime sounds and the barcode details are shown at the bottom of the display Barcode Scanned Successfully Barcode Voice Commands Voice Command Action ZOOM LEVEL 1 to 5 Zooms the camera by setting the level to specific value FLASHLIGHT OFF Turns OFF the flashlight FLASHLIGHT ON Turns ON the flashlight TELEPHOTO...

Page 86: ... use the calculator Calculator App 6 5 Clock App The Clock app contains an alarm clock countdown timer and stopwatch Say CLOCK or SELECT ITEM FIVE to open the app 6 5 1 Alarm Clock Say ALARM CLOCK to open the alarm clock Say HOURS and MINUTES to set the alarm For example to set the alarm to 8 30 PM do the following 1 Say EIGHT HOURS 2 Say THIRTY MINUTES 3 Say HOUR MODE until PM is displayed Note T...

Page 87: ...y TIMER to open the countdown timer Say HOURS MINUTES and SECONDS to set the timer For example to set the timer to 2 00 30 do the following 1 Say TWO HOURS 2 Say ZERO MINUTES 3 Say THIRTY SECONDS 4 Say START to start the timer Note The device will chime and display a timer notification 5 With the timer running you can use the following commands Say PAUSE at any time to pause the timer Say RESUME t...

Page 88: ...pwatch Say STOPWATCH to open the stopwatch Say START to start the stopwatch Say PAUSE at any time to pause and say RESUME to resume the stopwatch Say RESET to stop the stopwatch Note When the stopwatch starts the device will chime and display a stopwatch notification Running Stopwatch ...

Page 89: ...SYNC or SELECT ITEM SIX to open the app Note For more information go to https support realwear com knowledge Cloud Sync App 6 7 Configuration App The Configuration app allows you to configure RealWear Navigator by scanning a barcode generated in the RealWear Companion mobile app Say CONFIGURATION or SELECT ITEM SEVEN to open the app Barcode Scanned Successfully ...

Page 90: ...ows you to change basic RealWear Navigator settings Say MY CONTROLS or SELECT ITEM NINE to open the app IMPORTANT You can say MY CONTROLS from any screen to open the app Turn your head left or right to browse the controls and then say the name of the desired control to open it Note Items are active and can be selected even when not in the viewable area MY CONTROLS Command ...

Page 91: ...tween local and cloud based dictation FLASHLIGHT Toggles the built in flashlight ON and OFF HELP COMMAND Toggles visibility of the SHOW HELP icon ON and OFF MICROPHONE Toggles the auto mute function ON and OFF MOUSE Toggle the head tracked mouse ON and OFF POWER OPTIONS Opens the power management options VOLUME Changes the system volume setting WIRELESS NETWORK Enables or disables Wi Fi 6 9 1 Acti...

Page 92: ...reen Orientation for more information 6 9 3 Bluetooth Say BLUETOOTH to view the Bluetooth options Say ENABLE or DISABLE to turn Bluetooth ON or OFF respectively Say BLUETOOTH SETTINGS view and change Bluetooth settings Go to section 6 13 2 Connected Devices App for more information BLUETOOTH Command ...

Page 93: ...ion 1 1 6 9 4 Brightness Say BRIGHTNESS to view the display brightness options Say SET LEVEL 1 to 10 to change the brightness level BRIGHTNESS Command 6 9 5 Color Mode Say COLOR MODE to toggle the display between light and dark COLOR MODE Command to Dark ...

Page 94: ...6 9 6 Dictation Say DICTATION to toggle dictation between local and cloud Note Local dictation is not available for all system languages Wi Fi may be required DICTATION Command 6 9 7 Flashlight Say FLASHLIGHT to toggle the flashlight ON or OFF FLASHLIGHT Command ...

Page 95: ... toggle the SHOW HELP command visible or hidden Note The SHOW HELP command is always active HELP COMMAND Command 6 9 9 Microphone Say MICROPHONE to toggle the auto mute function ON or OFF When ON the microphone stops listening for voice commands if the device is idle for 30 seconds MICROPHONE Command ...

Page 96: ...ide Page 96 of 148 Version 1 1 6 9 10 Mouse Say MOUSE to toggle the mouse ON or OFF When ON move the mouse cursor over an item with head movement and say MOUSE CLICK to select the item MOUSE Command MOUSE CLICK Command Mouse cursor ...

Page 97: ...S to view the device power options Say POWER DOWN to turn OFF the device say REBOOT to restart the device and say SLEEP NOW to put the device in rest mode POWER OPTIONS Command 6 9 12 Volume Say VOLUME to view the device volume options Say SET LEVEL 1 to 10 to change the volume level VOLUME Command ...

Page 98: ...ABLE or DISABLE to turn Wi Fi ON or OFF respectively Say WIRELESS NETWORK SETTINGS view and change Bluetooth settings Go to section 6 13 1 Network and Internet App for more information WIRELESS NETWORK Command 6 10 My Files App Go to chapter 8 My Files App for more information 6 11 My Training App Go to chapter 9 My Training App for more information ...

Page 99: ...r SELECT ITEM TWELVE to open the app Pedometer App 6 13 Settings App The Settings app allows you to view and change settings on your device Say SETTINGS or SELECT ITEM THIRTEEN to open the app The following default applications are in the Settings app About device Accessibility Apps and notifications Battery Connected devices Display Location Network and internet Privacy RealWear Security Sound St...

Page 100: ...PAGE DOWN to scroll the list of settings Note The number for each setting changes when you scroll For example Battery is item 4 in the figure below but if you scrolled down and Battery was now at the top of the page it would become item 1 Settings 6 13 1 Network and Internet Settings Network and internet settings allow you to configure your Wi Fi settings Say NETWORK AND INTERNET or SELECT ITEM to...

Page 101: ... connect devices to RealWear Navigator Say CONNECTED DEVICES or SELECT ITEM to open the app Connected Devices Settings 6 13 3 Apps and Notifications Settings Apps and notifications settings allow you to view installed apps and device notifications Say APPS AND NOTIFICATIONS or SELECT ITEM to open the app Apps and Notifications Settings ...

Page 102: ...Settings Battery settings allow you to view and change battery settings Say BATTERY or SELECT ITEM to open the app Battery Settings 6 13 5 Display Settings Display settings allow you to change display and font settings Say DISPLAY or SELECT ITEM to open the app Display Settings ...

Page 103: ...low you to change volume levels and sound notifications Say SOUND or SELECT ITEM to open the app Sound Settings 6 13 7 Storage Settings Storage settings allow you to view internal on device and external micro SD card storage usage and capacity Say STORAGE or SELECT ITEM to open the app Storage Settings ...

Page 104: ...change permissions password settings and lock screen notifications Say PRIVACY or SELECT ITEM to open the app Privacy Settings 6 13 9 Location Settings Location settings allow you to view app location information and to enable Wi Fi and Bluetooth scanning Say LOCATION or SELECT ITEM to open the app Location Settings ...

Page 105: ...ttings allow you to configure your device security settings Say SECURITY or SELECT ITEM to open the app Security Settings 6 13 11 Accessibility Settings Accessibility settings allow you to change the device accessibility settings Say ACCESSIBILITY or SELECT ITEM to open the app Accessibility Settings ...

Page 106: ...gs allow you to toggle settings for Bluetooth storage and some camera features Say REALWEAR or SELECT ITEM to open the app RealWear Settings 6 13 13 System Settings System settings allow you to change languages date or time or to reset your device Say SYSTEM or SELECT ITEM to open the app System Settings ...

Page 107: ... device information and emergency contact information Say ABOUT DEVICE or SELECT ITEM to open the app About Device 6 14 Tetrominos App The Tetrominos app is a fun block puzzle game played with horizontal head movement and voice commands Say TETROMINOS or SELECT ITEM FOURTEEN to open the app Tetrominos App ...

Page 108: ... stored on your device Say WEB APPS or SELECT ITEM FIFTEEN to open the app Web Apps App 6 16 Wireless Update App The Wireless Update app allows you to check for device updates over Wi Fi Say WIRELESS UPDATE or SELECT ITEM SIXTEEN to open the app Note For more information go to https support realwear com knowledge Wireless Update App ...

Page 109: ...ication When My Camera is launched a live view of the RealWear Navigator 500 camera optical input will be visible in the RealWear Navigator display pod The camera Heads Up Display HUD provides the following camera controls and settings Exposure level My files Preview Record video Take photo Telephoto Zoom level 7 1 Take a Photo Say TAKE PHOTO to take a photo Note The photo is automatically saved t...

Page 110: ...e 110 of 148 Version 1 1 7 1 1 Exposure Level Say EXPOSURE LEVEL 2 to 2 to adjust the camera exposure level Exposure levels help the camera adapt to different environmental situations EXPOSURE LEVEL 2 Command EXPOSURE LEVEL MINUS 2 Command ...

Page 111: ...ILES Opens the My Files location PREVIEW Opens the recent photo or video shown in the preview thumbnail TAKE PHOTO Captures a photo TELEPHOTO Single zoom with greater precision and accuracy ZOOM LEVEL 1 to 5 Adjusts the zoom level 7 2 Record a Video To record a video do the following Note The video is automatically saved to the Camera folder in My Media 1 Say RECORD VIDEO to begin recording a vide...

Page 112: ...he preview thumbnail RECORD VIDEO Starts recording video STOP RECORDING Stops recording video ZOOM LEVEL 1 to 5 Adjusts the zoom level 7 3 Photo and Video Preview When a video or photo is captured an image preview window appears on the right side of the display While the preview image is visible say PREVIEW to open the image Image Preview Window ...

Page 113: ... 1 1 7 4 More Options Say MORE OPTIONS to display additional camera adjustment settings The following additional camera options are available Aspect ratio Field of View FOV Frame rate Image resolution Video resolution Video stabilization MORE OPTIONS Command ...

Page 114: ...ens the settings menu for frame rate IMAGE RESOLUTION Opens the settings menu for image resolution MORE OPTIONS Opens the Camera Options panel VIDEO RESOLUTION Opens the settings menu for video resolution VIDEO STABILIZATION Opens the settings menu for video stabilization 7 4 1 Aspect Ratio Say ASPECT RATIO to view the aspect ratio options To change the aspect ratio say SIXTEEN BY NINE or FOUR BY ...

Page 115: ... 7 4 2 Field of View Say FIELD OF VIEW to view the FOV options To change the FOV say WIDE or NARROW FIELD OF VIEW Command 7 4 3 Frame Rate Say FRAME RATE to view the frame rate options To change the frame rate say FIFTEEN TWENTY FIVE or THIRTY FRAME RATE Command ...

Page 116: ...LUTION to view the image resolution options To change the image resolution say HIGH or LOW IMAGE RESOLUTION Command 7 4 5 Video Resolution Say VIDEO RESOLUTION to view the video resolution options To change the video resolution say FOUR EIGHTY P SEVEN TWENTY P or TEN EIGHTY P VIDEO RESOLUTION Command ...

Page 117: ...on options To turn video stabilization ON or OFF say ON or OFF respectively Note Video stabilization provides compensation for movement for smoother video recording VIDEO STABILIZATION Command 7 5 Additional Camera Commands Say SHOW HELP to display the following additional camera commands Auto focus Flash auto Flash OFF Flash ON Manual focus ...

Page 118: ...ode to auto FLASH OFF Turns flash OFF FLASH ON Turns flash ON HIDE HELP Hides the help menu MANUAL FOCUS Switches focus mode to manual SHOW HELP Displays the help menu 7 5 1 Camera Flash To turn ON the camera flash say FLASH ON To turn OFF the camera flash say FLASH OFF To use the camera light sensor to detect if a flash is required say FLASH AUTO Note The default setting for the camera flash is O...

Page 119: ...cus To turn ON manual focus say MANUAL FOCUS Note Say AUTO FOCUS to return to automatically focus the camera Auto focus is the default camera setting MANUAL FOCUS Command With manual focus turned ON say FOCUS POINT 1 to 9 to set the camera focus point FOCUS POINT 1 to 9 Command ...

Page 120: ...RealWear Navigator 500 User Guide Page 120 of 148 Version 1 1 THIS PAGE INTENTIONALLY LEFT BLANK ...

Page 121: ... installed micro SD card using the My Files app Launch My Files from the Home Screen or My Programs The My Files screen shows the My Media My Documents and My Photos folders My Files Say MORE OPTIONS to open the options panel and access the Scan Bookmark tool Say RECENT FILES for quick access to any recently opened file MORE OPTIONS Command ...

Page 122: ...lays files stored in the videos folder and videos recorded using the RealWear Navigator 500 camera and stored in DCIM folder MY PHOTOS Displays files stored in the photos folder and still images captured using the RealWear Navigator camera RECENT FILES Displays recent files SHOW HELP Displays extra commands 8 1 My Media Folder The Camera folder located in the My Media folder contains a list of vid...

Page 123: ...f 148 Version 1 1 8 1 1 Media Player An audio or video file from My Media is played using the media player Say SELECT ITEM to select a file For example to select the first item say SELECT ITEM ONE 8 1 1 1 Video Playback Video File Video Playback ...

Page 124: ...inds the video 30 seconds VIDEO STOP Stops the video and returns to the My Media screen 8 2 My Documents Folder The My Documents folder contains PDF and image files stored on RealWear Navigator Say MY DOCUMENTS to open the My Documents folder Say SELECT ITEM to select a file MY DOCUMENTS Command 8 2 1 Document Viewer Open PDF files and image files using document viewer with hands free control If y...

Page 125: ... to the previous document 8 2 1 1 Zooming and Panning To zoom in say ZOOM LEVEL selecting a level from 1 to 5 When a document is zoomed in at any level past level 1 you can move your head to view different areas of the document A small thumbnail will appear in the upper left part of the screen with a purple rectangle representing the current view If you want to lock the location of the document sa...

Page 126: ... of the full size document ZOOM LEVEL 1 to 5 Zooms the document view size by setting the level to specific value 8 3 My Photos Folder The My Photos folder contains all still image files organized into folders in supported formats Say MY PHOTOS to open the My Photos folder By default the Camera folder appears Note Images copied to the SD card are stored outside the Camera folder Images taken with t...

Page 127: ...127 of 148 Version 1 1 MY PHOTOS Command 8 3 1 More Options Say MORE OPTIONS to edit or sort the files MORE OPTIONS Command Say SORT FILES to sort the image files by name or by date For Edit Mode instructions go to section 8 6 Deleting Files ...

Page 128: ...Command More Options Voice Commands Voice Command Action EDIT MODE Open the file editing menu SORT FILES Open the file sorting menu 8 4 My Downloads Folder The My Downloads folder contains all the downloads made to your device Say MY DOWNLOADS to open the My Downloads folder ...

Page 129: ...both locally to your device and externally to your micro SD card Say MY DRIVES to open the My Drives folder My Drives Folder Contents 8 6 Deleting Files Use Edit Mode to delete files from the My Media My Documents and My Photos folders To use Edit Mode to delete files do the following 1 Go to the applicable folder My Documents Example ...

Page 130: ...the files shown EDIT MODE Command 4 Say SELECT ITEM to select the applicable file A checkmark indicates the file is selected Note To select all files in the folder say SELECT ALL ITEMS Document Selected Example 5 Say SELECT ITEM again to select additional files as required 6 To delete the selected files say DELETE SELECTED ...

Page 131: ...er Guide Page 131 of 148 Version 1 1 DELETE SELECTED Command 7 Say CONFIRM DELETION to permanently delete the selected files 8 To cancel deleting the selected files say CANCEL CANCEL Command 9 Say CANCEL EDIT to exit Edit Mode ...

Page 132: ...n of the selected file CANCEL EDIT Exit Edit Mode CLEAR SELECTION Deselects the selected files CONFIRM DELETION Confirm deletion of the selected file DELETE SELECTED Delete selected item MORE OPTIONS Open the Options panel SELECT ALL ITEMS Select all items in the opened folder SELECT ITEM Select an item by the corresponding number ...

Page 133: ...y Training walks new users through simple and easy to use step by step instructions on how to configure RealWear Navigator 500 Say MY TRAINING from the Home screen to open the My Training app To use the My Training app follow the instructions that appear on the screen Start Page ...

Page 134: ...RealWear Navigator 500 User Guide Page 134 of 148 Version 1 1 THIS PAGE INTENTIONALLY LEFT BLANK ...

Page 135: ...rmining Eye Dominance section for more information Safety Symbols Symbol Definition Description Disposal of Old Electrical and Electronic Equipment The symbol of the crossed out wheeled bin indicates that within the countries in the European Union this product and any enhancements marked with this symbol cannot be disposed as unsorted waste but must be taken to separate collection at their end of ...

Page 136: ...e correct battery model There is a risk of explosion while charging if a battery other than the specified model is used IMPORTANT If you purchase a power adapter to charge your device make sure the power adapter meets the standard requirements A rechargeable battery powers your device Always use only the original type of RealWear battery that came with the device Use the battery only for its inten...

Page 137: ...ot allow the liquid to contact the skin or eyes In the event of leak or a hazard seek medical help immediately 10 3 4 Avoid Short Circuit Do not short circuit the battery An accidental short circuit can occur when a metallic object such as a coin clip or pen causes direct connection of the positive and negative terminals of the battery This might happen for example when you carry a spare battery i...

Page 138: ...arger disconnect from power supply When using an extension cable check the integrity of the ground conductor Disconnect the charger from RealWear Navigator once the battery is fully charged Do not use this charger in wet areas This charger is for indoor use only Do not insert or remove the plug with wet hands Do not open the charger For any issues contact support Do not cut break or bend the cable...

Page 139: ...wing to wipe down the RealWear Navigator 500 battery Damp cloth and mild soap Isopropyl alcohol wipes Dry cloth Cotton swabs Toothbrush 11 1 2 Hard Surface Cleaning WARNING Never submerge RealWear Navigator Make sure all covers are securely shut when cleaning the device Use any of the following to wipe down the RealWear Navigator hard surfaces Damp cloth and mild soap Isopropyl alcohol wipes 11 1 ...

Page 140: ... the hardhat clips 11 1 4 2 Hearing Protection Ear Buds WARNING Do not use water or a cleaning solution to clean the RealWear Navigator ear buds or foam tips Excessive moisture can damage the ear buds and foam Polish the ear buds with a dry or slightly damp cloth as required 11 1 4 2 1 Foam Tips Clean the ear bud foam tips with a dry cloth as required The ear bud foam tips are made of memory foam ...

Page 141: ...ce may not cause harmful interference and 2 this device must accept any interference received including interference that may cause undesired operation This equipment has been tested and found to comply with the limits for a Class B digital device pursuant to Part 15 of the FCC Rules These limits are designed to provide reasonable protection against harmful interference in a residential installati...

Page 142: ...s antenna s must not be co located or operating in conjunction with any other antenna or transmitter except tested built in radios 4 The Country Code Selection feature is disabled for products marketed in the US Canada 12 2 4 Français IC Statement 1 Le présent appareil est conforme aux CNR d Industrie Canada applicables aux appareils radio exempts de licence L exploitation est autorisée aux deux c...

Page 143: ... devices 12 2 6 Français IC Statement for WLAN 5GHz Device 1 Les dispositifs fonctionnant dans la bande 5150 5250 MHz sont réservés uniquement pour une utilisation à l intérieur afin de réduire les risques de brouillage préjudiciable aux systèmes de satellites mobiles utilisant les mêmes canaux 2 le gain maximal d antenne permis pour les dispositifs utilisant les bandes 5250 5350 MHz et 5470 5725 ...

Page 144: ...of 148 Version 1 1 12 3 Declarations of Conformity 12 3 1 EU Regulatory Conformance We RealWear Inc declare under our sole responsibility that the radio equipment model T21G is in conformity with Directive 2014 53 EU EU Declaration of Conformity ...

Page 145: ...145 of 148 Version 1 1 12 3 2 UK Regulatory Conformance We RealWear Inc declare under our sole responsibility that the radio equipment model T21G is in conformity with statutory requirement RER 2017 SE 2017 1206 UK Declaration of Conformity ...

Page 146: ...xposure requirements in the United States and Canada The limit recommended by FCC and IC is 1 6 W 2 2 lbs 1 6 W kg averaged over 0 04 oz 1 g of tissue The highest SAR value of the RealWear Navigator for use by ear is 0 95 W 2 2 lbs 0 95 W kg averaged over 0 04 oz 1 g of tissue 12 4 2 Europe Radiation Exposure Statement No minimum separation distance needs to be maintained between the user s body a...

Page 147: ...produit est sûr pour un fonctionnement tel que décrit dans ce manuel La réduction aux expositions RF peut être augmentée si l appareil peut être conservé aussi loin que possible du corps de l utilisateur ou que le dispositif est réglé sur la puissance de sortie la plus faible si une telle fonction est disponible 12 5 Limited Warranty and Software License Please visit https www realwear com legal t...

Page 148: ...RealWear Navigator 500 User Guide Page 148 of 148 Version 1 1 THIS PAGE INTENTIONALLY LEFT BLANK ...

Reviews: