background image


14 

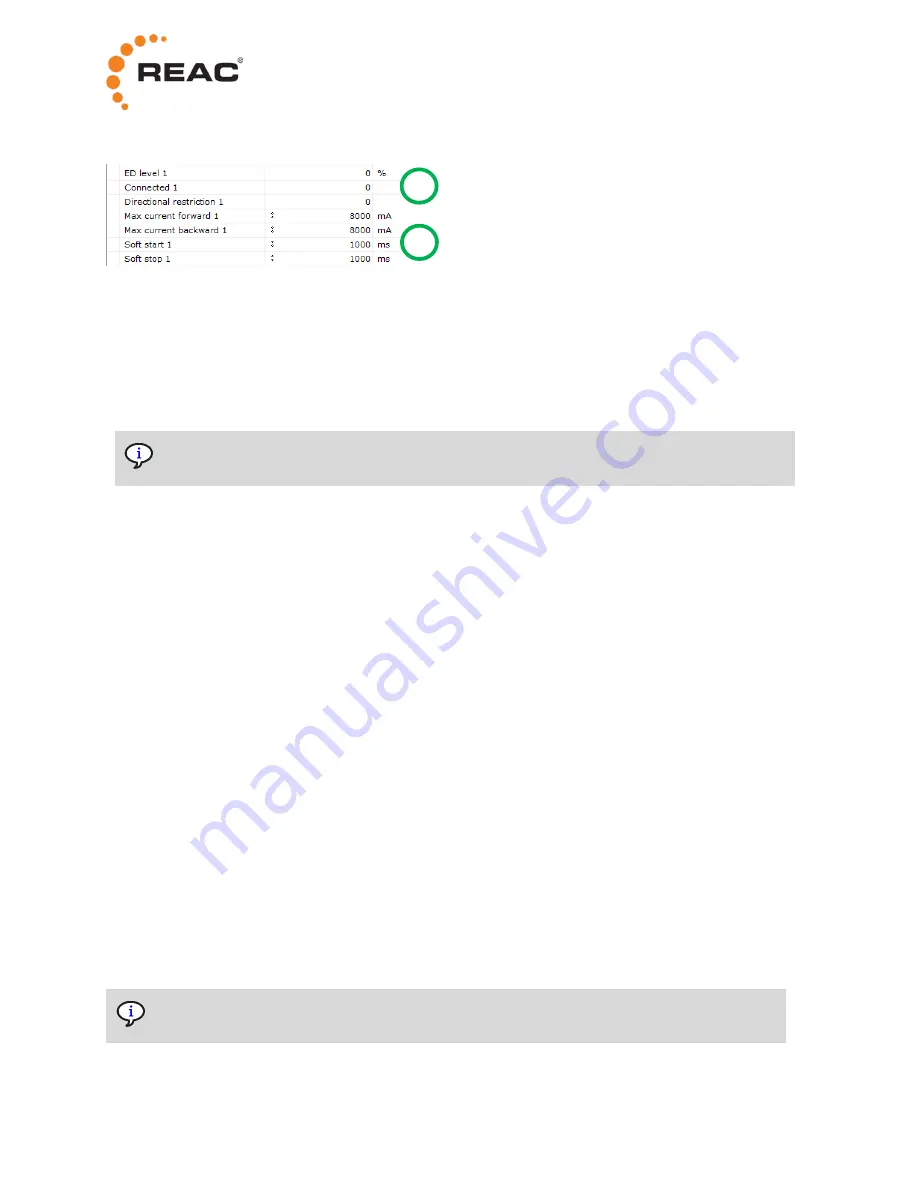
This image shows status registers and parameters in an expanded group. 


1.  Status registers are values that only can be read/viewed. 
2.  Parameters are values that can be changed. Parameters have a colon sign in front of the value. 


To change a parameter, do the following: 

1.  Click the parameter value. 
2.  Enter a new value. 
3.  Press Enter. The new parameter value becomes effective immediately. 


Parameters related to a channel will become effective after the next movement on that 

channel. 

5.2  RCB10+ parameters 

To view and change the RCB10+ parameters, select the 

C

 icon and expand the groups. 

The configurable parameters are available in the following groups: 

  DC out 1-4, one group per actuator channel 

  Operation 

  Usage 

5.2.1  Soft start and soft stop 

The soft start and soft stop parameters are used to adjust the start and stop ramps of the motor. 
The parameters are set in time (ms). The time is between 0 to 100% PWM. Simply explained it works 

more like a ramp speed setting, rather than an actual time setting. If a movement at 50% PWM is 

demanded, that PWM level will be reached in half the time.  
The 

Soft start 

and

 Soft stop

 parameters are available in the 

DC out

 groups. 

5.2.2  Gain 

If an actuator is considered to run too fast, either because it is built that way or as a result of the 

mechanics around it, the speed can be limited by using the gain parameter. This can be needed, for 

example, if the load is “helping” the actuator in one direction. 
There is one parameter in each direction: 

Gain forward

 and 

Gain backward

. The gain parameters are set 

in % of the full pass-through of the signal. 
The 

Gain forward 

and

 Gain backward

 parameters are available in the 

DC out

 groups. 


Even if the parameter is called “gain”, this is not about amplification of the signal.  

The maximum gain is the neutral 100%, meaning that it is only possible to reduce the signal. 

Summary of Contents for RCB10+

Page 1: ...www reac se USER MANUAL RCB10 REAC CONTROL BOX...

Page 2: ...cation of advanced motion systems REAC s power solutions contain compact and strong electrical actuators lift and tilt systems control units and hand controls We know that our customers have different...

Page 3: ...ND ACTUATORS 6 3 3 CONFIGURING RCB10 7 4 OPERATION 10 4 1 CHARGING THE BATTERY 10 4 2 DISCONNECTING AND ACTIVATING THE BATTERY 10 5 RST10 TOOLBOX 12 5 2 RCB10 PARAMETERS 14 5 3 ADDITIONAL FUNCTIONS 17...

Page 4: ...neral Features in RST10 1 2 Symbols The following symbols are used in the manual Injury to persons can occur if these instructions are not followed Damage to the product can occur if these instruction...

Page 5: ...e RHC10 hand control and almost any REAC actuator1 The RCB10 can also be connected to generic digital switches via the RHC12 adapter In this case the hand control cannot be connected 2 3 Configuration...

Page 6: ...harged battery depends on the current consumption in each application and the usage pattern RCB10 can handle energy from regenerating actuators This makes it possible to use the actuators with very go...

Page 7: ...The duty cycle limits can be configured using the RST10 see section 5 2 5 2 6 2 Disabled motor activation while charging If the battery charger is connected the RCB10 prevents any motor activation Th...

Page 8: ...ol and actuators do the following 1 Connect the hand control to the HC connector on the RCB10 2 Check that the LEDs on the hand control light up If not the battery needs to be activated Do the followi...

Page 9: ...o connect the RCB10 to the computer do the following 1 Connect the USB cable to the USB connector on the RHC12 adapter and to the computer 2 Connect the phono cable to the HC connector on the RCB10 an...

Page 10: ...le named portable 3 3 3 Setting parameters To change and set the parameters do the following 1 Run the RST10 from the program start menu or by double clicking the desktop icon 2 On the top menu select...

Page 11: ...ing 1 Click the plus sign in front of the group This displays all parameters in the group 2 Click the parameter value 3 Enter a new value 4 Press Enter The new parameter value becomes effective immedi...

Page 12: ...discharge the battery can be disconnected automatically or manually For more information see section 2 5 2 You should manually disconnect the battery before shipping storage and when the RCB10 will n...

Page 13: ...following 1 Connect the battery charger to the RCB10 charger jack and to a wall socket 2 Wait 5 seconds 3 The battery is now internally connected and the system is ready for use It is recommended to...

Page 14: ...service tools The RST10 can be used to configure settings evaluate application solutions perform service tasks and monitor system behavior This chapter describes the RST10 user interface and the confi...

Page 15: ...og for all units b G USB adapter gateway c C control box d H hand control To select a unit double click the icon 2 This area displays groups of status registers and parameters for the selected unit a...

Page 16: ...ramps of the motor The parameters are set in time ms The time is between 0 to 100 PWM Simply explained it works more like a ramp speed setting rather than an actual time setting If a movement at 50 P...

Page 17: ...l time The following levels can be configured per actuator channel ED warning level At this level the alert LED on the hand control will light up when the motor is running ED no start level At this le...

Page 18: ...on and to reset the interval counters Only authorized personnel is allowed to change the service limits and reset the counters If necessary service is not performed damage to the system and personal i...

Page 19: ...ormation about all units in the system for example firmware revision and serial number To check the system information for a unit do the following 1 Right click the icon for the unit This displays a m...

Page 20: ...plays the estimated battery charge level 5 3 3 Disconnecting the battery To protect the battery from deep discharge it is possible to disconnect the battery For more information see sections 2 5 2 and...

Page 21: ...ement To clear this flag disconnect the charger from the RCB10 Flags in the DC out groups There is one DC out group per channel each with a set of flags o The Error jack ID Error chain link and Incomp...

Page 22: ...tuator to the control box is firmly affixed Sealings Check all O rings for damage Replace if necessary Battery Before use make sure at least 1 green battery indicator LED is lit on the hand control 6...

Page 23: ...s a function that protects the actuator motor from overheating The alert indication LED on the hand control is lit during attempt to run the actuator Wait until the actuator rest time has elapsed Actu...

Page 24: ...and control drop quickly after full charge Service is needed Hand control appears dead Poor contact with control box Nothing happens when pressing a button no LEDs are lit Make sure the hand control i...

Page 25: ...ing to run actuator The alert indication LED on the hand control is lit Disconnect the charger No Charging Charger cable not connected to control box or wall socket The LED on the charger and the LEDs...

Page 26: ...RAL9016 8 2 Environmental conditions RCB10 Operating Ambient temperature 15 C to 50 C Relative humidity 15 to 90 Atmospheric pressure 700 to 1060 hPa Storage Ambient temperature 20 C to 50 C Relative...

Page 27: ...s entitled to deny any warranty if The product has not been correctly used or the product usage specifications load environment temperature duty cycle voltage current etc have not been respected The p...

Page 28: ...bles Electronics Metal Plastic Bies RCB10 Internal harness Charger cable Main circuit board Charger circuit board Screws Cover 2 12 V Pb Some of these main groups can be divided into sub groups Metal...

Page 29: ...sed on the packaging of REAC control system products Manufacturer manufacturing date Do not use if package is damaged Fragile handle with care Keep dry Temperature limits Relative humidity limits Atmo...

Page 30: ...28 Label example packaging...

Page 31: ...always is up to date nor can we take responsibility for any misinterpretation of our written context Technical specification might change due to load and external circumstances REAC products shall be...

Reviews: