background image

NoKey Force – Installing and Operating 

Programming the code lock 


29 

5  Programming the code lock 

General 

In order to perform any programming, the unit must be set to 

programming mode

. This can be done 

by entering the 

system code

. The default system code is 1234. 


Recommendation: Change the factory-set system code with your own system code as soon as 

possible.  (See ‘Changing the system code’ on page 31.) 

After having provided the system code, the user can select various submenus depending on what is 

required.   
Access codes can be between three and six digits. There are 98 memory positions, numbered from 1 

to 98, for the codes. A total of 98 different codes can therefore be programmed to function in 

parallel. 
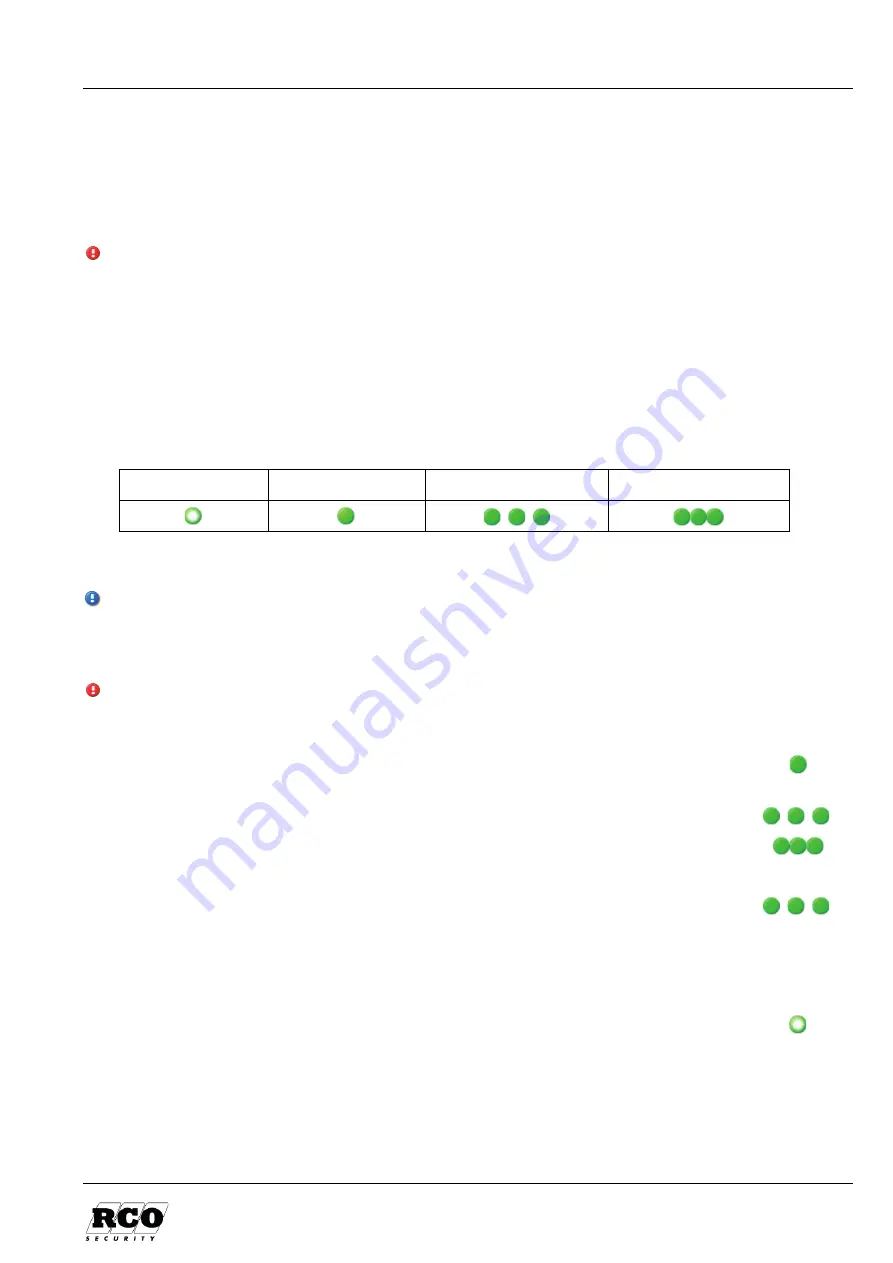
The unit's LED is used to assist in programming to show which step in the process has been 

achieved. The following symbols are used to describe how the LED indicates the various states: 

Off 

Steady shine 

“Normal” flashing 

“Quick” flashing 


See also “Appendix 1: Signals in NoKey force” on page 34. 


Programming (meny mode) exits automatically after approx. 20 seconds. You can also exit 

manually by pressing 0 and then #. 

Entering codes to unlock the door 


It is very important to document which memory positions are used, in order to be able to ensure 

correct management (replacement or deletion) of programmed codes. A table for this purpose is 

provided on page 36. 

1.


Set the unit into programming mode by entering the 

system code

 (standard 

1234). 


2.


Press 1 (menu selection), then #. 


3.


Enter memory position 1 (or other appropriate, 1–98). End with #. 


4.


Enter the desired code, 3–6 digits.  
End with #. A beep will confirm the action. 


5.


If several codes are to be programmed, repeat points 3 and 4 above. 


6.


To exit menu selection 1, press 0 then #.   
Choose a new number corresponding to the desired menu selection and then #. 
Alternatively, to end the programming session, press 0 again and then #. 


Summary of Contents for NoKey Force K01

Page 1: ...R CARD 5000 Installing and operating NoKey force K01 K03 KC03 Oval cylinder KC03 Round cylinder KC02 NoKey Force Installing and Operating April 2019 2019 RCO Security AB All rights reserved...

Page 2: ...e inside and outside of the door 23 The latch bolt can protrude 28 5 Programming the code lock 29 General 29 Entering codes to unlock the door 29 Changing access codes 30 Deleting access codes 30 Acti...

Page 3: ...declaration is available at www rco se Building product declaration The building product declaration is available at www rco se Batteries If the lock is fitted with batteries all spent batteries must...

Page 4: ...the unit s normal AA batteries are entirely spent All codes will work in this mode The codes also remain when batteries are changed NoKey force models Model Cylinder Knob K01 K03 KC03 Oval cylinder KC...

Page 5: ...ck housing When installing NoKey force tighten the lower screws by the handle so that the unit is fixed to the door leaf Then continue with the Allen screws 2 5mm which activate the barbs Ensure that...

Page 6: ...fitted to the rear of the inner unit To be ordered from RCO Security item no 20 180 815 Hold it against the door leaf when placing the gauge and defining the length of the square pin 1 1 Insert the s...

Page 7: ...gth as per the mark Make sure the cut is at a right angle Smooth off the cut face with a suitable tool 1 5 After cutting check with the gauge again The end of the square pin should be between the inne...

Page 8: ...for the cable the necessary adjustments will have to be made 2 1 Loosen and remove the lock housing Save the screws for later re installation 2 2 File the hole so that the cabling has space and the ga...

Page 9: ...unit by turning the handle and lock mechanism Remove the two screws Torx T25 that hold the mechanism in place Save them for later re installation 3 2 Turn the mechanism round 180 degrees without lift...

Page 10: ...force KC03 go to page 16 for KC02 go to page 23 To simplify the process for the installer the lock is always unlocked until it is in operation 4 1 Thread the cabling from the outer unit through the d...

Page 11: ...ner unit with the rounded end facing outwards Select the correct hex pin and insert it past the square pin turn it back and forth a few times and ensure that it grips in the mechanism Door thickness L...

Page 12: ...the lock housing and the outer unit 4 8 Cut the lower lock screws as follows Min door thickness 18 mm Max door thickness 26 mm Take care to ensure the threads are not damaged Smooth off the cut face...

Page 13: ...thickness 6 mm Max door thickness 11 mm Take care to ensure the threads are not damaged Smooth off the cut face with a suitable tool Insert the tension plate and the cut upper lock screws 4 12 Tighte...

Page 14: ...uld be because the lock or square pin does not have enough clearance against the door or lock housing Compare with the description on page 8 The square pin is too long Wrong square pin The door s inne...

Page 15: ...d inner unit 15 4 17 Refit the cover on the inner unit Ensure the handle is inserted towards the square pin 4 18 Re insert the four screws for the cover and tighten Allen 3 mm 4 19 Replace the battery...

Page 16: ...go to page 23 To simplify the process for the installer the lock is always unlocked until it is in operation 4 1 Thread the cabling from the outer unit through the door under the lock housing Ensure t...

Page 17: ...ner unit with the rounded end facing outwards Select the correct hex pin and insert it past the square pin turn it back and forth a few times and ensure that it grips in the mechanism Door thickness L...

Page 18: ...to the lock housing and the outer unit 4 8 Cut the lower lock screws as follows Min door thickness 18 mm Max door thickness 26 mm Take care to ensure the threads are not damaged Smooth off the cut fac...

Page 19: ...cylinder ring can be fitted the correct length screws must be defined A First insert the tension plate into the cylinder hole Then insert the screws to be used through the tension plate and lock hous...

Page 20: ...outside The lock is always unlocked until it is put into operation If something is sticking this could be because The lock or square pin does not have enough clearance against the door or lock housing...

Page 21: ...t under the load holder Insert the batteries 5 x AA into the battery compartment 4 17 To define the length of the knob pin A Insert the pin towards the lock housing until it reaches the bottom B Measu...

Page 22: ...Refit the cover on the inner unit Ensure the handle is inserted towards the square pin and the handle towards the lock housing 4 19 Re insert the four screws for the cover and tighten Allen 3 mm 4 20...

Page 23: ...ked until it is in operation 4 1 Begin by installing and screwing in the lock cylinders the inner using the accompanying 17 mm cylinder extender the outer with the 27 mm Also fit cylinder sleeves to t...

Page 24: ...om the door leaf or if a spacer plate is used 37 mm to compensate for the spacer plate thickness Fit the pin after it has been cut to the correct length 4 6 Select the correct hex pin and insert it pa...

Page 25: ...le 4 9 Cut the lower lock screws as follows Min door thickness 18 mm Max door thickness 26 mm Take care to ensure the threads are not damaged Smooth off the cut face with a suitable tool 4 10 Install...

Page 26: ...outside The lock is always unlocked until it is put into operation If something is sticking this could be because the lock or square pin does not have enough clearance against the door or lock housing...

Page 27: ...nsert the batteries 5 x AA into the battery compartment 4 16 Refit the cover on the inner unit Ensure the handle is inserted towards the square pin and the handle towards the lock housing 4 17 Re inse...

Page 28: ...Installing the outer and inner unit NoKey Force Installing and Operating 28 The latch bolt can protrude Tolerance When the handle is pressed the latch bolt can stick out 1 2 mm...

Page 29: ...are used to describe how the LED indicates the various states Off Steady shine Normal flashing Quick flashing See also Appendix 1 Signals in NoKey force on page 34 Programming meny mode exits automat...

Page 30: ...thout first needing to delete the old one See Changing access codes above 1 Set the unit into programming mode by entering the system code 2 Press 4 menu selection then 3 Enter the memory position 1 9...

Page 31: ...en 4 Press 1 to activate sound Alternatively press 0 to deactivate sound End with The unit will beep once to confirm the change 5 End with 0 followed by to end the programming session Changing the sys...

Page 32: ...ing a code see above for activating deactivating zero opening 2 End with star The lock can now be opened by pressing 0 Deactivating zero opening 1 Enter the activation code see above 2 End with The lo...

Page 33: ...nit into programming mode by entering the system code 2 Press 9 menu selection then 3 Press 1 to confirm factory reset End with A beep will confirm the unit has been reset If the system code is not kn...

Page 34: ...e entered door unlocked Normal flashing A menu has been selected Waiting for you to select a submenu or enter a value for example a memory position or a code Quick flashing A menu or submenu has been...

Page 35: ...ply 5 pcs Alkaline AA LR6 batteries not included Battery life More than 3 years with normal usage 100 passages per day Alternative power supply 9 volt battery 6LR6 for backup power on the outside Min...

Page 36: ...ing 36 Table for your own codes Code position Name use Code Code position Name use Code 1 31 2 32 3 33 4 34 5 35 6 36 7 37 8 38 9 39 10 40 11 41 12 42 13 43 14 44 15 45 16 46 17 47 18 48 19 49 20 50 2...

Page 37: ...n codes 37 Code position Name use Code Code position Name use Code 61 81 62 82 63 83 64 84 65 85 66 86 67 87 68 88 69 89 70 90 71 91 72 92 73 93 74 94 75 95 76 96 77 97 78 98 79 80 99 Code for activat...

Reviews: