10
1-4-2 Rear Panel
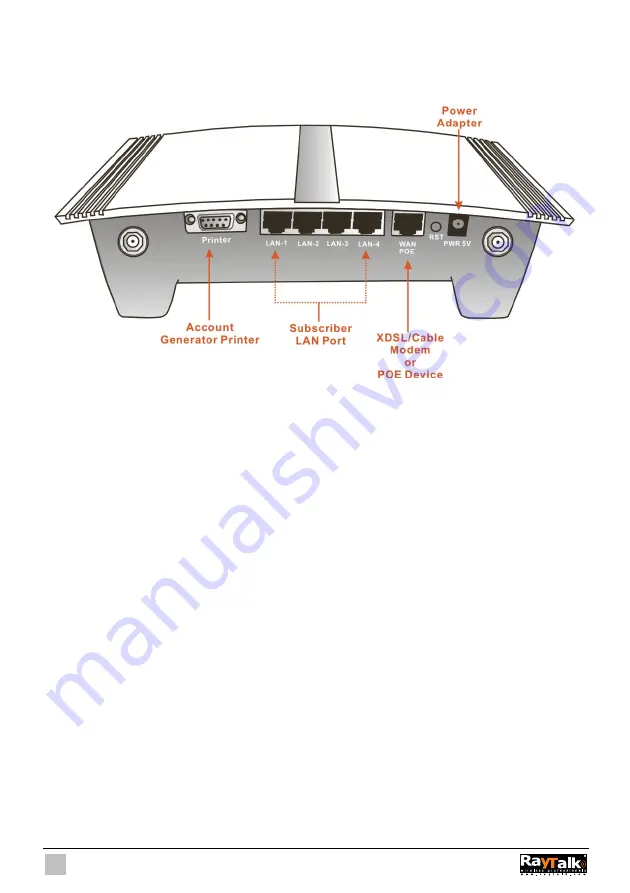
The rear panel of the Wireless Subscriber Gateway is shown below.
Figure 1-4 RA-490 Wireless Subscriber Gateway Rear Panel
1. Printer:
Used to connect the Account Generator Printer.
2. LAN (1-4):
The rear panel supports four auto-sensing RJ-45 ports and all ports can be auto-switched to MDI-II
connections. The LAN ports used for linking hosts or other network devices. The individual port can be
either connected to 100BaseTX networks or 10BaseT networks. When connecting to a 100BaseTX
network, the ports operate at 100Mbps in half-duplex mode or 200Mbps in full-duplex mode. When
connecting to a 10BaseT network, the ports operate at 10Mbps in half-duplex mode or 20Mbps in
full-duplex mode.
3. WAN:
One Ethernet port used for linking xDSL or Cable Modem.
4. Reset Button:
The Wireless Subscriber Gateway has a reset button at the rear panel of the device. Use this function
to reset the system back to factory defaults.
5. Power Jack:
Used to connect the external power supply with the Wireless Subscriber Gateway.
Summary of Contents for RA-490
Page 1: ......
Page 2: ...2 RA 490...
Page 37: ...37 Figure 3 20 Example Account Printout...
Page 42: ...42 Figure 3 27 Example Post paid Printout...
Page 59: ...59 3 2 5 RADIUS Authentication Figure 3 45 Authentication Setting Screen...
Page 72: ...72 Figure 3 60 PC connected Printer Printout Time to Finish...
Page 73: ...73 Figure 3 61 Web based Account Generator Printout Accumulation...
Page 77: ...77 Below is an example of the account printout Figure 3 67 Account Printout...
Page 79: ...79 Below is an example of the account printout Figure 3 69 Account Printout...
Page 88: ...88 3 2 9 Keypad Figure 3 79 Keypad Setting Screen...
Page 95: ...95 Network Report Printout Figure 3 91 Network Report Printout Press ABCAB...
Page 102: ...102 Figure 3 102 Logo Setting Screen Figure 3 103 Login Page...
Page 111: ...111 Figure 3 120 Billing Setting Screen...
Page 113: ...113 Figure 3 122 Service Selection Page Setting Screen iValidate net...
Page 114: ...114 Figure 3 123 Service Selection Page Setting Screen Secure Pay...
Page 115: ...115 Figure 3 124 Service Selection Page Authorize net...
Page 116: ...116 Figure 3 125 Service Selection Page iValidate net...
Page 117: ...117 Figure 3 126 Service Selection Page SecurePay...
Page 118: ...118 Successful Page Figure 3 127 Successful Page Setting Screen...
Page 145: ...145 3 2 22 Wireless Figure 3 154 Wireless Setting Screen...
Page 151: ...151 Figure 3 158 System Status Screen...
Page 167: ...167 3 5 2 Glossary of Terms Figure 3 189 Glossaries of Terms...


