


Item
Description
Quantity
Drill bit of appropriate size*
1
Adhesive tape
1
Note:
* The appropriate drill bit size is dependent on the thickness and material of the mounting
surface.
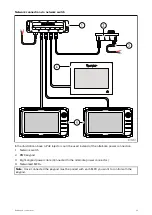
Removing the keypad mat
To gain access to the mounting hole locations, the keypad mat must be removed.
Tip
To help prevent scratching the product, cover the tip of your screwdriver blade with a small
piece of insulation tape.
1. Using a thin, flat bladed screwdriver insert the tip of the screwdriver into the gap between the
edge of the keypad mat and the keypad housing, at a location between locking tabs.
2. Gently lever the keypad mat away from the keypad to release the keypad mat.
Take care not to bend the keypad mat during removal.
23
Summary of Contents for RMK-10
Page 2: ......
Page 4: ......
Page 10: ...10 ...
Page 14: ...14 ...
Page 15: ...Chapter 3 Parts supplied Chapter contents 3 1 Parts supplied on page 16 Parts supplied 15 ...
Page 21: ...Chapter 6 Installation Chapter contents 6 1 Installation checklist on page 22 Installation 21 ...
Page 34: ...34 ...
Page 42: ...42 ...
Page 50: ...50 ...
Page 54: ......
Page 56: ...W Warranty 48 Water ingress 46 WEEE Directive 8 ...
Page 57: ......