
Raymarine 4000 mk2 Wheel Drive - Bulkhead/Box Pedestal Fitting Kit (E15017)
Installation Template and Instructions
D5603-1
Parts Supplied
Rubber
seal
Metal
ring
No 10 x
3
/
4
in
self-tapping screw (x 6)
Bracket
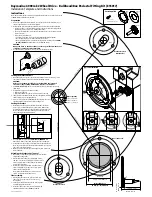
Typical installation
Alternative positions
Motor tube
48 mm (1.9 in) diameter
152 mm (6.0 in)
Slot 1
Slot 2
154 mm (6.1 in)
154 mm (6.1 in)
Motor tube hole
55 mm (2
1
/
8
in) diameter
Bracket location
235 mm (9.3 in)
190 mm (7.5 in)
min. clearance: 45 mm (1.8 in)
Document number: 84092-1
Instructions
Note: Before following these instructions, attach the wheel drive to the wheel (refer to the
Owner's Handbook for details).
Preparation
1. Cut out the appropriate 'wheel spindle' circle (at the center of this template), so you
can place the template over your wheel spindle.
2. Rotate the template to determine suitable locations for the motor tube and bracket:
• You may be able to orientate the wheel drive so the motor tube runs alongside the
pedestal. In this case, proceed to 'Cutting the bracket'.
• There are two alternative slots for the bracket in the back cover of the wheel drive
(Slot 1 and Slot 2).
• Locate the motor tube where:
• a 55 mm (2
1
/
8
in) hole can be cut in the bulkhead/pedestal (if required)
• the seal and ring can be secured around the motor tube
• there is sufficient space behind the mounting location to allow at least
10 mm
(0.4 in) clearance
around the motor (see diagram below)
CAUTION:
Mount the drive so the motor tube is as far as possible from the boat's
compass to reduce the risk of deviation.
3. Use the template to mark the locations of the bracket and motor tube.
Cutting the motor tube hole
1. Drill a small pilot hole at the center of the intended motor tube location so you can
check there is sufficient clearance behind the mounting location.
CAUTION:
Before you cut the motor tube hole, check behind the intended
location for any steering mechanisms, cables or obstructions.
2. Cut a
55 mm (2
1
/
8
in)
diameter hole at the motor tube location and smooth any
sharp edges.
3. Assemble the ring/seal onto the motor tube:
• fit the metal ring first
• then fit the rubber seal: the seal will self-center on the tube
4. Temporarily mount the wheel and drive onto the spindle, allowing
the motor tube to pass through the hole.
5. Press the seal against the bulkhead/pedestal, orientate the seal as
required, then mark the centers of its mounting holes.
Cutting the bracket
1. With the wheel still in place, hold the bracket under the wheel
drive so you can mark dimension A – the distance between the
mounting surface and the rear edge of the wheel drive front cover.
Note:If the wheel is bent or not running true, dimension A will
change. Measure the shortest distance.
2. Use a hacksaw to cut the pin
10 mm (0.4 in) LONGER
than
dimension A. Remove any sharp edges with a file or sandpaper.
3. Position the bracket so the pin is in the middle of the relevant slot.
Note: the center of the bracket pin should be 154 mm (6.1 in) from
the center of the wheel spindle.
4. Mark the center of the bracket's mounting holes then remove the
wheel and drive.
Attaching the bracket and ring/seal
1. Drill 4 mm (
5
/
32
in) diameter pilot holes for the bracket and
ring/seal mounting screws.
2. Attach the bracket using three self tapping screws
(No 10 x
3
/
4
in). Note: on fiber-glass surfaces you may
need to replace the mounting screws with suitable
nuts, bolts and washers.
3. Remove the ring/seal from the motor tube, then use
three self tapping screws (No 10 x
3
/
4
in) to attach
them to the mounting surface.
Note: make sure the rubber seal is closest to the
surface (i.e. with the metal ring on top).
Final assembly
1. Attach the drive cable to the socket on the motor
tube, then secure the cable so it is clear of any
moving parts.
2. Fit the wheel and drive back onto the wheel spindle
and fully tighten the wheel nut.
3. Route the cable to the control unit, bearing in mind
the EMC guidelines in the Handbook.
Wheel spindle
19 mm (
3
/
4
in) diameter
25 mm (1 in) diameter
32 mm (1
1
/
4
in) diameter
A
A + 10 mm
Cut here
A
Bracket location
(alternative)
minimum clearance diameter:
68 mm (2.7 in)
55 mm (2
1
/
8
in)
diameter hole
154 mm
(6.1 in)
required depth:
up to 190 mm (7.5 in)
Motor tube seal


