


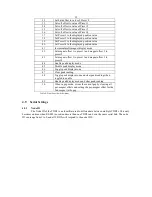


Figure 2: Editing a Floating Point Value
8
3.3.2
Front Panel Actions
The front panel switches can be configured to perform an action when pressed. Actions can be
configured to occur when the Right, Left, Up, Down, OK, or Cancel switches are pressed momentarily or
held for 2 seconds. Section 4.8 lists the available actions.
3.3.3
Navigating the Front Panel Menu
The front panel menu allows setup of the configuration values listed in section 4 of this document.
Press and hold the Right/Left and Up/Down switches simultaneously for 2 seconds to enter the menu.
Use the Right and Left keys to navigate the items in the menu. The OK key is used to select an item,
and the Cancel key is used to go back to the previously selected item.
Most top-level items are categories containing sub-items. Pressing OK selects a category and then
displays the first sub-item. These sub-items can then be navigated using the Right and Left keys. Pressing
Cancel will return to the list of categories. Pressing Cancel again will exit the front panel menu.
Pressing OK when a setup item is displayed to edit the value of that item. Instructions for editing each
type of item follow.
3.3.3.1
Editing List Items
After pressing OK, the current setting of the list item will be displayed. Press Up and Down to
cycle through the other options available. When the desired item is displayed, press OK to keep this setting
and return to the list of sub-items. Press Cancel at any time to abandon any changes made during this edit
and return to the list of sub-items.
3.3.3.2
Editing Integer Items
After pressing OK, the current setting of the integer item will be displayed. One digit will be
blinking – this is the active digit. Pressing Left or Right will change the current active digit. Press Up to
increment the active digit and press Down to decrement the active digit.
3.3.3.3
Editing Floating Point Items
After pressing OK, the current setting of the floating point item will be displayed, with one digit
blinking – the active digit. The value is formatted to have 6 digits before the decimal point and 5 digits after
the decimal point. The 11 digits cannot be displayed at
the same time, so only a portion of the value is shown
at one time. The value 12.5 is shown in Figure 2a,
where the box indicates the digits that are visible on the
display. If the active digit is not the leftmost digit of the
number, but is the leftmost digit of the display, and Left
is pressed, the digits shown on the display will shift to
the left. The transition between Figures 2a and 2b
shows this shift to the left. Likewise, if the active digit
is not the rightmost digit of the number, is the rightmost
digit of the display, and Right is pressed, the digits on
the display will shift to the right. The transition between Figures 2a and 2c show this shift to the right.
Pressing Up will increment the selected digit. Pressing Down will decrement the selected digit. If
the value is decremented below 0, the value will become negative.
When the desired value is displayed, press OK to keep this setting and return to the list of sub-
items. Press Cancel at any time to abandon any changes made during this edit and return to the list of sub-
items.
Note: The TDD2 stores floating point values in 32-bit IEEE format. This allows for 7 decimal
digits of precision. If a very large value is being edited, the smallest digits may not maintain the exact
value entered.
3.3.3.4
Editing Hexadecimal Integers
The hexadecimal integers involved in configuration of the TDD2 are always 32-bits long, and take 8
digits to display. Because the 8 digits cannot be displayed at the same time, only a portion of the value is
shown at one time. Shifting which digits are displayed is the same as editing a floating-point value (see


