


21
Placing an object
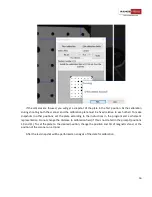
After you create a project, place an object in front of
the scanner at the working distance from the cameras.
The approximate distance to the surface of the object is
specified in the table in
s ection. The object
must be mounted securely to avoid vibration and change
of the position during the scan process. If the object does
not fit entirely into the scan area, you should not move
the scanner further to "increase" the scanning area. This
will lead to the decreased quality of the model. Scan the
object in a few positions, for example, the top and the
bottom parts separately, and then unite these parts. Using the auxiliary materials for securing an object,
take into account the possibility of their removal from the 3D model.
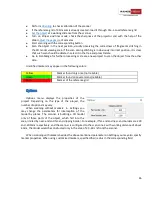
Adjusting the exposure and brightness
After you place an object at the needed distance, switch the projector to the
Lines and Stripes
lighting
mode
.
Adjusting exposure of the cameras (the slider in the toolbar), get maximum exposure value, which
does not cause red dots to appear on the lines. Areas of the image, not relating to the scanned object, don't
matter. Red color mark the areas of the excess lighting. The scanner doesn't digitize such areas. On the
figures below you may see the examples of too high exposure value (the object is in excessive light) and too
low value (the object is too dark).
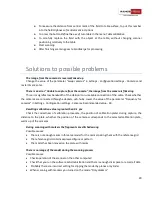
When working on battery, the brightness of illumination is lowered. Projector with fully charged battery
may work about an hour without being connected to a power supply.
Due to close distance to an object, it may be necessary to lower the brightness of lines and stripes in the
menu
Brightness settings.
Set the brightness of lines at approximately 2 times greater than the one of the