background image

Pro3 Series


3D Printer


/ User Manual

12

13

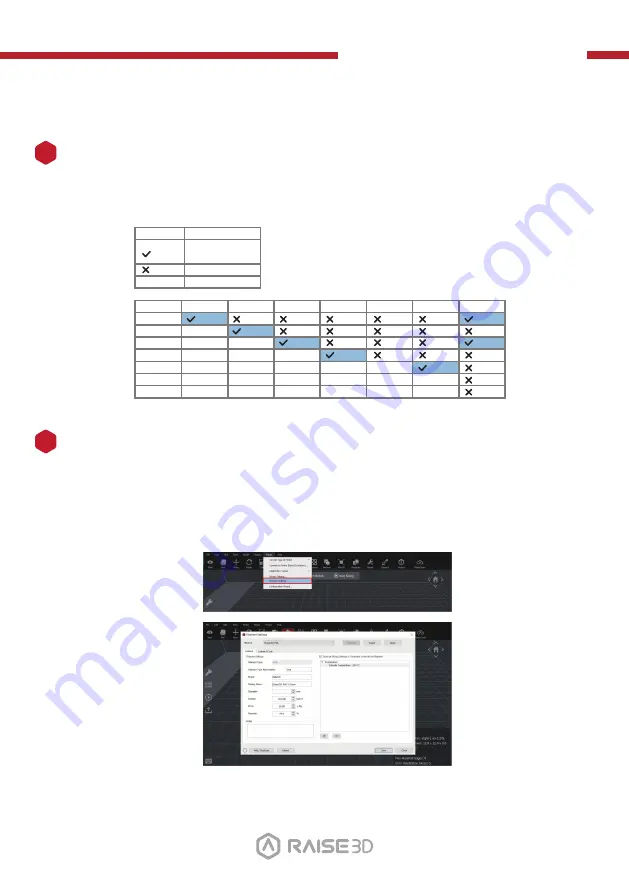
Dual-extrusion with Multiple Filament Types

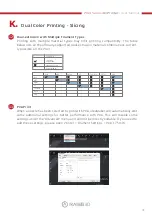
Printing with multiple material types may limit printing compatibility. The table 

below lists all the officially-supported dual-extrusion material combinations current-

ly possible on the Pro3.

K.


Dual Color Printing - Slicing

PVA Print

When a nozzle has been selected to print with PVA, ideaMaker will automatically edit 

some additional settings for better performance with PVA. This will disable some 

settings under the "Advanced" menu and will not be directly editable. If you need to 

edit these settings, please open Printer > Filament Settings > PVA 1.75mm.

LEGENDA

Officially

supported
Not supported
Experimental

PLA

Nylon

TPU 95A

PC

ABS

PETG

PVA

PLA
ABS
Nylon
PC
TPU 95A
PETG
PVA

36

Summary of Contents for Pro3 Plus

Page 1: ...ire manual before operating the printer This is a class A product In a domestic environment this product may cause radio interference in which case the user may be required to take adequate measures Pro3 Series 3D Printer Pro3 Pro3 Plus ...

Page 2: ......

Page 3: ...The contents of this User Manual maybe updated overtime For the latest version scan the QR code or visit the link below https support raise3d com Pro3 Series user manual 26 1399 html ...

Page 4: ...Pro3 Series 3D Printer User Manual CONTENTS 01 ...

Page 5: ...or the installer and the user of the printer Follow the safety instructions and warnings Please keep the instruction manual and the product information safe for future reference or for the next owner When unboxing the printer it should be checked for any damage that may have happened in transit If any damage is observed the printer should not be powered on before contact ing support If you have an...

Page 6: ...an meet the normal load requirements of the printers Please ensure that the power supply system current voltage and cables can meet the normal load requirements of the electrical printers Never equip the printer with an external switching device e g a timer or remote control When installing the printer check that the power cable is not trapped or damaged Select the fuse according to the fuse safet...

Page 7: ...he part break ing off the machine If the printer is moved by holding onto protruding components such as the printer door the parts may break off CAUTION Risk of cutting Touching sharp edges on the printer may lead to cuts Do not touch the sharp edges on the printer Wear protective gloves when installing and transporting the printer Safe use 5 Follow these safety instructions when using the machine...

Page 8: ...is hot When operating or printing at high temperatures the shell of the printer becomes hot Do not touch the print bed when it is hot Please operate with the heat resistant gloves in the attachments box Keep children away from the print bed when it is hot When operating or printing at high temperatures the print bed becomes hot Some parts in the printer are sharp and may cause injury To avoid inju...

Page 9: ...rd is damaged it must be replaced by the manufac turer the manufacturer s Customer Service or a similarly qualified person in order to prevent any risk WARNING Risk of electric shock Safe Maintenance 6 Improper repairs are dangerous CAUTION Risk of injury Do not use a steam cleaner or spray to clean the printer The use of non original spare parts and non original accessories is dangerous Ingress o...

Page 10: ...rmful interfer ence when the equipment is operated in a commercial environment This equipment generates uses and can radiate radio frequency energy and if not installed and used in accordance with the instruction manual may cause harmful interference to radio communications Operation of this equipment in a residential area is likely to cause harmful interfer ence in which case the user will be req...

Page 11: ...Temperature Connectivity Noise Emission Acoustic Operating Ambient Temperature Storage Temperature Filter PLA ABS HIPS PC TPU TPE PETG ASA PP PVA Nylon Glass Fiber Infused Carbon Fiber Infused Metal Fill Wood Fill 0 4 mm Default 0 2 0 6 0 8 1 0 mm Available 300 Wi Fi LAN USB port Live camera 55 dB A when building 15 30 C 10 90 RH non condensing 25 to 55 C 10 90 RH non condensing HEPA filter with a...

Page 12: ... USB Interface Camera Air Flow Manager Filament Guide Tube Ethernet Port Pro3 Power Inlet Input Power USB Interface Filament Run out Sensor Camera Air Flow Manager Filament Box Electric Control System Filament Box Electric Control System Filament Guide Tube Flat Cable Ethernet Port Touch Screen Hot End Fans Print Bed Extruder Top Cover Top Cover Flat Cable 09 ...

Page 13: ...er F Build Plate A plate for printing the model G Camera Used to observe the operation of the printer H Filament Guide Tube Protects and guides filaments I Flat Cable The integrated cable that transmits the signal from the motion controller board to the extruder a new flat cable is adopted to replace the large drag chain of Pro2 printer which reduces the weight of the extruder and avoids the saggi...

Page 14: ...charged which can accommodate 2 rolls of 1kg filaments at the same time M Electric Control System Stores the motion controller board N USB Interface 2 USB2 0 interfaces O Ethernet Port RJ45 port to connect the printer to a network P Input Power AC input and switching D List of Parts 11 ...

Page 15: ...sign indicates the presence of high voltages Always stay away from exposed circuitry It is recommended that all conductors be removed Replacement fuse identification and rating markings Identification of a suitable replacement fuse shall be marked adjacent to the fuse holder Protective Earthing Conductor Terminal Marked near the protective earthing conductor terminal Hot parts Burned fingers when ...

Page 16: ...ts and or default settings for better performance The Raise3D printer is designed with strong compatibility with filaments However please be very careful when using unverified filaments and settings This may cause abnormal printing tasks or damage the printer Please consult Raise3D or authorized dealers in your area for technical support and services Warning The printer belongs to EN55032 Class A ...

Page 17: ...may cause radio interference in which case the user may be required to take adequate measures AT DE LV NO FI BE IS LI PL SE BG IE LT PT CH CZ IT LU RO UK DK EL HU SI HR EE ES ME SK FR CY NL TR CE Output power table Function Frequency 2412 2472 MHz 5150 5250 MHz 5725 5850 MHz Frequency 18 dBm b 18 dBm g 13 dBm HT 19 dBm a 18 5 dBm HT20 17 5 dBm HT40 14 dBm a 14 dBm HT20 14 dBm HT40 Wi Fi FCC Output...

Page 18: ...ur hex head security bolts from Z axis clamps 2 bolts each These are located on the left and right sides of the printer of the ball screw thread Peel off the yellow stickers and remove the 24 security spacers These clips are designed to hold the extruder assembly in place during shipping and should be saved for future transport Do not operate the printer with the clips installed 1 Remove Plug the ...

Page 19: ...e touch screen displays the Home screen the printer is ready Once the unit is powered on the printer will go through a start up sequence Your Raise3D printer will take approxi mately 60 seconds to boot up When the touch screen displays the Home screen the printer is ready 5 Tap the Utilities tab and press the Z Homing button Press OK for the print bed to begin to Home to the origin position This w...

Page 20: ...et Right Z Probe Offset Bed Leveling R Nozzle XY Offset and Dual Color Cube The calibration process also includes loading the filament After all calibrations are completed by following the instructions on Raisetouch subsequent printing can be performed NOTE Once all the basic settings are completed a window introducing EVE will pop up Please follow it to move to the next step 8 Adjust the distance...

Page 21: ...et a better bottom surface of the model avoiding warping or the model detaching from the build surface 11 Adjust the matching gap between the left and right nozzles to ensure that the model will not be staggered in dual col or printing 12 It aims to verify whether the adjust ments in the previous four wizards are appropriate 18 ...

Page 22: ...Raise3D Supplies and Accessories Filament Holder 2 Filament 2 Nozzle Cleaning Kit Tweezers USB Storage Thumb Screws Other Accessories Spare Power Cable 5 Spatula Heat Resistant Gloves Hex Wrenches 2 5mm 2mm 1 5mm 3mm 0 3 mm Feeler Gauge Filament Guide Tube 2 19 ...

Page 23: ...stall ideaMaker and click Next 1 The slicing software ideaMaker is available on the USB storage device included with your printer Additional downloads and versions are available online at https www raise3d com download www raise3d com Download ideaMaker WINDOWS 20 ...

Page 24: ...ter User Manual Click Finish and ideaMaker is installed Follow the instructions provided by the guide and click Install After the installa tion is finished click Next to go to the next step 2 3 G ideaMaker Installation 21 ...

Page 25: ...for the ideaMaker installer This is located in the USB storage device included with your printer Alternatively you can download the latest version from www raise3d com pages download down im Next drag the ideaMaker icon left into the Application folder on the right side MAC OS X 22 ...

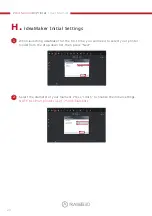
Page 26: ...s When launching ideaMaker for the first time you will need to select your printer model from the drop down list then press Next 1 Select the diameter of your filament Press Finish to finalize the initial settings NOTE ALL Pro3 printers use 1 75 mm filaments 2 23 ...

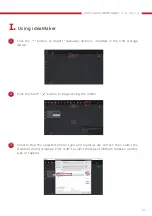
Page 27: ...slicing the model 2 Click the button to import Giveaway Spinner included in the USB storage device 1 Confirm that the selected printer type and material are correct then select the standard slicing template Click Edit to select the type of Platform Addition and the type of Support 3 24 ...

Page 28: ...ave and Close to return to the previous menu Click Slice to generate your file 4 Save the sliced files gcode and data by exporting them on the USB storage device NOTE File names that do not conform to the Western Latin character set may not display properly 5 Confirm that the files are saved and eject the USB storage device 6 25 ...

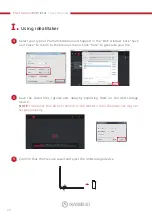
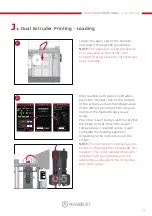
Page 29: ...b on the bottom of the screen and set the temperature of the left nozzle to match the require ments of the filament that you are using Press the Load button and the printer will begin to heat When the target temperature is reached press Load Complete the feeding operation according to the instructions on the screen NOTE This document s instructions are based on the properties of Raise3D PLA filame...

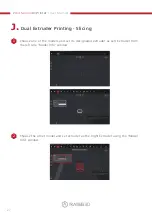
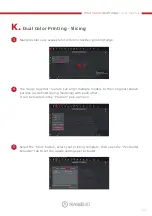
Page 30: ...Dual Extruder Printing Slicing Choose one of the models and set its designated extruder as Left Extruder from the left side Model Info window 1 Choose the other model and set extruder as the Right Extruder using the Model Info window 2 27 ...

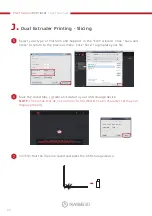
Page 31: ...Printing Slicing Confirm your printer type and materials for both extruders then select the standard sliding template Click Edit to select the type of Platform Addition and the type of Support 3 Click the Start or button to begin slicing the model 4 28 ...

Page 32: ...age device 7 Save the sliced files gcode and data to your USB storage device NOTE File names that do not conform to the Western Latin character set may not display properly 6 Select your type of Platform and Support in the Edit window Click Save and Close to return to the previous menu Click Slice to generate your file 5 29 ...

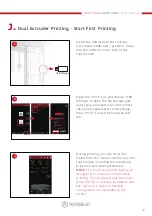
Page 33: ...ile printing This image will only be shown when the file is sliced by ideaMaker and the data file is saved in the USB storage device or uploaded to the screen Open the Print tab and choose USB Storage to open the file storage path Select your dual extrusion file to check the printing parameters and settings Press Print to start printing the test file 2 1 USB Storage Insert the USB device that cont...

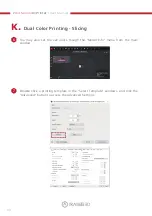
Page 34: ...g range To check the printing range of each nozzle when aligning models tick the Show Extruder s Printing Range box 1 To perform higher level dual color printing and carry out offset calibration at the same time please do the following Load your filament type for both the left and right extruders 2 31 ...

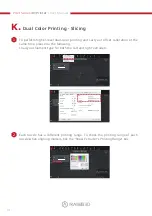
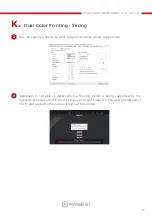
Page 35: ...ir original relative position as defined during modeling with each other It can be located in the Position pop up menu Multiple colors are available for different nozzles printing range 4 3 Select the Start button select your printing template then open the Per Model Extruder tab to set the nozzle settings per extruder 5 32 ...

Page 36: ...Dual Color Printing Slicing Double click a printing template in the Select Template windows and click the Advanced button to access the Advanced Settings You may also set the extruders though the Model Info menu from the main window 7 6 33 ...

Page 37: ...not able to detect when a floating model is being supported by the opposite extruder and will prompt the user to add supports The user should select not to add support structure as it will not be needed You can specify a nozzle to print support structure under Support tab 9 8 34 ...

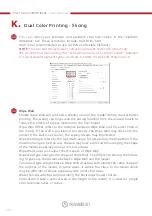
Page 38: ...shell of the model If the wall is positioned too closely the Wipe Wall may stick onto the model If the wall is set too far the wiping results may be affected Wipe Wall Angle refers to the maximum angle for generating the Wipe Wall If the maximum angle is set too low the wall may have a difficult time obeying the shape of the model especially around curved surfaces Wipe Wall Loop Lines adjust the t...

Page 39: ...Dual Color Printing Slicing PVA Print When a nozzle has been selected to print with PVA ideaMaker will automatically edit some additional settings for better performance with PVA This will disable some settings under the Advanced menu and will not be directly editable If you need to edit these settings please open Printer Filament Settings PVA 1 75mm LEGENDA Officially supported Not supported Expe...

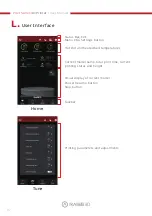
Page 40: ...ar EVE Menu title Settings button Taskbar Current model name total print time current Visual display of current model Pause Resume button Stop button printing status and height Home Hot End and heated bed temperatures Tune Printing parameters and adjustments 37 ...

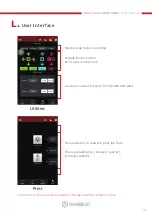
Page 41: ...e home Load and unload function for the L R extruders Moving step distance setting Disable Motor button Check uploading list recovery task list Print Choose where to load the print job from Contents of this brochure could be changed without written notice printing statistics 38 ...

Page 42: ...Experiencing Difficulties Contact Information If you run into any issues during this guided setup please contact our expert techni cians by opening a ticket online at support raise3d com ...

Page 43: ......

Page 44: ...US Office 43 Tesla Irvine CA 92618 USA Netherlands Office Stationsplein 45 Unit A4 004 3013AK Rotterdam the Netherlands China office 4th Floor B5 1688 North Guoquan Raod Yangpu District Shanghai 200438 ...

Reviews: