background image

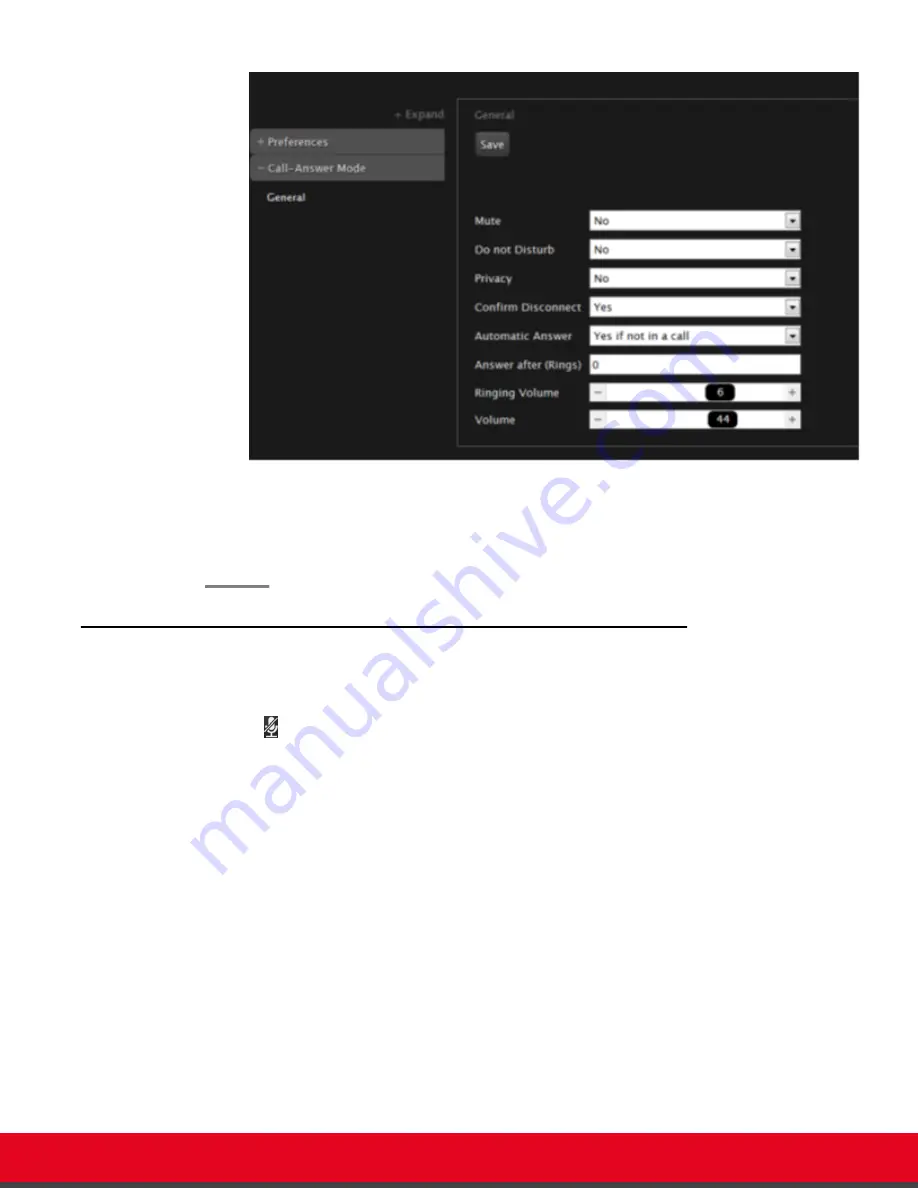
Figure 47: Call-Answer settings

2.  Drag the 

Volume

 slider to set the value.

3.  From the web interface only, select 

Save

.

Muting the Microphone

You can mute the microphone (embedded in the camera)or the optional Microphone Pod in your room if
you do not want participants at the remote site to hear you by doing one of the following:

Press the   Mute key on the XT Remote Control Unit to mute the embedded microphone or press
the Mute button on the optional Microphone Pod.

• Press 

ok/menu

 to access the In-call menu and select 

Mute Myself

:

User Guide for Scopia XT Executive Version 3.2

During Your Videoconference | 67

Summary of Contents for Scopia XT Series

Page 1: ...Scopia XT Executive User Guide Version 3 2 For Solution 7 7 8 0 x 8 2 3 2...

Page 2: ...ts RADVISION Ltd reserves the right to revise this publication and make changes without obligation to notify any person of such revisions or changes RADVISION Ltd may make improvements or changes in t...

Page 3: ...ontrol the Scopia XT Executive 24 Connecting to a Scopia XT Executive Used as a Room Endpoint 27 Switching Control Between Scopia XT Executive and Your Computer 28 Performing Basic Configuration 29 Ac...

Page 4: ...Headphones to the Scopia XT Executive 68 About Video Layouts 69 Selecting your Video Layout 69 Changing the Video Layout During the Call 71 Sharing Content 73 Sharing Content during a Call 73 Saving C...

Page 5: ...n for Customer Support 97 Resolving Monitor Display Problems 99 Resolving Problems Viewing Computer Content 100 Resolving XT Remote Control Unit Problems 100 Restoring Default User Settings 100 Resolv...

Page 6: ...increases so does the audio quality Audio input is provided with either a dedicated 3 way 1 way Microphone Pod or a microphone embedded in the camera depending on the model High quality video and audi...

Page 7: ...ive access to its features and a camera which varies depending on the specific model This section provides an overview of each model in the Scopia XT Series product line For more information about the...

Page 8: ...ce cost effective HD videoconferencing with the Scopia XT4000 Series which was designed specifically for small meeting rooms The included camera has 5x with an option to upgrade to 10x Figure 3 Scopia...

Page 9: ...s of the Scopia XT1200 or the Scopia XT5000 Figure 5 Scopia XT Telepresence Scopia XT Executive Designed as a professional personal endpoint the Scopia XT Executive is an all in one HD videoconferenci...

Page 10: ...stem designed to quickly convert a regular meeting room into a videoconferencing room it includes single or dual 55 inch high quality monitors mounted on a mobile stand This system uses the powerful X...

Page 11: ...onference connect from Scopia XT Desktop clients or devices running Scopia Mobile you can include up to 7 remote endpoints since one port is reserved for connecting to the Scopia XT Desktop Server For...

Page 12: ...60 fps Dual video at 720p 60 fps 1080p optional Dual video at 720p 60fps Dual video at 1080p 30fps Dual video at 1080p 60 30 fps Dual video at 1080p 60 fps High network error resilience SVC H 264 Hig...

Page 13: ...istrator should install and activate your XT Series For details see the following documentation Quick Setup Guide for Scopia XT Series Explains the simplest configuration necessary for the system to w...

Page 14: ...nference license required 7 If your endpoint has an embedded MCU license required you can also host videoconferences as described in Hosting Videoconferences with the Built in MCU on page 78 8 Set up...

Page 15: ...I socket of the XT Codec Unit and connect the other end of the cable to the computer Figure 8 Connecting a computer to Scopia XT Series For computers with a VGA output connector use the included DVI...

Page 16: ...ckering during the videoconference set the computer display to one of the supported picture resolutions and refresh frequencies This procedure assumes computers running Microsoft Windows Procedure 1 F...

Page 17: ...280x720 60 60 XGA 1024x768 60 70 75 60 70 75 SVGA 800x600 60 72 75 60 72 75 VGA 640x480 72 75 72 75 5 Select Apply How to Control the Scopia XT Executive You can set up and control your XT Series as w...

Page 18: ...ow to access the XT Series web interface The XT Series supports the following internet browsers Internet Explorer version 8 or later Google Chrome version 11 or later Mozilla Firefox version 3 6 or la...

Page 19: ...natively you can use your keyboard and mouse to navigate the menus as described in Using the Keyboard and Mouse to Control the Scopia XT Executive on page 24 Before you begin To access the endpoint s...

Page 20: ...ng start recording a videoconference license required Configure perform basic configuration and check the system status Important When you access the system for the first time only the Quick Setup wiz...

Page 21: ...on page 24 for details The XT Remote Control Unit has an improved design and increases usability to give you a smoother and more efficient videoconferencing experience Figure 12 The new XT Remote Cont...

Page 22: ...list press ok menu repeatedly to scroll through the options Use the XT Remote Control Unit keypad to enter letters and digits The default input method is abc1 you must press the required character key...

Page 23: ...Unit and the system software An XT Remote Control Unit is configured with code 01 by default Before you begin Decide what numeric code you want to use for your monitor and the XT Codec Unit You can c...

Page 24: ...e Control code appear at the top right corner of the screen Important The code and icon do not appear when the default code 01 is used 6 Set the code and exit by doing one of the following In the web...

Page 25: ...e 20 for details Before you begin To access the endpoint s main menu using your keyboard and mouse you must first perform the following procedures 1 Connect your computer to the Scopia XT Executive to...

Page 26: ...Control Unit Select an option Press Enter Click on the option Press ok menu Enter text Enter the characters numbers uppercase lowercase etc using your keyboard Use the XT Remote Control Unit keypad t...

Page 27: ...m Endpoint About this task If using the Scopia XT Executive as a room endpoint you must first connect to Scopia XT Control before using your keyboard and mouse to control the Scopia XT Executive The i...

Page 28: ...the Keyboard and Mouse to Control the Scopia XT Executive on page 24 Follow the instructions below to switch control between the Scopia XT Control and your computer when you are not in a call During a...

Page 29: ...eries first define basic settings such as the system s name language and network settings This is relevant for both new installations and also after restoring default settings and re installing softwa...

Page 30: ...tings and re installing software You can do this procedure from the endpoint itself or from the XT Series web interface Before you begin Your system administrator might already have set these paramete...

Page 31: ...tekeeper Settings on page 37 If your Scopia XT Series works in conjunction with a gatekeeper configure gatekeeper related settings Installing Scopia XT Control on page 38 To use your keyboard and mous...

Page 32: ...gure 18 Setting Country and Language 2 Select the required country from the Country list If performing this task from the endpoint interface use the arrow keys and press ok menu The system menu and th...

Page 33: ...nitor does not center the image correctly perform this procedure This can be done from the endpoint itself only Before you begin This procedure is performed as part of the Quick Setup Wizard after Set...

Page 34: ...top left corner Figure 20 Adjusting the image position 3 Use the arrow keys on the XT Remote Control Unit to position the image and then press ok menu 4 Press 2 to align the bottom right corner User...

Page 35: ...ng the Quick Setup Procedure on page 30 Procedure 1 Press ok menu and select one of the following from the IP Address Mode list Automatic Default Select this option if the system gets its IP address a...

Page 36: ...k that has been assigned Gateway Enter the default gateway static IP address The gateway is used to route information between two subnets for example between the headquarters and a partner site If the...

Page 37: ...lation Guide for Scopia XT Series Before you begin This procedure is performed as part of the basic configuration after Configuring Network Settings on page 35 Consult with your network administrator...

Page 38: ...quirements PC Windows XP Vista 7 8 Mac OSX v10 x up to 10 8 Perform the following procedures 1 Connect your computer to the Scopia XT Executive to use the Scopia XT Executive as your computer s monito...

Page 39: ...age to a folder on your computer b Launch the application by selecting the Scopia XT Control icon 5 For Windows users only select and run the setup package The installation wizard opens a Select Next...

Page 40: ...System Name and Language About this task This procedure describes how to set the name and language of the endpoint from the web interface You can also do this as part of the quick setup from the endpo...

Page 41: ...page 2 Enter the name of the XT Series in the System Name field 3 Select the required language from the Language list 4 From the web interface only select Save User Guide for Scopia XT Executive Versi...

Page 42: ...e for a videoconference To quickly dial with the settings best suited for a specific contact we recommend setting up your phone book to include calling preferences along with the contact s information...

Page 43: ...ontact from the Phone Book on page 47 Adding and Modifying Contacts in the Phone Book About this task If you are using the Scopia XT Series s local LDAP server you can add a new contact to the phonebo...

Page 44: ...alls or Contact list 2 Select the Plus icon next to Insert number Figure 28 Entering contact dialing information from the web interface 3 Enter the required information as described in Table 6 Enterin...

Page 45: ...tact Company Optional Enter the company name 4 Enter additional information for this contact such as the number and default call type as described in Table 7 Entering advanced information for a contac...

Page 46: ...andwidth is used 5 From the web interface only select Save Searching for a Contact in the Phone Book About this task You can search by first or last name or you can display all contacts You can do thi...

Page 47: ...ou can perform this procedure with your XT Remote Control Unit as described below or using your keyboard and mouse for more information see Using the Keyboard and Mouse to Control the Scopia XT Execut...

Page 48: ...umber using the XT Remote Control Unit Dialing a contact in the phone book to add a contact to the phone book see Adding and Modifying Contacts in the Phone Book on page 43 Dialing a number from the r...

Page 49: ...d calling options such as the call rate see Modifying the Default Call Settings on page 51 Figure 32 Dialing a number from the endpoint Dialing a Number from the XT Series Web Interface About this tas...

Page 50: ...n in your organization contact your system administrator Procedure 1 Access the XT Series web interface as described in Accessing XT Series Web Interface on page 18 2 Select the number to call from XT...

Page 51: ...ok to always use these customized settings as described in Adding and Modifying Contacts in the Phone Book on page 43 Procedure 1 Access the Advanced Calling Options menu as follows From the endpoint...

Page 52: ...Advanced Calling Settings Field Name Description Call protocol If necessary select the protocol to use when calling this personal endpoint or meeting room H 323 Select for H 323 endpoints such as oth...

Page 53: ...anual answering you can either accept or reject the incoming call When there is an incoming call the system displays a window with these options Figure 35 Answering a video call on page 53 Figure 35 A...

Page 54: ...see Confirming Call Disconnections on page 92 for details If your system administrator defined a time limit for videoconferences a message appears when the limit is reached and you can select one of t...

Page 55: ...a Number from the XT Series Web Interface on page 49 If your system administrator enabled encryption in your system and your call is secured an icon showing a padlock appears on your display For more...

Page 56: ...d videoconferences and store them to a connected USB storage device This procedure describes how to configure your recording preferences such as the video resolution and bitrate This is useful for exa...

Page 57: ...erface select Basic Settings Recording General From the endpoint s main menu select Configure Recording Figure 37 Setting your recording preferences 2 Define the following recording settings User Guid...

Page 58: ...me cases you can select a lower bitrate without noticing a significant drop in video quality for example during a presentation or when a lecturer is speaking and there is very little motion In video r...

Page 59: ...n recording a videoconference on a system with an embedded MCU you can include up to 4 remote endpoints The Scopia XT Series SMB Edition edition can include up to 4 remote endpoints You cannot at pres...

Page 60: ...ng In the web interface the remaining time appears at the bottom of the recording page Figure 42 Viewing a Recording from the Web Interface on page 62 Figure 40 Recording icon and time remaining on th...

Page 61: ...u can also view the recordings from the USB storage device itself The file is saved as endpoint ID name of endpoint date time MP4 for example 0011D_XT_2013_05_01_10_30 MP4 For more information on how...

Page 62: ...ontrol the way the video is displayed to control the audio output and input Navigation Blocking Video From the Scopia XT Series on page 62 Moving the Camera s Position on page 63 Adjusting the Volume...

Page 63: ...our video during a videoconference as follows Press and hold the Mute key on the XT Remote Control Unit Press ok menu to access the In call menu and select Privacy Options Privacy Figure 43 In call me...

Page 64: ...s ok menu During a videoconference press ok menu to access the videoconference menu Figure 44 Controlling your camera on page 64 and then select Control Camera You can now move the camera that you con...

Page 65: ...oom in slightly You cannot move the camera if the image has not been zoomed Adjusting the Volume About this task Press or on the XT Remote Control Unit to adjust the sound you hear when receiving a ca...

Page 66: ...mote Control Unit as described below or using your keyboard and mouse for more information see Using the Keyboard and Mouse to Control the Scopia XT Executive on page 24 Procedure 1 Access the volume...

Page 67: ...l Microphone Pod in your room if you do not want participants at the remote site to hear you by doing one of the following Press the Mute key on the XT Remote Control Unit to mute the embedded microph...

Page 68: ...phones to the Scopia XT Executive as described below During a call you hear the audio output on your headphones and remote participants hear the audio input from either the Scopia XT Executive s built...

Page 69: ...ideo Layout on page 69 Changing the Video Layout During the Call on page 71 Selecting your Video Layout About this task A video layout is the arrangement of participant images as they appear on the mo...

Page 70: ...the screen and the remote video in the small image PaP The PaP Picture and Picture view shows two images of the same size presented side by side PoP The PoP Picture out Picture view shows up to three...

Page 71: ...CU Edition see Changing the Video Layout from the Scopia XT Series MCU Edition on page 80 For more information about video layouts in point to point calls see About Video Layouts on page 69 You can ch...

Page 72: ...n page 71 for layout descriptions Alternatively right click an empty area of the main menu or call page and select the desired layout from the popup window Figure 52 Changing the video layout during a...

Page 73: ...on the XT Remote Control Unit Figure 54 Available video layouts in a call Sharing Content This section details how to share a presentation or any other file from a PC Whether your Scopia XT Executive...

Page 74: ...yout on page 69 and Changing the Video Layout During the Call on page 71 Important If your computer s audio output is connected to the audio input on the XT Codec Unit it is also shared with other par...

Page 75: ...8 2 Repeat the previous step to stop sharing the presentation Saving Content from the Videoconference About this task During a videoconference you can save the following content from the Scopia XT Exe...

Page 76: ...age to the computer s clipboard If both windows are the same size the content from the left hand window is taken Important A watermark is automatically added to the generated image 2 If your computer...

Page 77: ...r creating each snapshot a Access your computer screen by clicking the window in the layout that is displaying your computer screen Alternatively press Backspace or CTRL SHIFT 1 on your keyboard b Ope...

Page 78: ...t videoconferences license required Scopia XT5000 Series Yes Scopia XT1200 Yes Scopia XT Executive Yes Scopia XT4000 Series No Navigation Starting a Locally Hosted Videoconference on page 78 Hiding yo...

Page 79: ...ndpoint on page 48 or Dialing a Number from the XT Series Web Interface on page 49 Important Your organization may also have implemented a dial plan which defines various dial prefixes to determine th...

Page 80: ...with your XT Remote Control Unit as described below or using your keyboard and mouse for more information see Using the Keyboard and Mouse to Control the Scopia XT Executive on page 24 Alternatively...

Page 81: ...all For more information about moderating videoconferences seeModerating a Hosted Videoconference on page 83 and Moderating a Videoconference Hosted by Another Scopia XT Series on page 85 You can perf...

Page 82: ...ence as described in Moderating a Videoconference Hosted by Another Scopia XT Series on page 85 Procedure 1 While in a videoconference From the endpoint interface press ok menu on the XT Remote Contro...

Page 83: ...this task When you host your videoconference using the Scopia XT Series s built in MCU you are the moderator of conferences hosted on this XT Series This procedure describes how to invite and manage t...

Page 84: ...the endpoint press ok menu to access the videoconference menu and select Participants Figure 63 Moderating a hosted videoconference 2 You can moderate the videoconference as follows a To mute all par...

Page 85: ...ct to disconnect the selected endpoint c To view detailed information about an endpoint in the videoconference such as it s name dialing number and call rate From the XT Series web interface select Di...

Page 86: ...page 24 Alternatively to host the videoconference on your XT Series see Moderating a Hosted Videoconference on page 83 Important If the endpoint hosting the meeting does not support H 243 and your Sc...

Page 87: ...hosting a conference you can end the meeting and disconnect all endpoints in the videoconference To disconnect a specific endpoint only see Moderating a Hosted Videoconference on page 83 or Moderatin...

Page 88: ...mit is reached and you can select one of the following Figure 69 Meeting Duration Alert End Meeting to immediately end the call Do Not Limit to remove the time limit Snooze to postpone the reminder an...

Page 89: ...ayed on the interface If set you are required to enter this code before viewing or modifying any basic settings You can do this procedure from the endpoint itself or from the XT Series web interface B...

Page 90: ...ave your changes as follows From the endpoint select Done From the web interface select Save Use this new PIN the next time you are required access basic settings Setting Call Answering Preferences Ab...

Page 91: ...and your computer screen is displayed on the monitor the system does not automatically answer calls If you select this option the system only answers calls automatically if you are browsing in the end...

Page 92: ...nected By default calls are disconnected when a participant ends the call without requiring a confirmation You can perform this procedure with your XT Remote Control Unit as described below or using y...

Page 93: ...bled The system blocks notifications of incoming calls The icon appears in the system information area of the monitor display When a remote endpoint calls the system informs it that you are unavailabl...

Page 94: ...urb on page 94 To disable select Turn off Do not disturb from the endpoint s main menu and press ok menu Figure 73 Enabling Do Not Disturb Procedure 1 Access the call settings as follows From the XT S...

Page 95: ...lay indicating that the remote endpoint no longer receives video from your local endpoint You can perform this procedure with your XT Remote Control Unit as described below or using your keyboard and...

Page 96: ...saver helps protect your monitor from burn in without switching it off You can activate the screen saver at any moment by pressing the Power key on the XT Remote Control Unit When your Scopia XT Execu...

Page 97: ...About this task When contacting customer support or your system administrator you may need to provide information about the system This procedure describes how to view the following system information...

Page 98: ...Remote Control Unit Important If your system is currently in a call press ok menu and select Stats Configure About Figure 76 Viewing system information 2 To view additional system information such as...

Page 99: ...ank screen Solution Verify the power cord of the XT Codec Unit is connected properly at both ends Solution Verify the monitor s power cord is connected properly at both ends Solution Check that the mo...

Page 100: ...Computer to the Scopia XT Series on page 14 Solution Make sure the resolution of the PC output is supported by the XT Codec Unit see Selecting the Computer Display Resolution on page 16 Resolving XT R...

Page 101: ...and Mouse to Control the Scopia XT Executive on page 24 Before you begin Turn on the Scopia XT Series unit Verify that you have the four digit PIN code required to make changes to the system settings...

Page 102: ...ontrol the endpoint with your keyboard and mouse due to a failure to connect to Scopia XT Control indicated by the icon You can also check the Scopia XT Control connection status in the Scopia XT Exec...

Page 103: ...be authenticated by Scopia XT Control each time it is connected The icon indicates that authentication is required Solution Connect to Scopia XT Control as described in Connecting to a Scopia XT Execu...

Page 104: ...NTSC It is four times the resolution of CIF and is most widespread as the standard analog TV resolution 4SIF 4SIF describes a video resolution of 704 x 480 pixels NTSC or 704 x 576 PAL This is often...

Page 105: ...when a lecturer is speaking and there is very little motion In video recordings the bitrate determines the file size for each minute of recording Call Control See Signaling on page 116 Cascaded Video...

Page 106: ...in the organization s LDAP directory as associated exclusively with this user Dial Plan A dial plan defines various dial prefixes to determine the characteristics of a call For example dial 8 before...

Page 107: ...bile device endpoints like Scopia Mobile room systems like XT Series and telepresence systems like Scopia XT Telepresence Endpoint Alias See Alias on page 104 FEC Forward Error Correction FEC is a pro...

Page 108: ...olving dial strings H 323 alias or URI into the IP address of an endpoint and handles the initial connection of calls Gatekeepers also implement the dial plan of an organization by routing H 323 calls...

Page 109: ...sed to negotiate call parameters between endpoints and can control a remote endpoint from your local endpoint It is part of the H 323 set of protocols H 261 H 261 is an older protocol used to compress...

Page 110: ...in videoconferencing requires that both the sender and receiver s endpoints support it This is different from SVC which is an adaptive technology working to improve quality even when only one side sup...

Page 111: ...browser access to the web interface of many Scopia Solution products Image Resolution See Resolution on page 115 kbps Kilobits per second kbps is the standard unit to measure bitrate measuring the th...

Page 112: ...are a single set of addresses A distributed deployment places these components in different locations often connected via a VPN Management Management refers to the administration messages sent between...

Page 113: ...etwork This value must remain consistent for all network components including servers like the MCU and Scopia Desktop Server endpoints like XT Series and other network devices like LDAP servers and ne...

Page 114: ...e PiP Video Layout The PiP Picture In Picture view shows a video image in the main screen with an additional smaller image overlapping in the corner Typically a remote presentation is displayed in the...

Page 115: ...es video quality but typically requires higher bandwidth and more computing power Techniques like SVC H 264 High Profile and FEC reduce bandwidth usage by compressing the data to a smaller footprint a...

Page 116: ...network device by adding another identical device one or more to your existing deployment In contrast a non scalable solution would require replacing existing components to increase capacity SD Stand...

Page 117: ...gistrar on page 115 Single Sign On Single Sign On SSO automatically uses your network login and password to access different enterprise systems Using SSO you do not need to separately login to each sy...

Page 118: ...er s public internet address SVC SVC extends the H 264 codec standard to dramatically increases error resiliency and video quality without the need for higher bandwidth It is especially effective over...

Page 119: ...e TLS TLS enables network devices to communicate securely by exchanging certificates to provide authentication of the devices and encryption of the communication between them Transcoding Transcoding i...

Page 120: ...me sent when the received video is corrupted by packet loss In response to a VFU request the broadcasting endpoint sends a new intra frame to serve as the baseline for the ongoing video stream Video L...

Page 121: ...A Scopia Desktop webcast becomes available when a participant in the videoconference enables the streaming feature To invite users to the webcast one of the participants attending the Scopia Desktop v...

Page 122: ...ver IP and wireless networks We offer end to end visual communications that help businesses collaborate more efficiently Together Radvision and Avaya are propelling the unified communications evolutio...

Reviews: