background image

9

Installation

6. Plug the modular cord’s other end into

the phone jack, and plug the adapter
into a standard AC outlet.

CONNECTING AND 
CHARGING THE BATTERY 
PACK

The phone comes with a rechargeable
nickel-cadmium battery pack in the handset,
but not connected. Before using your phone,
you must connect the battery pack, then
charge it for about 24 hours.

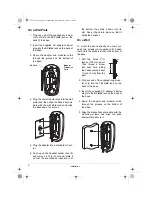
1. Press down and slide off the battery

compartment cover.

2. Lift the battery pack out of the compart-

ment. 

3. Plug the battery pack’s connector into

the socket in the compartment (the con-
nector fits only one way), then place the
battery pack in the compartment.

4. Replace the cover.

To charge the battery pack, place the hand-
set either faceup or facedown on the base.
The CHARGE/IN USE indicator on the base
lights and 

Total:00

 appears on the hand-

set display.

Recharge the battery pack when 

Low


Bat-

tery

 flashes on the display.

Important: Be sure the battery pack is prop-
erly connected before you try to charge it.
The CHARGE/IN USE indicator lights when

the handset is on the base, even if the bat-
tery pack is not connected. 

Notes:

• When you first use the phone after

charging or recharging the battery pack,
the phone might not work and you might
hear an error tone when you press

TALK

. Return the handset to the base for

about 5 seconds to reset the security
access-protection code.

• If the base loses power for about an

hour while the handset is away from it,
the security access-protection code
might be lost. To reset the code, return
the handset to the base for about 5 sec-
onds.

The handset does not lose its security
access-protection code even if the bat-
tery pack is completely discharged.

• Using a pencil eraser, clean the charg-

ing contacts on the handset and base
about once a month.

• If the battery pack becomes weak during

a call, the handset beeps every 3 sec-
onds and 

Low


Battery

 flashes. When

this happens, you cannot make a call
until you recharge the battery pack.

• About once a month, fully discharge the

battery by keeping the handset off the
base until 

Low


Battery

 flashes on

the display. Otherwise, the battery pack
loses its ability to fully recharge.

• If the display is blank and the phone

does not work, recharge the battery
pack. (The battery power might be too
low to light the display.)

• If you are not going to use your phone

for an extended period, disconnect the
battery pack. This increases the battery
pack’s usable life.

43-1122.C.fm  Page 9  Wednesday, December 13, 2000  1:56 PM

Summary of Contents for 4301122D

Page 1: ...Owner s Manual Please read before using this equipment 900MHz Cordless Telephone with Call Waiting Caller ID 43 1122 C fm Page 1 Wednesday December 13 2000 1 56 PM...

Page 2: ...our phone causes problems on the phone line the phone com pany can temporarily discontinue your ser vice If this happens the phone company attempts to notify you in advance If advance notice is not pr...

Page 3: ...ord to building surfaces with metal fittings if the product has an AC power cord 8 Unplug this product from the wall outlet before cleaning Do not use liquid clean ers or aerosol cleaners Use a damp c...

Page 4: ...abinet has been damaged If the product exhibits a distinct change in performance 18 Avoid using a telephone other than a cordless type during an electrical storm There may be a remote risk of electric...

Page 5: ...ging 13 Using a Headset 13 Memory Dialing 13 Storing a Number and Name in Memory 13 Entering a Pause 14 Editing or Deleting a Number in Memory 14 Reviewing Memory Numbers 15 Dialing a Memory Number 15...

Page 6: ...set Charging you can place the handset on the base facedown or faceup to show the Caller ID display Ample Talk and Standby Time the sup plied battery when fully charged provides about 7 hours of talk...

Page 7: ...ore you connect it to AC power When you finish disconnect the adapter from AC power before you dis connect it from the phone Your telephone connects directly to a modu lar telephone line jack If your...

Page 8: ...m then slide it down into its slot Snap it back into place so that it holds the handset On a Wall To mount the phone directly on a wall you need two screws not supplied with heads that fit into the ke...

Page 9: ...ging or recharging the battery pack the phone might not work and you might hear an error tone when you press TALK Return the handset to the base for about 5 seconds to reset the security access protec...

Page 10: ...nvolvement in this pro gram is part of the company s commitment to preserving our environment and conserving our natural resources SETTING THE DIALING MODE Your phone is set for tone dialing If you ha...

Page 11: ...Press SELECT to turn the Caller ID Call Waiting setting on or off On or Off appears indicating the selected setting 4 Return the handset to the base to store the new setting STORING YOUR AREA CODE Yo...

Page 12: ...appears as your phone search es for a clear channel ADJUSTING THE HANDSET S VOLUME To adjust the volume of the sound you hear through the handset during a call press 8 8 8 8 or 9 9 9 9 on the handset...

Page 13: ...of headsets available To connect the headset gently flip open the rubber headset jack cover on the side of the handset then insert the headset s plug into the jack Notes Connecting a headset disconne...

Page 14: ...a mistake use TONE 6 6 6 6 or 7 7 7 7 to move the cursor over the error then enter the correct character or press DELETE to delete a character To delete all characters hold down DELETE for at least 1...

Page 15: ...T when the cursor is by a memory location number To exit this display hold down DELETE until the display clears Dialing a Memory Number To dial a number stored in memory lift the handset and press MEM...

Page 16: ...RDS If the handset is face up on the base it shows the number of new and total Caller ID records and lets you view the display for any new records To review the Caller ID records lift the hand set and...

Page 17: ...9 9 9 9 to recall the record you want to store To add or delete the area code press 3 If it is a long distance number press 1 2 Press MEM Select Location appears 3 Choose a memory location 1 0 by pre...

Page 18: ...r is too low the handset cannot display Low Battery Low volume or unusual sounds Someone has picked up another phone on the same line Hang up the other phone Your conversation is difficult to hear due...

Page 19: ...to operate it If your telephone is not performing as it should take it to your local RadioShack store for assistance If the trouble is affecting the telephone lines the phone company can ask you to di...

Page 20: ...ng the warranty period take the product and the RadioShack sales receipt as proof of purchase date to any RadioShack store RadioShack will at its option un less otherwise provided by law a correct the...

Reviews: