1
IMPORTANT
Installer:
This Manual is the property of the customer
and must be retained with the product for
maintenance and operational purposes.
PRODUCT MANUAL
THERMOSTATIC BATH SHOWER MIXER
BSM
Page 1: ...1 IMPORTANT Installer This Manual is the property of the customer and must be retained with the product for maintenance and operational purposes PRODUCT MANUAL THERMOSTATIC BATH SHOWER MIXER BSM...
Page 2: ...13 Maximum Temperature 13 Maximum Temperature Setting 14 Fault Diagnosis 15 Maintenance 17 Planned Maintenance 17 Flow Regulator Removal 19 Filter Cleaning Replacement 21 Maintaining the Non Return V...
Page 3: ...m bath to shower outlet i e 44 C bath fill to below 41 C shower For ease of installation and maintenance this product includes a separate Inlet Manifold which allows access to the Inlet Connections Fi...
Page 4: ...ered as being functionally infallible 5 Provided that the Thermostatic Mixing Valve is installed commissioned operated within the specification limits and maintained according to this Manual the risk...
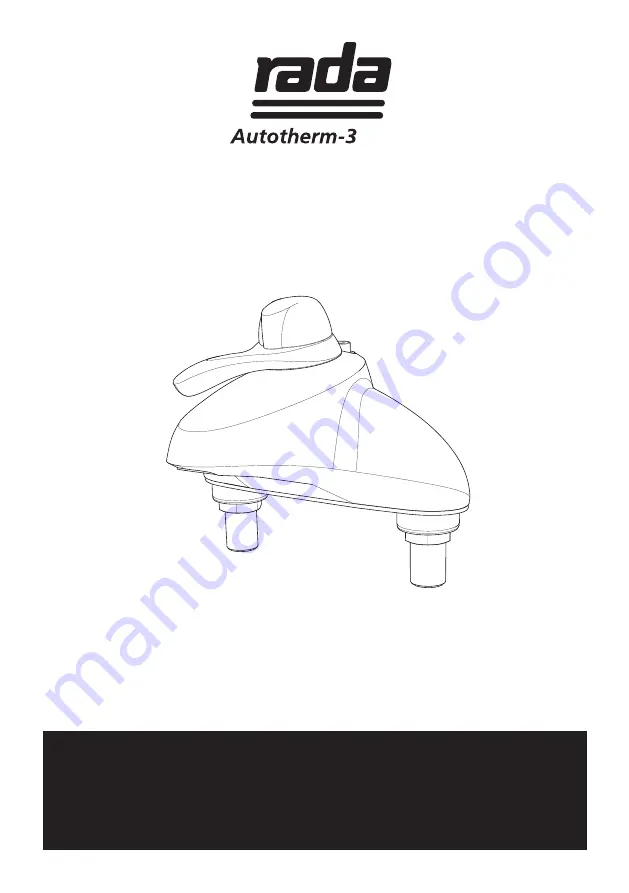
Page 5: ...1 x Quad Key 1 x Rada Autotherm 3 BSM 1 x Gasket 2 x Backnut Adaptors 2 x Backnuts 2 x Flexible Hoses With combined isolators Tick the appropriate boxes to familiarize yourself with the part names and...
Page 6: ...6 DIMENSIONS 145 180 NOTE NOT TO SCALE All dimensions are in millimetres 40 243 195 159 113 50 30 G3 4 INLETS G1 2 SHOWER...
Page 7: ...g commissioning as the setting will change with different supply conditions Thermostatic Temperature Control 35 C 45 C Note Optimum performance is obtained when a temperature differential of 20 C or m...
Page 8: ...mperature 55 C 65 C Recommended Cold Temperature 5 C 20 C Note The BSM can operate at temperatures up to 90 C for short periods without damage However for safety reasons it is recommended that the max...
Page 9: ...other system usage upon the dynamic pressures at the BSM inlets Recommended minimum supply line pipe diameter is 22 mm or 3 4 8 Systems which provide maintained supply pressures in excess of 5 Bar mu...
Page 10: ...3 Fit the two Backnut Adaptors and the two 3 4 BSP Backnuts and tighten Take care to prevent damage to the bath 4 Fit the Flexible Hoses supplied to the BSM using the Sealing Washers provided 5 Thorou...
Page 11: ...fitting of this Flow Regulator will render the Rada Autotherm 3 outside the scope of the TMV3 scheme In this case the thermostatic performance of the Rada Autotherm 3 will remain unaffected but the de...
Page 12: ...l adjusted by the Temperature Control The flow rate is determined by the supply pressures at the inlets of the product control or by the effective output power of the gas heater appliance Flow rates f...
Page 13: ...ted individually and the maximum temperature for the Autotherm 3 BSM is pre set under ideal installation conditions at the factory to approximately 44 C for bath fill and 41 C for showering Site condi...
Page 14: ...re of 44 C is obtained from the bath spout clockwise decrease temperature 5 Once the desired maximum blend temperature has been achieved refit the Temperature Control Hub without disturbing the Spindl...
Page 15: ...left side 2 Fluctuating or reduced flow a Check that the Inlet Filters are not blocked b Make sure that the minimum flow rate is sufficient for the supply conditions c Make sure that the maintained in...
Page 16: ...c Too high Supply pressure too high d Flow Regulators fitted incorrectly 7 Dripping from bath or shower outlet a Remove the Flow Divertor Cartridge and check the Cartridge Inlet Seal Replace if damage...
Page 17: ...ications such as hospitals aged person facilities residential care homes and in any other applications where the user is similarly at risk irrespective of supply and usage conditions or the evidence o...
Page 18: ...rature This is particularly important in such procedures as supervised bathing where patients are unable to respond immediately to unsafe temperatures Critical Components Irrespective of supply and us...
Page 19: ...heme In this configuration the thermostatic performance of the RadaAutotherm 3 BSM will remain unaffected but the delivery flow rates may be reduced due to the operating nature of combination boilers...
Page 20: ...tor 12 Refit the cold inlet Non Return Valve Housing and tighten with a spanner in a clockwise direction 13 Refit the Body on the Manifold and refit the 2 Body Retaining Screws 14 Refit the Cover Shro...
Page 21: ...7 Unscrew the 2 Body Retaining Screws using the 5 mm hexagonal wrench supplied and lift the Body from the Manifold 8 Unscrew the Filter Cap from the Manifold using the quad key supplied or a 12 mm he...
Page 22: ...ol Knob Shower Outlet Nipple Body Retaining Screws Flow Divertor Lever Manifold Cover Shroud Body Hub Screw Temperature Control Hub Slip Ring Flow Divertor Lever Retaining Screws Filter Cap Filter Bla...
Page 23: ...ench supplied and lift the Body from the Manifold 10 Unscrew the hot and cold inlet Non Return Valve Housings from the Manifold using a suitable spanner 11 Remove the Green Flow Regulator from the col...
Page 24: ...pple Body Retaining Screws Flow Divertor Lever Manifold Cover Shroud Body Hub Screw Pink Flow Regulator Temperature Control Hub Slip Ring Non Return Valve Housing Green Flow Regulator Flow Divertor Le...
Page 25: ...Carefully push back and lift off the Cover Shroud 7 Unscrew the Flow Control Gear Securing Screw using a 3 mm hexagonal wrench supplied and remove the Flow Control Gear and the Red Temperature Settin...
Page 26: ...ivertor Lever Body Clamp Plate Screw x4 Cover Shroud Temperature Setting Tool Thermostatic Cartridge Temperature Stop Sleeve Temperature Control Hub Temperature Control Gear Flow Control Gear Idler Ge...
Page 27: ...ls for signs of deformation or damage and renew as necessary taking care not to damage seal grooves 4 Make sure that the Insulation Channel Cap is aligned with the hot inlet and the face is below the...
Page 28: ...eck for any leaks 17 Set the maximum temperature Refer to section Maximum Temperature Setting Temperature Setting Tool Temperature Setting Tool 9 Line up the Temperature Control Gear with the Cartridg...
Page 29: ...upside down on the Flow Cartridge and pull out the Flow Cartridge 12 Remove the Flow Control Gear from the Cartridge and discard the Cartridge 13 Fit the new Flow Cartridge and Profile Seal Note The...
Page 30: ...er supplies and check for any leaks 23 Set the Maximum Temperature Refer to section Maximum Temperature Setting Temperature Control Knob Shower Outlet Nipple Hub Screw Flow Divertor Lever Body Screw C...
Page 31: ...Flow Straightener 462 12 Shower Nipple Assembly 462 13 Handle Pack 462 14 Screw Pack Not Illustrated 462 15 Seal Pack Not Illustrated 462 16 Clamp Plate 462 17 Cover Shroud 462 18 Inlet Hose Not Illu...
Page 32: ...32 462 12 1598 036 462 01 462 10 462 04 462 03 462 07 462 06 462 05 462 13 462 16 462 08 A A A 462 17...
Page 33: ...33 NOTES...
Page 34: ...34 NOTES...
Page 35: ...35 NOTES...
Page 36: ...ontrols com for further information For UK only Customer Service Post Installation enquiries including details of the Rada Commissioning Responsive and Maintenance Contract Service Packages please con...