MOUNTING
Fixture should not be recessed. Mount fixture on a wall with
lens facing down as shown above. Use the Drill Template
on the inside back surface of the housing to match most
standard junction boxes or lag bolt housing to mounting
surface using locations noted below.
1. Open door by loosening (4) screws. Remove LED Board.
2. Prepare the housing for use by drilling out the
appropriate holes.
3. Line up the housing in desired location and mount
securely.
4. Complete the wiring to the supply wires and ground
(see wiring instructions).
5. Replace the LED Board. Close door and tighten the four
screws.
Drill Template
Lag Bolt Locations
WP1LED INSTALLATION INSTRUCTIONS
Thank you for buying RAB lighting fixtures. Our goal is to design the best quality products to get the job done right. We’d like to hear your comments.
Call the Marketing Department at 888-RAB-1000 or email: [email protected]
IMPORTANT
READ CAREFULLY BEFORE INSTALLING FIXTURE. RETAIN THESE INSTRUCTIONS FOR FUTURE REFERENCE.
Fixtures must be wired in accordance with the National Electrical Code and all applicable local codes. Proper grounding is required
for safety. THIS PRODUCT MUST BE INSTALLED IN ACCORDANCE WITH THE APPLICABLE INSTALLATION CODE BY A PERSON
FAMILIAR WITH THE CONSTRUCTION AND OPERATION OF THE PRODUCT AND THE HAZARDS INVOLVED.
WARNING: Make certain power is OFF before installing or maintaining fixture.
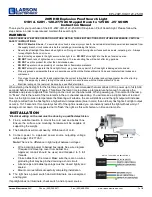
Housing
LED board
Door Lens
CAUTION: FOR PROPER WEATHERPROOF FUNCTION ALL GASKETS MUST BE SEATED PROPERLY AND ALL SCREWS INSERTED
AND TIGHTENED FIRMLY. APPLY WEATHERPROOF SILICONE SEALANT AROUND THE EDGE OF THE WALL BOX. THIS IS
ESPECIALLY IMPORTANT WITH AN UNEVEN WALL SURFACE. SILICONE ALL PLUGS AND UNUSED CONDUIT ENTRIES.