Q150T Sample Preparation System
10473 - Issue 5
56
Q150T - Instruction Manual
7.2
Carbon Rod Insert
This section describes the installation of the carbon rod insert supplied with Q150T E and
Q150T ES instruments. There are two inserts designed to accommodate 3mm carbon
rods (10033) or 6mm rods (10456).
To install the carbon rod insert:
1.
Check the machine is not operating.
2.
Press down firmly on the top cover to release the latch.
3.
Lift the top cover and lay back against its stop.
4.
Turn the two securing buttons to release the installed insert and remove the insert.
5.
Prepare the carbon rod insert for installation by removing from any packaging,
plastic bags etc. Check the ‘O’ ring in the outer ring of the lid assembly for
damage or debris and clean or replace as required.
6.
Place the insert in position in the outer ring of the lid assembly carefully locating
the M3 screw head in the rim of the insert in the slot to the right of the outer ring.
Lock the insert in position by turning the securing buttons until their flanges
overlap the insert.
7.
Prepare two carbon rods (see page 57).
8.
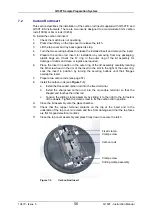
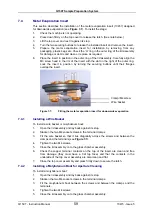
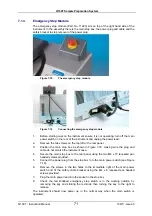
Install the carbon rods (see
Figure 7-3
):
a.
Install the flat-ended carbon rod into the fixed terminal.
b.
Install the sharpened carbon rod into the moveable terminal so that the
shaped end touches the other rod.
c.
Tension the sliding clamp assembly by sliding it to the right to the full extent
of the dowels. Tighten the clamp screw to fix the carbon rod in position.
9.
Close the lid assembly onto the glass chamber.
10.
Check that the copper terminal contacts on the top of the insert and in the
underside of the top cover are clean and free from damage and that the top faces
are flat for good electrical contact.
11.
Close the top cover assembly and press firmly down to secure the latch.
Figure 7-3.
Carbon Rod Insert
Fixed clamp
Clamp screw
Carbon rods
Clamp screw
Sliding clamp assembly
Summary of Contents for Q150T S
Page 92: ......

