background image


GRB-200 Demodulator (GOES-R) OI&M 


GRB-200 Demodulator (GOES-R) OI&M 

© Copyright 2015, Quorum Communications, Inc. 

35 


Revision A.01


GRB Feed Environmental Status 


Figure 28 - GRB Feed Environmental Status Screenshot 


Feed Tmp 33 Hum 31:

 the internal temperature (in C) and humidity (in %) 

of the GRB Feed 


Press 0.0:

 the internal pressure of the GRB Feed in PSI, should nominally be 

0.25 psi 


Purge OP:

  the status of the GRB Feed Purge Valve, OP –  OPEN or CL – 

Closed 


This display is useful to discover problems with the environmental controls and 
pressurization of the GRB Feed.  If the GRB Feed humidity is higher than 20% 
or the dew point is within 10 degrees C of the temperature, the purge valve will 
open to admit dry air.  The purge valve will close when the GRB Feed 
environment is OK. 


When the purge valve is open, the pressure reading will not be accurate. 


Summary of Contents for GRB-200

Page 1: ...GRB 200 Demodulator GOES R Operation Installation and Maintenance Manual Revision A 01 Release Date Quorum Communications Inc 3807 Carbon Rd www qcom com Irving TX 75038 USA ...

Page 2: ...M GRB 200 Demodulator GOES R OI M Copyright 2015 Quorum Communications Inc Revision A 01 2 Copyright 2015 Quorum Communications Inc All rights reserved This document may be freely distributed Printed in the United States of America ...

Page 3: ... Demodulator GOES R OI M Copyright 2015 Quorum Communications Inc 3 Revision A 01 Version History Revision No Implemented By Revision Date Approved By Approval Date Reason for Change A 01 M Morgan 06 01 2015 A Bundens 06 15 2015 New Document ...

Page 4: ...GRB 200 Demodulator GOES R OI M GRB 200 Demodulator GOES R OI M Copyright 2015 Quorum Communications Inc Revision A 01 4 This page intentionally left blank ...

Page 5: ...ROLS AND INDICATORS 21 3 1 1 Status LED s 21 3 1 2 Push Button Switches 22 3 1 3 LCD Display 23 3 2 CONFIGURING THE DEMODULATOR 24 3 2 1 Default Configuration 24 3 2 2 Using Setup to Configure the Demodulator 25 3 3 NORMAL AND DIAGNOSTIC DISPLAY MODES 30 3 3 1 Diagnostic and Status Displays 31 3 4 RECEIVING GRB DATA 37 3 5 READING THE SYSTEM STATUS DATA 38 3 5 1 Status Message 38 SECTION 4 THEORY ...

Page 6: ... Screenshot 25 Figure 18 Demodulator Spectrum Configuration Screenshot 26 Figure 19 Temperature Alarm Setting Screenshot 27 Figure 20 Exit Setup Screenshot 27 Figure 21 Demodulator Target Server IP Address Screenshot 28 Figure 22 Demodulators IP Address Screenshot 29 Figure 23 Normal Operation Display Screenshot 30 Figure 24 Basic Demodulator Status Screenshot 31 Figure 25 Demodulator Mode Spectru...

Page 7: ...y to support the requirements of both GRB reception and more importantly to work within the expected hostile RF environment of the GRB L band downlink Unlike traditional satellite video or data transmissions the GRB downlink will have potential close in interfering signals from cell phone transmissions that present unique challenges for error free reception When used with the Quorum GRB Feed poten...

Page 8: ...lar downlinks in a single 1U rack mount case integrated monitoring of the Quorum GRB Feed status and inclusion of this data in the available status monitoring messages CADU frame formatting of the raw DVB S2 data and streaming transmission of the CADU s on Gigabit Ethernet via UDP The output of the GRB 200 can be used directly by readily available community software to produce L1 and L2 data produ...

Page 9: ...g Supported QPSK 9 10 symbol rate 8 665938 Msps 8PSK 2 3 symbol rate 7 825768 Msps FEC Supported LDPC BCH GRB Coding and Modulation CCM Constant Coding and Modulation Implementation Loss Near Shannon limit Typical Eb No for QEF Performance QEF PER better than 1E 6 4 1 dB QPSK 9 10 3 9 dB 8PSK 2 3 Transport Stream Support Generic Transport Stream For Space Data Packets Matched Filtering 0 25 roll o...

Page 10: ...GRB 200 Demodulator GOES R OI M GRB 200 Demodulator GOES R OI M Copyright 2015 Quorum Communications Inc Revision A 01 10 This page intentionally left blank ...

Page 11: ...n a desktop It is designed to operate in a standard office environment 2 1 DESKTOP USE Four rubber foot pads must be installed on the bottom of the GRB 200 for desktop use see Figure 4 Rubber Foot Pads and 8 8 32 x 1 4 screws 4 Figure 4 Rubber Foot Pads and Screws Bottom View of Unit The GRB 200 requires a minimum clearance of five 5 centimeters 2 inches for ventilation airflow Placing a Orbital S...

Page 12: ...SE The GRB 200 is designed for installation in a standard 48 centimeter wide rack with a depth of 61 to 71 centimeters 19 x 24 to 28 inches To mount the GRB 200 in a rack remove the four rubber foot pads and screws and then attach the rack supports using the fasteners shown in Figure 5 Mount the GRB 200 with rack supports into the rack enclosure 8 8 32 x 3 8 Screws with split ring and washer 7 Fig...

Page 13: ... 6 GRB 200 Rear Input Panel Connections The following connections are located on the rear panel of the GRB 200 Demodulator AC Power Input Integrated Power Input Module J01 Feed Control MS Type Connection J02 RS 232 DB9 Connection SD Card Slot J03 GB Ethernet CAT 5e or CAT 6 J04 LHCP IF Input N Type Connection J05 RHCP IF Input N Type Connection ...

Page 14: ...3 type The GRB 200 usually is supplied with the appropriate power cord for the user s location In some circumstances however the power cord cannot be supplied and the user must provide it The user must obtain a power cord rated at 6A for local use Before connecting the power cord make sure the power switch on the power input module is in the off O position and then plug the IEC end of the power co...

Page 15: ...pre made interconnect cable for the Quorum GRB Feed Connect this cable between the GRB Feed and the J1 Feed Control connector on the rear of the GRB Demodulator J01 PT06J 12 10S Connection Pin Out Wire Color Purpose GRB 200 Demodulator J01 Pin Letter Red 24 VDC A Black Ground B Yellow 24 VDC C Brown Ground D Orange RS 485 E Violet RS 485 F Blue RSSI DCV G Drain Silver Case Ground H Not Used J Not ...

Page 16: ... not used for normal operation It is provided for test and diagnostic use during manufacture No connection should be made to J02 SD Card Slot 2 3 4 Figure 10 SD Card Slot The SD Card Slot is not used for normal operation It is provided for test and diagnostic use during manufacture Do not insert an SD Card in this slot as it could possibly interfere with the normal operation of the demodulator ...

Page 17: ...ly to a server used to process the received data It is also possible to connect the GRB 200 to a gigabit Ethernet switch and set it to transmit multicast UDP messages to multiple servers simultaneously In any case the GRB 200 should not be connected to a general purpose network and should only be used with a direct connection to associated data processing servers to ensure that packets are not los...

Page 18: ...ied cables between the GRB Feed and the J04 and J05 IF inputs Be sure to match the LHCP and RHCP outputs of the feed to the LHCP and RHCP inputs of the GRB Demodulator The GRB Demodulator outputs the LHCP and RHCP data to different UDP ports based on the physical connection to J04 and J05 If these are swapped you can tell by looking at the Virtual Channel ID field in the Transfer Frame Primary Hea...

Page 19: ...gnal types and polarities of the GRB 200 to the input requirements of the interface Refer to SECTION 3 for this information After the GRB 200 has been installed and the cables have been connected route the cables in a manner appropriate for safety convenience and to prevent them from becoming damaged If the GRB 200 is mounted in a rack using plastic ties to fasten the cables to the rails is recomm...

Page 20: ...GRB 200 Demodulator GOES R OI M GRB 200 Demodulator GOES R OI M Copyright 2015 Quorum Communications Inc Revision A 01 20 This page intentionally left blank ...

Page 21: ...gure the demodulator operation Figure 13 GRB 200 Demodulator Controls and Indicators Status LED s 3 1 1 Six status LEDs are grouped on the left side of the front panel Figure 14 Status LED s 24 VDC 24 volts is present from the power supply 5 2 VDC 5 2 volts is present from the power supply Feed the demodulator is receiving status data from the connected GRB feed LH Sync the demodulator is receivin...

Page 22: ...modulator IP Address Settings Pressing and holding the bottom switch when not in setup mode will display the IP Addresses which are configured for both the demodulator and the target server Releasing this switch will display the demodulator serial number This operation will also reset the display to normal mode if it were displaying special status or diagnostic information Setting the Demodulator ...

Page 23: ...e will be cancelled Once in setup mode pressing the bottom switch will cycle through the possible options for the displayed mode or increment the number above the caret symbol Pressing the top switch will move to the next option or digit in a number Setup mode can be exited by choosing exit when the option is presented in the display by pressing and holding the top switch for a few seconds at any ...

Page 24: ...ators are set to 8PSK mode and No Spectrum Inversion The IP Address of the demodulator is set to 192 168 123 100 MY IP The IP Address of the target server is set to 192 168 123 105 TO IP The Temperature Alarm Limit is set to 61 C Additionally certain parameters generally inaccessible by the user are reset The UDP port for the LHCP data is set to 50010 The UDP port for the RHCP data is set to 50020...

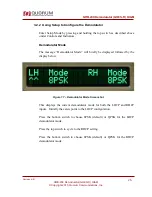
Page 25: ...ator Mode The message Demodulator Mode will briefly be displayed followed by the display below Figure 17 Demodulator Mode Screenshot This displays the current demodulator mode for both the LHCP and RHCP inputs Initially the carets point to the LHCP configuration Press the bottom switch to choose 8PSK default or QPSK for the LHCP demodulator mode Press the top switch to cycle to the RHCP setting Pr...

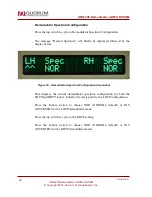
Page 26: ...ollowed by the display below Figure 18 Demodulator Spectrum Configuration Screenshot This displays the current demodulator spectrum configuration for both the LHCP and RHCP inputs Initially the carets point to the LHCP configuration Press the bottom switch to choose NOR NORMAL default or INV INVERTED for the LHCP demodulator mode Press the top switch to cycle to the RHCP setting Press the bottom s...

Page 27: ...etting The display will be as shown below Figure 19 Temperature Alarm Setting Screenshot Press the bottom switch to increment the temperature alarm set point It will roll over at 70C Exit Setup Press the top switch to cycle to the next display as shown below Figure 20 Exit Setup Screenshot If you don t need to change the demodulator IP addresses you can choose to exit setup by pressing the lower s...

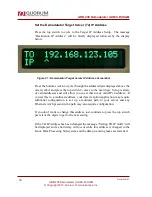
Page 28: ...to move to the next digit Setup is aware of valid addresses and will allow you to set this to any valid IPv4 address If you set this to a multicast address your data reception application may require additional configuration to set up a multicast path to your server and any Ethernet switch present in the path may also require configuration If you don t want to change this address just continue to ...

Page 29: ... the caret symbol and press the top switch to move to the next digit Setup is aware of valid addresses and will allow you to set this to any valid IPv4 address Continue to press the top switch to set all digits If you don t want to change this address just continue to press the top switch past all of the digits to get to the next setting If MY IP Address has been changed the message Setting MY IP ...

Page 30: ...ceived signal level lock status and Es No of the LHCP and RHCP inputs as shown below Figure 23 Normal Operation Display Screenshot LHCP or RHCP the input channel being displayed RSSI the received signal level in dBm should be between 60 dBm and 20 dBm LK or UL the demodulator status LK receiving DVB S2 baseband packets or UL unlocked Es No the signal to noise ratio of the signal should be higher t...

Page 31: ...of status and diagnostics displays as shown below Basic Demodulator Status Figure 24 Basic Demodulator Status Screenshot Tmp 36C the internal demodulator temperature Fan OK the fan is running at speed Could also display SL Slow or ST Stopped LO LK The 280 MHz LO Local Oscillator status LK Locked normal or UL unlocked Alarm Sn150503 the demodulator serial number R2 00 the demodulator controller sub...

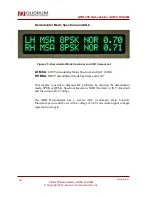
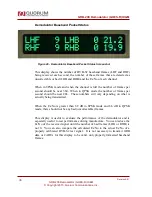
Page 32: ...SA LHCP demodulator Mode Spectrum and AGC MSA RH MSA RHCP demodulator Mode Spectrum and AGC This display is useful to diagnose RF problems by showing the demodulator mode 8PSK or QPSK Spectrum Inversion NOR Normal or INV Inverted and the current AGC voltage The GRB Demodulator has a reverse AGC Automatic Gain Control Maximum gain would be set with a voltage of 0 20 volts while higher voltages repr...

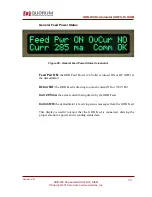
Page 33: ...eed Pwr ON the GRB Feed Power 24 Volts is turned ON or OF OFF at the demodulator OvCur NO the GRB Feed is drawing too much current NO or YE YES Curr 285 ma the actual current being drawn by the GRB Feed Comm OK the demodulator is receiving status messages from the GRB Feed This display is useful to know that the GRB Feed is connected drawing the proper amount of power and is sending status data ...

Page 34: ...TST the GRB Feed serial number This will normally be a number like 150601 R1 00 the GRB Feed Controller firmware revision Volts 23 0 the voltage that the Feed is receiving from the demodulator LO LK The status of the GRB Feed LO Local Oscillator This display is useful to determine that the voltage drop to the feed from the demodulator is within specification and that the local oscillator is operat...

Page 35: ...ure of the GRB Feed in PSI should nominally be 0 25 psi Purge OP the status of the GRB Feed Purge Valve OP OPEN or CL Closed This display is useful to discover problems with the environmental controls and pressurization of the GRB Feed If the GRB Feed humidity is higher than 20 or the dew point is within 10 degrees C of the temperature the purge valve will open to admit dry air The purge valve wil...

Page 36: ...en in QPSK mode the number of frames per second should be near 266 These numbers will vary depending on what is actually being transmitted When the Es No is greater than 6 9 dB in 8PSK mode and 6 6 dB in QPSK mode there should not be any bad uncorrectable frames This display is useful to evaluate the performance of the demodulator and is especially useful to test performance during manufacture You...

Page 37: ...4 4 1 Figure 30 Channel Access Data Unit CADU Structure The CADUs are then transmitted as a UDP packet directed to the Target Data Server TO IP IP Address LHCP data is sent to port 50010 and RHCP data is sent to port 50020 To receive the data connect the gigabit Ethernet port of the GRB Demodulator to your Data Processing Server and read it from the appropriate UDP port It is important to note tha...

Page 38: ...ec wisc edu csppgeo 3 5 READING THE SYSTEM STATUS DATA The system status data is compiled by the Controller Sub system once per second and sent to the Linux Data Processing Subsystem to be transmitted as a UDP packet to the TO IP address on port 50030 Status Message 3 5 1 The status message is formatted in XML as shown on the next page ...

Page 39: ...I val 34 3dB Atten val 00dB RHCP RF DEMOD LHCP PLsync val LK EsNo val 12 4dB AGC val 2 45V Mode val 8PSK Spectrum val NOR PLFPS val 360 BCHUC val 0 LHCP RHCP PLsync val LK EsNo val 12 4dB AGC val 2 52V Mode val 8PSK Spectrum val NOR PLFPS val 360 BCHUC val 0 RHCP DEMOD FEED Power val ON Current val 52mA Overcur val No Comm val OK Serialno val 150101 Voltage val 23 4VDC LOlock val LK Temp val 38C H...

Page 40: ...isplay section but will be repeated here GRB200 Serialno val 150101 Rev val 2 0 Temp val 32C Fan val OK GRB200 This section reports the serial number controller sub system firmware revision demodulator internal temperature and fan status RF LOlock val LK LHCP RSSI val 34 3dB Atten val 00dB LHCP RHCP RSSI val 34 3dB Atten val 00dB RHCP RF This section reports the status of the common 280 MHz LO loc...

Page 41: ...val 12 4dB AGC val 2 52V Mode val 8PSK Spectrum val NOR PLFPS val 360 BCHUC val 0 RHCP DEMOD This section reports the status of the PLsync DVB S2 physical layer baseband packets being received the signal quality ES No the AGC voltage the demodulator mode 8PSK the spectrum inversion NORMAL the number of physical layer frames being received per second PLFPS and the number of BCH uncorrectable frames...

Page 42: ... much current power will be temporarily removed from the feed After 10 seconds the GRB Demodulator will reapply power and attempt to restart the feed After this the value Comm reports that the GRB Demodulator is OK or is not NO receiving status data from the GRB Feed If the GRB Demodulator is receiving status data from the feed then the following fields Serial number Serialno feed voltage Voltage ...

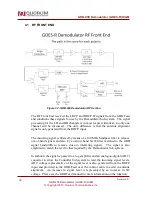
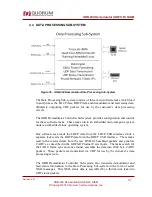
Page 43: ...ce Sub system provides flow control for the received data and provides a means to read the data into the Data Processing Subsystem The Data Processing Sub system is a set of software tasks running on an embedded Linux Microcomputer which processes the received data and status information making them available as UDP packets on a Gigabit Ethernet interface The Controller Sub system is responsible f...

Page 44: ...s filtered by means of a 140 MHz bandpass filter to remove out of band signals and also by a narrow band SAW filter matched to the GRB signal bandwidth to remove close in interfering signals The signal is also amplified to match the level to that required by the Demodulator Sub system In addition the signal is passed to a log amplifier and an analog to digital ADC converter to allow the Controller...

Page 45: ...tuner also provides an AGC function under control of the demodulator ASIC to match the baseband signal levels to the A D inputs The I and Q baseband outputs of the quadrature tuner are digitized at a 135 MHz rate with 8 bit resolution and made available to the DVB S2 demodulator ASIC The DVB S2 Demodulator ASIC monitors the digital output of the A D s and provides an AGC control signal to the quad...

Page 46: ... to the Data Processing Sub system This process is identical for the LHCP and RHCP signals so only one will be discussed The recovered baseband frame output from the Demodulator Sub system is burst into a 256 KB FIFO at a rate of 270 Mbps This data is then read out of the FIFO and written into a high speed USB 2 0 ASIC to be read by the Data Processing Interface The data rate of each GOES R signal...

Page 47: ...dded microcomputer system under an embedded Linux operating system One software task reads the LHCP data from the LHCP USB interface while a separate task reads the RHCP data from the RHCP USB interface These tasks read in the received data from the raw DVB S2 baseband packets and generate CADU s as described in the GOES R Product Users Guide The tasks search for the CADU frame sync and once found...

Page 48: ...x data processor to set up the network addresses and various task parameters such as data types and UDP ports then starts these tasks running Once the demodulator and Linux sub systems are set up and running the controller provides a user interface which displays status data on a 2 line x 20 character LCD display monitors the demodulator status for errors monitors the feed power and feed status ge...

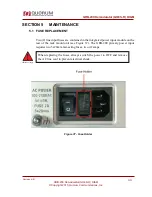
Page 49: ...ays switch the power to OFF and remove the AC line cord to prevent electrical shock SECTION 5 MAINTENANCE 5 1 FUSE REPLACEMENT Two 2 line input fuses are contained in the integrated power input module on the rear of the rack mount unit see Figure 37 The GRB 200 primary power input requires two 5x20mm fast acting fuses two 2 amps Figure 37 Fuse Holder ...

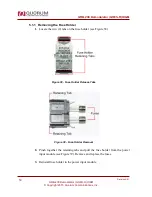
Page 50: ... Removing the Fuse Holder 1 Locate the two 2 tabs on the fuse holder see Figure 38 Figure 38 Fuse Holder Release Tabs Figure 39 Fuse Holder Removal 2 Pinch together the retaining tabs and pull the fuse holder from the power input module see Figure 39 Remove and replace the fuses 3 Reinstall fuse holder in the power input module ...

Page 51: ...c 51 Revision A 01 5 2 PROBLEM RESOLUTION Our technical support team is available during our business hours of 8 00 a m to 5 30 p m U S central time GMT 006 Email info qcom com telephone 972 915 0256 To return a product please contact the technical support team for a RMA number and shipping instructions ...

Page 52: ...GRB 200 Demodulator GOES R OI M GRB 200 Demodulator GOES R OI M Copyright 2015 Quorum Communications Inc Revision A 01 52 This page intentionally left blank ...

Page 53: ...GRB 200 Demodulator GOES R OI M GRB 200 Demodulator GOES R OI M Copyright 2015 Quorum Communications Inc 53 Revision A 01 This page intentionally left blank ...

Page 54: ...GRB 200 Demodulator GOES R OI M GRB 200 Demodulator GOES R OI M Copyright 2015 Quorum Communications Inc Revision A 01 54 This page intentionally left blank ...

Reviews: