


Page 12 of 69
PART LIST
•
I
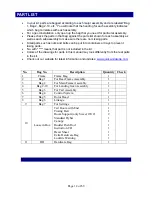
n your kit, parts are bagged according to each major assembly and are labeled “Bag
1, Bag 2, Bag 2-10, etc.” You will note that the heading for each assembly indicates
which bag correlates with each assembly.
•
For a good installation, only open up the bag that you need for particular assembly.
•
Please check the parts in that bag against the parts list shown for each assembly as
well as each subassembly to make sure there are no missing parts.
•
Small parts such as nuts and bolts can be put into containers or trays to prevent
losing parts.
•
No. with ***** means that part is not included in the kit.
•
Colors of the drawings for parts in this manual may look differently from the real parts
in the kit.
•
Check out our website for latest information and updates:
No. Bag
No.
Description
Quantity
Check
1 Frame
Frame
Bag
1
2
Bag 1
For Rear Frame Assembly
1
3
Bag 2
For Main Frame Assembly
1
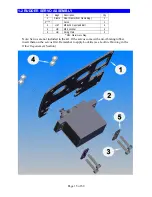
4
Bag 2-10
For Landing Gear Assembly
1
5
Bag 3
For Tail Assembly
1
6
Bag 4
Control System
1
7
Bag 5
Rotor Head
1
8 Bag
6
Linkage
1
9
Bag 7
For Settings
1
10
Loose in Box
Tail Boom with End
Timing Belt
Boom Support (only Sweet 16V2)
Standard Flybar
Canopy
Rudder Push Rod
Instruction CD
Decal Sheet
Extra Hardware Bag
Locktite Warning
1
1
2
1
1
1
1
1
1
1
11 HB
Hardware
Bag
1
Summary of Contents for Little Sweetie 10 Pro
Page 1: ...Page 1 of 69...
Page 7: ...Page 7 of 69 REQUIRED TOOLS Dremel Tools and Sandpapers would be helpful for building...
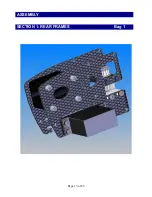
Page 13: ...Page 13 of 69 ASSEMBLY SECTION 1 REAR FRAMES Bag 1...
Page 17: ...Page 17 of 69 SECTION 2 MAIN FRAMES Bag 2...
Page 25: ...Page 25 of 69...
Page 27: ...Page 27 of 69...
Page 28: ...Page 28 of 69...
Page 37: ...Page 37 of 69...
Page 42: ...SECTION 5 A ROTOR HEAD for Little Quickie 10 Bag 5 Page 42 of 69...
Page 44: ...Page 44 of 69...
Page 53: ...Page 53 of 69...
Page 54: ...Page 54 of 69...
Page 55: ...Page 55 of 69...