

391 West Water St.
Taunton, MA 02780
1-800-699-0453
www.Quick-Sling.com
Quick Sling Hanger Unit Installation:
(
Please adhere to all local laws and building codes
)
Model#: (QSLG1000)
Step #1:
Remove pre-assembled J-
Bars & Extension Arms from box and
lay on a flat surface.
Step #2:
Remove 30.5” Extension Bar
& insert into bottom of two J-Bars
(2 x’s).
Step #3:
Determine desired width, then
insert & tighten
¼
“-20 Thumb Screws
(
Green Labeled Bag
).
Make sure
centerline mark on SL103 is equal
distance from each J-Bar.
Step #4:
Adjust L & R Hanger Arms
(SL101) to desired height. You may
also adjust height after installation to
provide a level surface for the HVAC
Unit.
See Photo #1 & #3 for reference.
Step #5:
Hang the Quick Sling Unit
using hardware in
Purple & Orange
Labeled Bags
. One Through Bolt & two
Pan Head screws must go in each
Hanger Arm.
See Photo #1
.
Step #6:
After the Sling Unit is hanging,
attach the two 2-piece Spacer Bar &
Saddle connecting both frames (SL104
& SL105) and tighten the thumbscrews.
Step #7:
Now hang (SL106) Drain Pan
Support on each J-Bar Frame (
See
Photo #2
). You are now ready to insert
HVAC Unit & Secondary Drain Pan.
Step #8:
Use Anti-Vibration Rubber
Pads (
Pink Labeled Bag
) between
HVAC unit and J-Bar Frame.
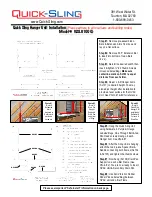
Photo #1
(On left)
Extension
Arms
mounted to
Rafters with
enclosed
hardware.
Photo #2
(On left)
Drain Pan
Hanger
Support &
Drain Pan
on bottom
of Sling.
Photo #3
(On left)
Quick Sling
Hanger Unit
installed on
Rafters with
Furnace &
Drain Pan.
Please see important “Safe Install” information on back page.
!
SL101
SL103
SL106
SL104
SL105
SL102


