background image

LOFT


54F01003C

Quax nv

 Karel Picquélaan 84 B-9800 Deinze Belgium 

T

T

 0032 9 380 80 95                                                                  www.quax.eu - 

E

E

 [email protected]

32

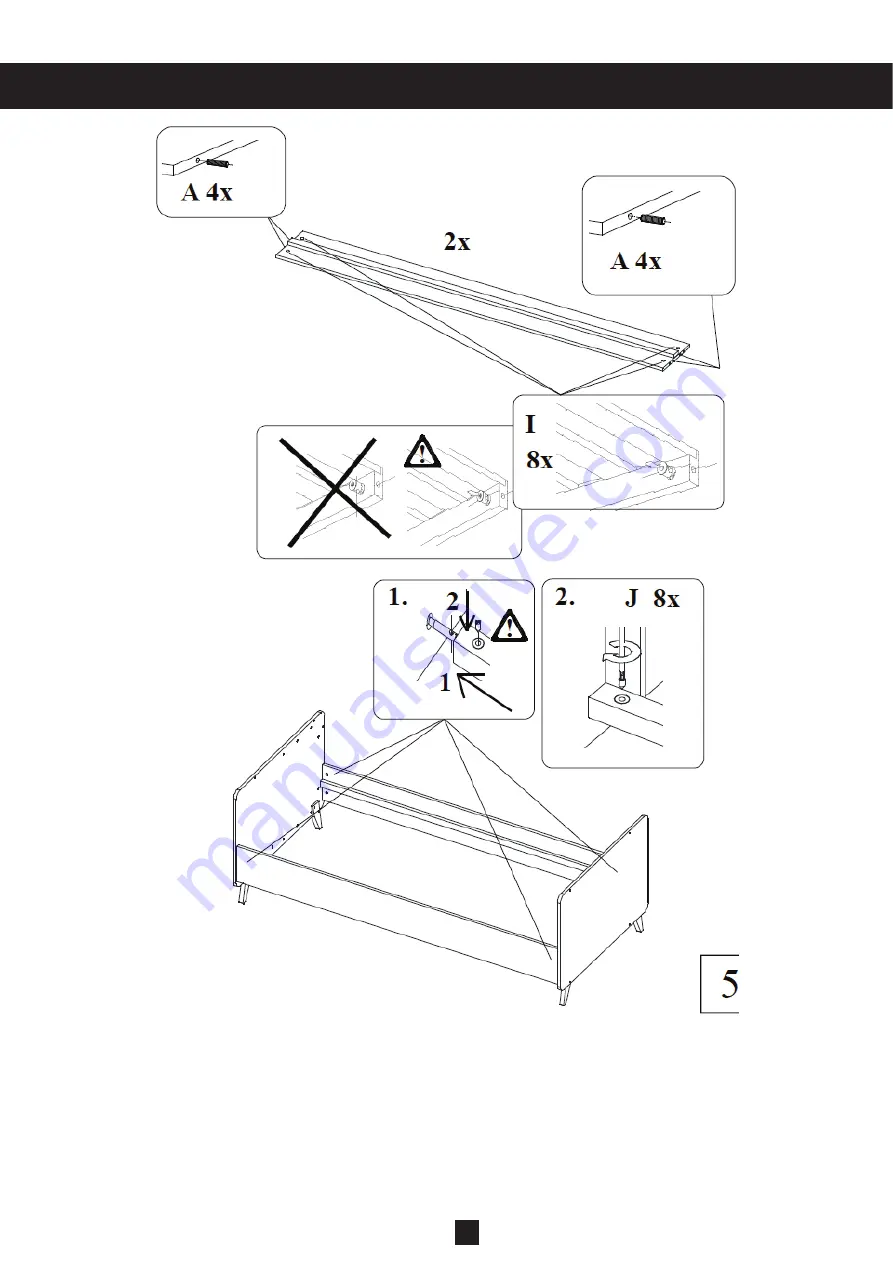
Stzp 5.2 

: Use the parts from step 

5.1

, both bed rails 

P5

, eight wooden dowels 

A

, eight cylindrical nuts 

I

 and eight bolts 

J

Push two wooden dowels (

A

) into the drillings on the ends of the bed rails (

P5

). Push the cylindrical nuts (

I

) into the 

holes on the inside of the bed rails. Push the bed rails with their drillings with cylindrical nuts on the connectors of one 
headboard. Tighten the bolts (

J

) in the cylindrical nuts. Push the other headboard with its connectors into the drillings with 

cylindrical nuts of the bed rails. Tighten the bolts (

J

) in the cylindrical nuts.

Summary of Contents for LOFT 54F01003C

Page 1: ...ructuur Il est important que le sommier soit bien fix la structure du lit Es ist wichtig dass den Boden gut an den Bettstruktur befestigt ist It is important to attach the mattress support to the stru...

Page 2: ...ikant of verdeler van dit bed Bodem Gebruik het bed nooit zonder de bodem De laagste bodempositie is de veiligste Plaats de bodem altijd in deze positie van zodra de baby zich rechtop op de knie n of...

Page 3: ...ntenservice customerservice quax eu Veiligheid Dit bed voldoet aan de veiligheidsvoorschriften omschreven in de norm EN 716 2017 Productinformatie Afmetingen van het gemonteerde babybed 124x66x107H cm...

Page 4: ...LOFT 54F01003C Quax nv Karel Picqu laan 84 B 9800 Deinze Belgium T T 0032 9 380 80 95 www quax eu E E info quax eu 3 Onderdelen 4...

Page 5: ...ats de pootjes P4 op de voorziene boringen van de eindzijden P1 Duw twee bouten E in de boringen van iedere poot en draai ze in de moeren van de eindzijden Druk twee cylindrische moeren C in de voorzi...

Page 6: ...erplaats de oogstiften H naar een andere positie op dezelfde hoogte en herhaal stap 4 2 Stap 4 2 Gebruik het gemonteerde bed van stap 4 1 het lattenrooster P3 vier moeren F en vier bouten G Plaats de...

Page 7: ...bodem Draai alle bouten D los in beide eindzijden en neem de spijlenzijden weg Wees voorzichtig dat niet alles in elkaar valt en zo danig krassen veroorzaakt Neem de oogstiften H weg van de eindzijde...

Page 8: ...e houten deuvels A in de boringen op de uiteinden van de bedsponden P5 Duw de cylindrische moeren I in de boringen aan de binnenkant van de bedsponden Duw de sponden met hun boringen met cylindrische...

Page 9: ...info quax eu LOFT 54F01003C Stap 5 3 Gebruik de onderdelen van stap 5 2 het lattenrooster P6 en tien houtschroeven B Plaats de bodem P6 op de steunprofielen van de bedsponden Duw de houtschroeven B do...

Page 10: ...le lit sans le fond La position du fond la plus basse est la plus s re et d s que le b b est en ge de s asseoir de s agenouiller ou de se hisser seul il est indispensable de toujours utiliser le fond...

Page 11: ...crites dans la norme EN 716 2017 Information produit Dimensions du lit b b assembl 124x66x107H cm Taille recommand e pour un matelas 120x60x9H cm Hauteurs r glables du fond 29 44 et 59 cm Dimensions...

Page 12: ...LOFT 54F01003C Quax nv Karel Picqu laan 84 B 9800 Deinze Belgium T T 0032 9 380 80 95 www quax eu E E info quax eu 3 Liste des pi ces d tach es 12...

Page 13: ...chets H Posez les pieds P4 sur les per ages des c t s terminaux P1 Poussez deux boulons E dans les trous de chaque pied et fixez les dans les crous des c t s terminaux Poussez deux crous cylindriques...

Page 14: ...placez les crochets H vers une autre position la m me hauteur et r p tez l tape 4 2 Etape 4 2 Utilisez le lit mont de l tape 4 1 le sommier lattes P3 quatre crous F et quatre boulons G Posez le sommi...

Page 15: ...z le fond Desserrez les boulons D aux c t s terminaux et retirez les c t s barreaux Veillez ce que le tout ne tombe pas et provoque des rayures Enlevez les crochets H des c t s ter minaux Desserrez le...

Page 16: ...hevilles en bois A dans les trous aux extr mit s des longerons P5 Poussez les crous cylindriques I dans les per ages l int rieur des longerons Poussez les longerons avec leurs trous avec les crous cyl...

Page 17: ...E info quax eu LOFT 54F01003C 17 Etape 5 3 Utilisez les pi ces de l tape 5 2 le sommier lattes P6 et les dix vis bois B Posez le sommier P6 sur les profils de support des longerons Poussez les vis bo...

Page 18: ...ne Boden verwenden Die niedrigste Bodenposition ist die meist sichere Legen Sie der Boden immer in dieser Position sobald das Baby sich aufrecht erhalten kann sowohl auf den Knien als auf H nde und F...

Page 19: ...eu Kundendienst customerservice quax eu Sicherheit Dieses Bett entspricht den im Standard EN 716 2017 beschriebenen Sicherheitsvorschriften Productinformation Ma e des zusammengebauten Babybettes 124...

Page 20: ...LOFT 54F01003C Quax nv Karel Picqu laan 84 B 9800 Deinze Belgium T T 0032 9 380 80 95 www quax eu E E info quax eu 3 Liste der Teile 20...

Page 21: ...e P4 auf die vorgesehenen Bohrungen der Stirnseiten P1 Dr cken Sie zwei Bolzen E in die Bohrungen jeder F und in die Muttern der Stirnseiten anziehen Dr cken Sie zwei zylindrische Muttern C in die vo...

Page 22: ...nstifte H in eine andere Position auf die gleiche H he und wiederholen Sie Schritt 4 2 Schritt 4 2 Verwenden Sie das montierte Bett des Schrittes 4 1 den Lattenrost P3 vier Muttern F und vier Bolzen G...

Page 23: ...ie alle Bolzen D an beiden Endseiten und entfernen Sie die Sta benseiten Achten Sie darauf dass nicht alles zusam menklapt und Kratzer verursacht Entfernen sie die senstifte H von den Endseiten L sen...

Page 24: ...Holzd bel A in die Bohrungen an den Enden der Bettrahmen P5 Dr cken Sie die zylindrischen Muttern I in die Bohrungen an der Innenseite der Bettrahmen Schieben Sie die Bettrahmen mit ihren Bohrungen mi...

Page 25: ...ww quax eu E E info quax eu 25 Schritt 5 3 Verwenden Sie die Teile aus Schritt 5 2 den Lattenrost P6 und zehn Holzschrauben B Stellen Sie den Lattenrost P6 auf die St tzprofile der Bettrahmen Dr cken...

Page 26: ...this bed without the base The lowest position is the safest and the base should always be used in that position as soon as the child is old enough to sit kneel or to pull itself up Mattress We recomm...

Page 27: ...r service customerservice quax eu Safety This bed meets the safety prescriptions provided in the EN 716 2017 standard Productinformation Dimensions of the assembled baby bed 124x66x107H cm Recommended...

Page 28: ...LOFT 54F01003C Quax nv Karel Picqu laan 84 B 9800 Deinze Belgium T T 0032 9 380 80 95 www quax eu E E info quax eu 3 Parts list 28...

Page 29: ...P4 on the provided drillings on the headboards P1 Push two bolts E into the holes of each leg and fasten them into the nuts of the headboards Push two cylindrical nuts C into the drillings at the top...

Page 30: ...ted frame Move the eye pins H to another position at the same height and repeat step 4 2 Step 4 2 Use the assembled bed of step 4 1 the slatted frame P3 four nuts F and four bolts G Place the slatted...

Page 31: ...remove the bottom Loosen all bolts D in both headboards and remove the side with bars Be care ful that not everything falls apart and causes scratch es Remove the eye tips H from the headboards Loosen...

Page 32: ...Push two wooden dowels A into the drillings on the ends of the bed rails P5 Push the cylindrical nuts I into the holes on the inside of the bed rails Push the bed rails with their drillings with cylin...

Page 33: ...E info quax eu LOFT 54F01003C 33 Step 5 3 Use the parts from step 5 2 the slatted frame P6 and ten wood screwn B Place the slatted frame P6 on the support profiles of the bed rails Push the wood scre...

Reviews: