Installing the DXi6900-S System in the Rack
Quantum DXi6900-S Installation Guide
29
Caution:
The Mini-SAS HD plugs can be mistakenly plugged in upside down. The cable will
appear to be inserted but is not. Verify the cable is seated by pulling lightly on the cable. Verify the
SAS link light is ON after powering on the RBOD. Failure to properly seat the Mini-SAS HD plugs
may cause an installation failure.
DXi6900-S Cable Connection Instructions
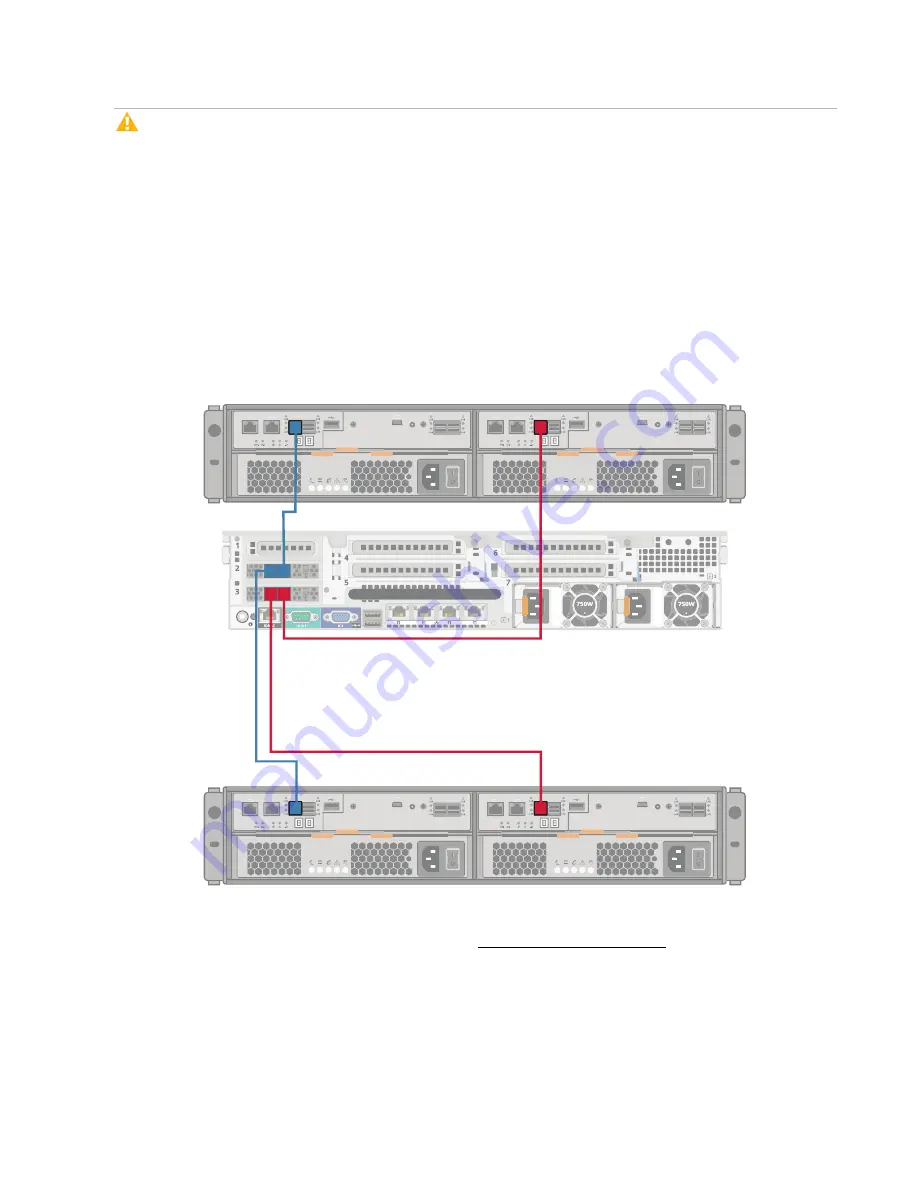
a. Connect port RBOD1 (slot 2) on the Node to SAS port Ch 1 (Controller A) on RBOD 1.
b. Connect port RBOD1 (slot 3) on the Node to SAS port Ch 1 (Controller B) on RBOD 1.
c. Connect port RBOD2 (slot 2) on the Node to SAS port Ch 1 (Controller A) on RBOD 2.
d. Connect port RBOD2 (slot 3) on the Node to SAS port Ch 1 (Controller B) on RBOD 2.
Figure 18:
DXi6900-S SAS Cabling (Node to RBODs)
Port 1
Port 2
ID/
Diag
|O|O|
Port 1
Port 2
ID/
Diag
|O|O|
Port 1
Port 2
ID/
Diag
|O|O|
Port 1
Port 2
ID/
Diag
|O|O|
System Node
RBOD 1
RBOD 2
1A
1B
2A
2B
1A 2A
1B 2B
2. Connect each Array module (RBOD) to its corresponding Expansion module (EBOD) using the
provided 2m mini-SAS HD to mini-SAS cables (see Figure 19 on the next page).
a. Connect SAS expansion port 1 (Controller A) on RBOD 1 to SAS port 1 (Controller A) on EBOD
1-1.


