Quadra-Fire SANTAFE-B1 Owner'S Manual Download Page 2

Page  2

7001-142C

November 2, 2005

Santa Fe Pellet Stove 

R

R

R

Hearth & Home Technologies welcomes you to our tradi-

tion of excellence!  In choosing a Quadra-Fire appliance, 

you have our assurance of commitment to quality, durabil-

ity, and performance.
This commitment begins with our research of the market, 

including ‘Voice of the Customer’ contacts, ensuring we 

make products that will satisfy your needs. Our Research 

and Development facility then employs the world’s most 

advanced technology to achieve the optimum operation of 

our stoves, inserts and fireplaces.  And yet we are old-

fashioned when it comes to craftsmanship.  Each unit is 

meticulously  fabricated  and  gold  and  nickel  surfaces  are 

hand-finished for lasting beauty and enjoyment.  Our pledge 

to quality is completed as each model undergoes a quality 

control inspection.    From design, to fabrication, to shipping: 

Our guarantee of quality is more than a word, it’s Quadra-

Fire tradition, and we proudly back this tradition with a Lim-

ited Lifetime Warranty.  
We wish you and your family many years of enjoyment in the 

warmth and comfort of your hearth appliance.  Thank you for 

choosing Quadra-Fire.

With warm regards,

___________________________

Dave Fiebelkorn

Materials Manager

___________________________

Alan Trusler

SeniorVice President

Dealer Channel

___________________________

Dan Henry

Vice President

AdvancedTechnologies

_________________________

Jason Olmstead

Vice President&

General Manager

___________________________

Quadra-Fire Brand Manager

Steve Tate

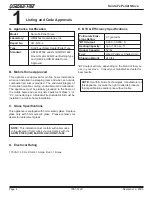
SAMPLE:  CLEARANCE TO COMBUSTIBLES LABEL

LOCATION:  Back side of left side panel.

Listed Solid Fuel Room Heater/Pellet Type Insert. Also suitable for Mobile Home

Installation. This appliance has been tested and listed for use in Manufactured Homes

in accordance with OAR 814-23-9000 through 814-23-909.

Tested to: ASTM E1509, ORD-C-1482-M199 0 Room Heating Pellet Burning Type,

APFI, (UM) 84-HUD FOR USE

ONLY WITH PELLETIZED WOOD OR SHELLED FIELD CORN

FUEL.

Input Rating:  30,000 Btu's/hr

Electrical Rating:

115 VAC, 60 Hz, Start 4.1 Amps, Run 1.1 AMPS .

Route power cord away from unit. Do not route cord under or in front of appliance.

DANGER:

Risk of electrical shock. Disconnect power supply before servicing. Replace

glass only with 5mm ceramic available from your dealer. To start, set thermostat above

room temperature, the stove will light automatically. To shutdown, set thermostat to below

room temperature.  For further instruction refer to owner's manual.

Keep viewing and ash removal doors tightly closed during operation.

U.S. ENVIRONMEN

TAL PROTECTION AGENC

Y

This model is exempt from E

PA certification under 40 CFR 60.531 by definition [

Wood Heater (A) "Air-to-Fuel Ratio"]

.

 2005         2006         2007         JAN          FEB

    MAR

 APR          MAY         JUNE        JULY         AUG        SEPT     OCT

 NOV          DEC

7001-143

DO NOT REMOVE THIS LABE

L / NEPAS ENLEVER L'ÉTIQUETT

E

Made in U.S.A./Fait Aux États-Unis

CAUTION

:

HOT WHILE IN OPERATION DO NOT TOUCH, KEEP CHILDREN, CLOTHING AND

FURNITUREAWAY. CONTACTMAY CAUSESKINBURNS. SEENAMEPLATEANDINSTRUCTIONS.

Operatethisunitwithfuelhopperlidclosed.

Failuretodosomayresultinemissionsproducts'combustionfromthe

hopper under certain conditions.  Maintain hopper seal in good condition.  Do no over fill the hoppe

r.

ATTENTION:

CHAUDLORSDE L'OPÉRATION.NE PAS TOUCHER.GARDEZLES ENFANTSET LES VÊTEMENTSLOIN

DEL'ESPACEDÉSIGNÉDEL'INSTALLATION.LECONTACT PEUT CAUSERDESBRÛLURESÀ LAPEAU. VOIRL'ÉTIQUETTE

ETLESINSTRUCTIONS.

Opérezcetappareilaveclecouvercledelatrémiefermé.Ledéfautdenepassuivrelesinstructionspeutrésulter,

sous certaines conditions, en une combustion des émissions des produits venant de la trémie. Ne pas remplir la trémie trop pleine.

Testé à: ASTM E1509-95, ORD-C 1482-M1990 Room Heating. Pellet Burning Type, APFI, (UM)

84-HUD POUR USAGE AVEC LES BOULETTES DE BOIS OU DE COMBUSTIBLE DE MAIS ÉCOSSÉ

DES CHAMPS.

Puissance de Rendement: 30,000 Btu's/hr

Puissance Électrique: 115 VAC, 60 Hz, Début 4.1 Amps, Courir 1.1 Amps,

Éloignez le fil électrique de l'appareil. Ne pas faire passer le fil électrique au dessus ou en dessous de l'appareil.

DANGER: Il y a risque de décharge électrique. Déconnectez le fil électrique de la prise de contact avant le

service.

Remplacez la vitre seulement avec une vitre céramique de 5 mm disponible chez votre fournisseu

r.

Pour allumer, monter la température du thermostat au dessus de la température de la pièce, le poêle s'allumera

automatiquement. Pour éteindre, descendre la température du thermostat en dessous de la température de la

pièce. Pour des instructions supplémentaires, référez vous au manuel du propriétaire. Gardez la porte

d'ouverture et la porte des cendres fermées hermétiquement durant l'opération.

Appareil de chauffage inséré de combustible solide/de type de boulettes. Accepté dans l'installation

dans les maisons mobiles. Cet appareil a été testé et enregistré pour l'usage dans les Maisons

Mobiles en accord avec OAR 814-23-9000 jusqu'à 814-23-909.

1445 Highway North

Colville, WA  99114

Manufactured by:Fabriqué par

:

 Listed by

Beaverton

Oregon USA

OMNI-Test Laboratories, Inc

.

C

R

Santa Fe Pellet Stove

Report

/

Rapport

061-S-53-2

SERIAL NO.

/

NUMÉRO DU

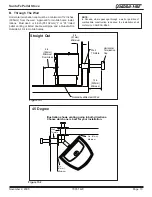
If Cast Base is installe d (Part 811-0840 ) use a noncombustibl e floor

protecto r, extendin g beneat h heate r and to the front/sides/rea r as

indicated. Measure front distance (I) from the surface of the glass door. If

Cast Base is not installed, the non-combustible floor protector must be 1/4"

(6.4mm) minimum thickness ("k" value = 0.84).

G =  2"/51mm

H* =  2"/51mm

I  =  6"/152mm

FLOOR PROTECTION / PROTECTION DU SOL

G

I

*H

G

*Non-combustible floor protection must extend beneath the flue pipe when

installed with horizontal venting or under the Top Vent Adapter with vertical

installation.

RECOMMENDED IN USA; REQUIRED IN CANADA

Installezet utilizeretayagedu fonte(Pièce811-0840),le poêledoit être placésur une assisenon

combustibles’étendanttoutautourde lui, commeles schémasl’indiquent.Mesurezla distancedu

devant (I) de la surface de la porte vitrée.

Nepasinstallezétayagedufonte le protecteurdeplancherdoitêtred'unminimumde1/4"(6.4mm)

d'épaisseur, ('k" value = 0.84) de matériel incombustible ou équivalent

.

*Un protecteur incombustiblede plancherdoit s'étendre sous le conduitde cheminée
pour une installation de ventilation horizontale ou sous un adapteur de ventilation de
dessus pour une installation verticale. ÉTATS-UNIS-RE COMMANDÉ ; CANAD A -
REQUIREN T.

www.quadrafire.co m

007

Manufactured 

Date

Serial Number

Model Name

Test Lab & 

Report No.

Summary of Contents for SANTAFE-B1

Page 1: ...e read this entire manual before installation and use of this pellet fuel burning room heater Failure to follow these instructions could result in property damage bodily injury or even death Do not st...

Page 2: ...ucts combustionfromthe hopperundercertainconditions Maintainhoppersealingoodcondition Donooverfillthehoppe r ATTENTION CHAUDLORSDE L OP RATION NE PAS TOUCHER GARDEZLESENFANTSET LESV TEMENTSLOIN DEL ES...

Page 3: ...e Wall Vertical 14 E Masonry 15 F Alternate Masonry 15 Section 6 Mobile Home 16 Section 7 Appliance Set Up A Outside Air Kit 17 B Top Vent Adapter 18 C Log Set Placement 19 D Grille Trim Ring Installa...

Page 4: ...ceiling and walls must be maintained The appliance must be properly grounded to the frame of the mobile home and use only listed pellet vent Class L or PL connector pipe A Quadra Fire Outside Air Kit...

Page 5: ...ire Safety Maintain the designated clearances to combustibles Insulation must not touch the chimney You must maintain the designated air space clearance around the chimney This space around a chimney...

Page 6: ...cause a re hazard WARNING Hearth Home Technologies disclaims any responsibility for and the warranty will be voided by the following actions D Measuring Standards 1 Pipe measurements are from center l...

Page 7: ...7 1 Top View Figure 7 3 Side View Figure 7 4 Side View with Top Vent Adapter 25 7 16 in 705 mm 12 11 16 in 322mm 21 3 16 in 538mm C L 27 3 4 in 705mm 28 5 8 in with base 727mm with base 16 7 16 in 41...

Page 8: ...to Appliance 2 51 H Side Wall to Flue Pipe 3 76 Alcove Installation Inches Millimeters Minimum Alcove Height 43 1092 Minimum Alcove Side Wall 6 152 Minimum Alcove Width 38 965 Maximum Alcove Depth 36...

Page 9: ...xtending beneath the ue pipe is recommended with horizontal venting or under the top vent adapter with vertical installation See Figure 9 2 CANADA INSTALLATIONS A noncombustible oor pro tection extend...

Page 10: ...used NO OTHER vent components may be used Substitute or damaged vent components may impair safe operation WARNING B Venting Termination Requirements 1 Termination must exhaust above air inlet elevatio...

Page 11: ...hart until you reach your altitude above sea level If you fall below the diagonal line 3 or 4 inch 76 to 102mm pipe may be used If it is anywhere above the diagonal line a 4 inch 102mm diam eter pipe...

Page 12: ...S ONLY Illustrations diagrams are not drawn to scale Actual installation may vary due to individual design preference A Alcove Figure 12 1 All minimums listed are to a combustible surface Minimum Maxi...

Page 13: ...l Approved for mobile home instal lations Must use 3 or 4 inch 76 102mm L or PL listed pellet venting or listed double wall pipe and a Quadra Fire Outside Air Kit in mobile homes NOTE In Canada where...

Page 14: ...mes Single wall pipe is approved for residential instal lations only C Vertical D Through The Wall Vertical Firestop Flashing Rain Cap 6 in 152mm Min Noncombustible Hearth Pad 3 in 76mm Min Cleanout C...

Page 15: ...sonry Noncombustible Hearth Pad Airtight Cleanout Door Cleanout cover Sheathing 3 in 76mm minimum 1 in 25mm clearance Flashing Fireclay flue liner with airspace Concrete Cap 1 in 25mm clearance with f...

Page 16: ...pro tection requirements on pages 8 9 for listings to combustibles and appropriate chimney systems 6 Use silicone to create an effective vapor barrier at the location where the chimney or other compon...

Page 17: ...vent opening in stove and mark location on wall Use saw to cut opening in wall Cut a 2 1 2 to 3 inch 64 76mm opening on inside wall and a 3 to 3 1 2 inch 76 89mm opening on outside of house 2 Use hose...

Page 18: ...screws Figure 18 1 6 Install the vent pipe into the top vent adapter be sure to silicone all joints 7 To clean the top vent adapter open the clean out cover Figure 18 2 B Top Vent Adapter Installation...

Page 19: ...shown There is a notch in the bottom of the log for clearance for the thermocouple and thermocouple cover ceramic protection tube Figure 19 1 2 Continue placing the last 3 logs around the repot as sho...

Page 20: ...b are completely out of the door Figure 20 2 2 Installing the Trim Ring Rib Face Grille Door Remove 2 screws Rib Locating screws on rib are the 2 outside holes on each side Figure 20 1 Start with stra...

Page 21: ...eadings The thermostat should be mounted on an inside wall and not in direct line with the appliance convection air NOTE If the thermostat is located too close to the appliance you may need to set the...

Page 22: ...actory and eld testing has demonstrated shelled eld corn to be an ef cient and very economical fuel We recommend the use of a 50 50 blend of corn and wood pellets The only change in operation is that...

Page 23: ...ctions D Starting Your First Fire 1 A thermostat is required for proper operation of this appliance except for corn At this time ll the hopper with pellets set the thermostat to its lowest setting Plu...

Page 24: ...ION WARNING Fire Risk Do NOT operate appliance With appliance door open Firepot oor open Cleaning slide plates open Do NOT store fuel Closer than required clearances to com bustibles to appliance With...

Page 25: ...nting system is clean Make sure front door is closed Replace control box Call light on No re Partially burned fuel in repot Firepot clean out plate not closed Firepot is dirty missed ignition Check th...

Page 26: ...x causing loss of vacuum Empty hopper of fuel Use a wet dry vacuum cleaner to remove remaining fuel from hopper including feed tube Check feed chute for obstructions Loosen 2 screws and jiggle feed as...

Page 27: ...stainless steel baf e from rebox to clean ash from on top of baf e Clean behind rear brick panels Change fuel brand to premium Check that repot clean out plate is fully closed Reduce feed rate using...

Page 28: ...fully closed when cleaning is complete See Disposal of Ashes on page 29 WARNING NEVER pull repot cleaning rod or cleaning slide plates out when appliance is operating Hot pellets may fall into ashpan...

Page 29: ...ds OUT and IN a couple of times Figure 29 1 8 Cleaning Beneath Heat Exchanger Frequency Monthly or after burning 1 ton of fuel By Homeowner Task A more thorough cleaning is needed to remove the excess...

Page 30: ...f there is a lot of horizontal pipe sec tions Ash will build up more quickly in the horizontal sections 10 Cleaning the Hopper Frequency Monthly or after burning 1 ton of fuel By Homeowner Task After...

Page 31: ...lf way point in the re pot IMMEDIATE ATTENTION AND CLEANING IS REQUIRED Follow the detailed instructions found in this section for each step listed below Shut down the unit by turning down the thermos...

Page 32: ...aving all wires still attached d Remove the upper rear screen from the appliance by removing 2 screws at the top 1 in the center and 2 screws on the sides at the top Leave both upper side curtains sti...

Page 33: ...the 2 leads with the spade connectors d Double check that the igniter wires are clear of any movement i e ash drawer firepot cleaning rod cleaning slide plates etc f Re install the ash drawer and sid...

Page 34: ...will be ush against the back wall and the braket s notches will be exposed Figure 34 2 3 Pull the right edge of the brick forward and slide the brick into the notches both top and bottom of right brac...

Page 35: ...face down b Using a screwdriver tap the bottom of the rope retainer rod to push it up out of the hole The top end of the rod will slide up Swing the rod toward you from the bottom and remove the rod R...

Page 36: ...hould be set on the lowest setting available 16 Snap Disc 1 Convection Blower 125 F When describing the location of a component it is always AS YOU FACE THE FRONT OF THE APPLIANCE 2 Convection Blower...

Page 37: ...center of the appliance and has a red reset button To access it remove the right side panel If the re tries to burn back into the feed system or push exhaust up the feed tube this snap disc will shut...

Page 38: ...Fuse Control Box Vacuum Switch Junction Box High Med Low Heat Output Switch Reset Button Reset B u tt o n Convection Blower Exhaust Blower Button Cleaning Rods Heat Exchanger Tubes TERMINAL BLOCK CEN...

Page 39: ...6 Screw 10 32 x 1 4 PH PHL MS ZC 7021 006 7 Screw 8 x 1 2 SMS S Grip 12460 57 Grille Assembly 412 5150 58 Face 7001 026 2 56 3 35 5 6 7 55 Figure 39 2 Firepot Assembly Item Description Part Number 56...

Page 40: ...41 Blower Exhaust 51 Top Cast 32 Thermocouple Cover 42 Vacuum Switch 52 Curtain Pedestal Side 33 Ash Drawer 43 Control Box 53 Baf e 34 Base Cast 44 Back 54 Brick Assembly 35 Igniter 45 Top Vent Kit 3...

Page 41: ...Pedestal 7001 169 38 Curtain Side Assembly with magnet 7001 023 30 Door Assembly 7001 035 Door Latch Assembly 7001 042 58 Face Assembly 7001 026 48 Feed Motor Assembly 812 4760 Feed Motor Only w capa...

Page 42: ...0840 Rear Vent Adapter 811 0620 Rear to Top Vent Adapter 811 0610 Top Vent Adapter 3 to 3 inch 811 0890 Top Vent Offset Collar 3 to 6 inch 812 3570 Thermostat Mechanical 812 3760 Thermostat Programmab...

Page 43: ...e Technologies discontinues the model and two 2 years for optional accessories Adjustments regular maintenance cleaning and temporary repairs do not qualify for a service call fee and will not be cove...

Page 44: ...OT discard this manual CAUTION Important operating and maintenance instructions included Read understand and follow these instruc tions for safe installation and operation Leave this manual with party...

Reviews: