background image

1

2

Advanced scan functions    2-25

Advanced scan functions

Color adjustment

When you scan in color, you can adjust the image to suit your requirements.

NOTE


• 

The color can only be adjusted when “Color” is set.  For details, see 

“Color” (page 

1-20)

.

• 

Images shown in this manual are sample data, which may be different from the 

actual images.


„

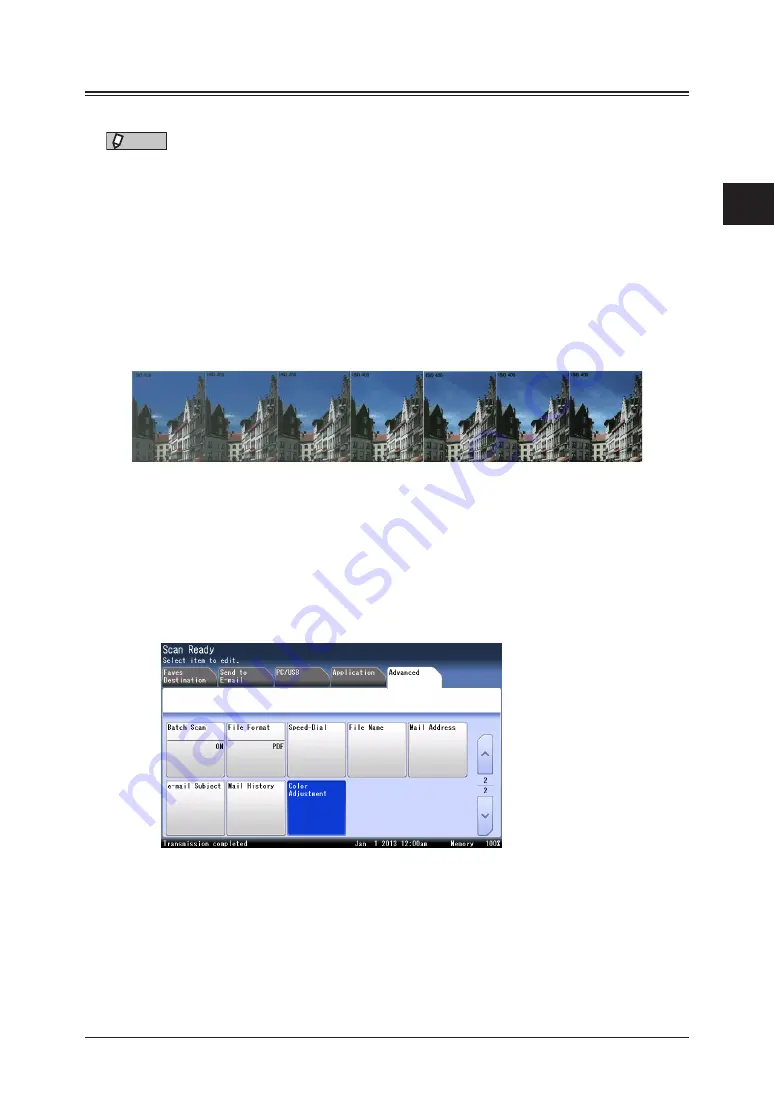
Adjusting the contrast

You can set the image contrast (the difference between light and dark) to seven different 

levels, from -3 (low) to +3 (high).

  – : The difference between brightness and darkness reduces and the whole image 

becomes dark.

  + :The light parts become lighter, and the dark parts darker.

-3

-2

-1

0

+1

+2

+3

Press [Scan] on My MFP Menu screen.

If My MFP Menu screen is not displayed, press <Mode> repeatedly until “Scan Ready” screen 
is displayed.

Press [Advanced].

Press [Color Adjustment].

Summary of Contents for MFX-3590

Page 1: ...Scanner and Fax Guide Plain paper digital Fax Copier Printer Scanner...

Page 2: ...apter 2 Advanced scan functions Chapter 3 Basic fax functions Chapter 4 Advanced fax functions Chapter 5 Specifying destinations Chapter 6 Communication management Chapter 7 Machine settings Chapter 8...

Page 3: ...a printer 1 17 Basic scan settings 1 19 Resolution 1 19 Color 1 20 Scanning with a TWAIN driver 1 21 Chapter 2 Advanced scan functions Introduction to advanced functions 2 2 Advanced scan functions 2...

Page 4: ...xt document setting Next Doc 4 9 Duplex scan 4 11 Stamp Option 4 12 Transmission related settings 4 13 Cover page 4 13 Delayed transmission 4 16 Sending the sender name TTI 4 18 E mail gateway 4 19 Se...

Page 5: ...ps 7 8 Registering Editing folder shortcuts 7 10 Registering Editing FTP server shortcuts 7 14 Registering favorite destinations 7 18 Registering color printer 7 20 Initial setup User Install 7 26 Ope...

Page 6: ...incorrectly For safe operation please follow instructions carefully IMPORTANT Describes important conditions or restrictions you should carefully observe to avoid problems caused by incorrect operatio...

Page 7: ...vi How to read this manual Screens This manual uses the screens of the MFX 3590 standard model unless otherwise stated The screens you see may differ depending on the options installed...

Page 8: ...mail address 1 2 Scanning to shared PC folders 1 4 Scanning to FTP servers 1 8 Scanning to USB memory device 1 12 Scanning to an Evernote address 1 15 Scanning to a printer 1 17 Basic scan settings 1...

Page 9: ...d an e mail address to the machine in advance For details on the network setting see chapter 2 Specifying the network settings in the Administrator s Guide and chapter 3 Setting the e mail environment...

Page 10: ...tarts immediately 6 Press Start This step is not necessary when you have selected the destination from the address book When you have loaded the document on the automatic document feeder this will con...

Page 11: ...ing the network settings in the Administrator s Guide The folder shortcuts should be registered to your machine in advance For details on registering the folder shortcuts see Registering Editing folde...

Page 12: ...access the folder proceed to step 8 7 Enter the password to access the folder and press Enter 8 The document will be scanned When you have loaded the document on the automatic document feeder this wil...

Page 13: ...age 1 20 4 Press PC USB and then Folder 5 Press Browse The list of computers or networks is displayed 6 Specify the shared folder to save the data and press Enter The specified folder will be highligh...

Page 14: ...der this will conclude the operation When you have loaded the document on the document glass a message will appear when the first page of the document is scanned 10 Load the next document and press Ne...

Page 15: ...ng the network settings in the Administrator s Guide The FTP shortcuts should be registered to your machine in advance For details on registering the folder shortcuts see Registering Editing FTP serve...

Page 16: ...document on the automatic document feeder this will conclude the operation When you have loaded the document on the document glass the following message will appear when the first page of the documen...

Page 17: ...Press Scan on My MFP Menu screen If My MFP Menu screen is not displayed press Mode repeatedly until Scan Ready screen is displayed 3 Set the resolution and document type as necessary For details see R...

Page 18: ...rator s Guide 10 Press Password 11 Enter the password and press Enter Up to 28 characters can be entered For details on entering characters see chapter 1 Entering characters in the Administrator s Gui...

Page 19: ...d USB hub and USB memory that does not meet the USB standards are all unsupported If the USB memory becomes full while the data is being saved the data that is being written is all deleted Therefore m...

Page 20: ...eeder this will conclude the operation When you have loaded the document on the document glass a message will appear when the first page of the document is scanned 7 Load the next document and press N...

Page 21: ...1 14 Basic scanning NOTE If you connect USB memory when the machine is in the ready state the following display will appear Select Scan To USB Memory Then follow the procedures from step 6...

Page 22: ...o set up LDAP server see chapter 2 Registering LDAP servers in Specifying the network settings in the Administrator s Guide 1 Load the document 2 Press Scan on My MFP Menu screen If My MFP Menu screen...

Page 23: ...stination select the destination to delete and press Delete You can change the destination from To to Cc or Bcc Press To to switch to a To Cc or Bcc destination 8 Press Start When you have loaded the...

Page 24: ...register the printer and MFP to use in Scan to Print Monitor For details see Registering color printer page 7 20 Even if the Scan to Print Monitor is not started you may be able to use the Scan to Pr...

Page 25: ...ric keys 8 Press Start When you have loaded the document on the automatic document feeder this will conclude the operation When you have loaded the document on the document glass a message will appear...

Page 26: ...on My MFP Menu screen If My MFP Menu screen is not displayed press Mode repeatedly until Scan Ready screen is displayed 2 Press Resolution If Resolution is not displayed press Advanced and then Resol...

Page 27: ...Scan Ready screen is displayed 2 Press Color The button switches between Mono and Color each time you press Color If Color is not displayed press Advanced and then Color Mono Color Select this setting...

Page 28: ...t the application software that supports TWAIN on your computer 3 Click Scan and select Muratec MFX 35x0 NW Scan This command may differ according to the application you are using If you have connecte...

Page 29: ...depending on the application software Set it as required Normally it is not necessary to change this setting from its default value Duplex When you want to scan both sides of a document select the bi...

Page 30: ...d if necessary Default Click to returns the settings to the factory defaults Scan Click to start scanning Select MFP Click to change the scanner or when the IP address of the machine has changed etc T...

Page 31: ...1 24 Scanning with a TWAIN driver This page intentionally left blank...

Page 32: ...ced scan functions 2 4 Preview 2 4 Document type Doc Type 2 6 Contrast 2 7 File name 2 8 Scan size 2 10 Stamp Option 2 12 Next document setting Next Doc 2 13 Duplex scan 2 15 Broadcast 2 17 Batch scan...

Page 33: ...to specify the document size page 2 10 Stamp Option You can stamp on a document that has been scanned or transmitted using the automatic document feeder and check it has been scanned page 2 12 Next d...

Page 34: ...in advance page 2 23 Color adjustment When performing color scanning you can adjust the image to suit your requirements page 2 25 Speed dial For details see chapter 5 Using speed dial numbers page 5 4...

Page 35: ...creen If My MFP Menu screen is not displayed press Mode repeatedly until Scan Ready screen is displayed 3 Press Preview and turn this feature on The button switches between ON and OFF each time you pr...

Page 36: ...celed When you press Delete and then Yes while the second page or later of document is displayed the image will be deleted Then the machine asks you whether to continue or complete the operation To co...

Page 37: ...oc Type is not displayed press Advanced and then Document Type 3 Select the document type to scan with according to the document and press Enter Text Auto Photo Select this when you want to scan text...

Page 38: ...with the normal contrast Select to scan with a contrast between the normal contrast and the darkest contrast Select to scan with the darkest contrast 1 Press Scan on My MFP Menu screen If My MFP Menu...

Page 39: ...he file names see Registering Editing file names page 7 44 You can edit the file name for the currently scanning document but not save it on the machine to use it later Entering a file name 1 Press Sc...

Page 40: ...le Name If File Name is not displayed press Advanced and then File Name 3 Press List 4 Select the file name you want to use 5 Edit the file name as necessary and press Enter Up to 80 characters can be...

Page 41: ...y an area from the center with a width equal to the set scan size is scanned The whole length of the document is scanned Document glass Automatic document feeder Reference setting position A A4 A5 F4...

Page 42: ...1 2 Advanced scan functions 2 11 Advanced scan functions 4 Select the scan size and press Enter 5 Specify the destinations and press Start For details on the procedure see Basic scanning page 1 2...

Page 43: ...This setting is only available with the automatic document feeder 1 Press Scan on My MFP Menu screen If My MFP Menu screen is not displayed press Mode repeatedly until Scan Ready screen is displayed 2...

Page 44: ...Doc on to divide scanning You can scan both through the automatic document feeder and on the document glass NOTE The next document settings can be set separately for the automatic document feeder ADF...

Page 45: ...tting 5 Specify the destinations and press Start For details on the procedure see Basic scanning page 1 2 The display shows Set next document when scanning is over 6 Load the next document and press N...

Page 46: ...document when both 600 dpi resolution page 1 19 and color scan page 1 20 are set 1 Press Scan on My MFP Menu screen If My MFP Menu screen is not displayed press Mode repeatedly until Scan Ready screen...

Page 47: ...2 16 Advanced scan functions NOTE Refer to the illustration below to select the binding position Image Binding position Long edge Short edge...

Page 48: ...ast is indicated below Destinations Number Address book destinations and groups 1 000 Manually entered e mail addresses 30 Shared folders 300 FTP servers 20 Using other than the address book or shortc...

Page 49: ...y until Scan Ready screen is displayed 2 Press Advanced 3 Press Broadcast 4 Select ON and press Enter Select OFF to deselect the setting 5 Specify the destinations using the address book or shortcuts...

Page 50: ...d page will be saved as an individual file 1 Press Scan on My MFP Menu screen If My MFP Menu screen is not displayed press Mode repeatedly until Scan Ready screen is displayed 2 Press Advanced 3 Press...

Page 51: ...the created PDF file Up to 28 alphanumeric characters and symbols can be entered for the password Set the password after pressing Start Permissions Password If you set this password the password must...

Page 52: ...7 Press Close 8 Press Enter 9 Specify the destinations and press Start For details on the procedure see Basic scanning page 1 2 If you have selected a file format other than PDF w Password encrypted P...

Page 53: ...ord enter the password and press Enter If you do not want to set a permissions password press Enter without entering a password 13 Enter the password set in step 12 again and press Enter If you did no...

Page 54: ...You can edit the message for the currently scanning document but not save it on the machine to use it later This function can be used with Scan to e mail 1 Press Scan on My MFP Menu screen If My MFP M...

Page 55: ...l Text Otherwise go to step 10 9 Enter the mail text and press Enter Up to 1 024 characters can be entered for the message For details on entering the characters see chapter 1 Entering characters in t...

Page 56: ...nt from the actual images Adjusting the contrast You can set the image contrast the difference between light and dark to seven different levels from 3 low to 3 high The difference between brightness a...

Page 57: ...or softness to seven different levels from 3 low to 3 high Softens texts and lines Sharpens texts and lines 3 2 1 0 1 2 3 1 Press Scan on My MFP Menu screen If My MFP Menu screen is not displayed pres...

Page 58: ...1 0 1 2 3 NOTE To adjust lightness set the contrast to Normal For details Contrast page 2 7 1 Press Scan on My MFP Menu screen If My MFP Menu screen is not displayed press Mode repeatedly until Scan...

Page 59: ...levels from 3 to 3 Lessens green and enhances magenta Enhances green and lessens magenta 3 2 1 0 1 2 3 You can set the ratio of B blue to seven different levels from 3 to 3 Lessens blue and enhances...

Page 60: ...functions 2 29 Advanced scan functions 5 Select the color ratio for red green and blue and press Enter 6 Press Close 7 Specify the destinations and press Start For details on the procedure see Basic...

Page 61: ...isplayed press Mode repeatedly until Scan Ready screen is displayed 2 Press Application and then ScanTag 3 Select the ScanTag setting you wish to use 4 Set the tag If the selected ScanTag setting has...

Page 62: ...lues and press Enter If you want to correct a value select the value and correct it 6 Confirm the entered values and press Enter 7 Press Start 8 Press Yes to scan another document using the tag settin...

Page 63: ...2 32 Advanced scan functions This page intentionally left blank...

Page 64: ...6 Basic transmission settings 3 8 Canceling Checking faxes 3 12 Receiving faxes 3 17 Operations during reception 3 20 Storing received documents 3 21 Making a phone call 3 23 Making a phone call 3 23...

Page 65: ...as necessary For details see Setting the resolution page 3 8 and Setting the contrast page 3 9 4 Specify the destination For details on specifying the destinations see Specifying destinations page 5 2...

Page 66: ...t is scanned 7 Load the next document and press Next Doc To finish scanning and start the transmission press Tx Start 8 Repeat step 7 to scan all the documents To finish scanning and start the transmi...

Page 67: ...tomatic document feeder 2 Press Fax on My MFP Menu screen If My MFP Menu screen is not displayed press Mode repeatedly until Fax Ready screen is displayed 3 Press Monitor If Monitor is not displayed p...

Page 68: ...during automatic transmission because the line was busy the number is automatically redialed at regular interval If the transmission was not successful even after the set number of redials the documen...

Page 69: ...ast transmission option page 7 29 1 Load the document 2 Press Fax on My MFP Menu screen If My MFP Menu screen is not displayed press Mode repeatedly until Fax Ready screen is displayed 3 Press Broadca...

Page 70: ...details on canceling the transmission see Canceling Checking faxes page 3 12 When the broadcast function is prohibited by security communication setting page 4 27 or when you sending a fax by manual...

Page 71: ...not displayed press Mode repeatedly until Fax Ready screen is displayed 3 Press Resolution If Resolution is not displayed press Advanced and then Resolution 4 Select the desired resolution and press...

Page 72: ...Press Fax on My MFP Menu screen If My MFP Menu screen is not displayed press Mode repeatedly until Fax Ready screen is displayed 3 Press Contrast If Contrast is not displayed press Advanced and then C...

Page 73: ...keys To use a prefix number it is necessary to register it in advance For details see List of other default settings page 7 40 1 To enter dialing options in PC fax enter the options indicated in the o...

Page 74: ...confirm that the fax is sent to the other machine 1 Load the document 2 Press Fax on My MFP Menu screen If My MFP Menu screen is not displayed press Mode repeatedly until Fax Ready screen is displayed...

Page 75: ...ssion press Job Confirm Fax Cancel During fax communication the information lamp flashes 2 If you want to cancel the currently sending fax job press Delete If you do not wish to cancel the job press C...

Page 76: ...rent destinations is displayed Press Delayed job If there are no fax job currently being transmitted proceed to step 3 3 Check the reserved documents To cancel a reserved document select the job to ca...

Page 77: ...elete If you do not want to cancel a destination press Close On the Detail screen the following statuses are displayed for each destination Reserved Under execution Completed Deleting Redial Displayed...

Page 78: ...tinations is displayed If there are no fax job currently being transmitted proceed to step 3 3 Press History 4 Select the item to display the communication history for Fax Tx Fax Rx e mail Tx e mail R...

Page 79: ...scribed as an example To print a transmission result press Print and then Yes For details on reading the transmission results see Reading the journals page 6 9 NOTE You can automatically print or spec...

Page 80: ...e machine rings When the other party sent you a fax When the other party called you NOTE You can set the machine to ring between 0 and 10 times For details see List of other default settings page 7 40...

Page 81: ...ng after reception starts Call charges will be accrued during this time Using both the answering machine and fax Ans Fax Ready The machine rings the number of times set in the answering machine The an...

Page 82: ...y receives faxes Manual reception See Primarily using the phone Tel Ready above 1 Press Fax on My MFP Menu screen If My MFP Menu screen is not displayed press Mode repeatedly until Fax Ready screen is...

Page 83: ...This may make it difficult for paper to be output and cause a paper jam Out of paper reception Out of paper reception is a function that stores the received document in memory when paper has run out...

Page 84: ...iginal size Standard size document As with original size Might be slightly reduced As with original size Long document When the length exceeding the effective recording area is within the reduction ma...

Page 85: ...xt page which can be prevented by setting the Reduction margin When the document length exceeds the effective recording area but is within the reduction margin the document is reduced or cut off to fi...

Page 86: ...ced and then Monitor 2 Dial the telephone number For details on specifying the destinations see Specifying destinations page 5 2 3 When the connection is established talk with the other party When Mon...

Page 87: ...ker volume 1 Press Fax on My MFP Menu screen If My MFP Menu screen is not displayed press Mode repeatedly until Fax Ready screen is displayed 2 Press Monitor 3 Press Volume 4 Select the desired volume...

Page 88: ...iver see chapter 1 Installing to Windows in the Printer Guide The procedure for a document created with Microsoft WordPad is described here as an example The procedures may differ according to the sof...

Page 89: ...paper size to transmit with If you select Same as document size the document will be transmitted with the same paper size as the document size Resolution 200 200 dpi Equivalent to setting the resoluti...

Page 90: ...to change the user authentication click Select User and select the user When you click Select User a list of users will be displayed Select the desired user enter password in box under the list and c...

Page 91: ...nal Address Book or Direct Input When no user is selected in step 7 you can choose only Shared Address Book or Direct Input Search String To search the address book enter a keyword here Search Click S...

Page 92: ...t which cover page to use Transmission Report Sets whether to print a transmission report Save settings Saves the current settings in the Destination Settings tab and the Other Setting tab This is use...

Page 93: ...settings in the Administrator s Guide and chapter 3 Setting the e mail environment in the OfficeBridge Guide Manual reception If you receive only a few documents each day or you want to check the rece...

Page 94: ...lated settings 4 13 Cover page 4 13 Delayed transmission 4 16 Sending the sender name TTI 4 18 E mail gateway 4 19 Security fax functions 4 20 Closed communications 4 20 Registering a passcode 4 22 ID...

Page 95: ...stributed to a specified destination if its information matches the conditions registered in advance Up to 200 distribution settings can be registered For details see Auto distribution page 4 33 Auto...

Page 96: ...be transmitted to machines other than this product If a passcode is set faxes can only be transmitted to machines that are the same product that have the same passcode registered page 4 20 ID check tr...

Page 97: ...en the confirmation dial function is set a screen requiring you to reenter the destination will be displayed before starting transmission Transmission is allowed only when the first and second numbers...

Page 98: ...y MFP Menu screen If My MFP Menu screen is not displayed press Mode repeatedly until Fax Ready screen is displayed 3 Press Preview and turn this feature on The button switches between ON and OFF each...

Page 99: ...press Delete and then Yes while the second page or later of document is displayed the image will be deleted Then the machine asks you whether to continue or complete the operation To continue the ope...

Page 100: ...is scanned When you scan using the automatic document feeder only an area from the center with a width equal to the set scan size is scanned The whole length of the document is scanned Document glass...

Page 101: ...ize If you loaded the document in the automatic document feeder Auto is selected 4 Select the scan size and press Enter 5 Specify the destinations and press Start For details on specifying the destina...

Page 102: ...You can scan both through the automatic document feeder and on the document glass NOTE The next document settings can be set separately for the automatic document feeder ADF and the document glass FBS...

Page 103: ...ns page 5 2 If you loaded the document in the automatic document feeder this concludes the procedure When the loaded documents have been scanned the message Set next document is displayed 6 Load the n...

Page 104: ...atedly until Fax Ready screen is displayed 2 Press Advanced 3 Select Duplex Scan 4 Select Long Edge or Short Edge and press Enter Refer to the display and set the document in the right direction To co...

Page 105: ...ional This setting is only available with the automatic document feeder 1 Press Fax on My MFP Menu screen If My MFP Menu screen is not displayed press Mode repeatedly until Fax Ready screen is display...

Page 106: ...age cannot be attached when performing manual transmission page 3 11 or when using an e mail gateway page 4 19 Registering cover page message You can register up to three types of message 1 Press Sett...

Page 107: ...en 6 Press Close Printing the cover page To confirm that the cover page is set correctly print a sample cover page from your machine 1 Press Setting on My MFP Menu screen If My MFP Menu screen is not...

Page 108: ...reen is not displayed press Mode repeatedly until Fax Ready screen is displayed 2 Press Advanced 3 Press Cover Page 4 Select ON Select OFF to deselect the setting 5 Select document number you want to...

Page 109: ...ble to copy scan or transmit other faxes This function can be also specified in combination with other functions such as broadcasting etc 1 Press Fax on My MFP Menu screen If My MFP Menu screen is not...

Page 110: ...E After scanning the document you can check or delete the reserved transmission by pressing Job Confirm Fax Cancel page 3 13 To change the specified time after scheduling the transmission you need to...

Page 111: ...see Registering your name or company name TTI page 7 30 1 Press Fax on My MFP Menu screen If My MFP Menu screen is not displayed press Mode repeatedly until Fax Ready screen is displayed 2 Press Advan...

Page 112: ...settings in the Administrator s Guide NOTE This function cannot be used in the following cases Real time transmission Closed transmission ID check transmission Attaching a cover page 1 Press Fax on M...

Page 113: ...Press Security Communication 4 Press Closed Transmission 5 Select ON to perform closed transmission and press Enter Select OFF to deselect the setting 6 Press Close NOTE If a passcode is set faxes can...

Page 114: ...and then press Enter 3 Press Security Communication 4 Press Closed Reception 5 Select ON to perform closed reception and press Enter Select OFF to deselect the setting 6 Press Close NOTE If a passcod...

Page 115: ...same passcode registered For details about the closed communication and the communication range specified by a passcode see Communication and range of passcodes page 4 23 1 Press Setting on My MFP Me...

Page 116: ...r Muratec machines With security function Does not match with the passcode set on your machine Communication error Match with the passcode set on your machine Communication OK Communication range of c...

Page 117: ...umber is not registered in the other machine a communication error occurs and transmission fails Even if this setting is ON you can set the ID check transmission OFF only for the next transmission whe...

Page 118: ...not displayed press Mode repeatedly until My MFP menu screen is displayed 2 Press Management If an administrator password is set press Admin Password to enter the password and then press Enter 3 Pres...

Page 119: ...ll allow you to prevent sending faxes to undesired destinations by mistake by reentering the fax numbers When the destination includes a dialing option like pause P you need to re enter it exactly as...

Page 120: ...ess Setting on My MFP Menu screen If My MFP Menu screen is not displayed press Mode repeatedly until My MFP menu screen is displayed 2 Press Management If an administrator password is set press Admin...

Page 121: ...tart time every day When documents have been received during security reception the message Security Reception document exists is displayed and the information lamp illuminates green Even if it is not...

Page 122: ...3 4 Advanced fax functions Security fax functions 4 29 7 Set the security reception starting time and press Enter Press PM or AM and enter the time in 12 hour format You can use numeric keys 8 Press C...

Page 123: ...e protect passcode using the numeric keys and press Enter 5 Press OFF and press Enter The function is turned off when the documents are printed The function is turned off even there are no documents s...

Page 124: ...the or symbols You can enter them from the numeric keys There are three possible PIN masking settings Off Deactivates PIN masking Any PIN you enter will appear on the display and or printouts which s...

Page 125: ...ollows the fax number For example to dial 67778889 with a PIN of 12345678 enter 67778889 12345678 3 Press Start Dialing in PIN mask mode 2 1 Press Fax on My MFP Menu screen If My MFP Menu screen is no...

Page 126: ...ering Editing individual distributing conditions You can register individual distributing conditions to determine whether to forward a received fax Enter as follows Setting Select whether to enable th...

Page 127: ...bute when the received fax number includes the entered number Schedule Set up the schedule for auto distributions Set up the day of the week start time and end time Auto Print Enable to also print the...

Page 128: ...ess Group to select a group For details see Using the Index page 5 3 Press Speed Dial to select a destination using a speed dial number For details see Using speed dial numbers page 5 4 Press Search t...

Page 129: ...Select the matching method and press Enter 16 Press Enter 17 Press Schedule 18 Set up the schedule for distribution Set up the day of the week start time and end time 19 Press Close 20 Press Auto Prin...

Page 130: ...Printing the distributing condition list 1 Press Setting on My MFP Menu screen If My MFP Menu screen is not displayed press Mode repeatedly until My MFP menu screen is displayed 2 Press Register 3 Pre...

Page 131: ...ly are enabled and faxes will be distributed according to the registered conditions 1 Press Fax on My MFP Menu screen If My MFP Menu screen is not displayed press Mode repeatedly until Fax Ready scree...

Page 132: ...the address book 5 2 Searching for server destinations 5 5 Entering the destination directly 5 10 Selecting destination from the history 5 12 Checking specified destinations 5 14 Checking with destina...

Page 133: ...or details see Address book destinations page 7 2 Selecting from the address book Selecting from the address book 1 Press Scan or Fax on My MFP Menu screen If My MFP Menu screen is not displayed press...

Page 134: ...alpha characters Lists the destination names starting with a symbol or number Lists the registered group names NOTE To use this function register group numbers in advance For details see Registering o...

Page 135: ...de repeatedly until Scan Ready or Fax Ready screen is displayed 2 To use the personal address book log in to the machine For details on logging in see chapter 1 Logging in Logging out in the Administr...

Page 136: ...s in Specifying the network settings in the Administrator s Guide Simple searching Enter part of the name or e mail address to search for 1 Press Scan or Fax on My MFP Menu screen If My MFP Menu scree...

Page 137: ...cified conditions Search Items Name Enter to search for destinations by name Fax Enter to search for destinations by fax number e mail Enter to search for destinations by e mail address Co Enter to se...

Page 138: ...l to display the address book 3 Press Search 4 Press Advanced 5 Press the search item box for the search condition you want to enter In this example Send to e mail is selected You can press Server on...

Page 139: ...peat the operation in steps 5 to 8 If the search condition is set proceed to step 10 10 Press Execute 11 Select the destination to specify from the search results and press Enter Press to check the de...

Page 140: ...AP server An e mail address on an LDAP server A fax number registered in the address book An e mail address registered in the address book Note Press to check the details for that destination Press Cl...

Page 141: ...and press Enter Up to 40 digits can be entered Press Clear to delete the digit at the position of the cursor Dialing options can be entered For details on the dialing options see Dialing options page...

Page 142: ...ed 3 Press Mail Address 4 Enter the e mail address and press Enter Up to 50 characters can be entered For details on entering the characters see chapter 1 Entering characters in the Administrator s Gu...

Page 143: ...ns registered in the address book are not displayed in the dial history 1 Press Fax on My MFP Menu screen If My MFP Menu screen is not displayed press Mode repeatedly until Fax Ready screen is display...

Page 144: ...displayed in the e mail history 1 Press Scan on My MFP Menu screen If My MFP Menu screen is not displayed press Mode repeatedly until Scan Ready screen is displayed 2 Press Advanced 3 Press Mail Histo...

Page 145: ...er FTP server Checking with destination confirmation function When the confirm destination function is enabled a screen to confirm or delete the destinations is displayed every time when you press Sta...

Page 146: ...d press Close until the ready screen is displayed 2 Press Location Example Scanner screen 3 Confirm the destinations To delete a selected destination select the destination to delete and press Delete...

Page 147: ...5 16 Checking specified destinations This page intentionally left blank...

Page 148: ...nt Checking the transmission report 6 2 Issuing the transmission report 6 2 Reading the transmission report 6 4 Printing journals 6 5 Printing the journal manually 6 6 Printing the journals automatica...

Page 149: ...g default fax settings page 7 39 Issuing the transmission report 1 Load the document 2 Press Fax on My MFP Menu screen If My MFP Menu screen is not displayed press Mode repeatedly until Fax Ready scre...

Page 150: ...s can be entered To delete one of the entered characters press Delete 8 Press Close 9 Specify the destinations and press Start For details on specifying the destinations see Specifying destinations pa...

Page 151: ...f communication is printed for the following types of communication Manual Tx Broadcast PC Fax Tx 8 Result OK Completed normally ECM Mode transmission Super G3 transmission Code The communication erro...

Page 152: ...0 jobs of each type of the journal Jobs older than the latest 100 cannot be printed Printing the journal automatically You can set the machine to print out the journal at every 100 jobs or at a specif...

Page 153: ...100 jobs is always retained Printing the journal manually You can print the history of the latest 100 jobs for the specified type of journal 1 Press Setting on My MFP Menu screen If My MFP Menu scree...

Page 154: ...een is displayed 2 Press Default Settings 3 Press Fax Settings 4 Press Other Settings 5 Press Auto Print Journal 6 Select when to print the journals To print the journals when there are transmission h...

Page 155: ...r Press AM or PM and enter the time in 12 hour format You can use numeric keys 9 Select the type of journal to print 10 Select ON press Enter If you select OFF the type of journal will not be printed...

Page 156: ...er User name GUEST Only when a user is logged in When transmission is performed without logging in to the machine When the machine sends a fax automatically by auto distribution function machine name...

Page 157: ...t elapsed from when the communication started until when the communication ended 6 Page s The number of pages transmitted 7 Result OK Completed normally ECM Mode reception Super G3 reception Code The...

Page 158: ...User name GUEST Model name Only when a user is logged in When transmission is performed without logging in to the machine When the machine performed transmission with a function such as sending trans...

Page 159: ...eld Fax forwarding An e mail was received and forwarded as a fax Error Mail MDN A reception error occurred and the MDN response was transmitted Error Mail Forwarding A reception error occurred and the...

Page 160: ...er path 3 File Name The file name 4 Start Time The time the communication started 5 Sender User name GUEST Only when a user is logged in When transmission is performed without logging in to the machin...

Page 161: ...6 14 Printing journals This page intentionally left blank...

Page 162: ...s 7 18 Registering color printer 7 20 Initial setup User Install 7 26 Opening the user install screen 7 27 Registering the user install 7 28 Specifying default settings 7 33 Specifying default scanner...

Page 163: ...ember Name The name for the destination Up to 30 characters can be entered Fax number The fax number of the destination Pause and other dialing options can be entered in addition to numerals Also regi...

Page 164: ...screen is not displayed press Mode repeatedly until My MFP menu screen is displayed 2 Press Register 3 Press Address Book Entry 4 Press Add 5 Use the numeric keys to enter the fax number Also registe...

Page 165: ...ations repeat the procedure from step 4 Useful registration method 1 Registering from the scanner or fax ready screen 1 Press Scan or Fax on My MFP Menu screen If My MFP Menu screen is not displayed p...

Page 166: ...Fax on My MFP Menu screen If My MFP Menu screen is not displayed press Mode repeatedly until Fax Ready screen is displayed 2 Use the numeric keys to enter the destination fax number 3 Press Register 4...

Page 167: ...ced 3 Press Mail Address 4 Enter the destination e mail address 5 Press Register 6 The procedure is then the same as for registering an address book destination Continue from step 10 of Registering or...

Page 168: ...Select the destination you want to delete 5 Press Delete 6 Press Yes Press No to close the screen without deleting the data To continue deleting data repeat the procedures from step 4 Printing the add...

Page 169: ...specified Registering or editing groups 1 Press Setting on My MFP Menu screen If My MFP Menu screen is not displayed press Mode repeatedly until My MFP menu screen is displayed 2 Press Register 3 Pres...

Page 170: ...ting groups 1 Press Setting on My MFP Menu screen If My MFP Menu screen is not displayed press Mode repeatedly until My MFP menu screen is displayed 2 Press Register 3 Press Group 4 Select the group y...

Page 171: ...tted at the center with and only the beginning and ending of the link will be displayed Link To specify the link to the folder enter the link manually or browse to the desired folder The link must be...

Page 172: ...to the previous screen 6 Press Shortcut Name If you do not want to register or edit the shortcut name proceed to step 8 7 Register or edit the shortcut name and press Enter For details on entering cha...

Page 173: ...epeat the procedure from step 4 Deleting 1 Press Setting on My MFP Menu screen If My MFP Menu screen is not displayed press Mode repeatedly until My MFP menu screen is displayed 2 Press Register 3 Pre...

Page 174: ...e 1 4 step 1 to 6 2 Refer to the procedure from step 4 of Registering Editing page 7 10 Registering a browsed folder 1 Specify a folder For details see Scanning to a shared PC folder by directly speci...

Page 175: ...haracters of the link are displayed instead Link Enter the link to the FTP server The link must be registered Up to 128 characters can be entered User Name Register a user name when it is required to...

Page 176: ...Enter For details on entering characters see chapter 1 Entering characters in the Administrator s Guide 8 Press User Name 9 Enter or edit the user name and press Enter For details on entering characte...

Page 177: ...f the shortcut to delete and press Delete 5 Press Yes to proceed with the deletion Press No to close the screen without deleting the shortcut To continue deleting shortcuts repeat the operation from s...

Page 178: ...TP Server 1 Specify an FTP Server For details see Scanning to an FTP server by directly specifying it page 1 10 step 1 to 11 2 Press Register 3 Press Yes Press No to close the screen without registeri...

Page 179: ...diting 1 Press Setting on My MFP Menu screen If My MFP Menu screen is not displayed press Mode repeatedly until My MFP menu screen is displayed 2 Press Register 3 Press Favorite Address 4 Press Add To...

Page 180: ...splayed press Mode repeatedly until My MFP menu screen is displayed 2 Press Register 3 Press Favorite Address 4 Select the destination you want to delete and press Delete 5 Press Yes to proceed with t...

Page 181: ...t errors in popup window Delete printed document Limit memory size 7 23 Network Settings The following items are set when installing the Scan to Print Monitor but can be changed as necessary IP Addres...

Page 182: ...inter You can register a printer installed in the computer you are using Margin With some printers the document may be reduced when printed to avoid the margin where printing cannot be performed You c...

Page 183: ...mation select the item you want to change and click Register Edit 5 Click Browse 6 Browse to the shared folder you created in Browse for Folder and click OK 7 Click the Printer list button and select...

Page 184: ...rinting when printing cannot be performed correctly due to the document size or resolution settings 1 Start Scan to Print Monitor Fore details see Starting the Scan to Print Monitor page 7 20 2 Right...

Page 185: ...ly set to 443 Perform secure communications Select this to perform SSL communications 1 Start Scan to Print Monitor Fore details see Starting the Scan to Print Monitor page 7 20 2 Right click the task...

Page 186: ...estinations 7 25 Machine settings Closing the Scan to Print Monitor Right click the task tray icon of the Scan to Print Monitor and select Exit NOTE To use the Scan to Printer function the Scan to Pri...

Page 187: ...on either Tone or Pulse If the wrong setting is made telephoning and faxing cannot be performed Automatic daylight saving time detection Adjust the clock automatically in the summer time period Broadc...

Page 188: ...the machine is being called This is an optional service provided by your telephone company NOTE Print out the Settings List to ensure that your settings are correct For details see chapter 1 Checking...

Page 189: ...the current time in the order of year 4 digits month 2 digits day 2 digits hour 2 digits and minutes 2 digits 1 Open the user install screen page 7 27 2 Press Time Setting 3 Enter the current date an...

Page 190: ...art transmission when registered destination is selected OFF or when Start is pressed with all destinations selected ON NOTE The broadcast setting is enabled for both scan to e mail and fax transmissi...

Page 191: ...t ON or OFF and press Enter Registering your name or company name TTI You can register three TTIs Transmit Terminal Identifier 1 Open the user install screen page 7 27 2 Press TTI Enter Edit 3 Press T...

Page 192: ...g your fax number 1 Open the user install screen page 7 27 2 Press TTI Number 3 Use the numeric key to enter the TTI number and press Enter TTI number can contain up to 20 characters To enter symbol b...

Page 193: ...anada GMT 06 00 Central Time US Canada GMT 05 00 Eastern Time US Canada GMT 04 00 Atlantic Time Canada GMT 03 30 Newfoundland GMT Greenwich Mean Time Dublin Edinburgh Lisbon London GMT 01 00 Amsterdam...

Page 194: ...fault values of often used functions can shorten the time required to adjust settings NOTE You can set the time it takes to return to the default settings For details see chapter 1 Specifying default...

Page 195: ...default resolution setting 100 dpi 200 dpi 300 dpi 600 dpi Scan Size Set the default scan size setting Letter Legal H LTR A4 F4 A5 Stamp 1 You can stamp on a document that has been scanned using the a...

Page 196: ...ting is also changed Mono TIFF PDF PDF w Password Color JPEG PDF PDF w Password PDF w Password Encryption Level Low 40 bit RC4 High 128 bit RC4 High 128 bit AES Printing Allowed Not allowed Editing Al...

Page 197: ...il My MFP menu screen is displayed 2 Press Default Settings 3 Press Scanner Settings 4 Press Other Settings 5 Press JPEG Compression 6 Select the default value and press Enter Low Normal High Decrease...

Page 198: ...If My MFP Menu screen is not displayed press Mode repeatedly until My MFP menu screen is displayed 2 Press Default Settings 3 Press e mail Settings 4 Select the function to set 5 Select the item to se...

Page 199: ...ed Editing Allowed Not allowed Copying Allowed Not allowed Batch Scan Set the default batch scan setting OFF ON NOTE Underlined values are the default settings specified at the time of shipment List o...

Page 200: ...MFP Menu screen is not displayed press Mode repeatedly until My MFP menu screen is displayed 2 Press Default Settings 3 Press Fax Settings 4 Select the function to set 5 Select the item to set For det...

Page 201: ...ent feeder FBS stands for document glass Flat Bed Scanner ADF OFF ON FBS OFF ON TTI The sender name printed at the top of a document received at the destination OFF ON Cover Page A cover page containi...

Page 202: ...e print method for received documents OFF Duplex Rx Quick Memory Transmission If this is set to ON fax transmission for multiple documents will begin in order of page when it has been scanned and stor...

Page 203: ...d as the subject for the e mail to transmit Up to 80 characters can be entered Text The text entered here is used as the message for the e mail to transmit Up to 1024 characters can be entered This se...

Page 204: ...Enter the message and press Enter For details on entering characters see chapter 1 Entering characters in the Administrator s Guide Press to enter a line break A line break takes up two characters Yo...

Page 205: ...displayed 2 Press Register 3 Press File Name 4 Select a new button To change a file name that is already registered select the file name you want to change 5 Enter the file name and press Enter Up to...

Page 206: ...s not displayed press Mode repeatedly until My MFP menu screen is displayed 2 Press Register 3 Press Domain Name 4 Select a new button To change a domain name that is already registered select the dom...

Page 207: ...7 46 Registering other settings This page intentionally left blank...

Page 208: ...Chapter 8 Troubleshooting Error messages 8 2 Communication errors 8 2 Troubleshooting 8 8 Cannot transmit faxes 8 8 Cannot receive faxes 8 9 Cannot scan 8 10...

Page 209: ...tion errors When a communication error occurs a message indicating the cause and countermeasure for the error is printed Check the error code and message and solve the problem Fax communication errors...

Page 210: ...so that it is within 35 4 900 mm and transmit it again If the screen Lamp error Checkout error is displayed after the error occurs turn the power of the machine OFF and then ON again and try making a...

Page 211: ...ntact your local technical representative R 2 3 Confirm the remote fax If you know who the sending party is ask them to transmit the document again If this error continues to occur contact your local...

Page 212: ...emporarily insufficient Wait a while and perform the operation again 1001 1003 1008 1013 1016 1017 1032 1033 1080 1087 1123 1230 1231 1232 1233 1234 2001 Cannot connect Check whether there is a comput...

Page 213: ...tion history Error code Countermeasure 2 The image attached to the received e mail does is not supported by the machine Request the other party to attach the file in a format supported by the machine...

Page 214: ...mail was requesting a Message Disposition Notification MDN the results of the confirmation were printed 5 Forwarding Error The received e mail was forwarded according to the When an e mail that cannot...

Page 215: ...he loaded documents include pages smaller than the minimum width 4 7 These pages should be loaded on the document glass and kept separate from the other pages Cannot transmit even though the number is...

Page 216: ...tall page 7 26 Does the machine have paper loaded Load paper For details see Loading paper in the User s Guide Is there a paper jam Check the error message and remove the jammed paper For details see...

Page 217: ...the e mail environment in the OfficeBridge Guide Cannot use the Scan to Folder function Is there a firewall set Firewall software may be stopping the file sharing function of Windows Change the setti...

Page 218: ...2013 MURATA MACHINERY LTD 3301 East Plano Parkway Suite 100 Plano Texas 75074 Muratec America Inc http www muratec com...

Reviews: