45
TD-001578-01-C
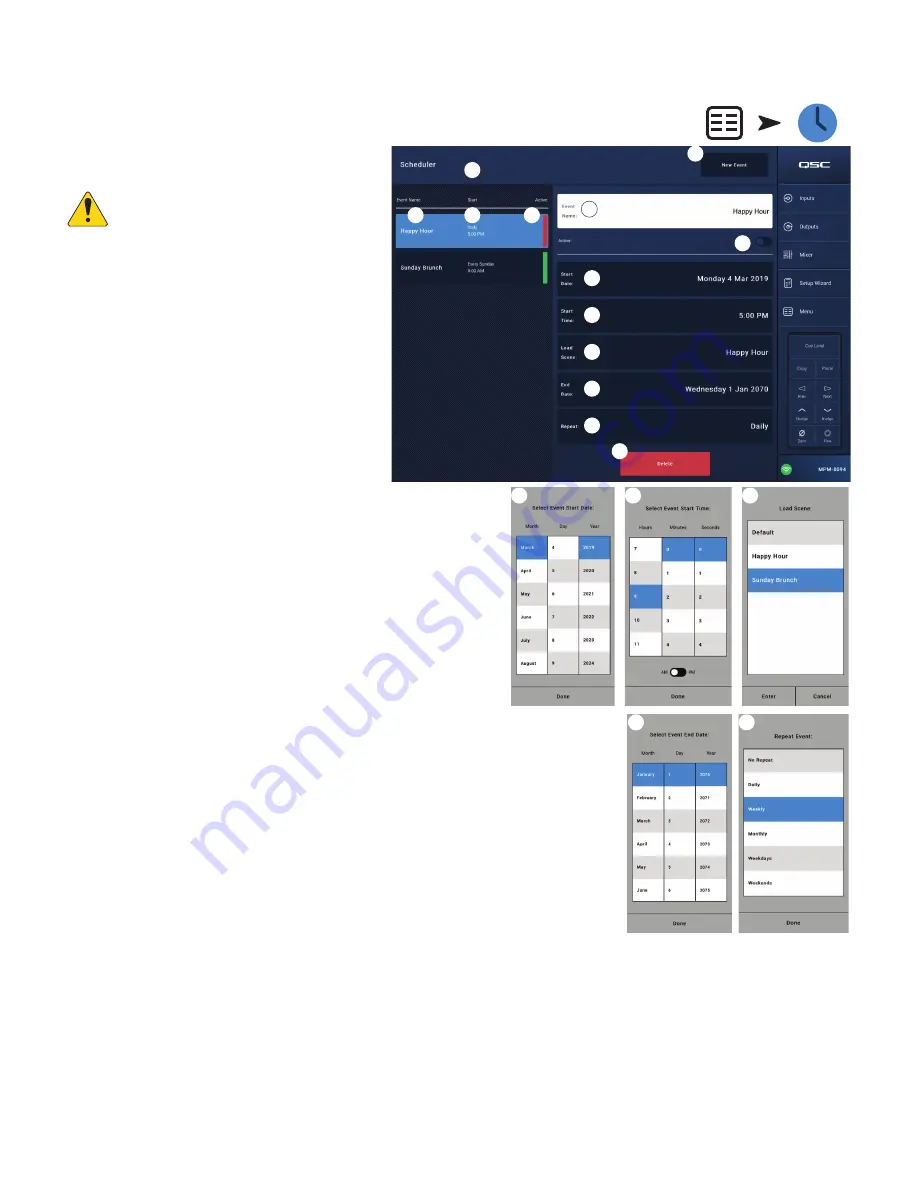
Menu – Scheduling
The Scheduling screen is used to set up scheduled recall
of scenes. Each scheduled recall is known as an Event.
This function is also supported in MP Manage if enabled
by the installer.
NOTE!:
Scheduling depends on the internal
clock of the MP-M being set to the correct
time. If the MP-M is connected to the
Internet, its internal clock will be automatically
updated. If it is not connected to the Internet,
the clock may be set to match the time of a
connected device from the settings screen.
1.
New Event
button – Touch this button to create a new
scheduled event.
Left Side of Screen
2.
Event List
– Displays a scrollable list of events
3.
Event Name
– The user-defined event name
4.
Start
– Frequency and start time of the event
5.
Active
– Green is active, red is inactive
Right Side of Screen
6.
Event Name
field – Touch to enter a name for the
event.
7.
Active
switch – Activates or deactivates the event
without changing any of the event settings.
8.
Start Date
button – Displays a pop-up to set the date
when the event is to occur for the first time.
9.
Start Time
button – Displays a pop-up to set the time
of day the event is to occur.
10.
Load Scene
button – Displays a pop-up with a list of
available scenes.
11.
End Date
button – Displays a pop-up to set the date
on which the event will no longer occur.
12.
Repeat
button – Displays a pop-up to select when the
event repeats. Options are:
a.
No Repeat
– one-time event
b.
Daily
– seven days per week
c.
eekdays
– Monday – Friday
d.
eekly
– one time per week beginning on the
Start Date
e.
eekends
– Saturday and Sunday only
13.
Delete
button – Deletes the selected Event.
Touch
Menu
Touch
Scheduling
3
4
1
10
9
6
8
11
5
12
2
7
13
10
9
8
12
11


