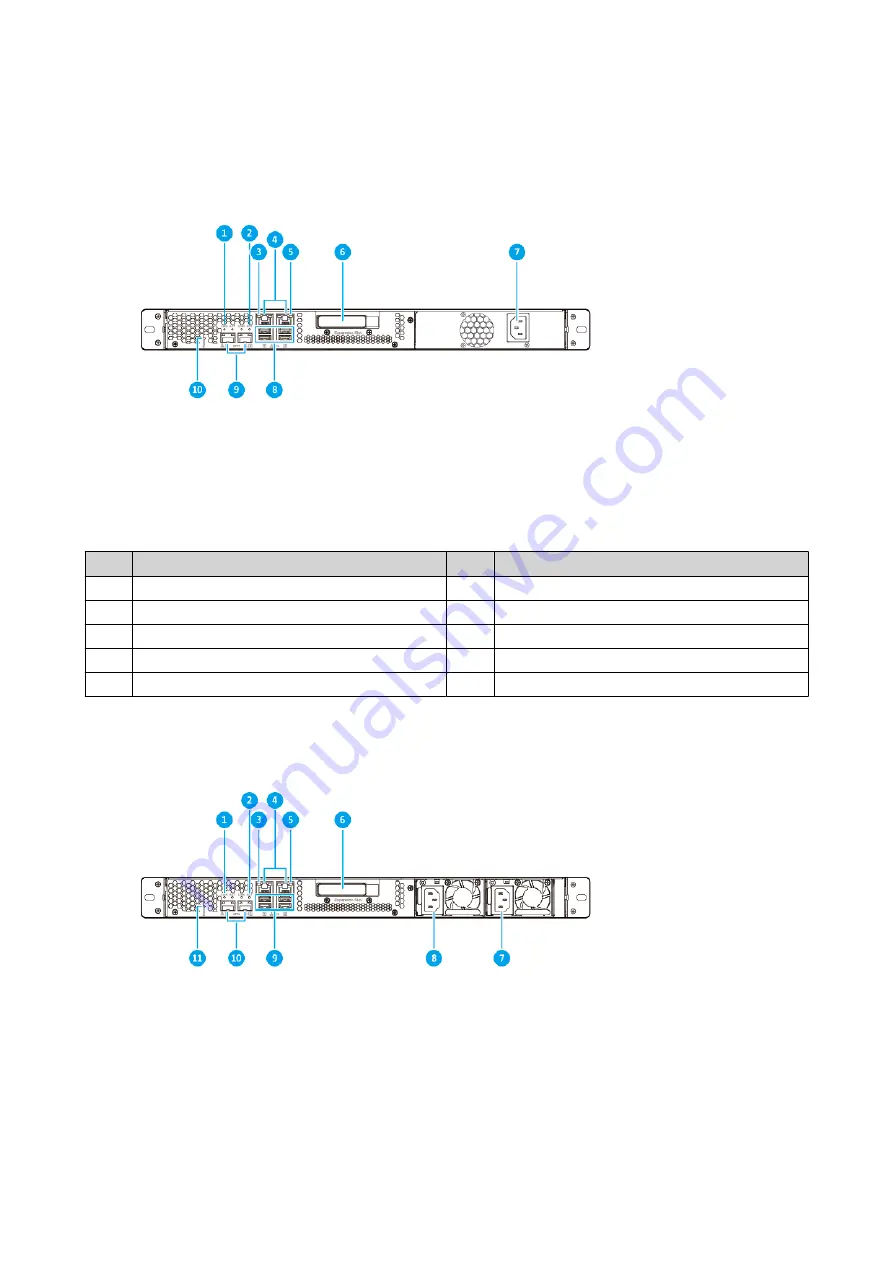
QNAP TS 32PXU Series User Manual Download Page 10

Rear Panel

TS-432PXU

No.

Component

No.

Component

1

10 Gigabit Ethernet SFP+ link LED

6

PCIe slot

2

10 Gigabit Ethernet SFP+ activity LED

7

Power supply unit

3

2.5 Gigabit Ethernet speed LED

8

USB 3.2 Gen 1 Type-A ports

4

2.5 Gigabit Ethernet ports

9

10 Gigabit Ethernet SFP+ ports

5

2.5 Gigabit Ethernet activity LED

10

Reset button

TS-432PXU-RP

TS-x32PXU User Guide

Product Overview   

9

Summary of Contents for TS 32PXU Series

Page 1: ...TS x32PXU TS 432PXU TS 432PXU RP TS 832PXU TS 832PXU RP TS 1232PXU RP User Guide Document Version 2 17 08 2020...

Page 2: ...19 Installing Handles 27 Replacing Memory Modules 29 Installing Expansion Units 34 Hot Swapping Redundant Power Supply Units 38 Rail Kits 40 QTS Installation 40 Installing QTS Using Qfinder Pro 41 Ins...

Page 3: ...7 Notices Limited Warranty 55 Disclaimer 55 GNU Public License 55 FCC Notice 63 CE Notice 63 BSMI Notice 63 SJ T 11364 2006 64 2...

Page 4: ...that the user has a basic understanding of storage and backup concepts Document Conventions Symbol Description Notes provide default configuration settings and other supplementary information Importa...

Page 5: ...e or replacement Any attempt to repair or perform maintenance procedures on the product by you or an unauthorized third party invalidates the warranty QNAP is not responsible for any damage or data lo...

Page 6: ...patible with SATA 3 Gbps Drive compatibility 3 5 inch bays 3 5 inch SATA hard disk drives 2 5 inch SATA hard disk drives 2 5 inch SATA solid state drives SSD cache acceleration support Supported Hot s...

Page 7: ...Hz 2 x 250W 100 240V AC 50 60 Hz System battery CR2032 lithium battery 3V Sound level TS 432PXU 38 db A TS 432PXU RP 39 db A TS 832PXU 24 9 db A TS 832PXU RP 30 6 dB A 32 2 db A Fans System 2 x 40 mm...

Page 8: ...S 432PXU TS 432PXU RP 2 x handles 2 x angle brackets 8 x screws Quick Installation Guide QIG 1 Components Front Panel TS 432PXU TS 432PXU RP No Component No Component 1 Drive 1 LED 5 Status LED 2 Driv...

Page 9: ...TS 832PXU TS 832PXU RP TS 1232PXU RP No Component No Component 1 Power button 4 Expansion unit LED 2 Status LED 5 Drive LED 3 LAN LED TS x32PXU User Guide Product Overview 8...

Page 10: ...lot 2 10 Gigabit Ethernet SFP activity LED 7 Power supply unit 3 2 5 Gigabit Ethernet speed LED 8 USB 3 2 Gen 1 Type A ports 4 2 5 Gigabit Ethernet ports 9 10 Gigabit Ethernet SFP ports 5 2 5 Gigabit...

Page 11: ...0 Gigabit Ethernet SFP ports 5 2 5 Gigabit Ethernet activity LED 11 Reset button 6 PCIe slot TS 832PXU TS 832PXU RP TS 1232PXU RP No Component No Component 1 2 5 Gigabit Ethernet speed LED 6 Power sup...

Page 12: ...System Board No Component No Component 1 PCIe 2 0 x2 2 Memory slot Drive Numbering TS 432PXU TS 432PXU RP TS x32PXU User Guide Product Overview 11...

Page 13: ...ons General Instructions The device should be stored in a secure location with restricted access controlled through the use of a tool lock and key or any means of security Only qualified skilled and a...

Page 14: ...tial battery explosion causing injury or damage to components ensure that you replace the existing battery with a battery of the same type Dispose of used batteries properly according to local regulat...

Page 15: ...following topics Installing 3 5 inch Hard Drives on 3 5 inch Trays Installing 2 5 inch Hard Drives and Solid State Drives on 3 5 inch Trays For a list of compatible drives and expansion cards go to h...

Page 16: ...inch solid state drives Installing 3 5 inch Hard Drives on 3 5 inch Trays Warning Installing a drive deletes all data on the drive Observe electrostatic discharge ESD procedures to avoid damage to com...

Page 17: ...o that the holes on the bottom of the drive are aligned with the holes on the bottom of the tray b Attach the screws to lock the drive to the tray 4 Load the tray into the bay a Insert the tray into t...

Page 18: ...ic discharge ESD procedures to avoid damage to components Moving fan blades Keep your hands and other body parts away from moving fan blades Other moving components Keep your hands and other body part...

Page 19: ...e on the tray so that the holes on the bottom of the drive are aligned with the holes on the bottom of the tray b Attach the screws 4 Load the tray into the bay a Insert the tray into the bay TS x32PX...

Page 20: ...blades Keep your hands and other body parts away from moving fan blades Other moving components Keep your hands and other body parts away from other moving components Note This process applies only to...

Page 21: ...onal Click the corresponding Note icon to view more information 2 Power off the NAS 3 Disconnect the power cord from the electrical outlet 4 Disconnect all cables and external attachments 5 Remove the...

Page 22: ...er a Remove the screw that secures the cover to the bracket b Pull the cover away from the slot 8 Install the expansion card a Hold the card by the edges b Insert the card into the slot c Attach the s...

Page 23: ...t into the PCIe slot on the system board b Attach the screws that secure the bracket to the chassis 10 Attach the top cover a Place the cover on the NAS b Attach the screws connecting the top cover to...

Page 24: ...ge ESD procedures to avoid damage to components Moving fan blades Keep your hands and other body parts away from moving fan blades Other moving components Keep your hands and other body parts away fro...

Page 25: ...fic component or device model in the list f Optional Click the corresponding Note icon to view more information 2 Power off the NAS 3 Disconnect the power cord from the electrical outlet 4 Disconnect...

Page 26: ...ew that secures the cover to the bracket b Pull the cover away from the slot 7 Install the expansion card a Hold the card by the edges b Insert the card into the slot c Attach the screw TS x32PXU User...

Page 27: ...8 Attach the case cover a Place the cover on the device b Slide the cover forward TS x32PXU User Guide Installation and Configuration 26...

Page 28: ...the power cord to the electrical outlet 11 Power on the NAS Installing Handles Installing handles enables you to better grip and secure the NAS Note Handles on the TS 432PXU and the TS 432PXU RP requi...

Page 29: ...angle bracket b Attach the screws to lock the handle to the angle bracket 3 Install the angle bracket on the device a Align the holes on the angle bracket with the holes on the chassis Note Ensure tha...

Page 30: ...result in serious injury or death Observe electrostatic discharge ESD procedures to avoid damage to components Moving fan blades Keep your hands and other body parts away from moving fan blades Other...

Page 31: ...TS 832PXU TS 832PXU RP TS 1232PXU RP 1 Loosen the screws 2 Slide the cover away from the NAS using the handle 3 Lift the cover off the NAS TS x32PXU User Guide Installation and Configuration 30...

Page 32: ...ng Attempting to remove a module that is not completely released may damage the module and the motherboard b Hold the module by the edges c Carefully slide the module out of the slot 6 Install a new m...

Page 33: ...wn on the module until the retention clips lock the module into place 7 Attach the case cover TS 432PXU TS 432PXU RP 1 Place the cover on the NAS 2 Attach the screws connecting the case cover to the c...

Page 34: ...2 Slide the cover forward 3 Tighten the screws TS x32PXU User Guide Installation and Configuration 33...

Page 35: ...torage expansion accessories from QNAP or an authorized reseller For details go to https shop qnap com For the list of compatible expansion units and the maximum number of applicable expansion units g...

Page 36: ...ATA drives USB 3 2 Gen 2 Type A to Type C cable TR 004U Uses a USB 3 2 Gen 1 Type C interface Supports SATA drives USB 3 2 Gen 1 Type A to Type C cable RAIL B02 TL D800C Uses a USB 3 2 Gen 2 Type C in...

Page 37: ...on which expansion unit supports the expansion card see Installing Expansion Units Note This shows the connection between the TL R1200C RP and the TS 432PXU Note This shows the connection between the...

Page 38: ...ired accessories details see Installing Expansion Units 1 Power off the NAS 2 Install a host bus adapter on the PCIe slot Note The QNAP QXP host bus adapter is required for connecting the SATA JBOD en...

Page 39: ...pansion units are listed Hot Swapping Redundant Power Supply Units Warning The NAS may have one or more power supply unit PSU cords To avoid serious injuries a trained service technician must disconne...

Page 40: ...electrical outlet 6 Power on the NAS 7 Enable alerts for PSU failures a Log on to QTS as administrator b Go to Control Panel System Hardware General c Select Enable Redundant Power Supply Mode d Click...

Page 41: ...installation Recommended If the NAS is connected to your local area network you can do the following Locate the NAS using Qfinder Pro Complete the steps in the Smart Installation Guide wizard Compute...

Page 42: ...Smart Installation Guide To install the out of the box version click Skip 6 Click Start Smart Installation Guide 7 Specify the following information NAS name Specify a name with 1 to 14 characters Th...

Page 43: ...default web browser 5 Create an account or sign in to myQNAPcloud Note You must return to this page to complete the installation after creating an account 6 Specify the myQNAPcloud device name for the...

Page 44: ...time Tip QNAP recommends connecting to an NTP server to ensure that the NAS follows the Coordinated Universal Time UTC standard 13 Click Next 14 Select Obtain an IP address automatically DHCP 15 Click...

Page 45: ...wer on Press the button once The device powers on Power off Press and hold the button for 1 5 seconds The device powers off Force power off Press and hold the button for 10 seconds The device powers o...

Page 46: ...A label attached to the device also lists the address as MAC1 TCP IP configuration Obtain IP address settings automatically via DHCP Disable jumbo frames If port trunking is enabled multi LAN models...

Page 47: ...the device is powered on The following LED information applies only when the drive is correctly installed and when the device is connected to the network or to a host For details on the location of t...

Page 48: ...reach its full capacity The system fan is not functioning An error occurred when accessing read write the data A bad sector is detected on the hard drive The device is in degraded read only mode two m...

Page 49: ...he network connection is operating at 10 Gbps Off There is no network connection 10 Gigabit Ethernet SFP activity Orange A network connection has been established Flashes orange Data is being transmit...

Page 50: ...oting reset button The operating system was updated The device is waking up from sleep mode The USB device has been removed USB One Touch copy button The device is starting USB One Touch copy 3 Cannot...

Page 51: ...status error occurred The disk volume is about to reach its full capacity The disk volume has reached its full capacity The USB device is being removed USB one touch copy button A volume status error...

Page 52: ...TS x32PXU User Guide Basic Operations 51...

Page 53: ...ber of Disks Maximum Number of Removed Drives Single No 1 N A JBOD Yes 2 RAID 0 Yes RAID 1 Yes 2 1 RAID 5 Yes 3 RAID 6 Yes 4 3 RAID 10 No 4 Must be an even number One or two member drives in two diffe...

Page 54: ...Go to Main Menu Storage Snapshots Storage Space 11 Locate the volume that contains the new drive and then verify that the status is Rebuilding Support and Other Resources QNAP provides the following...

Page 55: ...forwarding settings myQNAPcloud Provides various remote access services such as DDNS and myQNAPcloud Link QNAP ID User account that enables you to use myQNAPcloud remote access and other QNAP service...

Page 56: ...QNAP makes no warranty or representation expressed implied or statutory with respect to its products or the contents or use of this documentation and all accompanying software and specifically disclai...

Page 57: ...his version of the GPL to prohibit the practice for those products If such problems arise substantially in other domains we stand ready to extend this provision to those domains in future versions of...

Page 58: ...he work The Corresponding Source need not include anything that users can regenerate automatically from other parts of the Corresponding Source The Corresponding Source for a work in source code form...

Page 59: ...not combined with it such as to form a larger program in or on a volume of a storage or distribution medium is called an aggregate if the compilation and its resulting copyright are not used to limit...

Page 60: ...urs as part of a transaction in which the right of possession and use of the User Product is transferred to the recipient in perpetuity or for a fixed term regardless of how the transaction is charact...

Page 61: ...overed work except as expressly provided under this License Any attempt otherwise to propagate or modify it is void and will automatically terminate your rights under this License including any patent...

Page 62: ...uch an agreement or commitment not to enforce a patent against the party If you convey a covered work knowingly relying on a patent license and the Corresponding Source of the work is not available fo...

Page 63: ...ublished by the Free Software Foundation If the Program specifies that a proxy can decide which future versions of the GNU General Public License can be used that proxy s public statement of acceptanc...

Page 64: ...harmful interference when the equipment is operated in a commercial environment This equipment generates uses and can radiate radio frequency energy and if not installed and used in accordance with th...

Page 65: ...1364 2006 RoHS RoHS Pb Hg Cd CR VI PBB PBDE 0 0 0 0 0 0 0 0 0 0 0 0 0 0 0 0 0 0 0 0 0 0 0 0 0 0 0 0 0 0 0 0 0 0 0 0 0 0 0 0 0 0 0 0 0 0 0 0 O SJ T11363 2006 X SJ T11363 2006 TS x32PXU User Guide Notic...

Reviews: