background image

TL-D1600S

4.

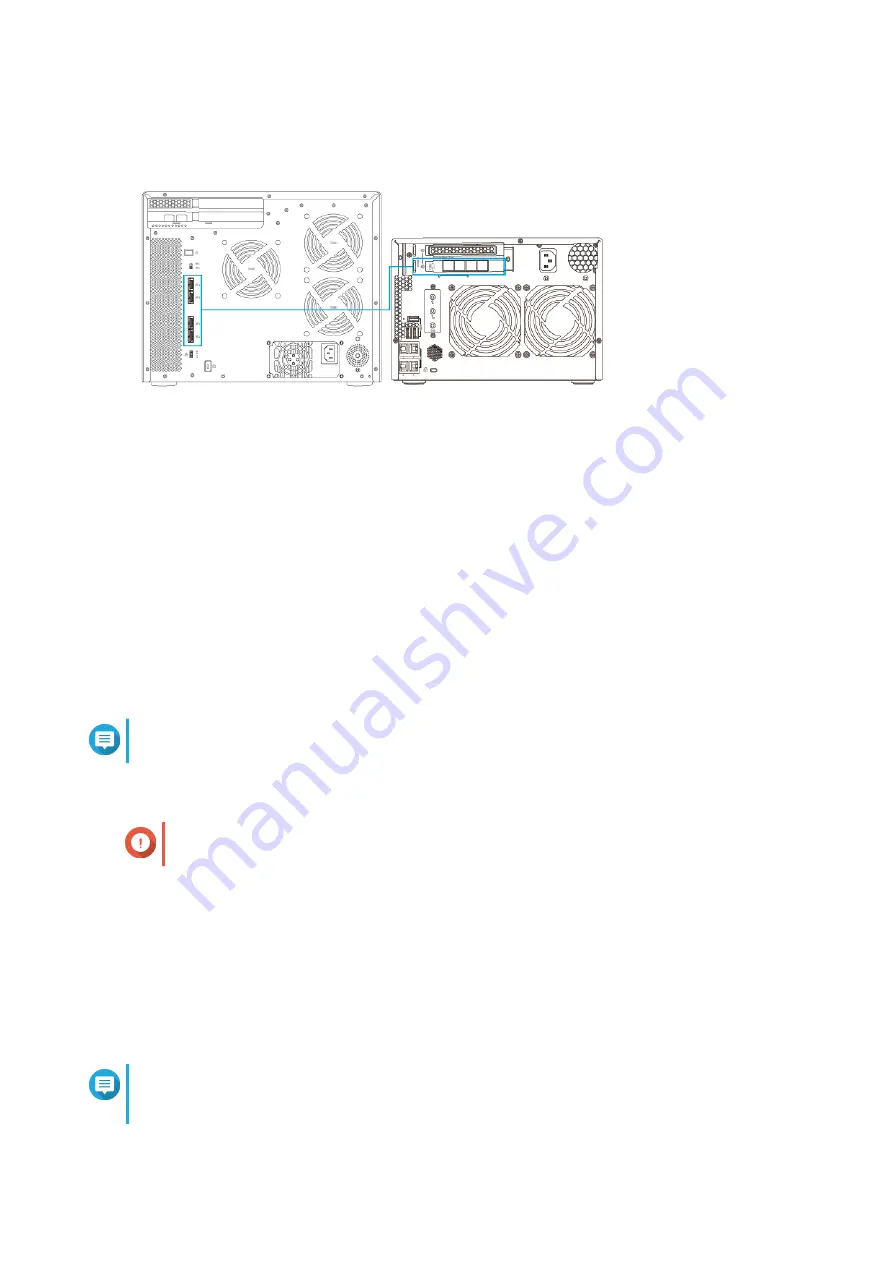
Power on the JBOD enclosure.

5.

Power on the NAS.

6.

Verify that the JBOD enclosure is recognized by the NAS.

a.

Log on to QTS as administrator.

b.

Go to 

Main Menu

 > 

Storage & Snapshots

 > 

Overview

 > 

Storage

 .

c.

Verify that the JBOD enclosure are listed.

Note

The NAS may take up to 30 seconds to detect the JBOD enclosure and the installed drives.

Connecting the JBOD Enclosure to a Computer

Important

QNAP JBOD enclosures cannot be connected to more than one host at a time.

1.

Power off the computer.

2.

Power off the JBOD enclosure

3.

Connect the JBOD enclosure to the computer.

a.

Connect one or more SFF-8088 connector cables to the SFF-8088 ports on the JBOD enclosure.

b.

Connect one or more SFF-8088 connector cables to the SFF-8088 or SFF-8644 ports on the host
bus adapter installed in the computer. 

Note

Refer to the hardware installation instructions for the computer for information on installing
expansion cards.

QNAP JBOD Enclosure User Guide

Hardware Installation   

24

Summary of Contents for TL-D400S

Page 1: ...JBOD Enclosure TL D400S TL D800S TL D1600S User Guide Document Version 3 12 03 2020...

Page 2: ...16 Installing Solid State Drives on Solid State Drive Trays 19 Connecting the JBOD Enclosure to a NAS 22 Connecting the JBOD Enclosure to a Computer 24 4 Basic Operations LCD Panel 27 LEDs 28 Audio A...

Page 3: ...uide assumes that the user has a basic understanding of storage and backup concepts Document Conventions Symbol Description Notes provide default configuration settings and other supplementary informa...

Page 4: ...enance procedures on the product by you or an unauthorized third party invalidates the warranty QNAP is not responsible for any damage or data loss caused by unauthorized modifications and installatio...

Page 5: ...mm 7 41 x 12 96 x 11 01 in 303 8 x 369 9 x 319 8 mm 11 96 x 14 56 x 12 59 in Net weight 3 66 kg 8 06 lbs 6 17 kg 13 6 lbs 11 59 kg 25 5 lbs Other Power supply unit 65W 100 240V AC 50 60 Hz 250W 100 2...

Page 6: ...71 x 2 71 x 0 47 in 119 65 x 68 9 x 12mm 4 71 x 2 71 x 0 47 in Tip Model specifications are subject to change without prior notice To see the latest specifications go to https www qnap com Package Co...

Page 7: ...ront Panel TL D400S No Component No Component 1 Status LED 3 Fan error LED 2 Link LED 4 Drive LEDs TL D800S No Component No Component 1 LCD panel 5 Fan error LED QNAP JBOD Enclosure User Guide Product...

Page 8: ...on 6 Link LED 3 Select button 7 Status LED 4 Drive LEDs TL D1600S No Component No Component 1 Enter button 5 Status LED 2 Select button 6 Drive LEDs 3 Fan error LED 7 LCD panel 4 Link LED QNAP JBOD En...

Page 9: ...Component No Component 1 Audio alert switch 5 Power input 2 SFF 8088 port drive bays 1 4 6 Kensington security slot 3 Fan speed switch 7 System fan 4 Power switch TL D800S QNAP JBOD Enclosure User Gu...

Page 10: ...on security slot 8 Audio alert switch TL D1600S No Component No Component 1 System fans 5 SFF 8088 ports Port 1 3 5 inch drive bays 1 4 Port 2 3 5 inch drive bays 5 8 Port 3 3 5 inch drive bays 9 12 P...

Page 11: ...Drive Numbering TL D400S TL D800S QNAP JBOD Enclosure User Guide Product Overview 10...

Page 12: ...sunlight liquids or chemicals Important The device should be stored in a secure location with restricted access controlled through the use of a tool lock and key or any means of security Only qualifie...

Page 13: ...rist strap Setting Up the JBOD Enclosure 1 Place the JBOD enclosure in an environment that meets the requirements For details see Installation Requirements 2 Install the drives For details see the fol...

Page 14: ...te drives Installing 3 5 inch Drives on 3 5 inch Trays Warning Observe electrostatic discharge ESD procedures to avoid damage to components 1 Power off the JBOD enclosure 2 Remove a drive tray a Optio...

Page 15: ...ing panels from the sides of the tray b Place the drive on the tray so that the holes on the sides of the drive are aligned with the holes on the sides of the tray c Attach the fastening panels QNAP J...

Page 16: ...the drive Important QNAP recommends attaching the screws to the drive trays when transporting the device 4 Load the tray into the drive bay a Insert the tray into the bay b Push the handle QNAP JBOD...

Page 17: ...osure may take up to 30 seconds to detect the new drive Installing 2 5 inch Drives on 3 5 inch Trays Warning Observe electrostatic discharge ESD procedures to avoid damage to components 1 Power off th...

Page 18: ...he preinstalled drive trays come unlocked Important Ensure that the drive tray keys are stored in a safe place b Pull the handle to release the tray c Pull the tray out 3 Install a drive on the tray Q...

Page 19: ...n the tray so that the holes on the bottom of the drive are aligned with the holes on the bottom of the tray c Attach the screws 4 Load the tray into the drive bay a Insert the tray into the bay b Pus...

Page 20: ...may take up to 30 seconds to detect the new drive Installing Solid State Drives on Solid State Drive Trays Warning Observe electrostatic discharge ESD procedures to avoid damage to components 1 Power...

Page 21: ...ote The preinstalled drive trays come unlocked Important Ensure that the drive tray keys are stored in a safe place b Pull the tray handle outward c Pull the tray out 3 Install a drive on the tray QNA...

Page 22: ...ve with the opening at the end of the tray b Place the drive on the tray 4 Load the tray into the drive bay a Insert the tray into the bay b Push the handle c Optional Lock the tray QNAP JBOD Enclosur...

Page 23: ...onnect one or more SFF 8088 connector cables to the SFF 8088 ports on the JBOD enclosure b Connect one or more SFF 8088 connector cables to the SFF 8088 or SFF 8644 ports on the host bus adapter insta...

Page 24: ...TL D400S TL D800S QNAP JBOD Enclosure User Guide Hardware Installation 23...

Page 25: ...r Important QNAP JBOD enclosures cannot be connected to more than one host at a time 1 Power off the computer 2 Power off the JBOD enclosure 3 Connect the JBOD enclosure to the computer a Connect one...

Page 26: ...bus adapter is required for connecting the JBOD enclosure to a host device Third party host bus adapters may not be compatible with QNAP JBOD enclosures TL D400S TL D800S QNAP JBOD Enclosure User Gui...

Page 27: ...ecognized by the computer a Go to your computer s disk management utility or open QNAP JBOD Manager in Microsoft Windows or Linux Ubuntu Note To download QNAP JBOD Manager go to https download qnap co...

Page 28: ...ption System Status System Booting The JBOD enclosure is booting SFF8088 Port 1 2 A host is connected to the port 1 Port ID 2 Host server name SFF8088 Port 1 Unknown Host A host is connected to the po...

Page 29: ...ote The default temperature warning threshold is 65 C Temp Critical The JBOD enclosure is critically overheated Note The temperature critical threshold is 70 C Confirmation Clear messages Clear event...

Page 30: ...on and off by using the audio alert switch on the rear panel Duration Frequency Description Short beep 0 5 seconds 1 The link is up The link is down Long beep 2 seconds 3 every 5 minutes The system f...

Page 31: ...Medium Low QNAP JBOD Enclosure User Guide Basic Operations 30...

Page 32: ...situations RAID 1 One member drive fails RAID 5 One member drive fails RAID 10 One member drive fails Two member drives fail one in bay 1 or 2 and one in bay 3 or 4 1 Log on to QTS 2 Go to Main Menu S...

Page 33: ...Rebuilding Support and Other Resources QNAP provides the following resources Resource URL Documentation https docs qnap com Service Portal https service qnap com Downloads https download qnap com Com...

Page 34: ...Software utility for Windows Linux and macOS that allows you to view and configure QNAP JBOD enclosures Storage Snapshots QTS utility that allows you to view and configure QNAP JBOD enclosures connect...

Page 35: ...makes no warranty or representation expressed implied or statutory with respect to its products or the contents or use of this documentation and all accompanying software and specifically disclaims it...

Page 36: ...ersion of the GPL to prohibit the practice for those products If such problems arise substantially in other domains we stand ready to extend this provision to those domains in future versions of the G...

Page 37: ...rk The Corresponding Source need not include anything that users can regenerate automatically from other parts of the Corresponding Source The Corresponding Source for a work in source code form is th...

Page 38: ...ombined with it such as to form a larger program in or on a volume of a storage or distribution medium is called an aggregate if the compilation and its resulting copyright are not used to limit the a...

Page 39: ...s part of a transaction in which the right of possession and use of the User Product is transferred to the recipient in perpetuity or for a fixed term regardless of how the transaction is characterize...

Page 40: ...d work except as expressly provided under this License Any attempt otherwise to propagate or modify it is void and will automatically terminate your rights under this License including any patent lice...

Page 41: ...n agreement or commitment not to enforce a patent against the party If you convey a covered work knowingly relying on a patent license and the Corresponding Source of the work is not available for any...

Page 42: ...hed by the Free Software Foundation If the Program specifies that a proxy can decide which future versions of the GNU General Public License can be used that proxy s public statement of acceptance of...

Page 43: ...ul interference to radio communications However there is no guarantee that interference will not occur in a particular installation If this equipment does cause harmful interference to radio or televi...

Page 44: ...RoHS Pb Hg Cd CR VI PBB PBDE 0 0 0 0 0 0 0 0 0 0 0 0 0 0 0 0 0 0 0 0 0 0 0 0 0 0 0 0 0 0 0 0 0 0 0 0 0 0 0 0 0 0 0 0 0 0 0 0 O SJ T11363 2006 X SJ T11363 2006 VCCI Notice VCCI B QNAP JBOD Enclosure U...

Page 45: ...BSMI Notice QNAP JBOD Enclosure User Guide Notices 44...

Reviews: