SC-110
User's Manual
(D/N: 250-0250-E Rev. 1.0)
Page 1: ...SC 110 User s Manual D N 250 0250 E Rev 1 0...
Page 2: ...mechanical magnetic optical chemical manual or otherwise without the prior written permission of the manufacturer Material scanned by this product may be protected by governmental laws and other regu...
Page 3: ...interference by one or more of the following measures Reorient or relocate the receiving antenna Increase the separation between the equipment and receiver Connect the equipment into an outlet on a ci...
Page 4: ...334 633 4300 declare that the product Model Number SC 110 conforms to the following Product Specifications Emission EN 50081 1 1992 EN 55022 Class A Conducted Radiated 1994 Immunity EN 60555 2 Harmon...
Page 5: ...ES WITH COPY FEATURES 3 10 3 4 1 REMOVING ORIGINAL BACKGROUND 3 10 3 4 2 ENLARGING OR REDUCING YOUR ORIGINAL 3 11 3 4 3 AUTO ZOOMING YOUR ORIGINAL 3 12 3 4 4 CHANGING YOUR COPY DENSITY 3 13 3 4 5 CHOO...
Page 6: ...1 9 1 1 UNPACKING THE ADF 9 1 9 1 2 INSTALLING THE ADF 9 2 9 1 3 UNLOCKING THE SC 110 9 4 9 1 4 CONNECTING THE CABLES 9 5 9 2 USING THE ADF 9 6 9 2 1 BEFORE YOU BEGIN 9 6 9 2 2 LOADING THE PAPER 9 7 9...
Page 7: ...ections introduce the unpacking hardware and software installation operation and maintenance information Please spend a few minutes reading through them to help you maintain quality scanning results F...
Page 8: ...eat may cause damage to the unit Do not install the SC 110 in a humid or dusty place Be sure to use the proper AC power source Place the SC 110 securely on an even flat surface Tilted or uneven surfac...
Page 9: ...uring shipment the SC 110 is designed with a lock switch beneath the main unit Therefore before using the SC 110 it is required to unlock SC 110 by moving the lock switch to the Use position See Figur...
Page 10: ...NNECTING THE CABLE 2 3 1 CONNECTING SC 110 TO WORK AS A COPIER Connect the power cable and signal cable as shown below Figure 2 2 Connect SC 110 to a printer To Printer To Power Outlet Power Cable Pri...
Page 11: ...2 4 2 3 2 CONNECTING SC 110 TO WORK AS A SCANNER COPIER Figure 2 3 SC 110 Cable Connection Power Cable SC 110 Parallel Cable Printer Cable To PC Parallel Port To Power Outlet To Printer To optional AD...
Page 12: ...2 5 2 4 DOCUMENT PLACEMENT As shown in Figure 2 4 place the document on the glass face text down Figure 2 4 Document Placement 1 Document Cover 2 Home Position Mark 3 Document 4 Document Glass 1 4 2 3...
Page 13: ...0 115 122 141 200 86 and 50 Choose your desired ratio or adjust the ratio in 1 increment by the or button Auto zoom Automatically scale your original document to fit your output paper 6 Lighter Darker...
Page 14: ...the default settings 13 Select Press to select your desired setting A star sign will appear to indicate the selection is done 14 Copy Count Choose the number of copies from 1 to 99 Increase the value...
Page 15: ...ORY To make good use of SC 110 it is recommended to install at least 4 MB of memory in your printer If you want to print your document using Quality mode 600 dpi as your Copy Quality mode you need mor...
Page 16: ...on pressing the or button until the desired paper size appears When the desired paper size message is shown in Message Display window press the Select button and a sign will appear on the right hand s...
Page 17: ...printer model name Note If the printer model connected to SC 110 is not any of QMS Print or PageWork systems currently supported specify PCL Emulation This is a generic printer model that will work w...
Page 18: ...onal 7 Multipurpose Tray 2 Tray 3 N A Output Bin N A Upper Face up Stack Face down Stack Top Bin Finisher Bin Bin 1 Bin 2 Bin 3 Bin 4 Bin 5 Bin 6 Bin 7 Bin 8 Bin 9 Bin 10 Upper Face Up Top Stack Cente...
Page 19: ...p edge 2 Offset Stacking If the output bin selected supports offset stacking then the output jobs will be offset from each other when enabled Off Copying jobs stack normally On Each copying job is off...
Page 20: ...er to identify the end of each job to ensure correct printing respectively None No End Job Mode QMS EOD QMS formatted End Job Mode HP EOD HP formatted End Job Mode Note The type of End Job Mode set on...
Page 21: ...your original face down on the document glass 2 Press the Copy button The Message window displays Copy and the Ready LED will flash 3 Within a few seconds the copying is done The Message window then...
Page 22: ...und to sharpen your text The Operating Steps 1 Place your document face down on the document glass 2 Press the Background remove button The Message window displays Background remove on 3 Press the Cop...
Page 23: ...d 150 enlargement select 141 then press the s button to increase the percentage to 150 in 1 increment 4 Press the Copy button And then the printout shows enlargement of 150 of your original Ratio 100...
Page 24: ...ation or reduction will be larger than the existing paper size set on the SC 110 The Operating Steps 1 Repeat the above Enlargement Step 1 2 2 Repress the Enlarge Reduce button until the Message Windo...
Page 25: ...ess the s to increase the level press the t button to decrease the level 4 Press the Copy button Your printout shows the darkness or brightness has been compensated 3 4 5 CHOOSING YOUR COPY QUANTITY T...
Page 26: ...s 2 Press the Normal Quality button The Message Window displays Normal mode 3 Repress the Normal Quality button and the Message Window displays Quality mode 4 Press the Copy button The copying begins...
Page 27: ...y clear The Operating Steps 1 Place your 3D object on the document glass 2 Press the Normal Quality button and the Message Window displays Normal mode 3 Repress the Normal Quality and the Message Wind...
Page 28: ...110 over an hour it automatically turns into power saving status At this moment the Message Window displays Power Saving while the Ready LED is flashing To resume the ready status press any one of the...
Page 29: ...ortion of the photo image is almost the same as that of text in the original to be copied it is recommended to utilize the Auto function from Auto Text Photo button in order to get the most optimal pr...
Page 30: ...enhanced parallel port 20 Megabytes of available hard disk space for installation 16 Megabytes of RAM 32 Megabytes or higher recommended A video graphics array VGA monitor A Microsoft Windows compati...
Page 31: ...ch If this happens choose to install the software utilities and driver from the main menu 3 Press the Start button choose RUN type d driver SC 110 exe where d is the CD ROM drive in use and then click...
Page 32: ...4 3 4 2 UNINSTALLING THE SC 110 DRIVER You can uninstall the SC 110 driver by selecting Start Programs SC 110 and clicking the Uninstall driver icon from SC 110 group...
Page 33: ...s used 2 A dialog box appears containing the different TWAIN sources that you can choose to bring an image into your application 3 Select SC 110 32 Vx xx as the source 4 When you have used the dialog...
Page 34: ...5 2 The TWAIN user interface...
Page 35: ...age in black and white only and there are no intermediate shades of gray in between Halftone In addition to the black and white display Halftone can present a somehow gray shade of image by using diff...
Page 36: ...els of gray scale 12 bit Gray presents a 4096 shades of gray in an image Color Internal 68 7 billion colors The 36 bit True Color internally presents 68 7 billion color levels with much more tonal ran...
Page 37: ...to a certain level the resolution will not be visually increased but the disk space will be increased Brightness Adjusts the lightness or darkness of an image The higher the value the brighter the im...
Page 38: ...s the scan area no matter what its size Descreen Eliminates the Moire patterns commonly found in printed matter Before descreen After descreen Invert Advance Settings Quality Mode Speed Mode Measureme...
Page 39: ...r at the command of Invert Advance Settings The Advance Settings provide several functions such as Dynamic Background Removal and Color Drop out These functions are briefly explained as below 1 DBR Dy...
Page 40: ...will be removed On the other hand if your original contains various color data then check the Neutral Gray to retain all the color data in gray since removing either one of the red green or blue colo...
Page 41: ...scanned image Or you can select speed mode scanning if you want to speed up the scanning process Pixel Inch Cm Represents the different measuring systems to be used in each scan Set Gamma Adjusts the...
Page 42: ...it Cancels the current job Document Size To designate the size of your document just click on its icon on the margin of the preview window As shown in the figure below in the Preview window you can de...
Page 43: ...do pass through printing 2 Do not scan and print at the same time 3 If your PC does not support EPP mode or has pass through compatibility problem please contact your authorized local dealer for an EP...
Page 44: ...erformance Procedure 1 Open the document cover as shown in Figure 6 1 2 Dip a soft clean cloth with isopropyl alcohol 95 3 Gently wipe the document glass and the white sheet beneath the document cover...
Page 45: ...ghtness setting of the TWAIN user interface to get a brighter image Question The scanning speed of my SC 110 is much slower than that of those installed at other computers Can I speed it up Answer Set...
Page 46: ...kswin con Question The printer does not print the documents Why Answer Pass through printing may pose a problem for some printers It is suggested to add a second printer card for printing purpose or y...
Page 47: ...rinting does not work at all Answer It may be that you fail to power on the SC 110 When doing pass through printing please be sure to power on the SC 110 Else without power the SC 110 can not transfer...
Page 48: ...er than printer Therefore if you would like to connect some parallel port devices other than printer please do not connect them to the same parallel port that the SC 110 currently uses It is suggested...
Page 49: ...nfiguration e g your host CPU type RAM size free disk space display card interface card The name and version of your scanning software application The version of your scanner driver The brand and mode...
Page 50: ...outh Africa QMS United Kingdom and Ireland QMS Netherlands and all unlisted countries Internet http www qms nl 61 2 9884 9966 800 268 0343 33 01 410 79 393 49 89 63 02 67 0 39 052 1231 998 46 8 600 01...
Page 51: ...Features Zooming from 25 400 Auto Zooming Auto Background Removal Auto Photo Text Separation Printer Model Supported PCL QMS 2060 4060 2560 QMS 3260 4032 PageWork Pro 18 Printer Interface IEEE 1284 b...
Page 52: ...Area Image Types PC Interface Flatbed Scanner 300 x 600 dpi 9600x9600 dpi 6 PPM 10 PPM with ADF at 300dpi Lineart Color Charged Coupled Device Cold Cathode Fluorescent Lamp Max 8 5 x 14 0 Legal size...
Page 53: ...110 Automatic Document Feeder ADF is a very convenient addition to your SC 110 With the ADF you can automatically copy or scan up to 25 pages at a time 9 1 INSTALLING THE ADF 9 1 1 UNPACKING THE ADF 1...
Page 54: ...move the document cover by opening the cover and lifting the studs from the hinge holes at the rear of the SC 110 Note Please store the document cover on a flat surface in a safe place 4 Hold the ADF...
Page 55: ...t the notched corners of the ADF Paper Support to the clip joints on the ADF Paper Tray 6 Insert the notched corners of the ADF Paper Tray into the clip joints on the ADF document cover Paper Support...
Page 56: ...9 4 9 1 3 UNLOCKING THE SC 110 Slide the Lock Switch on the bottom of the SC 110 to unlock the scanning unit 1 Shipping Position 2 Use Position...
Page 57: ...e respectively 9 1 4 2 CONNECTING SC 110 TO WORK AS A SCANNER COPIER Connect the ADF cable the power cable the SC 110 parallel cable and the printer cable respectively ADF Cable Power Cable Printer Ca...
Page 58: ...hed Paper with ink not totally dry Paper with inconsistent thickness such as envelopes Paper with wrinkles curls folds or tears Coated paper Carbonless paper Paper narrower than 4 5 or wider than 8 5...
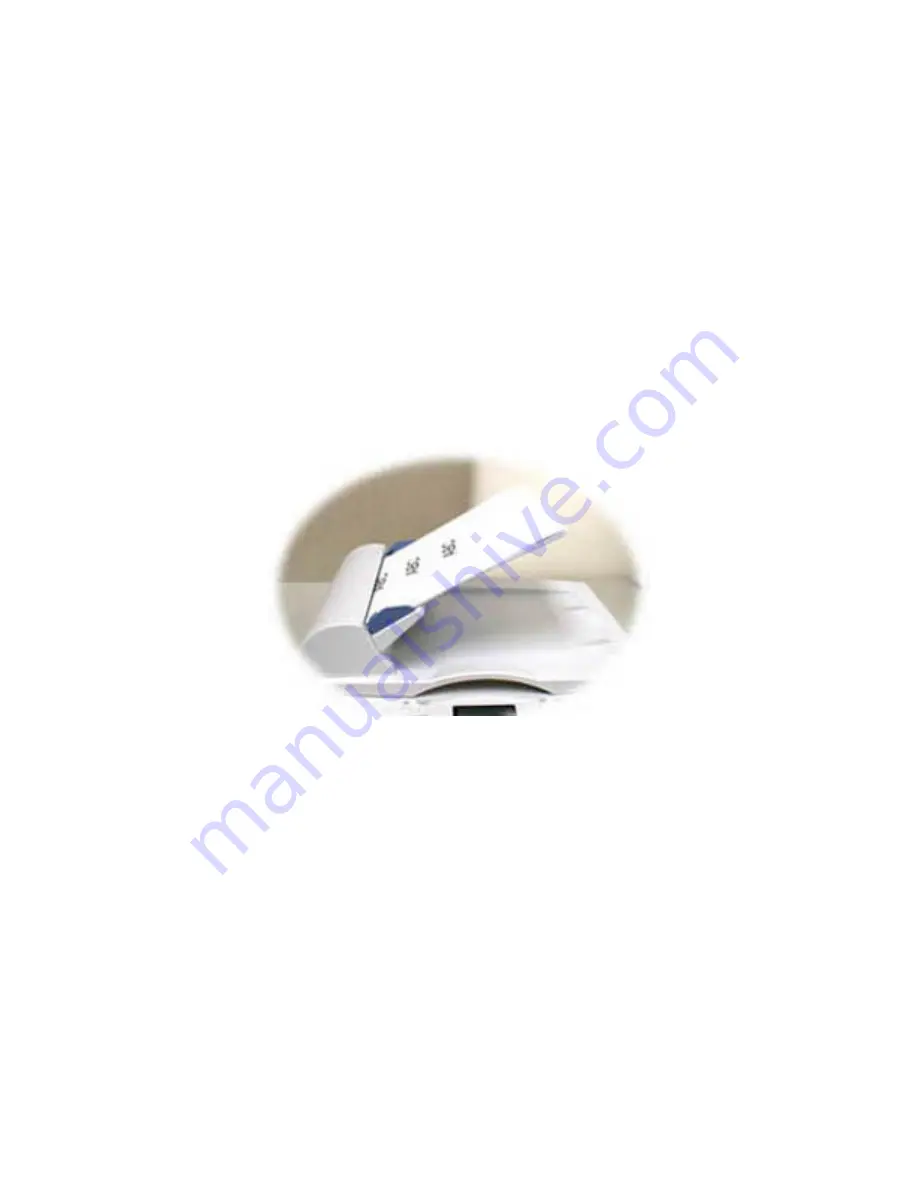
Page 59: ...1 COPYING MULTI PAGE DOCUMENT After the installation of the ADF unit is completed and you have properly placed a stack of your document on the ADF Paper Tray just a touch of the Copy button on the Co...
Page 60: ...ocument cover 3 Place your document face down on the document glass Observe that the top edge of your original near the document alignment as marked by a triangle MAY 0 Y A M A6 A5 B5 LTR A4 LGL A6 A5...
Page 61: ...on by clicking the Start button on the task bar and select the name of the application 3 Choose Acquire from the File menu and click Select TWAIN Source for example please select SC 110 V X xx The com...
Page 62: ...al scanned image at a low resolution to allocate your selected scan area 7 Open the ADF document cover to take out the document and then position it on the first page of the document on the ADF Paper...
Page 63: ...cation by clicking the Start button on the task bar and select the name of the application 5 Choose Acquire from the File menu and click Select TWAIN Source for example please select SC 110 V X xx The...
Page 64: ...9 12 The Preview Button The Scan Button...
Page 65: ...his occurs please follow the cleaning procedures to return your Scanner to its original state The cleaning procedures 1 Moisten a cotton swab with isoprophyl alcohol 95 2 Gently open the ADF front cov...
Page 66: ...9 14 Feeding Roller ADF Pad...
Page 67: ...In this case it is highly recommended to replace the pad module with a new one For ordering the pad module please consult your nearest dealer and follow the procedure below to replace it Disassemblin...
Page 68: ...9 16 Assembling Procedure 1 Take out the ADF pad module from the box 2 Press both arms of the ADF snap in pad module inwardly with your two fingers 3 Place it into the holes until it snaps into place...
Page 69: ...below to remove the paper 1 Turn the SC 110 off by disconnecting the power cable 2 Gently open the ADF front cover to the left 3 Carefully pull the paper out of the ADF unit 4 Close the ADF front cove...
Page 70: ...F SPECIFICATION Dimension 446 x 294 x 200 mm Weight 1 4 kgs Speed 10 PPM page per minute mono mode Paper tray capacity 25 pages Document size Max Legal size 8 5 x 14 Min 4 5 x 5 5 Document thickness 0...