


6LQJOH,Q/LQH
0HPRU\
0RGXOHV
4063ULQW6\VWHP2SWLRQV
5HPRYLQJD6,00
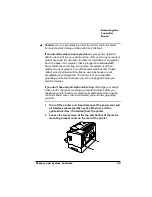
If all of the SIMM connectors are filled and you want to install more
memory (for example, if you want to replace an 16 MB SIMM with a
32 MB SIMM), one SIMM must be removed before a larger SIMM can
be installed. Then refer to the previous section, “Installing a SIMM,”
for installation instructions. You can insert a SIMM in any SIMM
connector as long as DRAM0 and the SIMM connector before the one
you’re installing are occupied. Also, you must make sure that there is
a total of at least 16 MB of RAM installed.
If your printer has a hard disk, you must remove it before you can
remove the last SIMM (DRAM3). See chapter 5, the ““Removing an
Internal IDE Hard Disk” section, for details.
0
WARNING:
Turn off the printer and unplug the power cord.
ACHTUNG!
Bitte schalten Sie den Drucker aus und ziehen Sie den
Netzstecker heraus.
V
Caution: Any change in system memory automatically restores
defaults. If your memory settings are specific for your environment,
print an advanced status page before making this hardware change,
so you can recover these memory settings.
It's very important to protect the printer controller board from
electrostatic damage while performing this SIMM installation. Please
review the anti-static caution in “Removing the Controller Board” on
page 2-2.
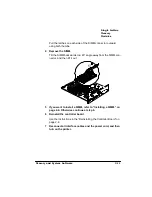
1
Access the printer controller board.
Use the instructions in the “Removing the Printer and Controller
Board Covers” section on page 2-2.
2
Position the controller board on a flat surface so that the
controller board lies flat and the interface bracket is facing
you.
3
Release the SIMM.
Summary of Contents for 2060
Page 1: ...406 3ULQW 6 VWHP 2SWLRQV...
Page 9: ...QWURGXFWLRQ Q 7KLV KDSWHU About This Manual on page 1 2 Typographic Conventions on page 1 3...
Page 126: ......
Page 127: ...6HFXULW H DQG DUQLQJ X HU Q 7KLV KDSWHU Security Key on page 6 2 BuzzBox Lite on page 6 6...
Page 146: ......
Page 154: ......
Page 160: ......


