background image


QIAcuity User Manual   06/2022 

61


Configuring the connection to the QIAcuity Software Suite in the QIAcuity instrument 
software 

The  QIAcuity  instrument needs to be connected to the QIAcuity  Software Suite to enable the 
exchange of data. To establish a connection, the instrument and the device in which the QIAcuity 
Software Suite is running must be connected to the same network. 

Note

: A plate run can only be performed if the QIAcuity  Software Suite is connected to the 

instrument through a network or direct cable connection to the QIAcuity Software Suite server.  

To connect the instrument to the QIAcuity Software Suite: 

1.


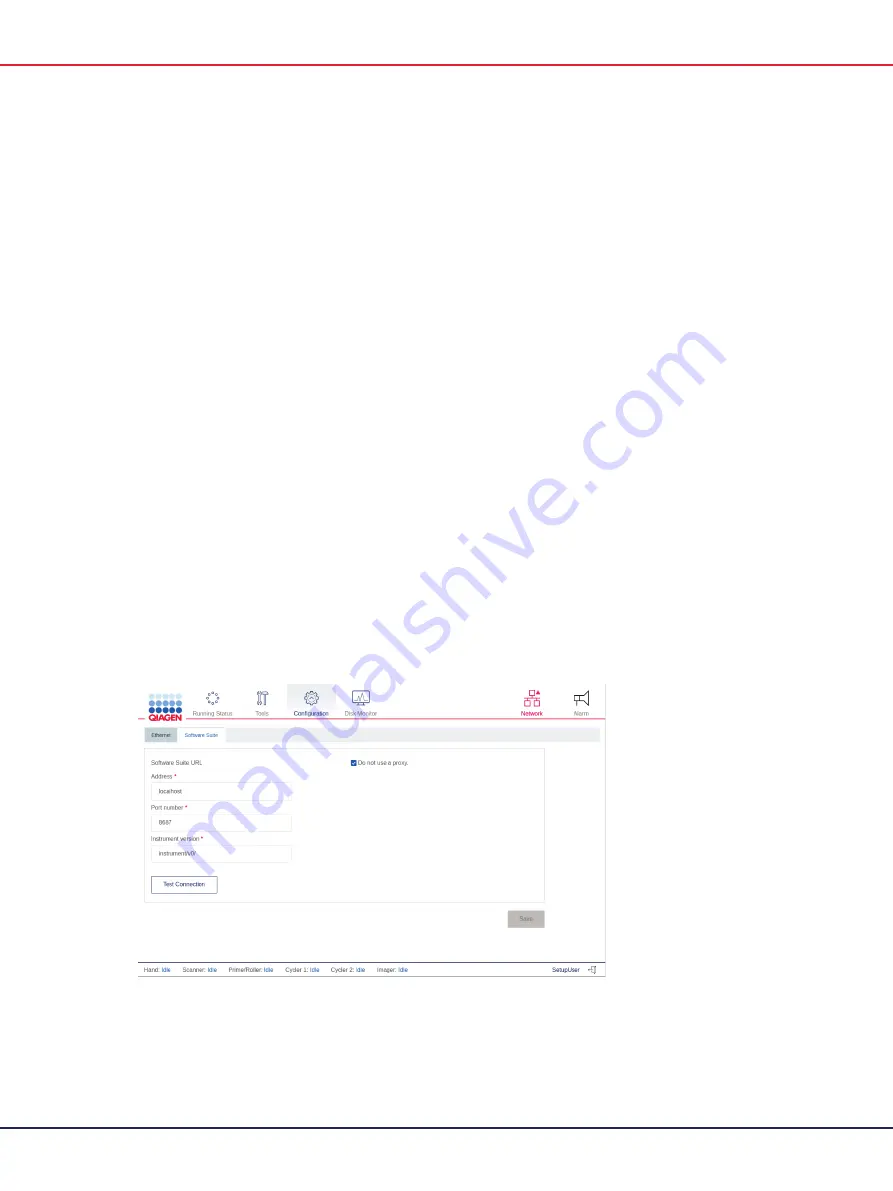
The Network Icon represents the connection between the QIAcuity Software Suite and the 
Instrument. When the icon is red, the connection is not established.  

2.


Log into the Instrument using the following credentials: 

2a.


Login: SetupUser 

2b.


Password: 2#ConnectSuite  

Note

: SetupUser is only allowed to log into the instrument when connection with the Software 

Suite is not established. Once established, login with SetupUser cannot be done. 

3.


On the Home screen, tap 

Configuration

4.


Tap the Software Suite tab.  


Summary of Contents for QIAcuity 911000

Page 1: ...Sample to Insight__ June 2022 QIAcuity User Manual 911000 911020 911040 911050 QIAGEN GmbH QIAGEN Strasse 1 40724 Hilden GERMANY...

Page 2: ...QIAcuity User Manual 06 2022 2...

Page 3: ...y 17 General Description 18 QIAcuity principle 18 External features of QIAcuity 20 Thermal cycler 23 Optical system 24 Installation Procedure 25 Installation of AC power cord 27 Unpacking the QIAcuity...

Page 4: ...actor VPF 255 Operating Plates 258 QIAcuity Nanoplate 26K 24 well 259 QIAcuity Nanoplate 26K 8 well 259 QIAcuity Nanoplate 8 5K 24 well 259 QIAcuity Nanoplate 8 5K 96 well 260 Maintenance Procedures 2...

Page 5: ...286 Declaration of conformity 289 Waste Electrical and Electronic Equipment WEEE 289 California Proposition 65 290 Liability Clause 290 Declaration list of China RoHS SJT 11364 2014 290 Appendix B QIA...

Page 6: ...QIAcuity User Manual 06 2022 6 Chemikalien 307 Wartungssicherheit 307 Strahlensicherheit 308 Symbole auf dem QIAcuity 308 Appendix E User management permissions 309 Document Revision History 312...

Page 7: ...tion 4 Installation Procedures 5 Operating Procedures 6 Maintenance Procedures 7 Troubleshooting 8 Glossary 9 Appendix A Technical Data 10 Appendix B QIAcuity Accessories 11 Appendix C Consignes de s...

Page 8: ...ital PCR dPCR approach Digital PCR uses the procedure of end point PCR but splits the PCR reaction in many single partitions in which the template is randomly distributed across all available partitio...

Page 9: ...products other than QIAGEN kits or QIAGEN assays designed for dPCR it is the user s responsibility to validate the performance of such product combination for any particular application The QIAcuity...

Page 10: ...ine use running protocols Laboratory technicians or equivalent Appropriately trained or experienced personnel familiar with use of computers and automation in general Assay design and validation Scien...

Page 11: ...ersons Details about these circumstances are given in a box like this one CAUTION The term CAUTION is used to inform you about situations that could result in damage to the instrument or other equipme...

Page 12: ...n the back of the instrument and unplug the power cord from the power outlet CAUTION Damage to the instrument C2 Only use QIAcuity specific consumables with the QIAcuity Do not use the plates without...

Page 13: ...ay damage the electronics To check the recommended supply voltage refer to the specifications indicated in the type plate of the instrument WARNING Risk of electric shock W7 Do not open any panels on...

Page 14: ...ON Damage to the instrument C6 Direct sunlight may bleach parts of the instrument and cause damage to plastic parts The QIAcuity must be located out of direct sunlight CAUTION Risk of overheating C7 T...

Page 15: ...ocuments Venting for fumes and disposal of wastes must be in accordance with all national state and local health and safety regulations and laws Chemicals WARNING Hazardous chemicals W10 Some chemical...

Page 16: ...ome into contact with the electrical parts of the QIAcuity CAUTION Damage to the instrument C8 Do not use bleach solvents or reagents containing acids alkalis or abrasives to clean the QIAcuity CAUTIO...

Page 17: ...n of the use of certain hazardous substances in electrical and electronic equipment Type plate on the back of the instrument Waste Electrical and Electronic Equipment WEEE mark for Europe Type plate o...

Page 18: ...ossible QIAcuity principle The QIAcuity is designed as a walk away instrument that integrates and automates all plate processing steps Only the plate preparation must be done manually before starting...

Page 19: ...QIAcuity Software Suite or the instrument software For more details on the thermal cycler specification see Appendix A Technical Data Imaging The final process step is the image acquisition of all wel...

Page 20: ...st the angle of the touchscreen pull gently at the bottom edge The touchscreen enables the user to see an overview of all plate slots and the corresponding process steps and remaining times Additional...

Page 21: ...ket It is only used to connect the QIAcuity to local area network via cable USB ports The QIAcuity has two USB ports that are located at the front of the instrument in the upper left corner A third sl...

Page 22: ...ct supply voltage is used Use of incorrect supply voltage may damage the electronics To check the recommended supply voltage refer to the specifications indicated on the type plate of the instrument W...

Page 23: ...arcode scanner Thermal cycler The thermal cycler of the QIAcuity is a plate thermocycler that features high speed and precision temperature control of the temperature cycling steps Several Peltier ele...

Page 24: ...lens on a CMOS camera chip see image below for a detailed overview of the components Depending on the configuration of the instrument 2plex 5plex there are up to 2 or 5 selectable detection channels...

Page 25: ...strument is powered on The site of installation should be free of excessive drafts excessive moisture and excessive dust and should not be subject to large temperature fluctuations Use a level workben...

Page 26: ...ting Do not lift at the touchscreen W2 CAUTION Damage to the instrument Direct sunlight may bleach parts of the instrument and cause damage to plastic parts The QIAcuity must be located out of direct...

Page 27: ...ument is equipped with a 3 conductor AC power cord that when connected to an appropriate AC power outlet grounds earths the instrument To preserve this protection feature do not operate the instrument...

Page 28: ...s of the workstation and keeping your back straight 5 Important Do not hold the touchscreen display while unpacking or lifting the QIAcuity as it might damage the instrument 6 Check if the packing lis...

Page 29: ...y while lifting the QIAcuity as this might damage the instrument WARNING Risk of personal injury and material damage The QIAcuity is too heavy to be lifted by one person To avoid personal injury or da...

Page 30: ...crew shall be closed with the dust cap that is provided with the accessories of the instrument cat no 9026772 Back of QIAcuity Connecting the power cord to the back of the QIAcuity 1 Remove the power...

Page 31: ...y 1 Ensure that the drawer of the QIAcuity is closed 2 Power ON the QIAcuity using the blue front power switch 3 The startup screen appears The instrument automatically performs initialization tests N...

Page 32: ...ty One instrument can be optionally supplied with a notebook See the following table for the recommended notebook requirements Table 3 Recommended notebook requirements Description Recommended require...

Page 33: ...tart menu and select Power Options 2b Click change plan settings next to your current power plan 2c Select Never in the Put the computer to sleep field 2d Click Save changes 2e Go to Advanced Settings...

Page 34: ...re Suite on the notebook follow the steps below 1 Locate the QIAcuitySoftwareSuite exe file and double click it The installation process starts 2 Check the I accept the terms in the License Agreement...

Page 35: ...User Manual 06 2022 35 3 In the prompt window asking you if you allow changes to your device click Yes Note During installation some command line windows may appear in the foreground Do not close any...

Page 36: ...QIAcuity User Manual 06 2022 36 4 When the installation is completed click Close 5 In the local host site that says the site is not secure click Advanced...

Page 37: ...QIAcuity User Manual 06 2022 37 6 Click Continue to localhost on to the webpage 7 You are directed to the QIAcuity Software Suite login screen...

Page 38: ...h user has assigned only one role in the system Otherwise it may cause an error in the User Management after the software upgrade to version 2 1 Note Before updating the QIAcuity Suite software to ver...

Page 39: ...one only in the upgrade phase so no backup will be created when uninstalling repairing or installing a fresh Suite The checkbox will be visible in Options menu also during the fresh installation howev...

Page 40: ...cuity Software Suite 1 2 or 2 0 to the newest version follow the steps below 1 Locate the QIAcuitySuite exe file and double click it The installation process starts Click Next 2 Check the I accept the...

Page 41: ...ow changes to your device click Yes 4 The system will then automatically upgrade the existing installation 5 When the installation is completed click Finish 6 Please note that the computer must be res...

Page 42: ...of the QIAcuity Software Suite 1 1 3 to 2 1 and Control Software 0 5 2 18 to 2 1 Note The Software Suite 1 1 3 cannot be updated directly to version 2 1 but has to be updated to version 1 2 18 first...

Page 43: ...Software Suite 1 2 18 or newer separately 2 Ensure that a direct connection or a connection via network is already established and that the instrument and the PC running the QIAcuity Software Suite 1...

Page 44: ...nual 06 2022 44 5 Please make sure that the Destination Folder points to the existing installation of the QIAcuity Software Suite Click Next in the Destination Folder window 6 Click Install to start t...

Page 45: ...tem will then automatically upgrade the existing installation 8 When the installation is completed click Finish 9 Update QIAcuity Suite as outlined in section Updating QIAcuity Software Suite 1 2 or 2...

Page 46: ...46 Uninstalling the QIAcuity Software Suite To uninstall the QIAcuity Software Suite from your system follow the steps below Please note that this will lead to loss of all data including plate runs 1...

Page 47: ...anual 06 2022 47 2 Select Uninstall a program from the Programs menu 3 Select QIAcuity Software Suite from the list and click Uninstall 4 In the prompt window asking you if you allow changes to your d...

Page 48: ...allation wizard read the description for each action Note The uninstall process will result in database deletion all plate data will be lost 6 Click the Uninstall and delete button and the QIAcuity So...

Page 49: ...gresSQL Updating the instrument software Note The latest Software Suite version 2 1 is only compatible with the control software version 2 1 If only one software component is updated no connection bet...

Page 50: ...evice Info USB panel 12 Tap Update software to proceed 13 The Update Flash Controller Software and Firmware window is shown 14 Tap Start to begin the software update or tap Cancel to return to the pre...

Page 51: ...ity instrument needs to be connected to the QIAcuity Software Suite to enable the exchange of data This also enables the QIAcuity Software Suite to set up plates analyze results and monitor the status...

Page 52: ...he LAN local area network For 10 users accessing the system in parallel the requirement is a minimum data connection speed of 10Mbit s for a setup via network Note Please make sure that the QIAcuity i...

Page 53: ...reassigned refer to point d under the Installation and maintenance section of Troubleshooting the instrument and software Follow the steps below to configure the notebook running the QIAcuity Software...

Page 54: ...ty User Manual 06 2022 54 4 On the left pane click Change adapter settings 5 Right click the ethernet network adapter and select Properties 6 Select Internet Protocol Version 4 TCP IPv4 and click Prop...

Page 55: ...following the steps below 8 From your Home screen click the Search icon Enter cmd and press the Enter key 9 Wait for the command line window to open Enter ipconfig command 10 The address should be vis...

Page 56: ...elect the Ethernet tab 4 Check the DHCP Enabled box If you check this box the IP address and MAC address fields are disabled The assigned IP and MAC addresses of device are displayed in the IP address...

Page 57: ...Note Before you start ensure that the QIAcuity instrument and the notebook are connected with an Ethernet cable Follow the steps below to configure the notebook running the QIAcuity Software Suite 1...

Page 58: ...r Manual 06 2022 58 4 On the left pane click Change adapter settings 5 Right click the ethernet network adapter and select the Properties option 6 Select Internet Protocol Version 4 TCP IPv4 and click...

Page 59: ...server address Note If the Preferred DNS server and Alternative DNS server fields are left blank the connected is showed as unknown 8 Click OK then click Close Optional You can check if the addresses...

Page 60: ...e the QIAcuity instrument 1 On the toolbar tap Configuration 2 Select the Ethernet tab 3 Ensure that the DHCP Enabled box is not checked Enter the following information IP address Enter 192 168 1 2 Su...

Page 61: ...d to the instrument through a network or direct cable connection to the QIAcuity Software Suite server To connect the instrument to the QIAcuity Software Suite 1 The Network Icon represents the connec...

Page 62: ...ed enter the port number default 8687 Note To get the IP address of the Suite Server the instrument must be connected to the Suite Server From your Home screen click the Windows icon and navigate to C...

Page 63: ...Do not use a proxy box is checked Then tap Test to test the connection Note An error message displays if the address and port number you entered are invalid Tap OK to close the error message and then...

Page 64: ...e proxy settings in your network configuration clear the Do not use a proxy box and enter the following information Proxy Server Enter the proxy server address Proxy Port Enter the port address User N...

Page 65: ...to turn on the instrument 2 The startup screen appears on the touchscreen Wait until the initialization tests are finished 3 Enter the following information in the Login page Tap the field to begin ty...

Page 66: ...your preferred QIAcuity name 1 On the Home screen tap Configuration 2 Select the System tab 3 Specify your preferred instrument name in the Device Name field If this field is left blank a default nam...

Page 67: ...described in section User management Note After 3 unsuccessful login attempts a user is temporarily blocked and needs to wait 10 minutes to unblock the account Note In version 2 1 after 30 days passwo...

Page 68: ...QIAcuity User Manual 06 2022 68...

Page 69: ...labware is then downloaded and updated Note Only user with appropriate rights are allowed to synchronize labware Note Please make sure that after the first successful suite connection the instrument...

Page 70: ...QIAcuity User Manual 06 2022 70 4 The progress of the download is shown in the dialog box Once the synchronization is complete tap OK to finish the process...

Page 71: ...the run Stops the run Starts runs on all loaded plates Stops all runs Closes an open tray Ejects selected tray Displays an additional menu Enables the user to edit plate parameters Enables the user to...

Page 72: ...o enter text or numbers tap the corresponding field An on screen keyboard is displayed on the touchscreen In some cases the value required in a text field must meet a specific criterion If required th...

Page 73: ...gain Shows special characters Shows alphanumeric characters Confirms the input and closes the window Discards the input and closes the window If the entered value is not correct the border of the text...

Page 74: ...in the Username and Password fields Setting up a run Before starting a run at least one plate must be created and its name plate type and dPCR parameters must be defined We recommend that you define p...

Page 75: ...a run is supported by QIAcuity Eight and QIAcuity Four To learn more about continuous loading and unloading refer to section Continuous loading and unloading of plates To load a tray and to start a ru...

Page 76: ...he Software Suite the loaded plate pane displays the defined run setup and can be started Note In case the barcode does not match an existing plate in the Software Suite e g if no barcode has been def...

Page 77: ...ded into the instrument the QIAcuity sends a request to the Software Suite to lock the plate This ensures that the plate is not modified by another user in the Software Suite while the plate is loaded...

Page 78: ...reen tap New Plate Note The New Plate button is not available for single plate instruments 2 To input the barcode manually tap the Barcode field To scan the barcode using the external USB scanner tap...

Page 79: ...he plate in Software Suite 2 Tap dPCR parameter to proceed with the next step Note Each step in dPCR parameter has its own tab The Priming Cycling and Imaging tabs are mandatory 3 In the Priming tab s...

Page 80: ...aging tab 6a In the Imaging tab select the applicable channel then enter the exposure duration and gain in the Exposure duration and Gain fields 6b To include more steps in the run tap the Add icon th...

Page 81: ...run in the Running Status window To start the run on all plates simultaneously without making any changes tap Run all To start the run of an individual plate without making any changes tap the corresp...

Page 82: ...y Alternatively you can create a new plate by following the steps in section Configuring a plate and starting a run To link the barcode to a defined plate in the Software Suite that has no barcode def...

Page 83: ...Stop Run button is available A status bar with the remaining time is displayed The panel also shows all the steps within the run The font color of the steps that are completed is black When a step is...

Page 84: ...tep of the run and the remaining time of the current step You can also view the parameters defined for each step Table 6 shows the meaning of each status icon that are shown in the dPCR parameter step...

Page 85: ...shed ones or remove plates that are still in progress To eject a tray press the physical button on the instrument or tap Eject tray on the touchscreen If any of the running plates are in the Imaging s...

Page 86: ...borted during the Thermocycling or Imaging step can be used again To rerun the plate configure a run with only the remaining steps See section Rerunning a plate for more information Note A run cannot...

Page 87: ...dule button is shown on the screen If the runs are started individually they will be added to the schedule in the order which they were started by tapping the Run icon on their respective panes If all...

Page 88: ...e that you want to move 3 Perform one of the following actions Tap Move up to move the plate run to an earlier position Tap Move down to move the plate run to a later position Tap Remove to cancel the...

Page 89: ...hree errors tap View all to view the full list of errors Disk Monitoring The Disk Monitor icon located in the header shows the real time usage of the disk free space and usage percentage Depending on...

Page 90: ...n the remaining free disk space is less than 4 GB 14 In case of 2 and 3 additional information is shown to inform about the actions that should be taken to gain the disk space forcing the clearing of...

Page 91: ...out icon located at the bottom right of the touchscreen Note The Logout button is disabled when the instrument is being calibrated or when a tray is ejected However you can log out when a plate is run...

Page 92: ...e Login screen is displayed on the QIAcuity display To view the run status of an ongoing run tap Running status The Running status screen is displayed in view only mode All functions are disabled To p...

Page 93: ...ar The main toolbar shows navigation items Clicking on the icon navigates to the overview of the selected area Depending on your role not all navigation areas might be visible An active icon becomes h...

Page 94: ...k space is needed See Regular maintenance procedure of QIAcuity for more information If you want to archive your plates on an external drive you can configure the archive See section Archive to get mo...

Page 95: ...e Suite Information bar The information bar located at the bottom of the screen displays the software version Concepts of the QIAcuity Software Suite User management The QIAcuity Software Suite requir...

Page 96: ...irst login attempt except the initial administrator user with login name admin provided by QIAGEN during the initial installation When working with Good Manufacturing Practice GMP Good Laboratory GLP...

Page 97: ...it trail functionality is limited to view the list of events and provide event details 3 Group leader The group leader has access to QIAcuity instrument control software and QIAcuity Software Suite fu...

Page 98: ...analyze results This role also allows for basic user management functionalities to read user descriptions and their permissions 7 Operator The operator is the role inside the laboratory and is designe...

Page 99: ...t accesses Instrument Maintenance X X Experiment Schedule X X X X X X Create Support Package X X X X X X Plates Create Plate X X X X X All Plates Run Experiment X X X X Edit Plate Data X X X X Edit An...

Page 100: ...Package X X X X X X Create Report for Analysis X X X X X X Sign Report X X X X X X Delete Report X X X Templates Create Template X X X X X Edit Template X X X X X Read Template X X X X X X X Delete Te...

Page 101: ...heckbox Log in Instrument and PC software 1 Instrument User can login to Instrument login and password is needed Log into the Instrument by providing credentials 2 Suite Software User can login to Sui...

Page 102: ...dPCR parameters Plate layout samples reaction mixes reagents controls and mark it as primed Note Read all Plate required to have fully available permission 3 Edit Analysis Data User can change the thr...

Page 103: ...on Import plate The import plate button is visible in Plates overview 2 Export Plate User can export the Plate as a ZIP file Note Read owned Plate or Read all Plate required to have fully available pe...

Page 104: ...upport Package User can download a support package for the Plate Note Read owned Plate or Read all Plate required to have fully available permission Create support package The support package button i...

Page 105: ...t existing Template Note Read Template required in order to be able to edit template Modify templates and their parameters 3 Read Template User can read information about existing Templates and use th...

Page 106: ...ace in Disk space monitor See Archived plate Search Archived Plate sort by Archived date Plate name Plate statuses time frame change view See Archived plate general data 3 Restore Plate from Archive U...

Page 107: ...create and edit a user and create and edit a role Note Read user and roles required to have fully available permission Go to the configuration panel Go to the User Management tab Go to Users tab in U...

Page 108: ...inistrator to get access rights Deactivate user deactivate button in row with user activate deactivated user activate button in row with deactivated user 4 Delete Role User can delete existing roles i...

Page 109: ...Trail User can see the list of Audit Trail events search for specific event check details of the event and export it to PDF Go to the configuration panel Go to the Audit trail tab in the configuration...

Page 110: ...te or edit users additionally permission Create and Edit Users and Roles is required 1 If you want to create a new user please click the New User button 2 Fill out the form user name first name surnam...

Page 111: ...user login only once and after user creation it cannot be changed To create a unique login please use letters numbers and symbols Minimal number of characters for login is 5 4 When all information is...

Page 112: ...tep you need to choose one role that will be assigned to the user The roles descriptions can be found below For detailed information about roles and permissions you can check in the attached tables be...

Page 113: ...y User Manual 06 2022 113 7 Read the roles descriptions and choose the user role 8 To see the permissions list assigned to each role please click the show all permissions button below the role s descr...

Page 114: ...l descriptions button 10 If you want to see the description of the permissions related to each permissions group please click the show all descriptions button 11 If you want to hide the description of...

Page 115: ...6 2022 115 12 If you want to go back and check or change user information please click the Back to User Information button or the User information step in the stepper 13 Click the Save button to confi...

Page 116: ...r 1 As you can see in the picture hereafter when you directly go to the second step the icon from the first step User information changed and informs you that you missed the first step In addition you...

Page 117: ...ed out click the Next button 4 To create the user please click the Save button When you are in the user creation panel at every moment you can go back to the user list by clicking the Back to Users Li...

Page 118: ...ting user To edit user data please follow the below instructions 1 On the users list please find the user that you want to edit 2 Click the Edit user icon 3 At the left hand side are three tabs relate...

Page 119: ...edit a user name or surname please click on the input field and type in the new name surname 3b User permissions tab In the User permissions tab you can change the role and check the permissions descr...

Page 120: ...assword On the New password field you need to enter the new password On the Confirm password you need to re enter the same password as in the New password field Those passwords should be the same If t...

Page 121: ...ole are able to deactivate other users to restrict access to the system for such users Note It is not possible to delete users 1 Find the user you want to deactivate 2 At the end of the row please fin...

Page 122: ...as deactivated If you activate the user again Plate Ownership will be reassigned 5 Click the Yes button to deactivate the user User activation Deactivated users may still be activated by users with A...

Page 123: ...e user you want to activate 4 Click the activate user icon 5 Read the text in the pop up window If you are sure you want to activate the user click the Activate button if not please click the Cancel b...

Page 124: ...e New Role button 2 Fill out the form role name and role description 3 When all information is filled out properly click Next or Permissions to move to the next step 4 In the Permissions second step y...

Page 125: ...sion step The software will indicate any missing information in the Role name step In case you have entered any information under Permissions before having completed all required entries under Role na...

Page 126: ...QIAcuity User Manual 06 2022 126 Pressing the Users list button will bring you to the list of all users and their status...

Page 127: ...t role you need Create and Edit Roles permission Only roles created by User can be edited Predefined roles cannot be edited To edit role please follow the below instructions 1 On the roles list please...

Page 128: ...u can change the role name and description To edit a user name or surname please click on the input field and type the new value 3b Role permissions tab In the Role permissions tab you can change perm...

Page 129: ...have been assigned to role you are modifying after pressing Save button you will be presented with window informing how many users will be impacted and you can check impacted users list using drop dow...

Page 130: ...ed Delete role permission Predefined roles cannot be deleted Only roles created by User with no users assigned can be deleted To delete role please follow the instructions below 1 On the roles list pl...

Page 131: ...added as plate owner if no plate owner is already assigned to the plate or if the assigned plate owner is a deactivated owner For upgraded plates owners from original plate will be preserved if they e...

Page 132: ...ing the user name surname login 6 Choose the user from drop down list by clicking the chosen name 7 User has been added 8 If you want to add another user start writing the user name surname login Then...

Page 133: ...you want to remove all owners click the clear icon on the end of the input field Log in screen The main toolbar shows which user is currently logged in To view more information about the user click t...

Page 134: ...log out click Logout to return to the home screen of the QIAcuity Software Suite Audit trail The Audit trail is a functionality in the QIAcuity Software Suite which supports users meeting Good Manufa...

Page 135: ...initiated the event that happened in the system category of the event Instrument Suite or Plate event type what who was affected by the action Plate ID User login or Instrument ID description of deta...

Page 136: ...racker ON click on the toggle When the Audit trail tracker is turned on the circle is at the right hand side the toggle is blue and an ON label appears at the right hand side Moreover there is additio...

Page 137: ...nistrator To display the Events list on the main toolbar click the Configuration tab At the left hand side you can see the tabs menu Click the Audit Trail tab After clicking the Audit Trail tab the fo...

Page 138: ...login You can search for Instrument ID number affected Plate ID or affected user login Click on the search field Search for Instrument ID affected Plate ID user login Input your query After a few seco...

Page 139: ...ecific time frame If you want to find all events that happened in one specific day or time period you need to use the filters Start date and End date Click on the Start date input field or click the c...

Page 140: ...ic category Instrument Software Suite or Plate Category refers to device tool Instrument Suite PC Software or Plate on which the action has been taken Instrument all events related to the instrument S...

Page 141: ...osing during run Clear error Audit trail toggle Archive configuration create Archive configuration update Archive configuration delete Archive configuration schedule Upload VPF Apply VPF Delete templa...

Page 142: ...in the system Login is unique and cannot be duplicated so filtering for it will provide the user specific results This filter allows you to even search for multiple users Check details In the Events...

Page 143: ...s list tab 2 Apply filters to select for those events that should be exported 3 At the right hand side above the Event list you can find the Export to PDF option Click on it 4 Afterwards a PDF file wi...

Page 144: ...played in QIAcuity Software Suite Priority level Type Color Description Required action from user 1 System error Red Combination of events requiring an action User interaction required 2 Warning Yello...

Page 145: ...tional information regarding the required data to be entered on a field Fields with information messages are marked with icon Clicking this icon displays a text box that provides additional informatio...

Page 146: ...QIAcuity User Manual 06 2022 146 2 Click New Plate 3 Refer to Table 12 to provide the following required information in each tab...

Page 147: ...mation Priming profile Cycling Imaging Reaction mixes Provide the following information for a new reaction mixes Reaction mix name Color Target Name Dye Channel Samples Controls Specify the following...

Page 148: ...lank Add sample Add control Add NTC Defining General Data In the General Data tab you can specify the basic information about the plate Mandatory input fields are marked with an asterisk The plate nam...

Page 149: ...e your experiments Plate ownership Enter users that should be allowed to view and edit the plate according to their permissions More than one user can be a Plate owner Barcode Enter the barcode that i...

Page 150: ...se the up and down arrows to arrange the order of the temperature steps 5 Check the box corresponding to the temperature steps that you want to use for the repeated cycling Then click Group 6 In the f...

Page 151: ...QIAcuity Eight offer 5 plex analysis The following table shows the available channels provided in each instrument Note The instruments offer an exposure duration from 1 4000 ms and a gain value of 0 d...

Page 152: ...te v2 0 or higher dust detected in one channel is used for finding dust in other channels as well If required to improve dust detection always image all channels even not used by assay s Defining reac...

Page 153: ...ual 06 2022 153 The Detailed List view tab displays the detailed information about the reaction mixes stored in your database To create a new reaction mix 1 Click New Reaction Mix 2 The New Reaction M...

Page 154: ...The Color box shows the color of the single target in the reaction mix 6 Select the channel from the channel list where your target is detected 7 Optional Select the dye of the target from the dye lis...

Page 155: ...to your samples to help you categorize your experiment Amount Enter the number of samples that shall have the same sample name They will automatically be numbered behind the sample name with 01 02 03...

Page 156: ...nd can be used for your experiment To add Non Template Controls 1 Click the Non Template Controls tab 2 Specify the name of your non template control in the Non Template Control Name field 3 Click Add...

Page 157: ...eaction mix to the plate 1 Left click the well you want to mark 2 Left click the icon then select Add reaction mix or Mark as blank The Add reaction mix window appears 3 Select the reaction mix you wa...

Page 158: ...ht click the well Note You can also mark more than one well if you want to assign a sample to multiple wells 2 Click Add sample 3 The Add Sample window appears 4 Select a sample to add to the plate To...

Page 159: ...plate from the Controls list or enter a new control name 5 In the Control type list select whether the control is positive or negative for the specific target 6 Click Assign 7 The control is added and...

Page 160: ...late Control window appears 4 Select an existing NTC from the Non Template Control name list or enter a new Non Template Control name 5 Click Assign 6 The NTC is added and the well is marked with NTC...

Page 161: ...umns CSV import export You can export the list view as CSV file Click CSV import export then click Export to CSV to export the list view as a CSV file You can also import sample names and reaction mix...

Page 162: ...in the Plate option needs to be selected if not existing samples and reaction mixes should be created automatically due to CSV import This option needs to be chosen if the CSV file includes reaction...

Page 163: ...tion for CSV Import After import additional samples will be created and the Plate layout of empty wells only will be filled according to the CSV file Pre defined filled wells will not be overwritten E...

Page 164: ...should be imported without selecting the Overwrite existing data option If this option is not selected the application will fail to import in case there are any existing data e g like reaction mixes...

Page 165: ...o export the plate When the selected plate is currently running you can see the run status and the respective plate details Search The plates overview screen provides a search for plates functionality...

Page 166: ...al plates overview either empty the search field and click or press Esc on your keyboard while the text field is active Filtering Click the calendar symbol beside Time Frame to limit the overview resu...

Page 167: ...to import a plate again click Import Plate in the plates overview A new window appears where you can import plate data by uploading the zip file Click Import and the plate is added to the plates over...

Page 168: ...plate 1 In the Main Toolbar click Templates then click New template 2 The Create New Template window appears 3 Enter the name for the template in the Template name field You can enter up to 100 charac...

Page 169: ...uired information you can save the information as a template to use for future plates 1 Click Plate templates in the upper right corner of the screen 2 Click Save as template 3 The Save as Plate Templ...

Page 170: ...plates 4 Select an existing template then click Import 5 All information in the selected template is automatically transferred to the new plate setup Managing your templates To enter the Templates env...

Page 171: ...modification date or name Sorting the templates by the modification date enables you to view the recently modified entries Filtering You can search for specific templates by entering the name in the S...

Page 172: ...ction Genome Editing Copy Number Variation Gene Expression Accessing the analysis environment To access the Plate Analysis environment 1 On the Plates Overview page of the Plates environment search fo...

Page 173: ...ormation about how to access the Plate Analysis see section Accessing the analysis environment To access the images click Check source images To select a channel click the corresponding button next to...

Page 174: ...a well Differences in the signal intensities between partitions are normalized and the fluorescence signals in the target channels are corrected accordingly If the fluorescence signal is saturated in...

Page 175: ...mize your RFU level For RFU values below 60 it is recommended to increase the exposure time of the corresponding channel s and for RFU values below 150 it is recommended to decrease the exposure time...

Page 176: ...s have been invalidated Those wells are greyed out in the plate layout and cannot be used for the result analysis Note This message also appears if not all wells were used in the run For that situatio...

Page 177: ...oo less valid partitions in the reference channel needed for analysis In this case the whole well is invalidated Image corrective measures To ensure proper analysis based on valid partitions artefacts...

Page 178: ...QIAcuity User Manual 06 2022 178 Raw image of a well showing dust particles marked with red circles...

Page 179: ...mage the plate Note For QIAcuity Software Suite v2 0 or higher dust detected in one channel is used for finding dust in other channels as well If required to improve dust detection always image all ch...

Page 180: ...validated Low amplification areas In case of low amplification areas the fluorescence signal in the target channels is less pronounced or not detectable in certain areas of the well The signal in the...

Page 181: ...filling Incorrect pipetting or sealing can lead to areas of the well which are not filled with reaction mix Those areas affect the reference channel as well as the target channels and reduce the numb...

Page 182: ...tion is done automatically by the software and does not require any user action The bleed through signals are removed from the images and are not taken into account in the result analysis The crosstal...

Page 183: ...then drag your mouse until all wells are selected To select all wells click Select all To remove a selected well click the well To remove all selected wells click Unselect all Plate table with availab...

Page 184: ...well To define a hyperwell select multiple wells with the same Reaction Mix and same Sample name Then click Group as hyperwell from the menu below or right click and select Group as hyperwell from th...

Page 185: ...ll will be aggregated and presented as a result from a single well Details about CI calculation and concentration determination in hyperwells are described in the QIAcuity User Manual Extension QIAcui...

Page 186: ...e because you have not selected the wells hyperwells with the same sample ID for the chosen reference sample 5 Click on the reference target drop down list and select one or more targets 6 Click the s...

Page 187: ...er Manual 06 2022 187 1 First select reference sample In this case the user has selected sample ID 01 patient 01 2 Enter the copies genome You can choose the value between 1 to 99 In this case the use...

Page 188: ...ERBB2 with channel Yellow 6 If all fields have been selected you can click the Show results button Multiple imaging steps If the plate was configured with multiple imaging steps you can select the one...

Page 189: ...e is shown by moving the mouse over the camera icon to indicate that the results might be incorrect Furthermore error messages are indicated with a red box around the image step icon warnings with a y...

Page 190: ...he diagram Zoom in Zooms in the diagram To reset the zoom double click the diagram Zoom out Zooms out the diagram To reset the zoom double click the diagram Reset axes Resets the axes after the view i...

Page 191: ...ge of the displayed data click one of the handlebars on the left or right side of the highlighted area and drag until you reach your preferred range Absolute quantification The Absolute Quantification...

Page 192: ...elect all targets click 4 Click Show results to view the results of the analysis 5 To analyze the plate by channels check the boxes of the corresponding channel color to select the relevant channels I...

Page 193: ...e or indicates whether the entry is an NTC or control Concentration copies l This column shows the concentration assigned to each target or channel per well CI 95 This column shows the value of the co...

Page 194: ...e or Target target name IC internal control if selected Control Type control type Concentration copies l calculated conentration CI confidence interval parameter Partitions valid number of valid parti...

Page 195: ...as in list view valid partitions are defined per channel RFU values If you want to export relative fluorescence units per partitions for selected wells please follow the instructions below 1 Select we...

Page 196: ...or each selected channel and compressed into one zip file Note Please be informed that due to some corrections provided by analysis models sometimes there might be changes when comparing IsPositive co...

Page 197: ...till shows independent rows for each selected well but replicates are grouped together Replicates from the same group are next to each other in the list view There are two additional columns indicatin...

Page 198: ...acts that he might have discovered in the source image view Each signal map represents the plate layout for a selected channel where only the images of the selected wells are loaded Remaining wells ar...

Page 199: ...e left side the well ID channel name and if defined the associated target name are shown The Software Suite provides a signal map view for the reference channel which is hidden by default To view the...

Page 200: ...Red Crimson separated by a horizontal line If the target or channel shown in a heatmap is not relevant to one or more wells those wells do not have a value displayed and their background color is gray...

Page 201: ...ick Show mean values for replicates Mean values are not supported in the partition view Therefore the related check box is greyed out in the partition view and a meaningful information message is show...

Page 202: ...06 2022 202 The partitions heatmap of a selected target To add any of the heatmaps to the report click Add to report next to the relevant diagram For more information on reports see section Reports He...

Page 203: ...the fluorescence intensity on the x axis For this the user clicks on the right side of the x axis which opens a text box This text box is used to insert the new upper range of the fluorescence intensi...

Page 204: ...to a single well selection To reset the software to automatically recalculate the threshold click Automatic threshold Again click Recalculate to apply the auto threshold to the results If the user tri...

Page 205: ...he values are common for all wells To apply the new threshold values for the analysis click Recalculate to trigger the recalculation of results Lasso mode for partition assignment Alternative of chang...

Page 206: ...reshold fluorescence intensity value decimal value that is used to distinguish between positive and negative partitions Fluorescence values below the threshold are shown in grey above the threshold in...

Page 207: ...QIAcuity User Manual 06 2022 207 To open an individual plot click on the appropriate header of the 1D Scatterplot...

Page 208: ...ld field 3 To change the value again using this method click the red line and drag it to the appropriate spot Alternatively you can also directly edit the value in the Threshold field Use the auto thr...

Page 209: ...lick the Recalculate button to trigger the re analysis of data If you change thresholds and wants to leave the 1D Scatterplot view without triggering the Recalculate button a propriate warning message...

Page 210: ...ecalculate The 1D Scatterplot for the reference channel uses the same functions as the 1D Scatterplot views for non reference channels 1D Scatterplot for the reference channel Lasso mode for partition...

Page 211: ...orm actions related to the 2D Scatterplot view such as downloading the plot hold the pointer over the diagram For more details about the toolbar refer to Diagram options The Common threshold field for...

Page 212: ...shown Dark blue Partition is assigned for x axis and y axis channel as positive Orange Partition is assigned to x axis channel as negative and for y axis channel as positive Light blue Partition is a...

Page 213: ...e When thresholds are changed and not confirmed by clicking the Recalculate button and if some partitions are selected through lasso mode and recalculated the threshold values are ignored Note Lasso s...

Page 214: ...below each graph The buttons are visible when you hold the pointer over a graph To view the values on a linear scale click lin To view the values on a logarithmic scale click log10 Each diagram prese...

Page 215: ...yzing plate contents to detect mutations in the samples The analysis results are put into list views heatmaps point diagrams and concentration diagrams Note Saving of mutation detection tests is not a...

Page 216: ...value in CI 95 This column shows the value of the confidence interval for mutant fraction at a 95 confidence level Replicates are treated different for multiplex and simplex test setup Multiplex test...

Page 217: ...tes is checked and disabled To export the list view information as csv file click Export to CSV Heatmap tab for mutation detection The Heatmap tab contains a heatmap that shows the mutant fraction as...

Page 218: ...are visible when you hold the pointer over a graph To view the values on a linear scale click lin To view the values on a logarithmic scale click log10 Each combination of wild type target and mutant...

Page 219: ...am that displays the distribution of concentration values in the wells together with their confidence intervals A concentration diagram has two axes The x axis shows the analyzed wells and samples and...

Page 220: ...is is also applied in same way by default to the view where targets are in different reaction mixes In this case individual replicate results are not available Mean values are calculated and shown ove...

Page 221: ...well position in the plate layout Sample NTC Control This column shows the sample NTC or control name with its corresponding icon that identifies the sample or indicates whether the entry is an NTC or...

Page 222: ...t view The list view is extended by 4 columns indicating following mean values Mean concentration value CI 95 CI of mean concentration as percentage Mean edited fraction as percentage CI 95 CI of mean...

Page 223: ...tailed information about a particular well point the cursor over the well A tooltip with detailed information opens To view the mean values for replicates in multiplex test click Show mean values for...

Page 224: ...n values for replicates click Show mean values for replicates If the user clicks into the checkbox to select the mean representation for replicates the points of individual replicates disappear and on...

Page 225: ...howing the concentration value together with the confidence interval To view detailed information hold the mouse pointer over its corresponding bar A tooltip with detailed information opens To view th...

Page 226: ...ains diagrams that visualize the data related to copied genes in targets of interest comparing to reference targets or reference sample The analysis results are put into list views heatmaps point diag...

Page 227: ...from the Reference target list 3 Enter the number of copies per genome in the Copies genome field for the target of interest in reference sample The value should be between 1 and 99 4 Select the appli...

Page 228: ...f the analysis click Show results 7 The results are divided into several tabs To view the contents of the tab click the tab title Setting up a copy number variation analysis with reference sample 1 Cl...

Page 229: ...and 99 4 Select the applicable target that you want to investigate from the Target of interest list 5 Select one or more reference targets from the Reference target s list Note You can select more th...

Page 230: ...the Reaction mix Target This column shows all target names with its corresponding target type Note Targets that were selected as target of interest TOI or reference target Ref are marked accordingly...

Page 231: ...eaction mixes the mean result is calculated and shown for replicates in the selection The list view is extended by 4 columns indicating following mean values Mean concentration value CI 95 CI of mean...

Page 232: ...tip with detailed information opens To view the mean values for replicates in multiplex tests click Show mean values for replicates For simplex tests the mean values view is always shown for replicate...

Page 233: ...The samples are sorted by sample ID but the reference sample of a test is always shown The well IDs and sample IDs are labeled on the x axis In case that targets are in different reaction mixes each c...

Page 234: ...riation The concentration diagram tab shows the diagram that displays the concentration values of the configured copy number variation test and the confidence intervals related to every value A concen...

Page 235: ...sts To view the mean values for replicates on the diagram click Show mean values for replicates When this checkbox is checked the concentration diagram shows bars that represents mean concentration va...

Page 236: ...up a gene expression analysis 1 Click the applicable wells in the plate layout 2 Select the applicable reference sample from the Reference sample list 3 Select the applicable target from the Target o...

Page 237: ...he confidence interval for the fold change at a 95 confidence interval Fold regulation This column shows the change in the level of gene expression compared to the reference sample Replicates are trea...

Page 238: ...to an CSV file click Export to CSV Heatmap for gene expression The Heatmap tab contains a heatmap view that shows the fold change in each of the wells If a well is not selected as a source for the ana...

Page 239: ...shown for each of the points on the diagram To view an additional toolbar that enables actions related to the diagram such as downloading the plot hold the pointer over the diagram For more details ab...

Page 240: ...QIAcuity User Manual 06 2022 240...

Page 241: ...view where targets are in different reaction mixes In this case individual replicate results are not available Mean values are calculated and shown over all replicates that are included in the well s...

Page 242: ...the toolbar refer to Diagram options The Concentration diagram is a bar plot which presents two values Concentration value as bar CI value as bar The diagram consists of all possible combinations Eac...

Page 243: ...argets are in different reaction mixes In this case individual replicate results are not available When selected well has no replicates within all selected wells individual result values are shown Not...

Page 244: ...a plate see Analysis 2 To include a diagram or table of your analysis in your report check the Add to report box of the corresponding diagram you want to include Checking this box saves and pre selec...

Page 245: ...ected diagram 6 Click Create report 7 In the Create report dialog box select which information you want to include in your report By default all options are selected Note You can create your own repor...

Page 246: ...arcode dPCR parameters Priming profile Cycling profile temperature with time duration Imaging profile channel exposure duration gain Plate layout List of all the elements added to each well Reaction m...

Page 247: ...e plate Managing reports of a plate in the report environment The report environment of a plate provides an overview of all created reports for this plate You can use this environment to manage your c...

Page 248: ...DF format Delete the report Back to Analysis view of this plate Back to plates overview screen Add signature to the report List signers user name role date and reason Sign report To support GMP GLP re...

Page 249: ...d and a reason for signing and finally click Sign the report button 4 When the report is signed an appropriate message will be presented on the report list and the Add signature button will be disable...

Page 250: ...lick on the Check signers button 8 A pop up window will appear with information about signers 8a Name and surname 8b Login in brackets 8c Role 8d Date of signature 8e Signing reason Moreover during PD...

Page 251: ...en Add archive is clicked the user can provide a path to the external drive and click Save When the archive is configured suitable information is presented on the Archive configuration screen Automati...

Page 252: ...To do so click the three dots on any of the plates on the Plates Overview screen and select Archive The plate will be moved to the archive Note Archiving plates can take a while depending on the spee...

Page 253: ...en and click on the three dots on any of the plates on the Archive screen and select Restore Note Due to technical restriction there is no possibility to restore plates bigger than 2 5 GB from the arc...

Page 254: ...name in the tile to enter the plate configurator view then click Upgrade in the context menu During the plate upgrade a new Plate will be created as a copy of the old Plate and an animation is shown...

Page 255: ...be addressed by applying the stamper specific VPF The VPF specifies the exact cycled volume of a well within a Nanoplate and therefore further increases precision of concentration calculation in each...

Page 256: ...r to always download the most recent version After uploading the file the QIAcuity Software Suite automatically chooses which VPFs are missing and applies them To load the most recent VPF you can eith...

Page 257: ...file is a zip file There is no need to extract it When loaded the QIAcuity Software will refresh all plates and align concentrations using the newly loaded well based volumes The notifications about m...

Page 258: ...0 Approx 26000 Approx 0 82 Nanoplate 26K 8 well Light blue 8 40 Approx 26000 Approx 0 82 Nanoplate 8 5K 24 well White 24 12 Approx 8500 Approx 0 34 Nanoplate 8 5K 96 well Gray 96 12 Approx 8500 Approx...

Page 259: ...anoplate In this plate one reaction mix is distributed over 4 wells and separated into approximately 26000 partitions The plate may be used for up to 8 samples and has a light blue frame as distinctio...

Page 260: ...qiagen com To set up a plate follow these steps 1 Prepare your master mix according to your reaction setup To prepare the reaction mix without sample the QIAcuity PCR Master Mix has to be mixed with p...

Page 261: ...rotective foils The 3 layered foil should not be folded Remove the bottom white protective foil carefully center and align the plate seal still containing the upper protective foil with the lower edge...

Page 262: ...he plate seal 9 For the transport of the Nanoplate to the QIAcuity instrument the plate should be held at the side edges or on the tray horizontally Make sure that the plate is transported to the QIAc...

Page 263: ...le material used and the downstream assay WARNING Risk of fire or explosion W1 When using ethanol or ethanol based liquids on the QIAcuity handle such liquids carefully and in accordance with the requ...

Page 264: ...e respective items Removal of nucleic acid contamination DNA ExitusPlus AppliChem cat no A7089 0100 can be used for cleaning surfaces DNA ExitusPlus can also be used to perform decontamination by spra...

Page 265: ...surfaces of the QIAcuity Take special care while cleaning the extended drawer that no liquid is spilled into the inside of the instrument WARNING Risk of fire W24 Do not allow cleaning fluid or decont...

Page 266: ...alcohol based disinfectant allow flammable vapors to disperse WARNING Risk of fire or explosion W23 When using ethanol or ethanol based liquids on the QIAcuity handle such liquids carefully and in ac...

Page 267: ...recommended cleaning agents you can use to clean the QIAcuity instrument All outer surfaces of the instrument including the touch display and the extended drawer can be cleaned Periodic maintenance Ai...

Page 268: ...QIAcuity User Manual 06 2022 268 3 Remove the filter from the swing out filter compartment 4 Replace with a new filter and push the compartment to the top to close...

Page 269: ...y follow the procedure in section Disinfection using the recommended disinfection agents Regular maintenance procedure for QIAcuity Instrument Software The QIAcuity stores various information about th...

Page 270: ...QIAcuity User Manual 06 2022 270 3 To clear the data tap Force clear images Click OK in the confirmation dialog box to delete the data Images from the system and database will be removed...

Page 271: ...y of free space Table 20 Disk status State Meaning Flag Normal No threshold has been reached None Warning Disk space reached the warning level there is only disk space for a few runs left Yellow dot i...

Page 272: ...tuation the support package either from the instrument and or the Suite is required Refer to Creating a support package Note Information about the latest software and protocol versions can be found at...

Page 273: ...information about support package see Creating a support package Creating a support package with the QIAcuity instrument software You can create a support package in case of an error The support pack...

Page 274: ...te a support package for the current day Tap Last week or Last 2 weeks to select either the last week or the last two weeks To set a custom timeframe tap From and select a start date from the calendar...

Page 275: ...Connect a USB drive to the instrument Wait for the device to detect the USB drive A notification is displayed once the drive is connected 4 In the Support Package pane Select Download to USB drive 5 T...

Page 276: ...eeks To set a custom timeframe tap From and select a start date from the calendar Then tap To and select an end date from the calendar 7 Tap Apply to save the changes 8 Tap Create download 9 A progres...

Page 277: ...ackage with the QIAcuity Software Suite 1 Select a plate in the plates overview 2 Click the left side of the screen on Support Package A new window pops up where you can specify what kind of support p...

Page 278: ...ombined image view of all wells The extended package includes the log files and the raw images of each single well By clicking on the calendar symbol you can define the time frame from which the suppo...

Page 279: ...connected to a laptop and the Instrument or a network depending on the selected setup Click the Repair button and proceed with the instructions Then restart the laptop See section Renew certificate fo...

Page 280: ...run in the background causing a long starting period up to 60 minutes Application a Images or analysis data cannot be viewed Check the connection to the QIAcuity instrument b Poor or no amplification...

Page 281: ...nical Service in order to solve the issue Software a The QIAcuity Software Suite does not start Check that the software is installed on the laptop Check the operating system The QIAcuity Software Suit...

Page 282: ...this time clear the Error and restart The instrument should start without an Error If the Error persists please contact QIAGEN Technical Services l Error 33 The error can occur if the instrument was...

Page 283: ...be cleared for each tray such as motor and slot numbers based on Insrument Version Note In QIAcuity Eight the More details button is located in the Upper Tray and Lower Tray panes In the QIAcuity Four...

Page 284: ...from background noise GUI Graphical user interface Initialization An operation performed automatically when the QIAcuity is switched on or by initiating a self check of the instrument if required Nano...

Page 285: ...not to exceed 10 of nominal supply voltages Maximum power consumption QIAcuity One 2plex 1000VA QIAcuity One 5plex 1000VA QIAcuity Four 1000VA QIAcuity Eight 1500VA Fuse 2x T12A L 250V Overvoltage cat...

Page 286: ...to 40 C 41 F to 104 F in manufacturer s package Relative humidity 5 to 85 non condensing Environmental class 1K21 IEC 60721 3 1 Ambient pressure 700hPa to 1060hPa Mechanical data and hardware features...

Page 287: ...ED with average 4750 lumens Image acquisition by CMOS camera with 6 3MP Capacity Up to 96 samples per plate Maximum plate capacity depends on the configuration One Four Eight Touchscreen Four Eight 10...

Page 288: ...attern Area Image 1280 x 800 pixel array Motion Tolerance Up to 89 cm s 35 in s Print Contrast Ratio 15 minimum Decode Capability Reads standard 1D 2D Postal and stacked codes Resolution 1D Linear 0 1...

Page 289: ...al laws and regulations The separate collection and recycling of waste electronic equipment at the time of disposal helps to conserve natural resources and ensures that the product is recycled in a ma...

Page 290: ...arranted only for the duration of the original warranty period and in no case beyond the original expiration date of original warranty unless authorized in writing by an officer of the Company Read ou...

Page 291: ...ectrical Units PCBs a components Sensors X O O O O O Power supply X O O O O O Cables Connecting cables O O O O O O Motors Motors Pumps Fans O O O O O O Optical Parts Filter Lenses O O O O O O Heating...

Page 292: ...with a 2 business day response time and 1 preventive maintenance visit 911035 QIAcuity Four Platform System FUL 1 Four plate digital PCR instrument for detecting up to 5 fluorescent dyes notebook com...

Page 293: ...t air inlet filter for QIAcuity One 9026699 Air Filter QIAcuity Four Eight 1 Replacement air inlet filter for QIAcuity Four and QIAcuity Eight 9026700 QIAcuity Nanoplate 26k 24 well 10 24 well dPCR Na...

Page 294: ...5 ml 5 x 1 ml 3x concentrated QIAcuity EvaGreen Mastermix 8 x 1 9 ml Water 250112 QIAcuity EG PCR Kit 25 ml 5 x 5 ml 3x concentrated QIAcuity EvaGreen Mastermix 4 x 20 ml Water 250113 For up to date l...

Page 295: ...cernant ces circonstances sont donn s dans un encadr identique celui ci ATTENTION Le terme ATTENTION est utilis pour indiquer des situations pouvant entra ner un endommagement de l appareil ou d autre...

Page 296: ...tation situ l arri re de l appareil et d brancher le c ble d alimentation de la prise secteur ATTENTION D t rioration de l appareil C2 Utiliser les consommables pour QIAcuity avec le QIAcuity Ne pas u...

Page 297: ...endommager les composants lectroniques Pour prendre connaissance de la tension d alimentation recommand e consulter les sp cifications indiqu es sur la plaque signal tique de l appareil AVERTISSEMENT...

Page 298: ...i re solaire directe peut provoquer le blanchiment de certains l ments de l appareil et d t riorer les pi ces en plastique Le QIAcuity doit tre tenu l abri de la lumi re directe du soleil ATTENTION Ri...

Page 299: ...ssaires afin de garantir que le lieu de travail environnant est s r et que les op rateurs de l appareil sont convenablement form s et ne sont pas expos s des niveaux dangereux d agents infectieux comm...

Page 300: ...plicables L vacuation des vapeurs et la mise au rebut des d chets doivent tre effectu es conform ment toutes les r glementations et lois nationales r gionales et locales relatives la sant et la s curi...

Page 301: ...Z lande Plaque signal tique l arri re de l appareil Marquage RoHS pour la Chine restriction de l utilisation de certaines substances dangereuses dans les quipements lectriques et lectroniques Plaque...

Page 302: ...em beschrieben VORSICHT Der Begriff VORSICHT wird verwendet um Sie ber Situationen zu informieren in denen das Ger t oder andere Ger te besch digt werden k nnten N here Einzelheiten ber diese Situatio...

Page 303: ...am Netzschalter auf der R ckseite des Ger ts AUS und ziehen Sie das Netzkabel aus der Netzsteckdose VORSICHT Besch digung des Ger ts C2 Verwenden Sie nur f r den QIAcuity vorgesehene Verbrauchsmateria...

Page 304: ...ch das ffnen der Abdeckungen oder das Entfernen von Geh useteilen k nnen spannungsf hrende Komponenten freigelegt werden WARNUNG Besch digung von elektronischen Bauteilen W6 Stellen Sie vor dem Einsch...

Page 305: ...besch digt erscheint das Ger t f r l ngere Zeit unter ung nstigen Bedingungen gelagert wurde das Ger t unsachgem transportiert worden ist Fl ssigkeiten in direkten Kontakt mit elektrischen Komponente...

Page 306: ...n Sicherheitsbestimmungen vor Tragen Sie immer eine Schutzbrille zwei Paar Laborhandschuhe und einen Laborkittel Die verantwortliche Person z B der Laborleiter muss alle erforderlichen Vorsichtsma nah...

Page 307: ...chritten werden Beim Betrieb eines Abzugs und bei der Entsorgung von Abfallstoffen m ssen alle Bestimmungen und Gesetze auf Bundes Landes und kommunaler Ebene zu Gesundheitsschutz und Sicherheit am Ar...

Page 308: ...Markierung gem RoHS Richtlinie f r China Einschr nkungen in Bezug auf den Gebrauch bestimmter Gefahrstoffe in Elektro und Elektronikger ten Typenschild an der Ger ter ckseite WEEE Markierung Zertifiz...

Page 309: ...ck Servicing and Configuration Experiment Schedule CSW_PLATE_EXPERIMENTSCHEDULE User can set up dPCR parameters priming cycling imaging Create Support Package CSW_INSTRUMENT_CREATESUPPORTPACKAGE User...

Page 310: ...all created Plates check details about owned Plate dPCR parameters plate layout samples reaction mixes controls export plate to CSV Delete Plate SUITE_PLATE_OWNED_DELETE User can delete owned Plates...

Page 311: ...can restore archived Plates Delete plate from Archive SUITE_PLATE_ARCHIVE_ARCHIVEDELETE User can delete any Plate from Archive User Management PC software Read Users and Roles SUITE_USER_ROLE_READ Us...

Page 312: ...IP address of the Suite Server to connect to the server Replaced the outband TCP port with 4 inbound TCP ports for communication with QIAcuity Software Suite Added a reminder to ensure the cable is p...

Page 313: ...parties 3 This kit and its components are licensed for one time use and may not be reused refurbished or resold 4 QIAGEN specifically disclaims any other licenses expressed or implied other than those...

Page 314: ...QIAcuity User Manual 06 2022 314 Ordering www qiagen com shop Technical Support support qiagen com Website www qiagen com...

Reviews: