background image

10

1

SLED information

2

SLED ON/OFF button

3

% of nominal P

OUT

4

Arrows

5

Slide bar

6

Spectrum view button

7

Return arrow

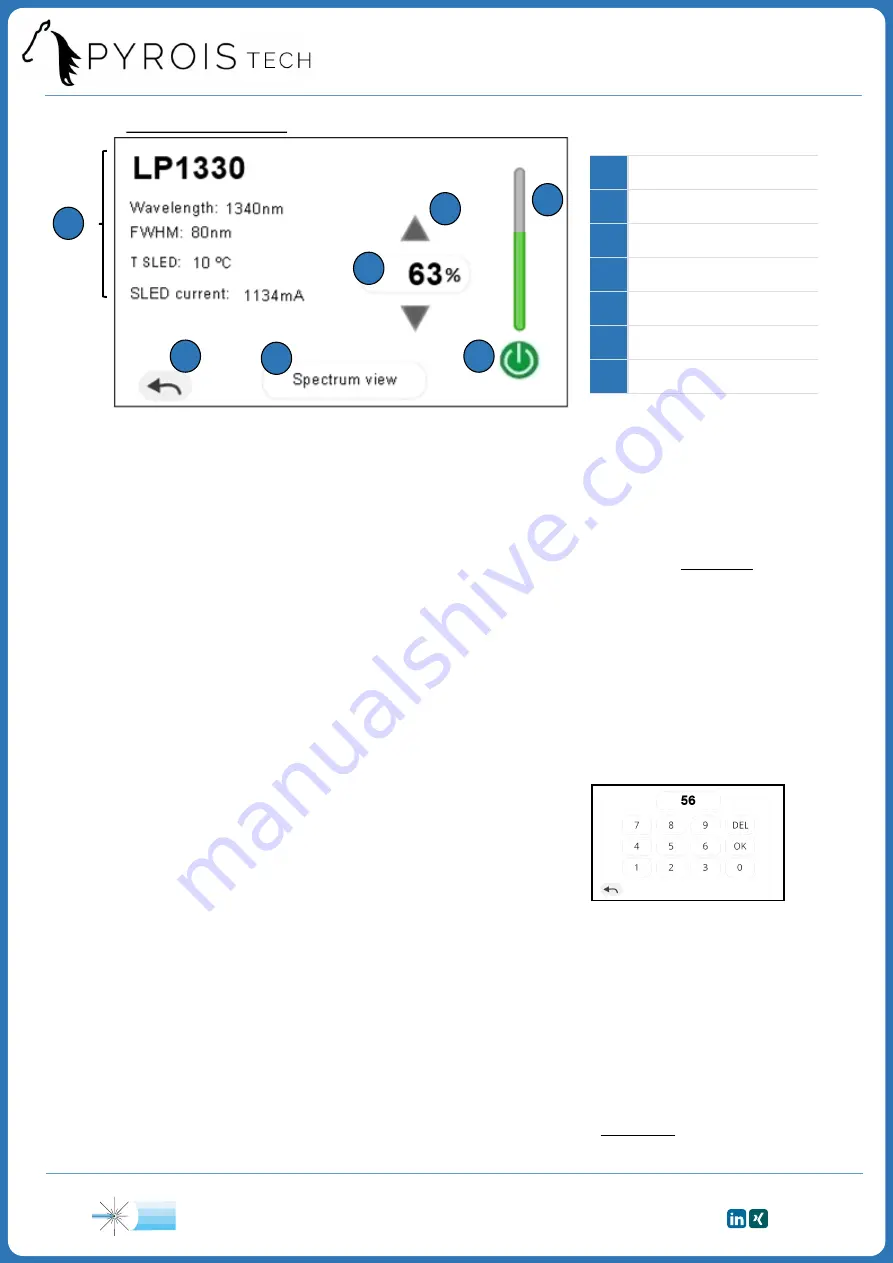
Figure 2. SLED screen

1

3

4

2

5

6

7

SLED information (1)

On the left of the screen, the following information can be read:

Name of the SLED

Central wavelength of the SLED

Full width at half maximum (FWHM)

Control of the output power

On the right of the screen, the percentage of the nominal output power of the SLED

can be adjusted from 0% to 100% with the following controls:

SLED ON/OFF button (2):

This button is OFF (grey) if the percentage is equal to 0%. By pressing it, it will

change to the ON state (light green) and the output power will be set to 100%.

This button is ON (light green) if the percentage is higher than 0%. By pressing it, it

will change to the OFF state (grey) and the output power will be set to 0%.

SLED Temperature (ºC)

SLED Current (mA)

Type of error (only when an error has

occurred, see Figure 5 on next page)

Keypad (3):

by clicking on the number, a keypad will

appear (Figure 3). A percentage 0%-100% can be

introduced by using it. You can erase a digit by pressing

‘DEL’. Press ‘OK’ to confirm the percentage. If the value

introduced is higher than 100%, it will be replaced by

the previous valid percentage.

Arrows (4):

using the up/down arrows will increase/decrease the current percentage

of the nominal output power by 1%.

Slide bar (5):

it permits you to adjust the output power from 0% to 100%. While

dragging the slide bar, it will be in yellow, and it will change to green once a value has

been selected.

On the bottom of the screen, if we click on “Spectrum view” (6), we will see the spectral

power distribution of the corresponding SLED (see Figure 4 on next page). The arrow (7)

enables to return to the initial screen.

Figure 3. Keypad

2.5.2 SLED screen

The sequence ‘70925841’ written on the keypad will restore

all the source parameters to their Factory Mode values

SI Scientific Instruments GmbH

Roemerstr. 67 | 82205 Gilching

+49 8105 77940  |  [email protected]  |  www.si-gmbh.de  |  Follow us on:

SI

Summary of Contents for FJORD Series

Page 1: ...Pyroistech S L C Tajonar 22 Edificio Jerónimo de Ayanz 31006 Pamplona Spain 34 698 91 04 12 2020 Pyroistech FJORD series User Manual Fiber coupled SLED light source NIR SI ...

Page 2: ... S L in any form of binding or cover other than that in which it is published The specifications indicated in this manual are subject to change without prior notice Disclaimer Every effort has been made to make this manual as complete and as accurate as possible but no warranty is implied on it The information provided is on an as is basis Pyroistech S L shall have neither liability nor responsibi...

Page 3: ...5 1 Initial screen 2 5 2 SLED screen 2 5 3 Error management 2 6 USB connection available extra 2 6 1 App Connection 2 6 2 App Control and monitoring 2 6 3 Commands through USB connection 3 Important Notes 4 Warranty 5 Compliance 5 5 7 7 7 7 8 9 9 10 11 12 12 13 14 15 17 17 SI Scientific Instruments GmbH Roemerstr 67 82205 Gilching 49 8105 77940 info si gmbh de www si gmbh de Follow us on SI ...

Page 4: ...4 SI Scientific Instruments GmbH Roemerstr 67 82205 Gilching 49 8105 77940 info si gmbh de www si gmbh de Follow us on SI ...

Page 5: ...lude one or both of the following two extras a touch screen to adjust the power of each SLED individually from 0 to 100 and a USB connection that enables to do the same through the computer allowing the remote control of the source 5 1 Technical Specifications General characteristics Configurable spectral bandwidth with up to 8 SLEDs see all the available SLED modules on the next page Max optical ...

Page 6: ...ht source separately at the time of assembly Right now we have available the FJORD configuration tool that allows you to combine up to 8 SLED to preview your desired output spectrum Contact us through info pyroistech com in order to get access to it or download it in our webpage Electrical characteristics Input voltage VIN 5 V Input current IIN 4 A max typical value it may vary depending on the mo...

Page 7: ...ing Press again the button to turn off the light source USB connection If your FJORD source has a USB connection available extra and you want to use it physically connect the source to the computer through the USB cable If your FJORD source has a touch screen available extra the message USB Connected will appear on it once you have done the connection In order to end the USB connection just discon...

Page 8: ...ont view Front view Rear view The size of the source may vary with the number of the SLED modules The standard FJORD on this page corresponds to a FJORD X2 1330 1550 model The FJORD with extras on this page corresponds to a FJORD X3 1330 1550 1650 model Rear view 2 8 SI Scientific Instruments GmbH Roemerstr 67 82205 Gilching 49 8105 77940 info si gmbh de www si gmbh de Follow us on SI ...

Page 9: ...an have the following colours Green the SLED is operating correctly and its temperature has achieved the value set as reference See the first SLED on the left on Figure 1 Yellow the SLED temperature hasn t achieved yet the value set as reference Observe the second SLED starting from the left on Figure 1 Red an error has occurred In this case a warning symbol 6 will appear in the rectangle of the c...

Page 10: ... has occurred see Figure 5 on next page Keypad 3 by clicking on the number a keypad will appear Figure 3 A percentage 0 100 can be introduced by using it You can erase a digit by pressing DEL Press OK to confirm the percentage If the value introduced is higher than 100 it will be replaced by the previous valid percentage Arrows 4 using the up down arrows will increase decrease the current percenta...

Page 11: ...reen or yellow and we have accessed to the screen of the corresponding SLED see Figure 5 in this case error 1 took place This way we will be able to know which type of error happened The error codes are given in Table 1 Code Type of error 1 T higher than maximum T 2 T lower than minimum T 3 Error in the driver of the SLED 4 T unexpectedly deviates from reference value after stabilizing 5 Error in ...

Page 12: ...are explained in detail in the following pages 2 6 1 App Connection Initially only the buttons Port and Connect are available In order to effectively connect the FJORD light source to the computer these steps must be followed Click on the button Port 1 to update the list of ports used by the devices connected to the computer Select on the drop down menu 2 to the right of the button Port the port t...

Page 13: ...rature in ºC is shown 7 This value is updated every second The output power of the selected SLED can be varied from 0 to 100 by using the slide bar 8 or by directly introducing the desired value in the regulator 9 The arrows permit to increase decrease this value by 1 10 After each change the button SET POWER 11 has to be pressed to update the new value of the output power of the corresponding SLE...

Page 14: ...trol The default value is 20 ºC and it is not recommended to introduce a lower one Addresses 0x20 and 0x24 are not used Modifying the maximum and minimum allowable currents through the TEC will affect the velocity of the temperature control Instantaneous T of the SLED is the real temperature of the SLED while measured T of the SLED is its value after applying a filter Both values can only be read ...

Page 15: ...nternal operation is based on NO optical feedback or at least very reduced compared to that which occurs in a laser The warranty does not cover problems associated with optical feedback simply because it is a problem that may be caused by an experimental end user assembly and it is not possible to test and ensure that optical feedback will not cause problems for all types of assembly As a safety t...

Page 16: ...mplemented with several security mechanisms This does not mean that the recommendations indicated in this manual should not be followed It is recommended to ensure that the ambient temperature is in the 15 25ºC range to avoid direct exposure to sunlight and to check that the equipment is not immediately adjacent to others that impede natural convection cooling to achieve optimal operation Failure ...

Page 17: ...s should be used no closer than 30 cm 12 inches to any part of this equipment Otherwise degradation of the performance of this equipment could result The use of cables power supplies transformers and accessories other than those specified by Pyroistech S L in addition to not being covered by the warranty may lead to increased emissions and or decreased electromagnetic compatibility WEEE Compliance...

Page 18: ...18 Version Date Description 1 0 3 May 2020 First Document SI Scientific Instruments GmbH Roemerstr 67 82205 Gilching 49 8105 77940 info si gmbh de www si gmbh de Follow us on SI ...

Reviews: