background image

User Manual


PT-PMS-82S 


VOLUME: 


Press the volume knob in to toggle among 

MIX

HDMI OUT 

and 

HDBT OUT


audio control, and the corresponding LED will illuminate blue. 


Rotate the knob to increase or decrease the volume of the selected audio. 


Press and hold the knob at least three seconds to mute the selected audio. 
Rotate the knob to unmute. 


3.2


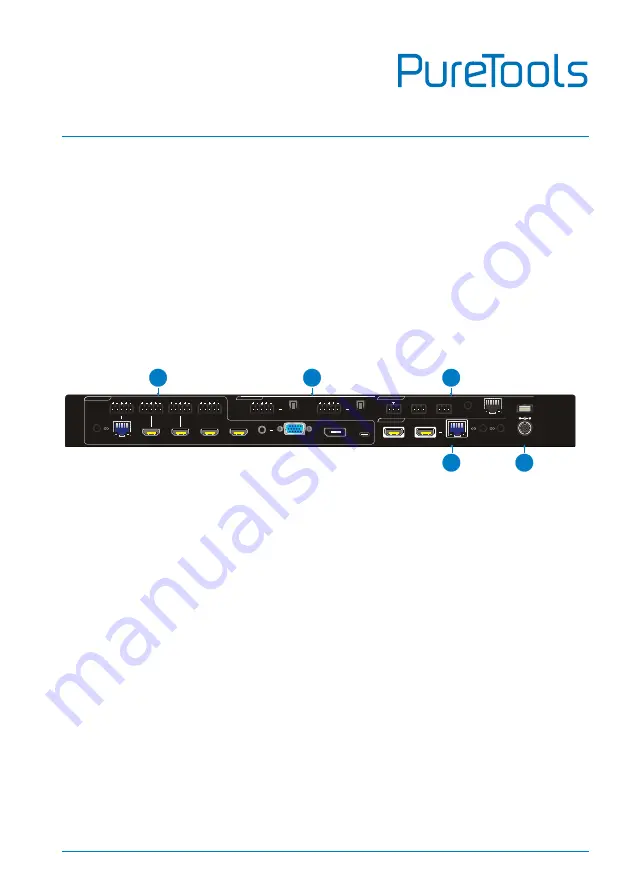
Matrix Switcher Rear Panel 


INPUT: 

Total eight video inputs, five audio inputs and one IR input. 


1-HDBT: 

RJ45 port to connect the PT-HDBT-200-TX transmitter to receive 

AV signal, IR and RS232 control signal, and one external balanced audio 
input (5-pin) can be embedded in the HDBT video. In addition, the HDBT 
input supports 24V PoC. 


2-HDMI:

 Type-A female HDMI port to connect the HDMI source. One 

external balanced audio input (5-pin) can be embedded in the HDMI video.


3-HDMI:

 Type-A female HDMI port to connect the HDMI source. One 

external balanced audio input (5-pin) can be embedded in the HDMI video.


4-HDMI:

 Type-A female HDMI port to connect the HDMI source. 


5-HDMI:

 Type-A female HDMI port to connect the HDMI source. 


6-VGA: 

15-pin female VGA port to connect the VGA source. One stereo 

auxiliary audio input (3.5mm jack) can be embedded in the VGA video.


7-DP:

 Type-A female DP port to connect the DP source. 


6. VGA

8. USB-C

AUDIO

7. DP

DC 24V 

OUTPUTS

2. HDBT

IR IN

1. HDMI

TCP/IP

CONTROL

IR EYE

FIRMWARE

1

L

R

L

R

IR OUT

2. HDMI

5. HDMI

4. HDMI

2. HDMI

3. HDMI

1. HDBT

IR IN

L

R

L

R

L

R

MIX

L

R

 INPUTS

2

RS232

Tx

Rx

RELAY1

NO COM NC  

RELAY2

NO COM NC  

AUDIO OUT

1

2

5

3

4

Summary of Contents for PT-PMS-82S

Page 1: ...User Manual PT PMS 82S User Manual 8x2 HDMI 2 0 Seamless Matrix Switcher Model PT PMS 82S Designed in Germany 2018 PureLink GmbH All rights reserved V1 0 ...

Page 2: ...ied or reproduced without the prior written consent FCC Statement This equipment generates uses and can radiate radio frequency energy and if not installed and used in accordance with the instructions may cause harmful interference to radio communications It has been tested and found to comply with the limits for a Class B digital device pursuant to part 15 of the FCC Rules These limits are design...

Page 3: ...907 2006 EU und 2011 65 EU EMC LVD Electro Magnetic Compatibility Low Voltage Directive PureLink GmbH hereby declares that this product PureTools PT PMS 82S complies with Directives 2014 30 EU and 2014 35 EU The full text of the EU Declaration of Conformity is available at the following Internet address http www purelink de ce 4251364718230_CE pdf ...

Page 4: ... install this product near water Do not put any heavy items on the extension cable in case of extrusion Do not remove the housing of the device as opening or removing housing may expose you to dangerous voltage or other hazards Install the device in a place with fine ventilation to avoid damage caused by overheat Keep the module away from liquids Spillage into the housing may result in fire electr...

Page 5: ... Switcher Rear Panel 8 3 3 Transmitter Front and Rear Panel 10 3 4 Receiver Front and Rear Panel 11 4 System Connection 12 4 1 Usage Precaution 12 4 2 System Diagram 12 5 Button Control 13 5 1 Manual Switching 13 5 2 Automatic Switching 13 5 3 Resolution Selection 14 5 4 Sound Volume Control 14 6 IR Remote Control 15 7 GUI Control 16 7 1 Video Switching 17 7 2 Resolution Selection 18 7 3 Audio Con...

Page 6: ... 8 2 RS232 Communication Command 34 8 2 1 Device Control 34 8 2 2 Source Switching 35 8 2 3 Preset Setting 36 8 2 4 Output Resolution Setting 37 8 2 5 Audio Control 38 8 2 6 EDID Management 39 8 2 7 Relay Control 40 8 2 8 VGA Output Image Adjustment 40 8 2 9 Switcher Baud Rate Setting 41 8 2 10 CEC Control 42 8 2 11 Third party Device Control 45 9 OSD Control 47 10 Panel Drawing 50 11 Troubleshoot...

Page 7: ...ge quality It is designed for use with the PT HDBT 200 extender kit The USB C input is ideal for AV interfacing with newer MacBook Chromebook and Windows PC as well as smart phones and tablets The matrix switcher supports auto switching on HDMI HDBaseT and HDMI loop outputs based on TMDS activity signals sensing It also allows users to control system functionality via Web GUI RS232 IR and CEC Addi...

Page 8: ... Supports HDMI output HDBaseT output audio control Controllable via RS232 local and pass through IR local and pass through TCP IP relay CEC and on OSD 1 2 Package List Matrix Switcher 1x PT PMS 82S 8x2 HDMI 2 0 Seamless Matrix Switcher 2x Mounting Ears with 6 Screws 4x Plastic Cushions 1x IR Remote 1x IR Receiver 3x 3 pin Terminal Blocks 7x 5 pin Terminal Blocks 1x Power Adaptor 24V DC 6A Extender...

Page 9: ... HDMI 1 HDBaseT Video Output Connector 2 Type A Female HDMI 1 RJ45 Video output Video Resolution HDMI Up to 4Kx2K 60Hz 4 4 4 HDBaseT Up to 4Kx2K 60Hz 4 4 4 HDMI Version 2 0 HDCP Version 2 2 Audio Input Audio Input 1 External balanced audio L R for 1 HDBT input port 1 External balanced audio L R for 2 HDMI input port 1 External balanced audio L R for 3 HDMI input port 1 Stereo auxiliary audio for 6...

Page 10: ... level SNR 80dB 20Hz 20KHz bandwidth Crosstalk Isolation 70dB 10KHz sine at 0dBFS level or max level before clipping L R Level Deviation 0 3dB 1KHz sine at 0dBFS level or max level before clipping Frequency Response Deviation 0 5dB 20Hz 20KHz Output Load Capability 1KΩ and higher Supports 10x paralleled 10KΩ loads Stereo Channel Separation 70dB 1KHz Noise Level 80dB Control Part Control Port 1 RS2...

Page 11: ...ut Connector 1 Type A female HDMI Output 1 HDBT OUT Output Connector 1 RJ45 Control 1 IR IN 1 IR OUT 1 RS232 Control Connector 2 3 5mm jacks 1 3 pin terminal block Video Resolution Up to 4Kx2K 60Hz 4 4 4 8bit Receiver RX Input 1 HDBT IN Input Connector 1 RJ45 Output 1 HDMI Output Connector 1 Type A female HDMI Control 1 IR IN 1 IR OUT 1 RS232 Control Connector 2 3 5mm jacks 1 3 pin terminal block ...

Page 12: ...HDMI Version 2 0 HDCP Version 2 2 Bandwidth 18Gbps Power Consumption 14W max Operation Temperature 10 55 Storage Temperature 25 70 Relative Humility 10 90 External Power Supply Input Power 12V DC 2A or Power over Cable PoC AC Adaptor Input Power 100 240VAC 50 60Hz Dimension W H D 115mm x 16mm x 84mm Net Weight g Transmitter Receiver 150g ...

Page 13: ...y for OSD Auto switching mode selector Press this to enter or exit automatic switching mode Press and hold it at least 2 seconds to enable OSD menu OUTPUTS Two buttons with blue backlight 1 HDMI output selector 2 HDBT output selector RESOLUTION Two output video resolution selectors Press the 1 HDMI or 2 HDBT button repeatedly to cycle through the four video resolutions A series of four LEDs one of...

Page 14: ... input supports 24V PoC 2 HDMI Type A female HDMI port to connect the HDMI source One external balanced audio input 5 pin can be embedded in the HDMI video 3 HDMI Type A female HDMI port to connect the HDMI source One external balanced audio input 5 pin can be embedded in the HDMI video 4 HDMI Type A female HDMI port to connect the HDMI source 5 HDMI Type A female HDMI port to connect the HDMI sou...

Page 15: ...s through IR OUT 3 5mm jack to connect the IR emitter for IR pass through AUDIO OUTPUT 1 One balanced audio output 5 pin and one digital SPDIF audio output for 1 HDMI output audio de embedding 2 One balanced audio output 5 pin and one digital SPDIF audio output for 2 HDBT output audio de embedding CONTROL RS232 3 pin terminal block to connect the control device e g PC to control the switcher by se...

Page 16: ...nates red when power is applied HDMI IN Type A female HDMI port to connect the HDMI source RS232 3 pin terminal block to connect the RS232 control device e g PC or a device to be controlled by RS232 commands IR IN 3 5mm jack to connect the IR receiver for IR pass through IR OUT 3 5mm jack to connect the IR emitter for IR pass through HDBT OUT RJ45 port to connect the HDBT IN port of switcher by CA...

Page 17: ...es red when power is applied HDMI OUT Type A female HDMI port to connect the display device RS232 3 pin terminal block to connect the RS232 control device e g PC or a device to be controlled by RS232 commands IR IN 3 5mm jack to connect the IR receiver for IR pass through IR OUT 3 5mm jack to connect the IR emitter for IR pass through HDBT IN RJ45 port to connect the HDBT OUT port of switcher by C...

Page 18: ...PUTS 2 HDBT IR IN 1 HDMI TCP IP CONTROL IR EYE FIRMWARE 1 L R L R IR OUT 2 HDMI 5 HDMI 4 HDMI 2 HDMI 3 HDMI 1 HDBT IR IN L R L R L R MIX L R INPUTS 2 RS232 Tx Rx RELAY1 NO COM NC RELAY2 NO COM NC AUDIO OUT Blu Ray DVD HDMI 2 0 Transmitter Game Console PC MacBooK Cellphone RS232 Tx Rx IR STEREO BRIDGE MONO L R MIC LINE 48V MIC 1 2 INPUTS Audio Player Speaker Amplifier Soundbar HDTV Project Screen P...

Page 19: ...n to confirm switching setting otherwise it will automatically confirm after three seconds 5 2 Automatic Switching Please following the below steps to enable auto switching mode for 1 HDMI or 2 HDBT output 1 Press AUTO and the button LED turns blue 2 Press either 1 HDMI or 2 HDBT output button and the corresponding button LED turns blue 3 Press AUTO button again to confirm the setting otherwise it...

Page 20: ...DBT input In auto mode the input source also can be switched by the manual switching steps 5 3 Resolution Selection Press the 1 HDMI or 2 HDBT button on RESOLUTION area repeatedly to cycle through the four video resolutions A series of four LEDs one of which illuminates blue to indicate which resolution is selected 5 4 Sound Volume Control Press volume knob to choose MIX HDMI OUT or HDBT OUT audio...

Page 21: ...ect output channel Press BALCK and then select output channel to make it output black screen Enable Disable OSD menu Confirm and Navigation buttons OK UP DWON LEFT and RIGHT for OSD menu Return to the previous OSD menu MIX input audio control Mute Volume Down and Volume Up HDMI output audio control Mute Volume Down and Volume Up HDBT output audio control Mute Volume Down and Volume Up 5 HDMI 4 HDM...

Page 22: ...The default IP settings are IP Address 192 168 0 178 Subnet Mask 255 255 250 0 Type 192 168 0 178 in the internet browser it will enter the below log in webpage Username admin Password admin Type the user name and password and then click Login to enter the section for video switching ...

Page 23: ...ch the selected input source to HDMI output Click AUTO to enable disable automatic switching mode HDBT OUTPUT Switch the selected input source to HDBT output Click AUTO to enable disable automatic switching mode Preset Save the current routing status to preset 1 5 ...

Page 24: ...atically select the best output resolution for satisfying the connected display HDBT OUTPUT Select the HDBT output video resolution Press AUTO to automatically select the best output resolution for satisfying the connected display Note If EDID communication is failed the 1080P 60Hz will be used as default output resolution ...

Page 25: ... HDMI video input 3 HDMI Embedded Select the external balanced audio 5 pin to embed in 3 HDMI video input MIX MIX input audio volume control HDMI Output Select MIX input audio to mix with HDMI output audio and then control the global output audio by volume bar and buttons HDBT Output Select MIX input audio to mix with HDBT output audio and then control the global output audio by volume bar and but...

Page 26: ...User Manual PT PMS 82S 20 7 4 Configuration 7 4 1 PoC Setting Turn on or off PoC for HDBT output port Turn on or off PoC for HDBT input port ...

Page 27: ...User Manual PT PMS 82S 21 7 4 2 EDID Management Select the compatible built in EDID for the selected input source Upload user define EDID ...

Page 28: ...en starts to be rolled up or dropped down until the auto stop time is up Click Latching the projector screen starts to be rolled up or dropped down and then click Latching again to stop process RELAY 1 and RELAY 2 Ports Definition When click Momentary the NO connection closes and the NC connection opens When the delay time is up the NO connection opens and the NC connection closes ...

Page 29: ...delay time is up the NO connection opens and the NC connection closes 7 5 CEC Control If the input sources and display support CEC they can be controlled by the below control buttons to replace IR remote 1 Source Control Select the input source which needs to be control and then press function button as need ...

Page 30: ...User Manual PT PMS 82S 24 2 Display Control Select the output display which needs to be control and then press function button as need ...

Page 31: ...the CEC command can be edited and saved in the Trigger textbox Select the input source and then type CEC command in the Trigger 1 or Trigger 2 box to control the selected source Select the output display and then type CEC command in the Trigger 1 or Trigger 2 box to control the selected display ...

Page 32: ...User Manual PT PMS 82S 26 7 6 Tags Setting INPUTS Modify the label of input sources Preset Modify the label of presets ...

Page 33: ... to control the third party device which is connected to the HDBaseT transmitter HDBT Receiver Pass Through Establish RS232 pass through communication between the switcher and HDBaseT receiver e g PT HDBT 200 RX The RS232 port of the switcher can be used to transfer commands to control the third party device which is connected to the HDBaseT receiver Local Control The RS232 port of the switcher is...

Page 34: ...mitter HDBT Out Send RS232 commands to control the far end third party e g projector which is connected to the RS232 port of HDBaseT receiver Select HEX or ASCII format Baud Rate Supports 2400 4800 9600 19200 38400 57600 or 115200 Command Ending NULL CR LF or CR LF can be chosen Command Type command in this textbox to control the third party device Trigger On Type Power On command in this box to t...

Page 35: ...User Manual PT PMS 82S 29 7 8 Network Setting Static IP or Dynamic Host Configuration Protocol DHCP Modify the static IP Address Subnet Mask and Gateway ...

Page 36: ...User Manual PT PMS 82S 30 7 9 Password Setting Modify the login password Lock or unlock the front panel buttons ...

Page 37: ...sername and password the same as the GUI log in setting modified password will be available only after rebooting to login the configuration interface After that click Administration in the source menu to get to Upload Firmware as shown below Select the desired update file and press Apply it will start upgrading then ...

Page 38: ...llation Copy the control software file to the control PC Uninstallation Delete all the control software files in corresponding file path Basic Settings Connect the switcher with all input devices and output devices needed then to connect it with a PC which is installed with RS232 control software Double click the software icon to run this software Here take the software CommWatch exe as example ...

Page 39: ... set the parameters of COM number bound rate data bit stop bit and the parity bit correctly and then you are able to send command in command sending area Parameter configuration area Monitoring area show the commands and its feedback information Command sending area ...

Page 40: ... on system PWON PWOFF Power off system Turn off HDBaseT power supply PWOFF STANDBY System standby Press any button to awake STANDBY Type Report system model PT PMS 82S Version Report firmware version V1 0 0 Lock Lock front panel buttons System Locked Unlock Unlock front panel buttons System Unlock 9964 Report IP address IP 192 168 0 178 USBUpdata x Upgrade the 3458 IC After successfully upgrading ...

Page 41: ... Undo Ok x All Switch input x to HDMI and HDBT outputs x 1 4 Example 4ALL Feedback 4 To All All Switch all input signal to the corresponding output channel 1 1 2 2 All Through All Turn off all output All Closed x Switch input x to output x x 1 2 1 Through x Turn off output x x 1 2 1 Closed x Turn on output x x 1 2 01 Open All Turn on all outputs All Open x B y Switch input x to output y x 1 8 y 1 ...

Page 42: ... 03 04 Connect Y Y N N In 05 06 07 08 Connect N N N Y AutomationON X Enable the auto switching mode for the output X X Output Port 1 HDMI 2 HDBT HDMI Automation ON HDBT Automation ON AutomationOFF X Disable the auto switching mode for the output X X Output Port 1 HDMI 2 HDBT HDMI Automation OFF HDBT Automation OFF 8 2 3 Preset Setting Command Description Feedback Example Save y Store the current s...

Page 43: ...e VRES X Y Set the output resolution of port X to Y 1 X 9 10 X Output Port 9 HDMI 10 HDBT 2 Y 1 10 Y Resolution 1 4K 60Hz 2 4K 30Hz 3 1920X1200 60Hz 4 1080P 60Hz 5 1080P 50Hz 6 1600x1200 60Hz 7 1360x768 60Hz 8 1024x768 60Hz 9 720P 60Hz 10 720P 50Hz Outport HDMI 720p 50Hz Outport HDBT 720p 50Hz ...

Page 44: ...HDMI output audio volume Volume of HDMI 29 HDMIMute Mute the HDMI output audio HDMI Mute HDMIUnmute Unmute the HDMI output audio HDMI Unmute SetHDBTVol xx Set the HDBT output audio volume to xx xx 0 60 Volume of HDBT 30 HDBTVolume Increase the HDBT output audio volume Volume of HDBT 31 HDBTVolume Decrease the HDBT output audio volume Volume of HDBT 29 HDBTMute Mute the HDBT output audio HDBT Mute ...

Page 45: ...dded HDMI3 Embedded 8 2 6 EDID Management Command Description Feedback Example EDID x y The input x invoke built in EDID y x 1 5 7 y EDID 1 1080P 60Hz 2 4K 30Hz 4 4 4 3 4K 60Hz 4 4 4 EDID 4 1 EDIDUpgrade x Upgrade the EDID data of the input port x x 1 5 7 When the command applied system prompts to upload the EDID file bin Operation will be cancelled in 10 seconds Please disconnect HDBT connection ...

Page 46: ...1 2 RelayAutomationCtl X Y Set the auto stop time of relay X to Y seconds X 1 2 Y 0 20 ToggleRelay X Toggle relay X X 1 2 8 2 8 VGA Output Image Adjustment When 6 VGA source is selected the below commands can be used to adjust the output picture Command Description Feedback Example SetVGAPhase XX Set the phase position to XX XX 0 100 SetVGABrightness XX Set the brightness to XX XX 0 100 SetVGACont...

Page 47: ... to 2400 Set Local RS232 baudrate is 2400 Baudrate 4800 Set the RS232 baud rate of switcher to 4800 Set Local RS232 baudrate is 4800 Baudrate 9600 Set the RS232 baud rate of switcher to 9600 Set Local RS232 baudrate is 9600 Baudrate 19200 Set the RS232 baud rate of switcher to 19200 Set Local RS232 baudrate is 19200 Baudrate 38400 Set the RS232 baud rate of switcher to 38400 Set Local RS232 baudra...

Page 48: ...send specific command to control input source or display device CEC I O port command The I represents the input port The O represents the output port The port represents the port number The input ports are 01 05 and the output ports are 06 07 The command represents the specific command from the table below Control the input source Command Description Example and Feedback CECI port 00 Confirm opera...

Page 49: ...e ray Exit CECI port 41 Volume up CECI0141 CEC Source VOL CECI port 42 Volume down CECI0142 CEC Source VOL CECI port 44 Play CECI0144 CEC blue ray play CECI port 45 Stop CECI0145 CEC blue ray stop CECI port 46 Pause CECI0146 CEC blue ray pause CECI port 48 Rewind CECI0148 CEC blue ray backward CECI port 49 Fast forward CECI0149 CEC blue ray forward CECI port 4B Forward CECI014B CEC blue ray skid f...

Page 50: ...er on CECI016D CEC Source Power on Control the output display Command Description Example and Feedback CECO port 34 Input channel selection CECO0634 CEC TV input select CECO port 41 Volume up CECO0641 CEC TV VOL CECO port 42 Volume down CECO0642 CEC TV VOL CECO port 43 Mute CECO0643 CEC TV VOL Mute CECO port 36 Power off CECO0636 CEC TV Power off CECO port 04 Power on CECO0604 CEC TV Power on ...

Page 51: ... the switcher Y 1 HDBT Transmitter Pass Through Establish RS232 pass through communication between the switcher and the HDBaseT transmitter e g PT HDBT 200 TX The RS232 port of the switcher can be used to transfer commands to control the third party device which is connected to the HDBaseT transmitter Y 2 HDBT Receiver Pass Through Establish RS232 pass through communication between the switcher an...

Page 52: ... RS232 port of switcher 2 Y 2 The RS232 port of HDBaseT receiver 3 Y 3 The RS232 port of HDBaseT transmitter X Represents the baud rate of third party device 1 X 1 2400 2 X 2 4800 3 X 3 9600 4 X 4 19200 5 X 5 38400 6 X 6 57600 7 X 7 115200 3 3 123456 Send the command 123456 to the third party device The baud rate is 9600 ...

Page 53: ...tc There are two ways to enter OSD menu 1 Press and hold the MENU 2s button at least two seconds on the front panel 2 Press the MENU button on the IR remote Operation Press direction buttons on IR Remote to switch between menu options and menu pages Press OK on the IR Remote to confirm the selection Options include Picture Sound Option System and Info PICTURE MENU ...

Page 54: ...User Manual PT PMS 82S 48 Note When set the Picture Mode to User the Picture Adjust and Colortemp Adjust are available SOUND MENU OPTION MENU ...

Page 55: ...User Manual PT PMS 82S 49 SYSTEM MENU INFO MENU ...

Page 56: ...MI 5 HDMI 4 HDMI 2 HDMI 3 HDMI 1 HDBT IR IN L R L R L R MIX L R INPUTS 2 RS232 Tx Rx RELAY1 NO COM NC RELAY2 NO COM NC AUDIO OUT 8 USB C 1 HDBT 7 DP 5 HDMI 6 VGA 4 HDMI 3 HDMI 2 HDMI SOURCE SELECT MUTE 3s MIX HDBT OUT HDMI OUT VOLUME 1 HDMI OUTPUTS 1920x1200 4K 30Hz 4K 60Hz 1080P RESOLUTION 1920x1200 4K 30Hz 4K 60Hz 1080P ENTER MENU 2s PT PMS 82S Presentation Matrix 436 4 mm 31 8 mm 44 0 mm 115 0 ...

Page 57: ...User Manual PT PMS 82S 51 PT HDBT 200 RX HDBaseT Receiver 115 0 mm 84 0 mm 16 0 mm ...

Page 58: ... loose connection Make sure the connection is good The switcher is broken Send it to authorized dealer for repairing POWER indicator doesn t work or no respond to any operation Fail connection of power cord Make sure the power cord connection is good Cannot control the device by control device e g a PC through RS232 port Wrong RS232 communication parameters Type in correct RS232 communication para...

Page 59: ... fee Warranty expiration Factory applied serial number has been altered or removed from the product Damage deterioration or malfunction caused by Normal wear and tear Use of supplies or parts not meeting our specifications No certificate or invoice as the proof of warranty The product model showed on the warranty card does not match with the model of the product for repairing or had been altered D...

Page 60: ... Technical Support Phone 49 5971 800299 0 Fax 49 5971 800299 99 Technical Support Hours 8 30 AM to 5 00 PM Monday thru Thursday 8 30 AM to 4 00 PM Friday Write to PureLink GmbH Von Liebig Straße 10 D 48432 Rheine www purelink de info purelink de ...

Reviews: