background image

65

Solution:

 Make sure the printer is properly calibrated, tighten the black knob at the top of the

tower and tighten both resin tank screws evenly and with the same amount of force.

15.8. Print doesn’t appear / resin does not solidify

If the print 

does not appear on the print platform, nor at the bottom of the resin tank,

 there are

a couple of possible causes: insufficient exposure times, faulty UV panel, faulty LCD screen, or
there’s too much isopropyl alcohol in the resin.

Solution:

 First try a new batch of resin. If you kept re-using one batch several times, it’s possible

the resin lost its original properties and won’t solidify anymore. Check the UV panel and LCD
screen, whether they work as intended - run the printer’s self-test and calibration to make sure the
hardware is not faulty.

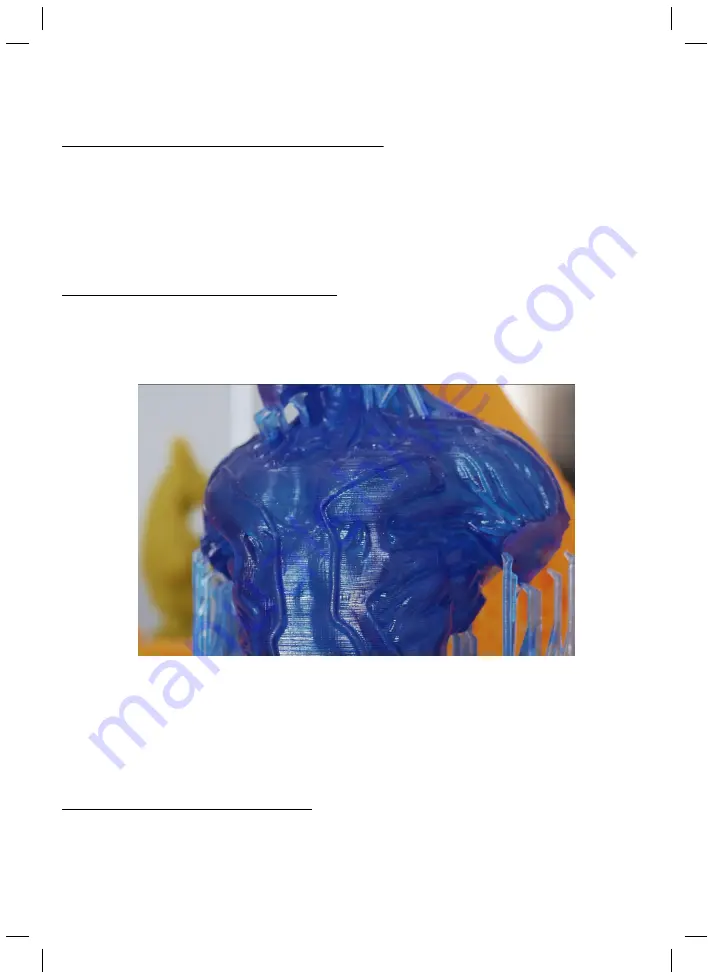
15.9. Printed object has very visible layers

Even though SLA printers can achieve much better resolution than standard FFF/FDM 3D
printers, layers on objects can be still visible if you look very closely. If you feel like the layers on
your prints are too visible, there’s a couple of things you can try.

Solution:

 Print a sample object with a good/tested resin (like the sample bottle of Prusa Orange)

and see if the issue is still present. If it’s not, then the cause is usually related to slicing settings.
Try rotating the object to eliminate gradually rising / declining surfaces. Extreme exposure times
can also produce visible layers. Mixed / low quality resins can also affect the print quality - use a
fresh, high-quality resin and shake the bottle for at least 20 seconds before you pour the resin in
the tank.

15.10. Delamination / Separated layers

If you encounter delamination, separated layers or missing layers, the cause is usually in a broken
SL1S / STL file - it’s a different case than a lack of supports. Another cause can be a faulty UV
LED panel or dirt in the resin tank.

Summary of Contents for PRUSA CW1S

Page 1: ...V1 06 ENG 3DPRINTING HANDBOOK USER MANUAL FOR THE ORIGINAL PRUSA SL1S SPEED ORIGINAL INSTRUCTIONS ...

Page 2: ...ons carefully 1 Place the printer on a flat and stable surface 2 Download and install updated firmware and software packages 3 Calibrate the printer by following the on screen calibration flow wizard 4 Inspect the FEP film bottom of the tank for any kind of damage 5 Pour resin into the tank 6 Use the Print menu file browser to select a sample object to print 7 Important notice tip hint or informat...

Page 3: ...est model Prusa i3 MK3S is currently on the market it s an improved version of the original 3D printer s third iteration Prusa Research keeps expanding into new territories and the Original Prusa SL1S you just purchased is just one of the examples Josef Prusa also organizes workshops for the public participates in professional conferences dedicated to the popularization of 3D printing For example ...

Page 4: ...er print checks and actions 26 5 1 Washing Curing Drying models 26 5 1 1 Washing 26 5 1 2 Drying and curing 26 5 2 Disposing of resins 27 5 3 Menu structure and advanced functions 28 6 Printing your own models 29 6 1 Obtaining a printable model 29 6 2 Creating your own models 30 6 3 What are SL1S files 30 6 4 PrusaSlicer 31 6 5 Slicing objects for the SL1S 32 6 6 Importing an object into PrusaSlic...

Page 5: ...UV light and potential health risks 57 13 7 Fan cleaning Removing dust 57 13 8 Carbon filter replacement 58 13 9 Tower maintenance 58 13 10 Tilt maintenance 58 14 Hardware troubleshooting 59 14 1 FEP film Tank bottom replacement 59 14 2 Replacing the print screen 59 14 3 Spilled resin 60 15 Print quality troubleshooting 60 15 1 Removing an object stuck to the bottom of the tank 60 15 2 First layer...

Page 6: ...icenses The Original Prusa SL1S is published under a GNU GPL v3 license www gnu org licenses gpl 3 0 en html If you improve or alter any part of the printer and you want to sell them then you have to publish the source code under the same license Source codes can be found at https www github com prusa3d Warranty The pre assembled Original Prusa SL1S printer is covered by a 24 month warranty for en...

Page 7: ...the power cord from the socket pull the plug rather than the cord to 5 reduce the risk of damage to the plug or to the AC outlet Never disassemble the printer s power supply it does not contain any parts that could be 6 repaired by an unskilled worker All repairs must be performed by a qualified technician Do not reach inside the printer while it is still in operation An injury may be caused by it...

Page 8: ...ED array increased the size of the print area by 25 and added many other changes We hope you will enjoy using the SL1S SPEED You can find more information about the SL1S and other printers on our official website https www prusa3d com or on our community hub https www prusaprinters org where you can download models for printing chat with other users or create local printing communities How does SL...

Page 9: ... is the area where the printed object appears The print platform can be easily removed by loosening the Knob without affecting the calibration Tank The container for liquid resin It has a transparent bottom that allows UV light to pass 6 through The bottom of the tank is an FEP film a consumable that will degrade after some time The FEP film is replaceable see chapter on Printer Maintenance Use on...

Page 10: ...dled and optional There s a number of accessories and tools you will find in the package They will help you to use the printer more effectively and safely Gloves for safer handling of resins Protective tray to shield the printer from resins during object removal Sharp pliers for support removal Funnel with a filter for filtering resin Plastic spatula the only spatula you can use to carefully clean...

Page 11: ...en 18 32 C Connect to the internet and download the latest firmware updates Calibrate the printer before the first use Keep clean at all times Use the bundled drip tray when filling the tank or removing prints Do not place the printer in direct sunlight Do not keep the lid open while printing Resin tank Empty and clean the tank after every print because tiny bits of cured resin might remain in the...

Page 12: ...D printer please check the last pages of this handbook for general troubleshooting guides A more comprehensive set of troubleshooting artices is available at https help prusa3d com However in case the suggested solutions don t work please contact our tech support via e mail at support prusa3d com or via the Live chat at https shop prusa3d com the chat is in the lower right corner Please try to att...

Page 13: ...13 ...

Page 14: ...nue in chapter 4 2 First start and calibration 4 2 First start and Calibration The calibration is essential for correct operation Without a properly calibrated tilt and print platform the printed object won t stick to the platform or even worse you may damage your printer Connect the power cord and turn on the printer using the switch on the back of the machine located directly next to the power p...

Page 15: ...n the lid 1 Remove the foam protectors 2 Remove the tank and the foam layer underneath it 3 Carefully peel off the sticker from the display 4 Once the 3D printer is fully unpacked the Selftest starts This procedure will make sure your printer arrived in a good shape ...

Page 16: ...een to make the logo more visible Do not forget to close the cover Insert the tank and secure it with two tank screws 7 Take the print platform and place it across the tank as seen in the picture Close the cover and 8 wait util the cantilever touches the print platform Finally make sure the tank is correctly secured Place the platform on the cantilever and 9 secure it with the black knob The print...

Page 17: ...d the tank are perfectly clean 5 Place the resin tank on the tilt bed and secure it with both screws Tighten them evenly and 6 with the same amount of force otherwise the tank may end up in a skewed position Make sure the platform is secured by the black knob 7 The print platform will go all the way down and touch the bottom of the tank Rotate the 8 platform so it s parallel with the edge of the s...

Page 18: ... on screen button To change values in various sub menus use the on screen symbols such as and or arrows up and down Pressing and holding a symbol results in a continuous increase or decrease of the associated value Some screens can be swiped to reveal additional information these screens are marked with little dots at the bottom of the page Use touchscreen controls to navigate the menus Use short ...

Page 19: ...o your router s instructions or your provider s tech support in case you run into trouble To check whether the connection has been successfully created go to Main Menu Settings Network 4 5 2 Internet connection Wireless connection The SL1S 3D printer has a built in Wi fi network card compatible with 2 4GHz networks To open the Wi Fi network browser go to Settings Network A list of all available ne...

Page 20: ...t platform with the display and make sure it is completely clean and there is no debris anywhere Wear gloves when handling resins Place the tank on the tilt platform There is a small groove running around the tilt bed that will help you to position the tank properly You may hear a little click as it falls into place Use the two resin tank screws to secure it to the tilt bed Tighten screws simultan...

Page 21: ...y print Some models might be too large and require more than the maximum amount of 200 ml resin in the tank The printer can recognize when the resin starts running low and pauses the print An on screen message is displayed asking you to fill resin back to the max level mark Once you refill the resin you can press the on screen Continue button to resume the print Keep in mind that in certain cases ...

Page 22: ... start the print or go to Print Settings and adjust the exposure for normal layers for first layers and also switch between two print profile modes The faster print mode is the default one If you encounter issues during the print especially if the printed object detaches from the print platform consider using the slower profile If you re printing a sample object everything is already pre configure...

Page 23: ...arefully slide the print platform out and turn it sideways so the remaining resin goes back to the tank tray Use the bundled metal spatula to remove the print from the print platform To prevent injuries do NOT use your fingernails to remove the prints since the plastic can easily get under your nails and break off Removing a printed object with a metal spatula Inspect the printed sample object Che...

Page 24: ... FEP film without damaging it see chapter 15 1 Removing an object stuck to the bottom of the tank 4 12 Removing supports Supports for SLA printers are designed to be thin yet strong enough to support the printed material The end of support is called a support head which is usually even thinner than the rest of the support which makes them easy to remove leaving little to no trace on the object its...

Page 25: ...D models The Original Prusa SL1S comes with several bundled models These models are pre sliced and their purpose is to provide a benchmark for end users By including complex geometry extremely thin lines and miniature patterns these models will give you a good overview of whether your printer has been calibrated correctly The models are pre sliced so if they don t print correctly you can be sure t...

Page 26: ...ly soft and sticky To reach optimal surface properties it is necessary to wash dry and cure the print We recommend using our own Curing and Washing Machine CW1S for short It s a 4 in 1 device it can wash the object in isopropyl alcohol dry it using hot air and cure it with UV light all in a matter of minutes and without any extra hassle It can also preheat your resins to optimal working temperatur...

Page 27: ... After you finish a print we recommend pouring the leftover resin into a new bottle so it doesn t mix with unused clean resin Used resin may contain tiny solidified bits that may affect the quality of the next print or even damage your printer Also since the resin has been exposed to UV light its properties might have changed slightly We recommend curing the paper towels soaked with liquid resin i...

Page 28: ...Platform Axis Sensitivity Tank Axis Sensitivity Limit for Fast Tilt Platform Offset Firmware Factory Reset Settings Sensors Device Hash in QR on off Auto Power Off on off Cover Check on off Resin Sensor on off Rear Fan Speed Touchscreen Screensaver Timer Touchscreen Brightness Language Time Set Language Time Settings System Logs Save to USB Drive Upload to Server Support Download Examples Manual V...

Page 29: ...ly 3D printing has many fans so there are sites from which you can download a large variety of ready made 3D models for free These range from a simple playing dice to a detailed figure from a favorite movie game or TV series Be sure to check out our own community website PrusaPrinters org it s an ever expanding community hub for all Prusa 3D printer owners It has a ton of cool features and plenty ...

Page 30: ...deo tutorials so it is an ideal choice both for beginning enthusiasts and professionals To fully utilize the precision of the SL1 you should focus on programs such as Blender Zbrush Maya SculptGL MakeHuman SketchUp Clara io Moment of Inspiration or 3D Studio Max These applications are better for creating organic shapes such as characters or character parts but only a few of them are free 6 3 What ...

Page 31: ... Apps Drivers package The Original Prusa SL1S SPEED is supported in PrusaSlicer 2 3 2 and newer Add object 1 Remove object Remove All 2 Add Remove an instance of an object 3 Switch between Simple Advanced Expert mode 4 Layer height 5 Liquid resin type 6 Printer selection 7 Generate supports Use pad checkboxes 8 Object modifiers 9 Object size scale information 10 Slice Now and Export G code buttons...

Page 32: ...e Choosing a good object orientation minimizes the amount of supports needed Supports for SLA are different compared to FFF FDM 3D printers Decide when to use the pad and or supports for some objects using the pad and supports is not mandatory One of such examples is the model of Eiffel tower It has four reasonably sized contact points which can be placed directly on the print platform Since the t...

Page 33: ...either by selecting Add a new printer option in the same menu or by going to Configuration Configuration Wizard Then select the layer height in the SLA print menu and finally the resin you want to use Please note that built in resin profiles have pre defined and tested settings If you select a wrong profile it may affect your print due to incompatible exposure times PrusaSlicer allows you to impor...

Page 34: ...el that has an unwanted part e g a base under a figure you can use the cut tool to cut the model in half You can decide whether to keep both parts of the model or delete one of them Cuts can be made only in plane Hollow and drill H Only available when you have the Original Prusa SL1S selected Allows you to create a hole inside the object to decrease the weight and save material Please refer to cha...

Page 35: ...e generated everywhere that means even between various parts of the model this might be necessary for complex shapes You can then move onto support generation but you can always come back and change these options In the picture on the left is the SLA Support Points menu which can be found in the left side toolbar If you can t open it it usually means the model you have imported is too large for th...

Page 36: ...r most objects Larger and heavier objects may require stronger connections higher values The support point gizmo has a small cone shaped part that shows the direction in which the support will be attached and its size Lock supports under new islands these are the critical parts of the object that often start mid air Automatic generation of supports can recognize these parts and creates supports fo...

Page 37: ...s based on the object you want to print Heavier larger objects require more or thicker supports 6 9 3 Layer height explained Compared to FFF FDM printers MSLA 3D printers have a fixed XY resolution determined by the resolution of the LCD screen so the only axis that dynamically affects the looks of the model is the Z axis How much the Z axis the tower with the print platform moves between layers i...

Page 38: ...or standard layers and 12 25 seconds for first layers is a good practice The SL1S features a high performance UV LED panel which has enough power to reach very short exposure times while retaining great surface properties of the printed model Going under 1 6 seconds is possible however most resins won t solidify in such a short amount of time The prints will start to lose detail or won t have enou...

Page 39: ...and supports are generated you can press the Slice now button Slice will analyze and process the 3D model and turn it into a number of separate layers Inspect the object in the Preview window using the slider on the right side of the window If everything seems to be ok press the Export button to generate an SL1S file Place this file on a USB drive and connect it into the printer Tap the Print icon...

Page 40: ...o quickly rotate the object Then use Scale Move and Rotate tools to adjust the final placement before you slice the model 6 11 2 Petrin tower This is another model that is very easy to slice Disable the Pad and Supports and use the Place on face function along with move rotate scale tools to position the object until it s green meaning it fits the print platform ...

Page 41: ...ned them before printing 6 11 4 Characters and props Characters and props are often some of the most complex objects you can find The Original Prusa SL1S can handle the details on character models without any issue so you can produce high quality figures or props from your favorite movie or game Usually you will need to use the pad and supports and adjust the density of supports or add extra suppo...

Page 42: ...thout issue however removing the supports may leave small marks on the detailed and most important part of the object Bridging doesn t work the same way as with FFF FDM 3D printers The SL1S cures a single layer at a time which in this case would most likely lead to layer separation due to peeling forces Tilt the object by 45 and generate supports to print this object without issues Insufficient am...

Page 43: ...head 2 Support head penetration changes how far into the model will the support head go 3 If you re trying to print a very large objects and it has a tendency to detach from the platform during the print try changing the Print profile before you start printing again Select the project from the file browser and go to Print Settings Change the Print profile to the slower option the tilt will be slig...

Page 44: ...it is vital to have a correctly positioned drainage hole it also serves to negate the suction effect You need PrusaSlicer 2 2 or newer to access the Hollowing tool Hollowing can be configured for each model individually using the Hollowing tool in the left toolbar Alternatively you can configure hollowing for all models at once in Print Settings Hollowing The hollowing and drainage hole workflow i...

Page 45: ...can remove holes by right clicking on any of them Each hole is always perpendicular to the surface and its diameter and depth can be configured the current settings will be used for newly placed holes If the input mesh is broken the hole drilling algorithm may refuse to proceed in order to prevent program crashes or incorrect results Confirm and preview the hollowed mesh The hollowing and hole dri...

Page 46: ...isplay the IP address Alternatively tap the network icon in the top menu Next you need to set the login credentials There are two ways how to complete this step By default the printer has HTTPS Digest enabled for increased security We recommend 1 leaving HTTP Digest on You can adjust this option by going into Main Menu Settings Network Login Credentials and turning the HTTPS Digest on or off If yo...

Page 47: ... appear in the file browser Main Menu Print Local Warning We strongly suggest not to leave the printer unattended Always prepare the printer for the next print according to the instructions in this handbook The purpose of this function is to eliminate the need for a USB stick and improve the convenience of use It is not possible to start the print remotely 8 Updating the printer s firmware We reco...

Page 48: ...ver turn off or reset the printer during the firmware flashing process 9 Material Guide Liquid resins are photosensitive materials used for printing on SLA 3D printers Resins are also known as photopolymers and they are cured solidified by UV light this also includes sunlight Compared to filaments for FFF FDM printers the major difference is that there are not various materials such as PLA PETG or...

Page 49: ... resins in case you experience any kind of discomfort itching rash stop using the machine and contact a doctor Do not throw resin bottles empty or full into regular waste Liquid resins should be treated as dangerous chemicals and you should follow your country s laws about disposing of dangerous chemicals There are usually special containers e g oily waste cans available for public located near ga...

Page 50: ...the resin in it Never store resin in bottles from drinks if you have to label it clearly Do not store resins in cold places as it may lead to gelation of the resin 9 3 Types of resins Material type Properties Standard resin Smooth surface lots of details Fragile Not suitable for mechanical parts Clear resin Semi transparent Can be turned nearly fully transparent through post processing Casting res...

Page 51: ...able at help prusa3d com 10 Software driver package We provide owners of Original Prusa printers with a bundle of useful programs and tools called Drivers Apps package which can be downloaded from https www prusa3d com drivers This package contains among other things the latest stable version of PrusaSlicer and also a bundle of sample models which can be used to test the print quality of your 3D p...

Page 52: ... to be washed dried and cured This process involves washing the object in isopropyl alcohol drying using hot air and curing using UV light see chapter 5 1 Drying and Curing Printed Objects To make this process much faster simpler and more convenient we have designed a 4 in 1 device called Curing and Washing Machine CW1 for short This device is sold as an optional accessory and it reduces an otherw...

Page 53: ...is described in chapter 14 1 Replacing the FEP film at the end of this handbook Several things to keep in mind regarding FEP films The FEP film we re using is not proprietary you are free to buy FEP films from online or retail stores The FEP film is a consumable it means the quality of the surface will slowly degrade through continuous use However we wanted the part to be easy to replace and inexp...

Page 54: ... to remove stuck objects from the FEP film Do not use fingernails screwdrivers or other sharp objects to remove stuck objects from the FEP film Do not clean the FEP film with isopropyl alcohol Use a combination of warm water and a dishwashing product 12 3 Additional accessories Optional accessories you should consider buying Paper towels for cleaning up the printer drying printed models Isopropyl ...

Page 55: ...loth under the printer for easier cleaning However be careful the table cloth must not block the fan on the underside of the printer Do not use acetone or ethanol to clean the lid The lid is made of acrylic glass and it has a special surface finish to block UV light from reaching the printing chamber You can clean it with standard products for cleaning glass and or isopropyl alcohol Don t use acet...

Page 56: ... print platform clean make sure that the print platform is nice and shiny before you start the next print Any leftovers on the platform leftover supports pads could potentially damage the bottom of the resin tank or even the display Surface scratches on the print platform won t affect the quality of the print After you clean the print platform with isopropyl alcohol dry it thoroughly 13 4 Exposure...

Page 57: ...designed to contain the UV light inside which means that when used according to the instructions in the manual there are no health risks related to UV radiation during regular use DO NOT LOOK DIRECTLY INTO THE UV LIGHT AND DO NOT PRINT WITH THE BODY COVER REMOVED If you want to check the UV led panel look at it through your phone camera app or take a photo so you won t look directly into the UV li...

Page 58: ...emove the filter Check if it is in good shape and consider replacing it if it isn t 13 9 Tower maintenance The tower Z axis consisting of the trapezoidal rod and the cantilever requires little to no regular maintenance In case the printer starts making unwanted noises when lifting or raising the platform consider applying a lubricant on the trapezoidal rod any good super lube will do the trick 13 ...

Page 59: ...ready made FEP films from our e shop The process of replacing a damaged FEP film is described in our Knowledge base at https help prusa3d com An extreme case of FEP film damage If you replace the FEP film re calibrate the printer 14 2 Replacing the print screen The print exposure display is a consumable and it will degrade over time When you start noticing visible artifacts on your prints e g miss...

Page 60: ... it Unscrew the resin tank screws and remove the tank 1 Take an empty bottle and insert the bundled funnel filter in it 2 One of the tank corners has a different shape use it to pour the resin from the tank into the 3 bottle Always pour used resin into a new bottle don t mix it with unused liquid especially if the print failed Wipe the tank with a soft paper cloth The layer that got stuck should b...

Page 61: ...ect object orientation can be another source of issues with adhesion After a layer is solidified the printer has to detach it from the bottom of the tank if there s a single support holding a large part of the object it won t withstand the peel force causing it to detach Solution Please refer to the chapter Slicing Best practices to learn how to position an object correctly e Resin has been mixed ...

Page 62: ...sin will not have enough time solidify which may result in missing details Always make sure you re using recommended exposure times for your prints Solution Make sure you are using exposure times recommended for the resin of your choice c Faulty hardware Another possibility a less common one is that your print display or UV LED panel is faulty so either the mask is incorrectly displayed or only a ...

Page 63: ...e object cannot detach properly Consider using PrusaSlicer to hollow out the object Too heavy solid objects may be too much for default supports and as a result they often detach from supports once they reach a certain weight threshold Solution Increase the number of supports or the thickness of supports Check the exposure times and change them to recommended values Use a slower print profile when...

Page 64: ...the sample object has the same sort of trouble inspect the FEP film in the resin tank it may be dirty In very rare scenarios a faulty UV LED panel can be the cause 15 7 Printed object is skewed deformed A skewed deformed print is usually caused by loose screws either the large black knob at the top of the cantilever or the resin tank screws are not properly tightened ...

Page 65: ...ers Even though SLA printers can achieve much better resolution than standard FFF FDM 3D printers layers on objects can be still visible if you look very closely If you feel like the layers on your prints are too visible there s a couple of things you can try Solution Print a sample object with a good tested resin like the sample bottle of Prusa Orange and see if the issue is still present If it s...

Page 66: ... LED panel check whether it works correctly Otherwise the cause is most likely a broken object file Either try re slicing the model or download a new one 15 11 Warped layers Most resins have a tendency to expand by several micrometers after they are cured These expansions and resulting forces can lead to layer warping and layer separation However these errors are usually limited to large solid lay...

Page 67: ...rrectly NEVER LOOK DIRECTLY IN THE UV LIGHT The safe way to check whether the panel works or not is to use your smartphone s camera either look at the LED panel through your phone s screen or take a picture and inspect the photo You can also place a sheet of paper onto the exposure display and then run the display check Main Menu Settings Calibration Display Test Q Printer cannot be calibrated the...

Page 68: ...the back side of the printer switched to the On position Try disconnecting the power cord and then reconnecting it after a few seconds Q LCD touch screen does not respond to touch A The display uses a capacitive touch screen layer and it might not recognize a touch with wet fingers Make sure your hands are dry and the display is clean Q Resin vapours are very noticeable A Some resins have a more p...

Page 69: ......

Page 70: ...Print and share Do not forget to tag your prints with prusasl1s while sharing so we can find pin and showcase them with our http www prusa3d com original prusa i3 prints Happy Printing ...

Reviews: