background image


Appendix 

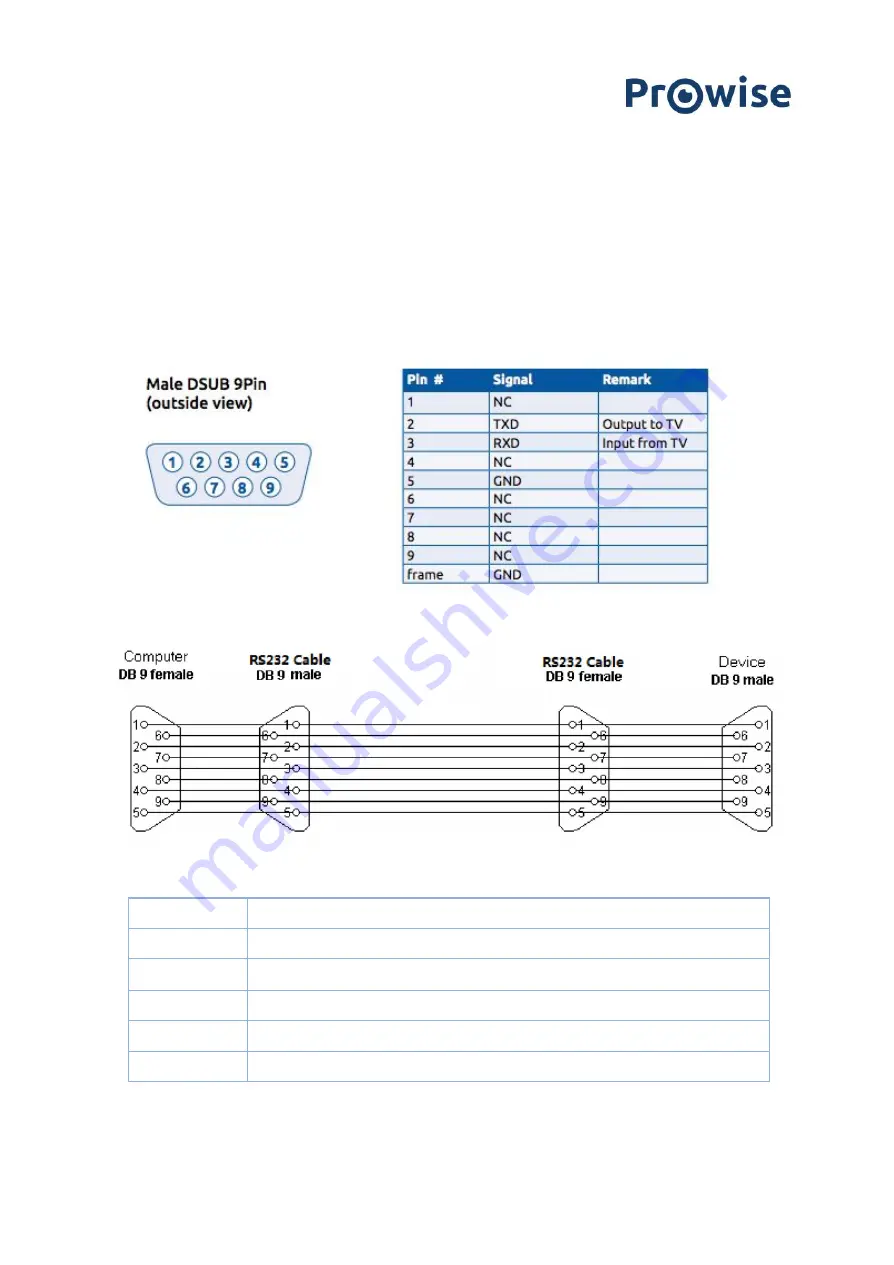
RS232 protocol 

This appendix describes the hardware interface specification and software protocols of RS232 interface 

communication between the touchscreen and the connected PC or other control unit with RS232 protocol. The 
RS232 code list can be found on www.prowise.com. 


Pin2 is TXD Pin3 is RXD. Pin to Pin connection as below. 


Serial Port Settings 


Items 

Value 

Baud Rate 

115200bps (fixed) 

Data Bits 

8 (fixed) 

Stop Bits 

1 (fixed) 

Parity 

None (fixed) 

Stream Control 

None (fixed) 

www.prowise.com


44 / 44


Summary of Contents for PW.1.17055.0001

Page 1: ...This user manual applies to the Prowise Touchscreens with the following model numbers 55 PW 1 17055 0001 65 PW 1 17065 0001 75 PW 1 17075 0001 86 PW 1 17086 0001 ...

Page 2: ... 12 4 2 In the box 17 4 3 Product overview 19 4 4 Touchscreen control 21 4 5 The control button 22 Control button 22 4 6 Microphone 23 4 7 NFC card reader remote control receiver and sensors 23 4 9 ProWrite technology 24 4 10 Cleaning 25 5 Getting started 26 5 1 Turn the touchscreen on and off 26 Enable 26 Disable 27 Shut down automatically 27 5 2 Starting your device for the first time 28 5 3 Con...

Page 3: ...he batteries of the remote control 37 10 Connecting auxiliary equipment 38 10 1 1 HDMI 38 10 1 2 VGA 39 10 1 3 DP 39 10 1 4 AV 39 10 1 5 USB C 39 10 2 Connecting the Prowise touchscreen to audio equipment 40 10 2 1 Connecting headphones 40 10 2 2 Connecting an amplifier 41 10 2 3 Connecting using the HDMI port ARC 42 10 2 4 Connecting using the HDMI port CEC 43 Appendix 44 RS232 protocol 44 Serial...

Page 4: ...ire 2 2 Placement We recommend not to install the touchscreen yourself or by a third party Let Prowise or a certified Prowise partner install or mount the touchscreen to avoid possible damage Prowise can not be held responsible for any damage or injury caused by incorrect installation by third parties Damage due to incorrect installation by third parties will not be covered by the warranty Do not ...

Page 5: ...tandby mode is 0 5 watts The Prowise touchscreen is ENERGY STAR certified When the touchscreen is no longer usable it can be disposed of at a designated collection point WARNING Warning for electrified parts Never open the housing of the touchscreen You can get an electric shock cause a short circuit or even a fire This can cause injuries or damage to yourself and or the touchscreen PLEASE NOTE Wh...

Page 6: ...will install the Prowise touchscreen on delivery and will ensure the screen is ready for use We do not recommend it but if you or someone else wants to install the screen then please follow the steps below Do not install the touchscreen alone Use a certified Prowise wall bracket to install the Prowise touchscreen on a wall Use a Prowise VESA bracket when assembling the screen on a Prowise lift sys...

Page 7: ...ed so hot air can escape 3 2 Cabling Only use the power cable supplied by Prowise to connect the Prowise touchscreen to the mains power supply The touchscreen must be placed close to the electrical outlet and the electrical outlet should be easy to reach Cables should not be laid in the walkway to avoid anyone stepping on them or tripping over them To avoid damage to the cables do not place any ob...

Page 8: ...elow to successfully install the Wi Fi module CAUTION Only plug the power cable into grounded electrical outlets with AC 100 240V 50 60Hz If you are not sure about the power supply at the installation location consult your energy company HAZARD WARNING Choking hazard This product contains small parts that form a choking hazard for children Keep this product out of reach for children when not insta...

Page 9: ...te the OPS PC module is optional WARNING Please make sure the power cable of the Prowise touchscreen is disconnected before installation CAUTION Please ensure the power cable is not connected to the main power supply while installing the OPS PC module 1 Unscrew the screws www prowise com 9 44 ...

Page 10: ...2 Remove the cover plate 3 Insert the OPS PC module into the slot www prowise com 10 44 ...

Page 11: ...touch both the top and the bottom without bending down or reaching up high By putting the screen in the right position you can prevent physical complaints caused by an incorrect posture Avoid physical complaints caused by a poor posture 4 Tighten the lock screw of the PC module DANGER Risk of injury Do not stand on a chair stool or other object to operate the touchscreen This especially applies to...

Page 12: ...s of glass panel 3 2 mm Hardness of glass panel Mohs 7 Aspect ratio 16 9 Contrast ratio 1200 1 Dynamic contrast ratio 5000 1 Brightness 450 cd m2 75 400 cd m2 86 Number of colours 10 Bit 1 07B Viewing angle 178º Refresh rate 60Hz PC module slot Yes OPS module Touch type Type ProWrite with InGlass Technology Multi touch Yes 40 points Multi writing Yes 16 points Auto calibration Yes Resistant to sun...

Page 13: ...fer power 1 x 15W 8Ω Max amplifier output 80W Dolby Audio certification Yes Microphone Type Microphone Array Number of microphones 6 Auto Switch Windows Central Yes ProWrite Number of pens 2 Simultaneous writing with multiple colours Yes Simultaneous writing with multiple line thicknesses Yes Windows Ink support Yes Prowise Central Android version Android 8 0 Storage 32GB Memory 4GB www prowise co...

Page 14: ... LAN Output RJ45 10 100 1000 mbps 1 Micro SD card reader 1 Headphone connection 1 3 5 mm mini jack female AV input 1 3 5 mm mini jack female VGA input 1 Mini Audio input 1 3 5 mm mini jack female Audio output analogue 1 2x RCA L R Audio output digital 1 SPDIF RS232 1 DB9 male USB 2 0 connection with lift system 1 USB 3 0 1 Wi Fi BT Module Yes 1x Wi Fi 6 2 400 GHz 2 4835 GHz 2 4GHz ISM Band 802 11a...

Page 15: ...perature when stored 20 C 60 C 4 140 F Humidity during use no condensation 10 90 Humidity when stored no condensation 10 90 General information Voltage 100 240 V 50 60Hz Nominal power consumption without modules 140W Energy consumption in ECO mode 72W Energy consumption in on mode 120W Energy consumption in standby mode 0 5 Watt Gross weight 55 kg 121 2 lbs www prowise com 15 44 ...

Page 16: ...packaging W x H x D 1420 x 910 x 240 mm 55 91 x 35 83 x 9 45 inches VESA standard 55 400 x 400 65 600 x 400 75 800 x 400 86 800 x 600 VESA arrangement for external devices VESA 100 x 100 mm Certification CE EMC LVD FCC IC RoHS UL CB RCM and Energy Star Warranty 5 years standard warranty up to 8 years www prowise com 16 44 ...

Page 17: ...4 2 In the box www prowise com 17 44 ...

Page 18: ...n 12 User manual Wi Fi module 13 Power cord 14 USB touch cable 15 HDMI cable WARNING Keep the packaging material such as plastic foil away from children Improper use of packaging materials can result in a choking hazard PLEASE NOTE Check whether the supplied package is complete in case anything is missing please contact our service desk within 5 days after delivery Please provide the serial number...

Page 19: ...eft D Ports left 1 HDMI Output 2 0 2 USB Type C HDMI 2 0 60W power USB 2 0 Touch 3 HDMI 2 0 Type A HDCP2 2 CEC 4 USB 3 0 Type B Touch port 5 Display port 1 2 DP 1 2 6 USB 3 0 Type B Touch port 7 HDMI 2 0 Type A HDCP2 2 CEC ARC 8 USB 3 0 Type B Touch port 9 LAN IN port RJ45 www prowise com 19 44 ...

Page 20: ... Sensors front 1 Light sensor 2 Remote control receiver 3 NFC card reader 4 Motion sensor G Ports bottom 1 AV video input 567i 2 VGA input 1920x1080p 60Hz 3 USB 3 0 Type B Touch port 4 PC Audio input 5 Analog Audio port RCA L R 6 S PDIF Optical Digital Audio port 7 RS232 Serial Port 8 USB 2 0 Type A 9 USB 3 0 Type A H AC input and Main Power Switch front 1 AC input 2 Main switch I Ports right 1 US...

Page 21: ...creen gently tap with one finger on the touchscreen Drag Tap with one finger on the item that you want to move and drag it to the new location without releasing your finger from the screen Open Prowise Central menu Place five fingers of one hand on the screen for at least 2 seconds The menu will appear Right click context menu PC module Tap and hold one finger on the screen for a few seconds for t...

Page 22: ... touchscreen Control button When the touchscreen is in standby mode short press this button to turn it back on again When the touchscreen is turned on long press this button to turn it off When the touchscreen is turned on short press this button to open the Central menu The LED inside the control button indicates the touchscreen s status The touchscreen is switched on White Background lighting is...

Page 23: ...eiver and sensors The tab on the right hand side of the speaker bar of the touchscreen has various functions Hold the NFC card in front of the tab to log in using NFC technology The remote control s IR sensor is located here The light sensor that determines the brightness of the screen is located here if enabled Two motion sensors in the bottom left and bottom right corners PLEASE NOTE To log in w...

Page 24: ...kes the ProWrite technology and pen combination unique in the market is that the pen has 2 different tip sizes available to use when writing on the screen The advantages of this are Write small and switch to large without any software interaction Switch between colours by turning around the pen Write simultaneously in 2 different colours and sizes Next to the uniquely designed pens we enhanced the...

Page 25: ...ggressive cleansers as these can cause damage to the screen Never spray a cleanser directly onto the screen apply it to a cloth first The cloth may be slightly damp but not wet as this can cause damage to the screen Gently wipe down the screen with the cloth Clean the screen with gentle circular movements without pressure to gain the best result Never use an abrasive cleanser www prowise com 25 44...

Page 26: ...aker bar of the touchscreen Press the on off button on the supplied remote control Warning In the unlikely event that the touchscreen gets wet do not turn the power on and do not insert the power cable into the electrical outlet This can result in an electric shock Should the touchscreen get wet when it s turned on immediately turn off the power supply and disconnect the power cable of the touchsc...

Page 27: ...d after 15 seconds by the system and the touchscreen will be shut down 1 Press the control button in the middle of the speaker bar 2 The notification The system will shut down in 15 seconds will appear 3 Select Shut down if you want to shut down the touchscreen immediately or wait 15 seconds Press Cancel to cancel the shut down process 4 Turn off the main power supply by using the power switch on ...

Page 28: ...ollow the steps of the set up guide to complete the set up 6 Once you are connected to the internet the touchscreen will automatically check for updates 7 The welcome screen will appear and the Prowise Central environment will open right after that 8 Open the Prowise Central menu to get started on your touchscreen Open the menu by placing 5 fingers of one hand on the screen for at least 2 seconds ...

Page 29: ...ons of the network 1 Open the Central menu by clicking on the hamburger menu icon in the quick menu 2 Open the sidebar to access the settings menu 3 Select the sub menu Connectivity 4 Select Ethernet by activating the toggle 5 The network specifications will be displayed Wi Fi connection Follow the steps below to set up a connection to a Wi Fi network 1 Make sure the Wi Fi module is installed corr...

Page 30: ... 8 Press the Connect button to connect to the wireless network 5 4 Adjusting the volume The volume of the touchscreen can be adjusted in different ways With the remote control Use the volume buttons to adjust the volume With the Central menu Adjust the volume with this feature of the Prowise Central menu Drag the dot to the right to increase the volume and to the left to decrease the volume Click ...

Page 31: ...make life as easy as possible for you as the user Fully and easily optimise all the features you use on a daily basis in an utmost secure environment PLEASE NOTE In the future extra features will be added to Prowise Central The updates for Central will be installed on the touchscreen via OTA updates More information about OTA updates can be found in OTA Over The Air updates www prowise com 31 44 ...

Page 32: ...open the Prowise Central menu The Prowise Central menu unfolds on the left hand side of the Prowise touchscreen You can open the Prowise Central menu in three ways 1 Press the three stripes on the left hand side of the screen 2 Press and hold down five fingers on the screen for a minimum of two seconds 3 Shortly press the home button 4 Press the Prowise Central home button on the remote control ww...

Page 33: ...entral manual 8 OTA updates over the air updates OTA updates over the air updates ensure that you always have the latest software version installed on the touchscreen The only thing you need for the OTA updates is an internet connection with Prowise Central This can either be a Wi Fi or an Ethernet connection OTA updates are activated by default Updates are installed once the touchscreen is switch...

Page 34: ...9 Remote control 9 1 Schematic overview and explanation of the buttons www prowise com 34 44 ...

Page 35: ...r than Prowise Central home is active this button can be used to return to Prowise Central home 9 Freeze display 10 Open input source Prowise Central 11 Temporarily disables the screen This is depicted in the form of a black screen 12 Go back one menu If Central menu is active then this closes the menu 13 Enable or disable the IR touch functionality of the touchscreen 14 Increase the volume level ...

Page 36: ...eiver of the touchscreen bottom right corner of the touchscreen The remote control has a range of around 8 metres CAUTION Any obstacles between the remote control and the receiver of the touchscreen can obstruct the signal and cause the remote control to not work properly www prowise com 36 44 ...

Page 37: ...control 2 Insert the two batteries 1 5V AAA into the remote control 3 Place them with the positive and negative poles as indicated by the and signs in the battery compartment 4 Close the battery compartment again by carefully replacing the cover plate Warning Remove any leaking batteries as quickly as possible from the remote control Thoroughly wash your hands afterwards The leaking chemicals are ...

Page 38: ...ce 1 Connect an HDMI cable to the HDMI port of the external PC and to the HDMI input port of the touchscreen 2 Connect the USB touch cable to the touch USB port of the touchscreen and to a USB port on the external PC 3 Once all cables have been connected switch on the touchscreen and the external PC 4 Once the touchscreen and the external PC have booted up navigate in the Central menu to Input and...

Page 39: ...f the touchscreen 2 Once the cables have been connected switch on the touchscreen and the external PC 3 As soon as the touchscreen and the external PC have booted up navigate to Input in the Central menu and select the source 10 1 4 AV The composite video signal is a signal that emits transmits both video and audio You can connect the composite video with the Prowise Touchscreen with a 3 5mm Jack ...

Page 40: ... touchscreen to audio equipment 10 2 1 Connecting headphones Connect headphones by plugging them into the analogue audio output headphones Use the touchscreen s volume control to adjust the headphones volume www prowise com 40 44 ...

Page 41: ... to adjust the amplifier s volume PLEASE NOTE The audio outputs the analogue line output and the digital Coax port are always active If you connect an external audio device to the touchscreen and only wish to use this audio device press the Mute button on the remote control or in the Central menu to turn off the touchscreen s internal speakers www prowise com 41 44 ...

Page 42: ... Audio Return Channel connection This allows the external audio device to be controlled via the touchscreen To connect an audio device via ARC insert one end of an HDMI cable into the touchscreen s HDMI port with ARC support 3 and the other end in the external audio device s HDMI port www prowise com 42 44 ...

Page 43: ...ality that works via HDMI The devices that are connected to each other in this way communicate via CEC This allows these devices to be controlled via the touchscreen s remote control Connect a device via CEC by inserting an HDMI cable in the touchscreen s HDMI port 3 www prowise com 43 44 ...

Page 44: ...n the touchscreen and the connected PC or other control unit with RS232 protocol The RS232 code list can be found on www prowise com Pin2 is TXD Pin3 is RXD Pin to Pin connection as below Serial Port Settings Items Value Baud Rate 115200bps fixed Data Bits 8 fixed Stop Bits 1 fixed Parity None fixed Stream Control None fixed www prowise com 44 44 ...

Reviews: