background image

Promega Corporation · 2800 Woods Hollow Road · Madison, WI  53711-5399 USA · Toll Free in USA 800-356-9526 · 608-274-4330 · Fax 608-277-2516 

53

www.promega.com


TM320 · Revised 4/15

10.C. Updating Firmware

As Promega provides new purification kits, new versions of firmware may be required. The firmware version 
installed on your instrument can be verified by turning the machine o

 and then on again. The initial screen will 

display the version number of the firmware loaded on the instrument. Please note the firmware version currently 
installed on your instrument before contacting Promega or your local Promega representative for new firmware.

Firmware is updated using an SD card reader in the Maxwell

®

 16 MDx Instrument port. Download the updated 

firmware from the Promega web site as main.bin onto a computer. Place the SD card in the computer’s SD card 
port, and download the updated firmware to the SD card. If you do not have an SD card reader on your computer, 
use the enclosed SD card reader to download the updated firmware to the SD card through a USB port on your 
computer.

Place the SD card containing the firmware into the SD card port; make sure the instrument door is closed, and 
turn the instrument o

 and on. The instrument will install the firmware, and the Maxwell

®

 16 MDx Instrument 

screen will indicate that the firmware is being updated, and it will go through the diagnostic checks. During the 
diagnostic checks, the instrument will display the new firmware version. When installation is complete, the Home 
screen will open. If the firmware was loaded successfully, the main.bin file will be deleted from the SD card. 

With the Maxwell

®

 Sample Track Software, you also can update the firmware through the RS-232 serial port on 

the back of the instrument. Firmware can be updated from any computer running 

Maxwell

®

 Sample Track

See 

the


Maxwell

®

 Sample Track Software Technical Manual 

#TM314 for details.

10.D. Service

We recommend that the Maxwell

®

 16 Instrument be serviced once a year. The Maxwell

®

 16 MDx instrument 

allows you to print the service history of the instrument. In the


Home 

screen, select 

Setup

. In the 

Maxwell

®

 16 

Configuration 

screen, select 

Service Mode

, and enter the Administrative PIN that is supplied in the Welcome 

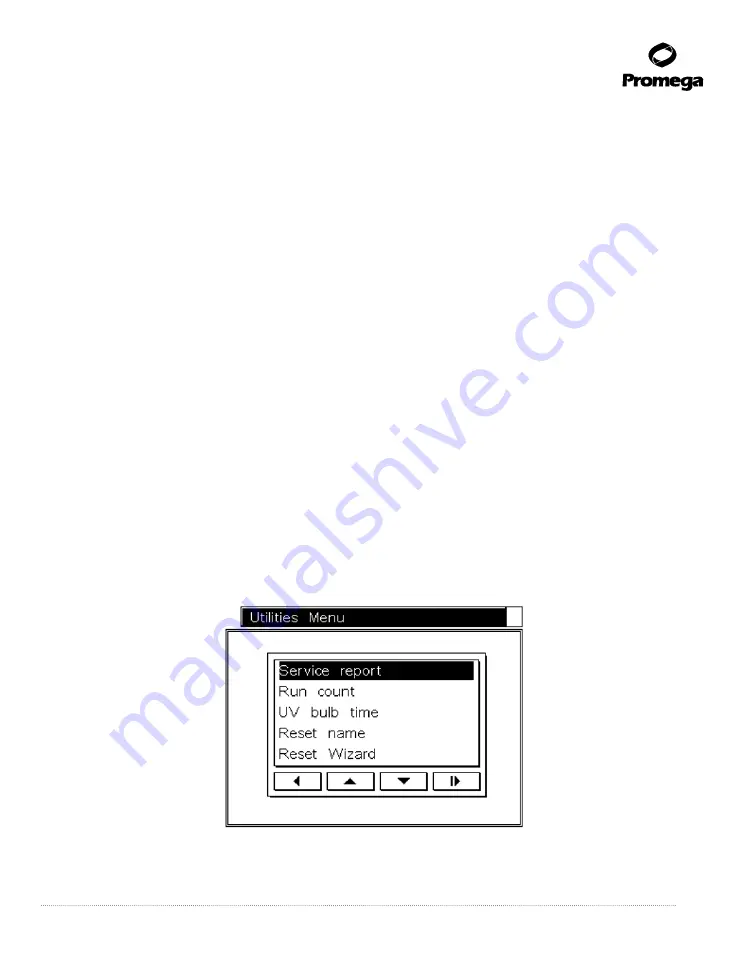
letter to access the 

Utilities Menu


screen.

8227T

A

Figure 44. Utilities Menu screen.

Summary of Contents for Maxwell 16 MDx

Page 1: ...Revised 4 15 TM320 O P E R A T I N G M A N U A L Maxwell 16 MDx Instrument Instructions for Use of Product AS3000 2800 Woods Hollow Rd Madison WI USA...

Page 2: ...E Precautions 7 1 F Environmental Requirements operating shipping and storage conditions 9 2 Hardware Overview 10 3 Hardware Mode 13 4 Unpacking and Setting Up the Maxwell 16 MDx Instrument 14 4 A Unp...

Page 3: ...n Using the UV Lamp 38 8 E Replacing the UV Bulb 39 8 F Periodic Maintenance 39 9 Troubleshooting 40 10 Appendix 45 10 A User Defined Methods 45 10 B Homogenization Method 52 10 C Updating Firmware 53...

Page 4: ...es bound to the particles away from other cellular components Elution of the product The instrument contains a touch screen for navigating programming and running the instrument It has a UV lamp to ai...

Page 5: ...mination of instrument Reporting functionality Maxwell Sample Track Software and bar code reader included Preprogrammed methods for DNA RNA and protein purification Ability to create user defined prot...

Page 6: ...ck Start Guide 1 Bar Code Reader provided in a separate box 1 CD containing Sample Track Software and manual 1 RS 232 Cable for communication with a computer or printer 1 RS 232 USB Adaptor for data e...

Page 7: ...090TA 11470TA 11546TA Figure 1 Maxwell 16 MDx Instrument accessories Panel A Components shown include Bar Code Reader Cable Bar Code Reader Power Cord UV Bulb SD Card Reader and Cable SD Card RS 232 U...

Page 8: ...hazard to the instrument or surrounding area Warning Pinch point hazard Warning Hot surface Burn hazard Warning Lifting hazard Warning Biohazard Warning UV light hazard Do not look directly at the UV...

Page 9: ...o do so may result in damage to the instrument After each run verify that the plungers have been completely removed from the magnet rods before pressing Run Stop to extend the platform Use only Promeg...

Page 10: ...Install the instrument on a clean level surface To avoid shortening the expected lifespan of the instrument install in a location that meets the following criteria Locate on a sturdy level surface Avo...

Page 11: ...ont view of the Maxwell 16 MDx Instrument 8085TA Figure 3 Touch Screen and Keypad The touch screen and the keypad for use in navigating through the various screen displays for the Maxwell 16 MDx Instr...

Page 12: ...the rear of the Maxwell 16 MDx Instrument The rear of the instrument showing the On O switch and where to connect the power cable A 3 amp time lag fuse is located next to the power switch 8082TA On o...

Page 13: ...ion 10 C The SD card slot cannot be used to download data from the Maxwell 16 MDx Instrument We recommend that you keep the SD Card in the instrument to avoid misplacing it Figure 6 shows the hardware...

Page 14: ...he various Maxwell Purification Kits for information on the hardware mode setting required The existing hardware mode SEV or LEV setting is displayed in the upper right hand corner of the Home screen...

Page 15: ...he packaging material in case the instrument needs to be returned for service or repair later 4 B Removing the Magnetic Rod Assembly Plunger Bar Platform Shipping Anchors 1 Ensure that the instrument...

Page 16: ...t see Figure 10 Twist the bulb a quarter turn until it is firmly in place The UV bulb has an average life of 3 000 hours The Maxwell 16 MDx Instrument will warn you when the accumulated UV bulb usage...

Page 17: ...e Tripp Lite instruction manual Connect the bar code reader to the USB port on the side of the instrument Users who wish to print run data directly can connect a serial printer to the RS 232 port of t...

Page 18: ...itial setup This Wizard will help you to set up the instrument configuration to best meet your needs During setup you can set the following parameters Language Touch Screen settings Date Time UV Lamp...

Page 19: ...een Reset Successful message indicates that the calibration was successful and the Wizard can continue Figure 12 Calibrating the Touch Screen To calibrate the screen touch the symbols in the order the...

Page 20: ...Selecting each of the screen options opens a keypad to add numerical values 8207TA Figure 14 Date Time Setup screen 4 UV Lamp You can program the Maxwell 16 MDx Instrument to turn on the UV lamp auto...

Page 21: ...e Options screen Important The options chosen must be entered during the run setup Options not chosen will be displayed on the Barcode Input screen during run setup Section 5 B but you will not be abl...

Page 22: ...the user to enter a PIN to perform a purification run The PIN is four digits The list of users and associated PINs can be modified as described in Section 7 B Keep a separate list of all users and ass...

Page 23: ...is treatment Important Do not open the door if the UV lamp is on The UV lamp will not run if the door is open The Home screen contains the menu options that allow access to all of the functions availa...

Page 24: ...ocol 8231TA 2 Choose a protocol according to the Maxwell reagent kit technical manual Select User to access and run custom protocols Instructions for setting up customized protocols are presented in S...

Page 25: ...5 B for more information Setting Up a Run in the LEV Mode 1 The Home screen must indicate LEV Select Run Select the User and add the matching PIN if appropriate Pressing the Run Stop button opens the...

Page 26: ...o the front position of the LEV rack Once all of the samples elution tubes and plungers have been loaded press the Run Stop button The instrument platform will move back into the instrument Close the...

Page 27: ...al position To start at a di erent position number select the Position option to open a keypad for choosing the required number 2 Scan the bar code label on the sample tube The bar code data is displa...

Page 28: ...ion All of the data can be removed by selecting the Clear All option 7 Select Next Sample to add the information for the next sample For empty sample positions select Next Sample repeatedly until the...

Page 29: ...the data required The data will appear on the screen next to Eluate ID Place the tube in the appropriate elution tube slot at the front of the cartridge rack next to the cartridge Review the data All...

Page 30: ...trument goes through a run without plungers the magnetic rod assembly must be removed and cleaned see Section 8 B The cartridges containing the samples must be discarded During the run the Processing...

Page 31: ...thod has ended The export of run data occurs before the samples are removed from the instrument see Section 6 8222TA After the run is complete open the instrument door and check that all of the plunge...

Page 32: ...xport If No is selected the run data are saved for subsequent retrieval and not exported If Yes is selected the File Output screen opens 8223TA The Transfer to PC option allows the computer containing...

Page 33: ...ile from the instrument To remove files use the Data Transfer option on the Home screen In the File Output screen select File Maintenance and enter the Administrator PIN In the Select File screen the...

Page 34: ...ll 16 Configuration screen 2 Follow the on screen instructions First open the door 3 The Magnetic Assembly will move down to allow you to remove the Magnetic Assembly Rod Do not push down on the magne...

Page 35: ...l hardware installed If the screen does not match the physical hardware installed turn the instrument o install the appropriate hardware and restart the machine The hardware mode indicated on screen s...

Page 36: ...tighten 9 Close the door the screen will indicate that the hardware has been changed The instrument indicates a hardware change once the door is closed whether or not you actually completed the physi...

Page 37: ...from the Maxwell 16 Configuration screen Important You may need to scroll down the screen to see all of the options 8284TA 1 Changing the Language Select the Select Language option in the Configurati...

Page 38: ...samples or reagents have been spilled it is important to clean the instru ment immediately to avoid damage or contamination of samples Most parts of the Maxwell 16 MDx Instrument have an anodized coat...

Page 39: ...is removed In case of spills in the instrument where there is a potential biohazard wipe up the spill with towels and wash the spill area with a detergent solution such as Steris LpH se following the...

Page 40: ...in the UV lamp socket which is just inside the door on the ceiling Twist the bulb a quarter turn until it can slide out Place the new bulb into the instrument see Figure 10 UV lamp socket as described...

Page 41: ...located next to the power switch If the fuse is blown iden tify and correct the cause Never replace this fuse with a fuse rated for higher than 3A Contact Promega or your local Promega representative...

Page 42: ...temperature before continuing the run This means that there may be slight variations in run time between runs UV Lamp errors After 2950 hours of accumulated lamp time the following error message appea...

Page 43: ...t reached the set point in a few minutes there may be a problem with the heater Contact Promega or your local Promega represen tative for service A heater problem may a ect yield Installed hardware do...

Page 44: ...forward freely Turn the in strument o wait a few seconds and turn the instrument back on If the calibration error persists please contact Promega or your local Promega representative for service Calib...

Page 45: ...anually move the plungers up and down in the wells to wash the particles o Switch the instrument on Note the UV light will not come on during the self diagnostic checks that the instrument performs Ho...

Page 46: ...ysis times could result in the formation of precipitates which may interfere with purification and downstream applications Changing Binding Time This is the amount of time that is allowed for binding...

Page 47: ...Maxwell Instrument Settings for Preprogrammed Methods The values for the Maxwell 16 MDx Instrument preprogrammed methods are given in Table 1 for LEV and Table 2 for SEV These can be used as a guide...

Page 48: ...promega com TM320 Revised 4 15 Setting a User Defined Method 1 To set up the custom method select Setup in the Home screen In the Maxwell 16 Configuration screen select User Protocols 8265TA 2 In the...

Page 49: ...nued 3 In the User Protocol screen select Edit The Choose A Method screen will appear choose RNA DNA or Protein SEV or DNA RNA or Total NA LEV 8235TA 4 In the User Protocol screen select Edit Protocol...

Page 50: ...method parameters are defined the new method can be named and a PIN added PIN protec tion can prevent inadvertent changes After changing the parameters press the Run Stop button to open the User Proto...

Page 51: ...and press the Run Stop button 8234TA 2 In the User Protocol screen select View to see the parameters for an existing method Select Edit and enter the correct PIN if the method is PIN protected 8235TA...

Page 52: ...next User Protocol screen select Administration to open the User Protocol Options screen 8237TA 5 To change the protocol name select Edit Add Protocol Name use the keyboard to enter the new name To ch...

Page 53: ...s in the lysis bu er If the sample floats use 200 l of lysis bu er If the sample sinks use 300 l of lysis bu er Sample Heating The sample can be heated during homogenization to enhance the release of...

Page 54: ...on your computer Place the SD card containing the firmware into the SD card port make sure the instrument door is closed and turn the instrument o and on The instrument will install the firmware and t...

Page 55: ...which describes how to do this The Utilities Menu screen also allows the following options Run Count shows the number of times the instrument has been run UV Bulb Time shows the number of hours the b...

Page 56: ...esult in a decontamination charge Use the original packaging to ensure that no damage will occur to the instrument during shipping Any damage will incur additional charges Note If the original packagi...

Page 57: ...f the open box Slide the small inside shipping box containing the instrument into the large outside shipping box Repack the Maxwell 16 MDx Instrument accessories into the original box and place on top...

Page 58: ...n addition to the standard limited warranty that comes with the Maxwell 16 MDx Instrument a premier warranty and various service agreement options are available for purchase If you purchased a premier...

Page 59: ...n We will repair your instrument and return it to you performing to original factory specifications Additionally this option includes one preventive maintenance visit during the term of the agreement...

Page 60: ...ctionality and demonstrates that everything ordered with your instrument is supplied and installed in your laboratory Upon delivery to the lab the instrument and its components will be visually inspec...

Page 61: ...40 Maxwell 16 LEV Blood DNA Kit 48 preps AS1290 Maxwell 16 Buccal Swab LEV DNA Purification Kit 48 preps AS1295 Maxwell 16 LEV Plant DNA Kit 48 preps AS1420 RNA Purification Kits Product Size Cat Maxw...

Page 62: ...from the instrument surfaces Repeat the procedure as many times as required to e ectively disinfect and decontaminate the instrument Failure to confirm disinfection and decontamination will result in...

Page 63: ...ed trademarks of Steris Inc Tripp Lite is a registered trademark of Trippe Manufacturing Company Products may be covered by pending or issued patents or may have certain limitations Please visit our W...

Reviews: