C
3
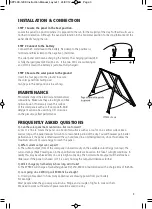
STEP 3 Secure the solar panel to the ground
Insert the four pegs into the ground to secure
the solar panel from falling over.
Two pegs in the body and one in each leg.
INSTALLATION & CONNECTION
STEP 1 Locate the panel in the best position.
Locate the panel in a position where it is exposed to the sun for the majority of the day. For Best results use a
northern orientation. Although the panel will function in the horizontal position, for best performance tilt the
panel directly facing the sun.
STEP 2 Connect to the battery
Connect the 5 meter lead to the battery, Red clamp to the positive (+)
terminal and Black clamp to the negative (-) terminal.
The solar panel will now be charging the battery. The charging (yellow) LED
or fully charged (green) LED will be on. If the two LED’s are oscillating on
and off this means the battery is just about fully charged.
SPP80K shown
MAINTENANCE
Periodically inspect the electrical and mechanical
connections. Make sure they are all tight and free
from corrosion. If necessary clean the surface
of the solar panels with a soft dump cloth. Mild
detergent can also be used. Any dirt or residue
on the glass may effect performance.
FREQUENTLY ASKED QUESTIONS
Q. Can the solar panel be mounted on a flat roof or wall?
A. Yes. It is fine to mount the panel on a horizontal surface such as a roof or on a vertical surface like a
wall as long as the panel receives full sun for a reasonable period of the day. You will however gain better
performance if the panel is tilted toward the sun and faced in a northerly direction, since this enables the
maximum amount of solar energy to reach the panel.
Q. What current output can I expect?
A. The current output (mA) of the solar panel is based mostly on the available solar energy (sun rays). The
current ratings (Peak Power) given in the specifications table are based on the ‘ideal’ sunlight conditions. In
reality this may be achieved only on a very bright sunny day. The normal current output will therefore be a
little lower. If the panel is shaded or if it is a very hot day the output will decrease further.
Q. Will it charge my flat battery & how long will it take?
A. The SPP80K will charge a flat battery (above 9V) 250-650CCA (Automotive) with a charge time of 8-35Hrs.
Q. I am going on a 4WD trip, will 80 Watts be enough?
A. It really comes down to how many appliances are drawing power from your battery.
For example:
Most people when they go away would run a Fridge, and a couple of lights to cook with etc.
We need to work out how much power would be used in a day.
SPP40K-120K Instruction Manual_Layout 1 24/01/12 2:00 PM Page 3


