Pro-Lift F-2332JSC Operating Instructions & Parts Manual Download Page 6

6

Jack Stands

PREPARATION

1. Before using this product, read the owner’s manual and familiarize yourself thoroughly with the product and the 

hazards associated with its improper use. 

2. Inspect stands before each use. Do not use if bent, broken or cracked components are noted. Ensure that all 

parts move freely.

3. Verify the product and your application are compatible. If in doubt, contact Pro-Lift Customer Support @ (816) 

891-6390.

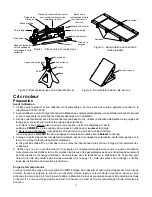
4. Install ratchet bar into frame. Ratchet portion of bar must be aligned with ratchet pawl (stopper).

5. Move the ratchet bar to its lowest position by raising the locking handle, releasing the ratchet pawl, and guiding 

the bar downward.

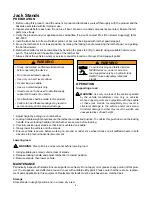
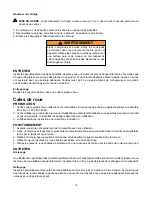
6. Ratchet bar/collar lock is accomplished by bending the press tab (Fig.1) inward using a suitable hammer and 

punch. This will prevent inadvertent loss of the ratchet bar. 

7. Always check the vehicle owners or service manual for location of proper lift and support points.

•  Study, understand, and follow all instructions 

before operating the device.

•  Do not exceed rated capacity.
•  Use only on hard, level surface.
•  Center load on saddle.
•  Use as a matched pair only.
•  Stands are not to be used to simultaneously 

support both ends of a vehicle.

•  No alterations shall be made to this product.
•  Failure to heed these markings may result in 

personal injury and/or property damage.

!


WARNING

!


WARNING

To avoid crushing and related injuries:

NEVER work on, under or around a 

load supported only by a hydraulic jack. 

ALWAYS use adequately rated jack 

stands.

OPERATION

Supporting a load

WARNING:

 Use only on areas of the vehicle specified 

by the vehicle manufacturer. Use only on vehicles 

whose support points are compatible with the saddle 

of these jack stands. Incompatibility may result in 

structural damage to the vehicle and/or jack stand. 

Structural damage to either may result in sudden and 

unexpected loss of load height.

1. Adjust height by pulling up on ratchet bar.

2. Locking handle weight should secure the ratchet bar in desired position. To confirm this, push down on the locking 

handle. Ensure locking handle and ratchet bar are secure before loading.

3. 

Carefully

 position jack stands so that load is centered on saddle.

4. 

Slowly

 lower the vehicle onto the stands.

5. Ensure vehicle is secure before working on, around or under. Use wheel chocks on all unlifted wheels in both 

directions to prevent inadvertent movement.

Lowering load

WARNING:

 Clear all tools and personnel before lowering load.

1. Using suitable jack, raise vehicle clear of stands.

2. Release locking handle and adjust ratchet bar to lowest position.

3. Remove stands, then lower vehicle.

MAINTENANCE

Periodically inspect both stands. Ensure all parts move freely. Do not apply oil or grease to any portion of this prod-

uct. If rust appears, sand affected area and cover with suitable utility paint. Please note that there are no replace-

ment parts applicable to this equipment. Replacement stands must be purchased as a matched pair.

Storage

Store stands in upright position and in a clean, dry area. 


!


!

Summary of Contents for F-2332JSC

Page 1: ...a Box 6 Piece Combo Set This is the safety alert symbol It is used to alert you to potential personal injury hazards Obey all safety messages that follow this symbol to avoid possible injury or death...

Page 2: ...sonnel Labels and Operator s Manuals are available from manufacturer PRODUCT DESCRIPTION Pro Lift Garage in a Box comes with a 2 Ton Floor Jack 2 Ton Jack Stand pair 2 Wheel Chocks and a detachable cr...

Page 3: ...ve then pump 6 to 8 full strokes This will help release any pressurized air which may be trapped within the reservoir Oil level should be even with the bottom of the oil filler plug hole Reinstall the...

Page 4: ...and the potential for sudden and immediate loss of load Adding oil 1 With saddle fully lowered set jack in its upright level position Remove vent screw 2 Fill with oil until 3 16 above the inner cylin...

Page 5: ...rformance Fluid level low Air trapped in system Ensure proper fluid level Refer to Bleeding Venting Trapped Air procedure on page 3 Will not lift to full extension Fluid level low Ensure proper fluid...

Page 6: ...around a load supported only by a hydraulic jack ALWAYS use adequately rated jack stands OPERATION Supporting a load WARNING Use only on areas of the vehicle specified by the vehicle manufacturer Use...

Page 7: ...nstructions before assembling this garage creeper Do not ex ceed the rated capacity Do not stand on this garage creeper or use it as a cart Stop using immediately if any parts are missing loose or bro...

Page 8: ...LACEMENT OF DEFEC TIVE PRODUCTS AS DESCRIBED ABOVE and 2 SFA Companies Inc SHALL NOT BE LIABLE FOR ANY CONSEQUENTIAL OR INCIDENTAL DAMAGE OR LOSS WHATSOEVER and 3 THE DURATION OF ANY AND ALL EXPRESSED...

Page 9: ...6 pi ces Voici le symbole signalant un danger pour la s curit Il est utilis pour vous alerter des dangers potentiels de blessures Respectez tous les messages de s curit qui suivent ce symbole afin d v...

Page 10: ...ris par le fabricant communiquez avec le distributeur ou le fabricant pour avoir une liste des endroits autoris s Il est recommand qu un personnel qualifi inspecte le chariot annuellement Il est possi...

Page 11: ...tion FERM E de la soupape de surpression utilis e pour soulever la charge b Dans le sens antihoraire mais pas plus d un demi tour partir de la position ferm e C est la position OUVERTE de la soupape d...

Page 12: ...sistance 3 Consultez le manuel du propri taire fourni par le fabricant du v hicule pour conna tre les points de levage approuv s Centrez le point d appui du cric sur le point de levage 4 V rifiez le p...

Page 13: ...our voir s il y a de la rouille ou de la corrosion Nettoyez selon les besoins et essuyez avec un linge huileux AVIS N utilisez pas de papier sabl ni de mat riau abrasif sur le piston du levier et le v...

Page 14: ...ce et la description de la pi ce Pour conna tre les prix actuels appelez nous ou crivez nous Soutien la client le 10939 N Pomona Ave Kansas City MO 64153 T l phone 1 816 891 6390 T l copieur 1 816 89...

Page 15: ...sont pas cela peut causer des dommages de structure au v hicule et aux b quilles De tels dommages l un ou l autre peuvent faire descendre de mani re soudaine et inattendue la charge soutenue Lisez co...

Page 16: ...bles Si vous avez des doutes appelez le soutien la client le Pro Lift au 1 816 891 6390 2 Avant d utiliser ce produit lisez le manuel d utilisation au complet et familiarisez vous parfaitement avec le...

Page 17: ...accordez les deux sections du chariot de visite en les ins rant dans les connecteurs fournis Assurez vous que les trous de fixation sont align s 4 Ins rez les boulons et crous de blocage dans les quat...

Page 18: ...ompanies Inc NE SERA PAS TENUE RESPONSABLE DES DOMMAGES CONS CUTIFS OU INDIRECTS OU DE PERTES QUELCONQUES 3 LA DUR E DE TOUTE GARANTIE IMPLICITE OU EXPRESSE CE QUI INCLUT SANS LIMITATION LES GARANTIES...

Page 19: ...piezas Este es el s mbolo de alerta de seguridad Se usa para alertar sobre peligros potenciales de le siones personales Obedezca todos los mensajes de seguridad que tengan este s mbolo para evitar pos...

Page 20: ...icante o el distribuidor para obtener una lista de los centros de servicio de f brica autorizados Se recomienda realizar una inspecci n anual a cargo de personal calificado Las etiquetas y los manuale...

Page 21: ...usa para elevar la carga b A la izquierda pero no m s de 1 2 giro completo con respecto a la posici n de cerrado Esta es la posici n ABIERTO de la v lvula de liberaci n que se usa para bajar la carga...

Page 22: ...gire la manija a la derecha hasta que sienta una resistencia firme 3 Consulte el manual del propietario del fabricante del veh culo para ubicar los puntos de elevaci n en el veh culo Centre el asiento...

Page 23: ...a o con aceite seg n sea necesario AVISO No use papel de lija ni materiales abrasivos en las superficies del ariete y el pist n de la bomba Almacenamiento Cuando no lo utilice guarde el gato con el as...

Page 24: ...y la descripci n de las piezas Para obtener el precio vigente comun quese a Centro de soporte al cliente 10939 N Pomona Ave Kansas City MO 64153 Tel fono 816 891 6390 Fax 816 891 6599 Art culo Descrip...

Page 25: ...s indicaciones podr an producirse lesiones personales o da os a la propiedad ADVERTENCIA ADVERTENCIA Para evitar lesiones por opresi n y otras lesiones NUNCA trabaje sobre debajo o alrededor de una ca...

Page 26: ...y uniformes Si no se respetan estas indicaciones podr an produ cirse lesiones personales o da os a la propiedad FUNCIONAMIENTO Aseg rese de que la aplicaci n sea compatible con el producto Lea compren...

Page 27: ...justando la tuerca de bloqueo con la llave y llave proporcionada 3 Conecte ambas secciones de la plataforma rodante a la vez insert ndolas en los conectores proporcionados Aseg rese de que los orifici...

Page 28: ...REEMPLAZO DE LOS PRODUCTOS DEFECTUOSOS COMO SE DETALLA ARRIBA y 2 SFA Companies Inc NO SER RESPON SABLE EN NING N CASO POR DA OS O P RDIDAS EMERGENTES O INCIDENTALES y 3 LA DURA CI N DE TODA GARANT A...

Reviews: