background image

30

 Key No.  Qty. 

Description

 Key No.  Qty. 

Description


#8 x 1/2" Ground Screw


3/8" x 2 1/2" Bolt


3/8" Nut


3/8" x 4" Screw


10 

3/8" Star Washer


56 

#8 x 3/4" Screw


5/16" x 1" Screw


5/16" Star Washer


3/8" x 3 1/2" Screw


10 

1/4" x 1" Screw


11 

10 

#3 x 1/4" Screw


12 

M8 x 45mm Bolt


13 

Speaker


14 

1/4" x  2 1/2" Screw


15 

3/8" x 1 3/8" Bolt


16 

1/2" x 2 1/4" Bolt


17 

1/2" Nut


18 

Hood Clip


19 

19 

#8 x 3/4" Truss Head Screw


20 

3/8" x 1 3/4" Bolt


21 

3/8" Locknut


22 

Incline Motor Spacer


23 

1/4" x 3/8" Screw


24 

#8 x 1/2" Screw


25 

5/16" x 1 1/4" Bolt


26 

Left Speaker Cover


27 

5/16" x 1 3/4" Bolt


28 

5/16" Washer


29 

5/16" Nut


30 

Right Speaker Cover


31 

Pulse Crossbar


32 

1/4" x 2" Screw


33 

#8 x 1" Tek Screw


34 

#8 Star Washer


35 

Filter


36 

Platform Cushion


37 

Left Foot Rail


38 

Latch Warning Decal


39 

Walking Platform


40 

Walking Belt


41 

Belt Guide


42 

Rubber Spacer


43 

Drive Roller/Pulley


44 

Magnet


45 

Reed Switch Clamp


46 

Drive Motor Belt


47 

Drive Motor


48 

Frame Spacer


49 

Frame


50 

Right Foot Rail


51 

Storage Latch


52 

Right Rear Foot


53 

Left Rear Foot


54 

#8 x 1/2" Pulse Ground Screw


55 

Filter Bracket


56 

Idler Roller


57 

Motor Hood


58 

Incline Frame Spacer


59 

Incline Frame


60 

Incline Motor


61 

Sensor


62 

Controller


63 

Wire Tie


64 

Belly Pan Plate


65 

Power Switch


66 

Power Cord


67 

Grommet 


68 

Belly Pan


69 

Upright Cap


70 

Upright Wire


71 

Left Handrail


72 

Right Handrail


73 

Left Base Cover


74 

Right Base Cover


75 

Left Upright


76 

Right Upright


77 

Base Cap


78 

Caution Decal


79 

Base Pad


80 

Base


81 

Wheel


82 

Key/Clip


83 

Console Base


84 

Module Housing


85 

Right Tray


86 

Console


87 

Console Frame


88 

Access Door


89 

Console Ground Wire


90 

Console Back


91 

Console Wire Tie


92 

Right Speaker Grill


93 

Left Speaker Grill


94 

Base Pad Spacer


95 

Reed Switch


96 

Console Clamp


97 

Left Tray


98 

Grounding Bracket


99 

Receptacle

  100 

Latch Crossbar

PART LIST

Model No. PETL10812.1 R0513A

Summary of Contents for 910 ZLT

Page 1: ...36102 Website www iconsupport eu E mail csuk iconeurope com Write ICON Health Fitness Ltd c o HI Group PLC Express Way CASTLEFORD WF10 5QJ UNITED KINGDOM AUSTRALIA Call 1800 993 770 E mail australiacc iconfitness com Write ICON Health Fitness PO Box 635 WINSTON HILLS NSW 2153 AUSTRALIA CAUTION Read all precautions and instruc tions in this manual before using this equipment Keep this manual for fu...

Page 2: ... MOVE THE TREADMILL 25 TROUBLESHOOTING 26 EXERCISE GUIDELINES 29 PART LIST 30 EXPLODED DRAWING 32 ORDERING REPLACEMENT PARTS Back Cover RECYCLING INFORMATION Back Cover TABLE OF CONTENTS This drawing shows the locations of the warning decals If a decal is missing or illegible call the telephone number on the front cover of this manual and request a free replacement decal Apply the decal in the loc...

Page 3: ...t No other appliance should be on the same circuit When replacing the fuse in the power cord adapter insert an ASTA approved BS1362 13 amp fuse into the fuse carrier 13 If an extension cord is needed use only a 3 conductor 14 gauge 1 mm2 cord that is no longer than 5 ft 1 5 m 14 Keep the power cord away from heated surfaces 15 Never move the walking belt while the power is turned off Do not operat...

Page 4: ...roperly tighten all parts of the treadmill regularly 25 DANGER Always unplug the power cord immediately after use before clean ing the treadmill and before performing the maintenance and adjustment procedures described in this manual Never remove the motor hood unless instructed to do so by an authorized service representative Servicing other than the procedures in this manual should be performed ...

Page 5: ...is manual To help us assist you note the product model number and serial number before contacting us The model number and the location of the serial number decal are shown on the front cover of this manual Before reading further please familiarize yourself with the parts that are labeled in the drawing below BEFORE YOU BEGIN Handrail Console Key Clip Power Switch Walking Belt Motor Hood Wheel Foot...

Page 6: ... number following the key number is the quantity used for assembly Note If a part is not in the hardware kit check to see if it is preat tached Extra parts may be included 3 8 x 3 1 2 Screw 9 4 3 8 x 4 Screw 4 6 3 8 x 2 1 2 Bolt 2 2 1 4 x 1 3 4 Screw 107 2 5 16 x 1 Screw 7 2 1 4 x 1 Screw 10 4 8 x 3 4 Screw 6 12 5 16 Star Washer 8 2 3 8 Star Washer 5 10 M8 Nut 108 2 3 8 Nut 3 2 M8 x 45mm Bolt 12 1...

Page 7: ...edlenose pliers To avoid damaging parts do not use power tools ASSEMBLY 2 Make sure that the power cord is unplugged Locate the Upright Wire 70 bundled around the front of the Base 80 Cut the plastic tie securing the Upright Wire Then route the Upright Wire out of the indicated hole Press a Base Cap 77 into each side of the Base 80 See the inset drawing Cut the plastic tie near the Upright Wire 70...

Page 8: ...u pull the other end of the wire tie upward through the Left Upright 3 70 75 75 Wire Tie 70 Wire Tie 4 With the help of a second person hold the Left Upright 75 against the Base 80 Be careful not to pinch the wires Partially tighten three 3 8 x 4 Screws 4 with three 3 8 Star Washers 5 into the Left Upright 75 and the Base 80 do not fully tighten the Screws yet Attach the Right Upright not shown in...

Page 9: ... the Left Handrail 71 near the Left Upright 75 Insert the wire tie on the Upright Wire 70 into the bottom of the Left Handrail and pull it out of the end of the Left Handrail Then pull the Upright Wire through the Left Handrail as shown Attach the Left Handrail 71 to the Left Upright 75 with two 3 8 x 3 1 2 Screws 9 and two 3 8 Star Washers 5 do not fully tighten the Screws yet Be careful not to p...

Page 10: ...do not fully tighten the Screws yet 7 76 72 9 5 8 Insert the Console Frame 87 into the Handrails 71 72 Attach the Console Frame with four 1 4 x 1 Screws 10 Start all four Screws and then tighten them Be careful not to pinch the Upright Wire not shown Firmly tighten the four 3 8 x 3 1 2 Screws 9 8 10 10 9 9 71 87 72 ...

Page 11: ...NECTORS PROPERLY THE CONSOLE MAY BECOME DAMAGED WHEN YOU TURN ON THE POWER Then remove the wire tie from the Upright Wire 9 Console Assembly 70 70 Wire Tie Console Wire Console Wire 71 10 Set the console assembly on the Left and Right Handrails 71 72 Make sure that no wires are pinched Insert the excess Upright Wire 70 into the Left Handrail Attach the console assembly to the brackets on the Handr...

Page 12: ...ee step 4 Tighten all six 3 8 x 4 Screws 4 11 96 Console Assembly 6 97 85 6 6 6 6 12 12 Identify the Left and Right Trays 97 85 Orient the Trays as shown and attach each Tray with four 8 x 3 4 Screws 6 Start all of the Screws and then tighten them Be careful not to overtighten the Screws ...

Page 13: ... x 50mm Bolt 104 and an M8 Nut 108 Attach the upper end of the Storage Latch 51 to the Latch Crossbar 100 with an M8 x 45mm Bolt 12 and an M8 Nut 108 12 Large Barrel 108 13 13 Raise the Frame 49 to the position shown Have a second person hold the Frame during the next three assembly steps Attach the Latch Crossbar 100 to the Frame 49 with two 1 4 x 1 3 4 Screws 107 100 49 107 108 Latch Knob ...

Page 14: ...rts may be included Keep the included hex key in a secure place the hex key is used to adjust the walking belt see page 27 and page 28 15 81 81 80 2 3 15 Attach a Wheel 81 to the Base 80 with a 3 8 x 2 1 2 Bolt 2 and a 3 8 Nut 3 Do not over tighten the Nut the Wheel must turn freely Attach the other Wheel 81 to the other side of the Base 80 in the same way See HOW TO LOWER THE TREADMILL FOR USE on...

Page 15: ...atures above 122 F 50 C or below 14 F 10 C Do not excessively bend or stretch the sensor when using or storing the heart rate monitor To clean the sensor use a damp cloth and a small amount of mild soap Then wipe the sensor with a damp cloth and thoroughly dry it with a soft towel Never use alcohol abrasives or chemicals to clean the sensor Hand wash and air dry the chest strap TROUBLESHOOTING If ...

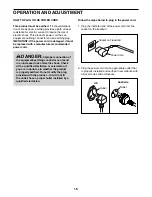
Page 16: ... indicated end of the power cord into the socket on the treadmill 2 Plug the power cord into an appropriate outlet that is properly installed and earthed in accordance with all local codes and ordinances DANGER Improper connection of the equipment earthing conductor can result in an increased risk of electric shock Check with a qualified electrician or serviceman if you are in doubt as to whether ...

Page 17: ...ur workout results race against other iFit users and access many other features To pur chase an iFit module at any time go to www iFit com or call the telephone number on the front cover of this manual You can even listen to your favorite workout music or audio books with the console s premium stereo sound system while you get in shape To turn on the power see page 18 To use the manual mode see pa...

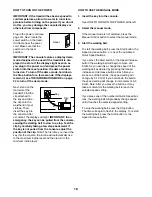
Page 18: ...pulled from the console adjust the position of the clip Note The first time you insert the key into the console the incline will automatically rise to the maximum incline level and then return to the minimum incline level HOW TO USE THE MANUAL MODE 1 Insert the key into the console See HOW TO TURN ON THE POWER at the left 2 Select the manual mode If the manual mode is not selected press the Manual...

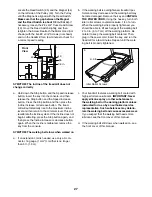
Page 19: ...the workout A new segment will appear at the end of each minute The Speed tab will show a profile of the speed set tings of the workout The My Trail tab will show a track that represents 400 m 1 4 mile As you exercise the flashing rectangle will show your progress The My Trail tab will also show the number of laps you complete The Calorie tab will show the approximate amount of calories you have b...

Page 20: ...ll to the lowest setting The incline must be at the lowest setting or you may damage the treadmill when you fold it to the storage position Next remove the key from the console and put it in a secure place When you are finished using the treadmill press the power switch into the off position and unplug the power cord IMPORTANT If you do not do this the treadmill s electrical components may wear pr...

Page 21: ... a different speed and or incline setting is programmed for the next segment the treadmill will automatically adjust to the new speed and or incline setting The workout will continue in this way until the last segment of the pro le ashes in the display and the last segment ends The walking belt will then slow to a stop Note The calorie goal is an estimate of the number of calories that you will bu...

Page 22: ...er of calories that you will burn during the workout The actual number of calories that you burn will depend on various factors such as your weight 4 Follow your progress with the displays See step 5 on page 19 5 Measure your heart rate if desired See step 6 on page 20 6 When you are finished exercising remove the key from the console See step 7 on page 20 HOW TO USE AN IFIT WORKOUT Note To use an...

Page 23: ...of the workout If you select a competition workout the display will count down to the begin ning of the race Note Each iFit button can also run two demo work outs To use the demo workouts remove the iFit module from the console and press one of the iFit buttons 5 Start the workout See step 3 on page 21 During some workouts the voice of a personal trainer will guide you through your workout To stop...

Page 24: ...on the console will function normally when you plug in the power cord press the power switch into the reset position and insert the key into the console However when you remove the key the displays will remain lit although the buttons will not function If the demo mode is turned on the word ON will appear in the matrix To turn on or turn off the demo mode press the Enter button CONTRAST LVL Press ...

Page 25: ... the storage position Moving the treadmill may require two people 1 Hold the frame and one of the handrails and place one foot against a wheel 2 Pull back on the handrail until the treadmill will roll on the wheels and carefully move it to the desired location CAUTION Do not move the treadmill without tipping it back do not pull on the frame and do not move the treadmill over an uneven surface 3 P...

Page 26: ...in b Make sure that the power cord is plugged in If the power cord is plugged in unplug it wait for ve minutes and then plug it back in c Remove the key from the console and then reinsert it d If the treadmill still will not run please see the front cover of this manual SYMPTOM The console displays remain lit when you remove the key from the console a The console features a display demo mode de si...

Page 27: ...e key from the console SYMPTOM The walking belt slows when walked on a If an extension cord is needed use only a 3 con ductor 14 gauge 1 mm2 cord that is no longer than 5 ft 1 5 m b If the walking belt is overtightened treadmill per formance may decrease and the walking belt may become damaged Remove the key and UNPLUG THE POWER CORD Using the hex key turn both idler roller screws counterclockwise...

Page 28: ...the walking belt Then plug in the power cord insert the key and run the treadmill for a few minutes Repeat until the walking belt is centered SYMPTOM The walking belt slips when walked on a First remove the key and UNPLUG THE POWER CORD Using the hex key turn both idler roller screws clockwise 1 4 of a turn When the walk ing belt is correctly tightened you should be able to lift each edge of the w...

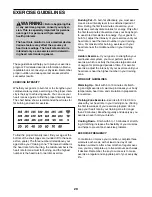
Page 29: ...ic Exercise If your goal is to strengthen your cardiovascular system you must perform aerobic exercise which is activity that requires large amounts of oxygen for prolonged periods of time For aerobic exercise adjust the intensity of your exercise until your heart rate is near the highest number in your training zone WORKOUT GUIDELINES Warming Up Start with 5 to 10 minutes of stretch ing and light...

Page 30: ...ve Roller Pulley 44 1 Magnet 45 1 Reed Switch Clamp 46 1 Drive Motor Belt 47 1 Drive Motor 48 2 Frame Spacer 49 1 Frame 50 1 Right Foot Rail 51 1 Storage Latch 52 1 Right Rear Foot 53 1 Left Rear Foot 54 1 8 x 1 2 Pulse Ground Screw 55 1 Filter Bracket 56 1 Idler Roller 57 1 Motor Hood 58 2 Incline Frame Spacer 59 1 Incline Frame 60 1 Incline Motor 61 1 Sensor 62 1 Controller 63 3 Wire Tie 64 1 Be...

Page 31: ... Chest Strap 104 1 M8 x 50mm Bolt 105 8 8 Flat Washer 106 2 Small Cushion 107 2 1 4 x 1 3 4 Screw 108 2 M8 Nut User s Manual Note Specifications are subject to change without notice For information about ordering replacement parts see the back cover of this manual These parts are not illustrated ...

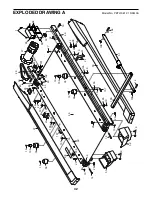
Page 32: ...29 28 14 29 25 40 43 44 12 46 48 48 19 45 19 1 16 16 56 19 19 19 19 19 19 95 19 29 19 19 19 52 53 36 36 19 36 19 36 19 23 102 101 1 1 34 55 35 105 105 105 105 105 105 105 105 19 106 19 106 100 107 51 108 108 104 107 EXPLODED DRAWING A Model No PETL10812 1 R0513A ...

Page 33: ...33 6 65 63 62 58 59 58 18 20 21 60 22 6 57 6 64 21 21 17 17 20 21 6 18 6 6 6 6 6 68 6 6 18 6 6 1 34 1 34 98 66 99 EXPLODED DRAWING B Model No PETL10812 1 R0513A ...

Page 34: ...80 78 15 5 5 77 15 4 4 78 4 76 77 2 81 3 33 3 2 81 33 67 1 5 79 79 77 77 33 79 94 33 79 94 73 72 75 9 5 70 74 71 69 31 89 54 6 6 6 6 6 6 9 10 10 8 7 69 8 7 5 EXPLODED DRAWING C Model No PETL10812 1 R0513A ...

Page 35: ...35 6 88 86 85 87 83 91 96 6 6 6 82 6 6 6 97 6 6 6 6 6 90 6 84 6 13 13 11 11 96 6 6 6 6 93 92 6 6 6 6 6 11 11 30 11 11 11 6 6 6 26 103 61 EXPLODED DRAWING D Model No PETL10812 1 R0513A ...

Page 36: ...u require more information about safe and correct disposal methods please contact your local city office or the establishment where you purchased this product RECYCLING INFORMATION To order replacement parts please see the front cover of this manual To help us assist you be prepared to provide the following information when contacting us the model number and serial number of the product see the fr...

Reviews: