background image

5

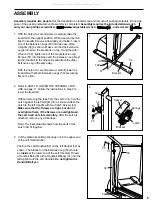
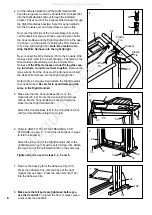
1. With the help of a second person, carefully raise the

treadmill to the upright position. While a second person
tips the treadmill to one side slightly and holds it, insert
one of the Extension Legs (59) into the base of the
Uprights (32) as shown. Make sure that the Extension
Leg is turned so the bracket is on top. Using the Allen
Wrench (102), tighten one of the two Extension Leg
Screws (57) into the Base and the Extension Leg. Next,
tip the treadmill to the other side and attach the other
Extension Leg in the same way.

With the help of a second person, carefully lower the
treadmill so that both Extension Legs (59) are resting
flat on the floor.

57

102

59

32

Bracket

1

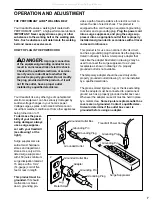
2. Refer to HOW TO LOWER THE TREADMILL FOR

USE on page 11. Follow the instructions in step 2 to
lower the treadmill. 

Without removing the tape from the Latch (34), hold the
Latch against the left Upright (32) as shown. Attach the
Latch to the left Upright with four Catch Screws (33).
Make sure that the Screws are tight, but do not
overtighten them; if the Screws are overtightened,
the Latch will not slide smoothly. 
After the Latch is
attached, remove any visible tape.

Note: The inset drawing shows how the parts of the
Latch (34) fit together.

34

33

33

32

2

ASSEMBLY

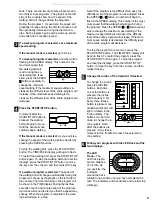
Assembly requires two people. Set the treadmill in a cleared area and remove all packing materials. Do not dis-
pose of the packing materials until assembly is completed. Assembly requires the included allen wrench
and your own phillips screwdriver                       , adjustable wrench                       , and scissors                   .

Spacer

Springs

Bracket

Latch

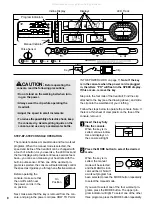
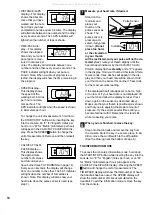
3. Cut the plastic tie holding the cage nut in the upper end

of the Left Handrail (60).

Position the Left Handrail (60) on the left Upright (32) as
shown. The bracket on the Extension Leg (59) should
be inside of the lower end of the Left Handrail. Thread
a Handrail Bolt (30) with a Handrail Washer (31) into the
left Upright and the Left Handrail. Do not tighten the
Handrail Bolt yet. 

60

30

31

32

59

3

All manuals and user guides at all-guides.com

Summary of Contents for 625ex wide deck

Page 1: ...ou have questions or if there are missing parts please call 1 888 936 4266 Mon Fri 8h00 until 18h30 EST excluding holidays CAUTION Read all precautions and instruc tions in this manual before using th...

Page 2: ...more than one person on the treadmill at a time 9 Wear appropriate exercise clothing when using the treadmill Do not wear loose cloth ing that could become caught in the treadmill Athletic support clo...

Page 3: ...or moving the treadmill make sure that the storage latch is fully closed 22 Inspect and tighten all parts of the treadmill regularly 23 Never drop or insert any object into any opening 24 DANGER Alway...

Page 4: ...onday through Friday 8h00 until 18h00 Eastern Time excluding holidays To help us assist you please note the product model number and serial number before calling The model number of the treadmill is P...

Page 5: ...ach the Latch to the left Upright with four Catch Screws 33 Make sure that the Screws are tight but do not overtighten them if the Screws are overtightened the Latch will not slide smoothly After the...

Page 6: ...e wire tie and the Console Wire Harness 90 into the Right Handrail and out through the indicated bracket Pull as much of the Console Wire Harness through the Right Handrail as possible Note It may be...

Page 7: ...led and grounded in accordance with all local codes and ordinances This product is for use on a nominal 120 volt circuit and has a grounding plug that looks like the plug illus trated in drawing 1 bel...

Page 8: ...attached to the key see the drawing above and slide the clip onto the waistband of your clothing Follow the steps below to operate the console Note If there is a thin sheet of clear plastic on the fa...

Page 9: ...of the console The time remaining in the program will be shown in the TIME display During the last few seconds of each one minute period of the program four tones will sound to alert you that the spe...

Page 10: ...ensor as shown The pulse sensor is pressure acti vated fully press it down Do not press too hard or the circulation in your thumb will be restricted and your pulse will not be de tected Next raise you...

Page 11: ...n temperatures above 30 C 85 F HOW TO MOVE THE TREADMILL Before moving the treadmill convert the treadmill to the stor age position as described above Make sure that the stor age latch is closed fully...

Page 12: ...ust be in the on position PROBLEM The power turns off during use SOLUTION a Check the circuit breaker located on the treadmill frame near the power cord see c above If the circuit breaker has tripped...

Page 13: ...reful not to overtighten the walking belt If the walking belt has shifted to the right turn the left rear roller bolt counterclockwise 1 2 of a turn Plug in the power cord insert the key and run the t...

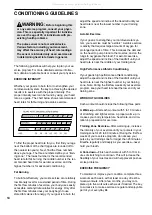
Page 14: ...ine of the treadmill until your heart rate is near the middle of your training zone High Performance Athletic Conditioning If your goal is high performance athletic conditioning adjust the speed and i...

Page 15: ...he following information the MODEL NUMBER OF THE PRODUCT PCTL62590 the NAME OF THE PRODUCT PROFORM 625EX treadmill the SERIAL NUMBER OF THE PRODUCT see the front cover of this manual the KEY NUMBER AN...

Page 16: ...n under this warranty is limited to replacing or repairing at ICON s option the product at one of its authorized service centers All products for which warranty claim is made must be received by ICON...

Page 17: ...FROM THE MANUAL Save this page for future reference Note Specifications are subject to change without notice For information about ordering replacement parts see the back cover of the User s Manual A...

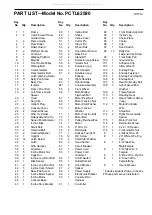
Page 18: ...il 63 1 Rear Endcap 64 1 Console Assembly 65 2 Front Wheel 66 1 Motor Pulley Flywheel Fan 67 1 Motor Pivot Bolt 68 1 Motor Tension Nut 69 1 Motor Star Washer 70 1 Motor Tension Washer 71 1 Motor Tensi...

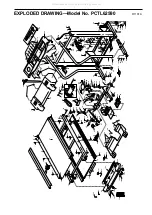
Page 19: ...5 17 17 16 1 81 54 35 54 80 108 36 37 37 9 102 101 96 98 97 83 82 11 66 73 75 78 100 14 105 77 98 42 50 98 98 94 109 54 54 54 44 5 34 33 33 17 88 30 24 31 24 38 33 30 31 62 64 46 110 37 92 108 13 13 1...

Reviews: