background image

14

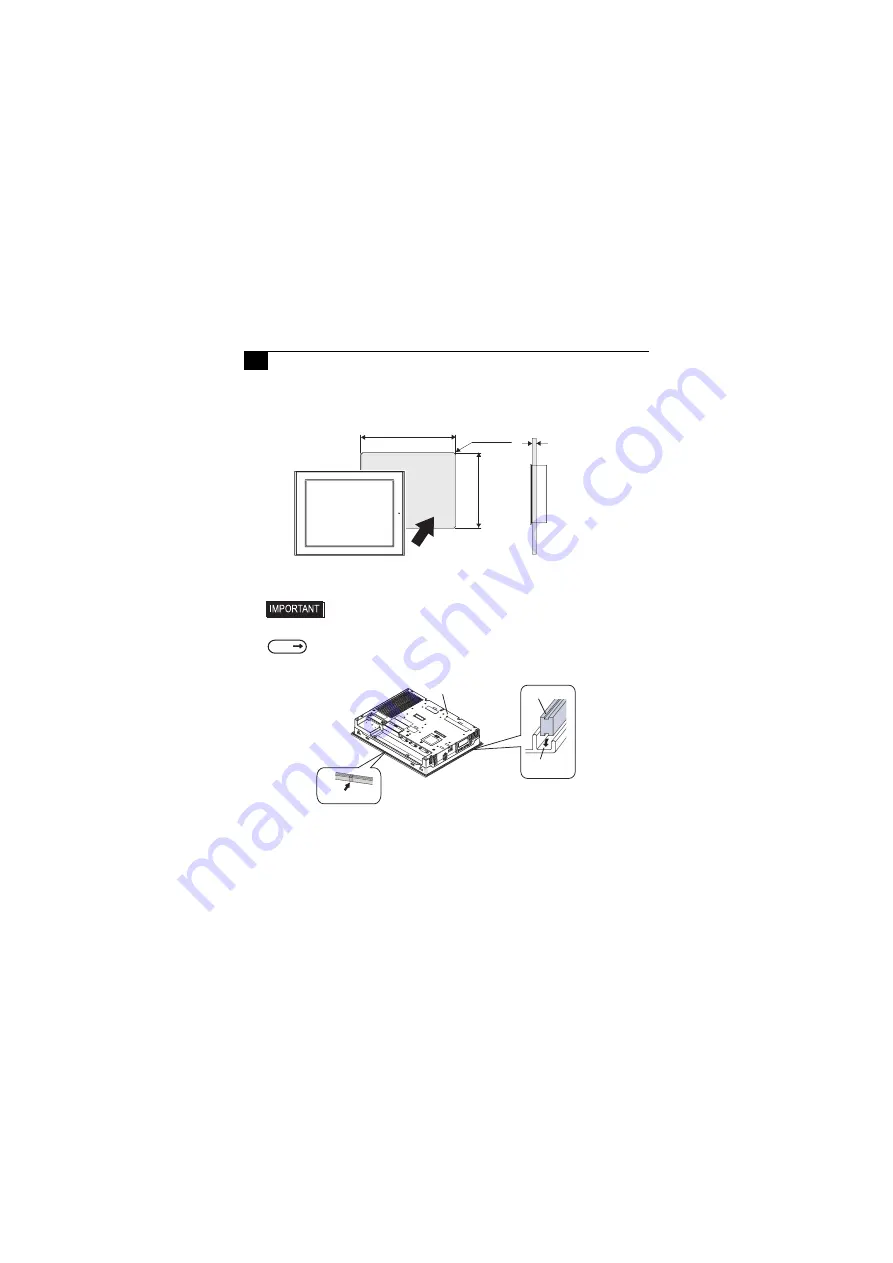
The PS-G unit is designed to be installed in a Panel. Refer to the following procedure to 
mount the PS-G unit.
(1) Create a Panel Cut on the Panel surface as shown in the panel cut dimensions 

illustration.

(2) Confirm that the installation gasket is attached to the PS-G unit and then place the PS-G 

unit into the Panel from the front.

2

Installing the PS-G unit in a Panel

• It is strongly recommended that you use the installation gasket, since it 

absorbs vibration in addition to repelling water.

SEE

For the procedure for replacing the installation gasket, refer to “PS-3600G 
Series User Manual”.

301.5 -0

+1

227.5

-0

+1

Under 4-R3

Panel thickness
1.6 [0.06] to 10.0 [0.39]

PS-G

Unit: mm [in.]

[11.87            ]

-0

+0.04

[8.96            ]

-0

+0.04

Gasket Seam

PS-G Rear Face

Gasket

Installation 

Groove

Summary of Contents for PS-3600G Series

Page 1: ...PS 3600G Series Installation Guide...

Page 2: ...ains cars and ships disaster and crime prevention devices various types of safety equipment non life support related medical devices and other similar equipment After the PS G unit s backlight burns o...

Page 3: ...do not restrict or block the PS G unit s rear face ventilation slots Do not operate the PS G in areas where large sudden temperature changes can occur These changes can cause condensation to form ins...

Page 4: ...image is changed If this happens turn off the PS G wait 10 seconds and then restart the unit This is an LCD characteristic and not a product defect To prevent an afterimage Set the PS G unit s displa...

Page 5: ...ll it in a vertical panel Also it s recommended that the PS G should be mounted at least 100 mm away from any other adjacent structures or machine parts The temperature must be checked on the final pr...

Page 6: ...s installation of the Adobe Corporation s Adobe Reader Adobe Reader 6 0 Installation To install the Adobe Reader software follow the steps given below 1 This software in the form of a self extracting...

Page 7: ...r Input Terminal Block H Backup Battery Cover I Power Plug Connector A B C D E F H G D E F H I Back PS3600G T41 Back PS3600G T41 24V Front Common to PS3600G T41 and PS3600G T41 24V LED PS G Status Gre...

Page 8: ...erface COM2 N Serial Interface COM1 O Ethernet Interface LAN P Speaker output interface Q CF Card Cover J K L Left Side Common to PS3600G T41 and PS3600G T41 24V Bottom PS3600G T41 24V Bottom PS3600G...

Page 9: ...e Drop 1cycle max 10ms max Power Consumption 72VA max 32W max In Rush Current 60A max Excluding the input surge current 0 2 ms max to the built in noise filter 30A max Voltage Endurance AC1500V 20mA f...

Page 10: ...original level of the protection cannot be guaranteed To maintain the original protection level be sure to replace the installation gasket regularly Physical Ambient Operating Temperature 0 C to 50 C...

Page 11: ...hen you setup the system PS G Connector XM2C 0942 502LX OMRON Co Stacking Metal Fittings 4 40 inch screws Recommended cable Connector XM2D 0901 OMRON Co Recommended cable Cover XM2S 0913 OMRON Co Reco...

Page 12: ...CS CTS Input Send Possible 9 VCC 5V 5 Output 0 25A 1 Shell FG Frame Ground Common with SG PS G Connector XM2C 1542 502L OMRON Co Stacking Metal Fittings M2 6 metric screw thread screws Recommended cab...

Page 13: ...Expansion Unit Interface 1 Used to connect an S GMU bus compliant Expansion Unit Expansion Unit Interface 2 Used to connect a PCMCIA Card Adaptor Unit PSG PCM00 Speaker Output Interface Used to connec...

Page 14: ...abinet or enclosure s internal temperature Be sure that heat from surrounding equipment does not cause the PS G to exceed its standard operating temperature When installing the PS G in a slanted panel...

Page 15: ...then place the PS G unit into the Panel from the front 2 Installing the PS G unit in a Panel It is strongly recommended that you use the installation gasket since it absorbs vibration in addition to r...

Page 16: ...is completely turned OFF via a breaker or similar unit The PS3600G T41 unit s are designed to use AC100 to 240 V input The PS3600G T41 24V is designed to use only DC24 V Supplying a power voltage othe...

Page 17: ...und Terminal position the Ring Terminals and reattach the screws Check each wire to make sure the connections are correct 4 Reattach the Terminal Strip s clear plastic cover 1 Wiring for the PS3600G T...

Page 18: ...G T41 24V unit DC24V Power Cord Diameter 0 2 to 2 5mm2 0 0001 to 0 0097inch2 24 to 12 AWG Conductor Type Simple or Twisted Wire 1 Conductor Length 24V 0V FG Grounding Terminal connected to the PS G Be...

Page 19: ...put signal lines To avoid excess noise make the power cord as short as possible If the supplied voltage exceeds the PS G unit s range connect a constant voltage transformer For between the line and gr...

Page 20: ...than 2mm2 0 0062inch2 Create the connection point as close to the PS G unit as possible and make the wire as short as possible When using a long grounding wire replace the thin wire with a thicker wi...

Page 21: ...amp band around the cables Removal To remove the clamp from the USB cables push down on the clamp strap s clip to release it while pulling up on the clamp Peripheral Devices Installation 1 USB Cable C...

Page 22: ...main unit Hook the upper pick of the USB holder to the attachment hole of the main unit and then insert the lower pick as shown below to fix the USB holder 2 Insert the USB cable into the USB Host Int...

Page 23: ...attery refer to PS 3600G Series User Manual The Lithium Battery CR2032 is made by Hitachi Maxell Ltd There is a danger of explosion if the PS G unit s backup battery is incorrectly replaced This batte...

Reviews: