


Fit everything. Together.
FOR MORE INFORMATION CONTACT:
T
1.604.881.7875
F
1.604.881.7835
www.primex.com
452-3120 E & OE 12/18
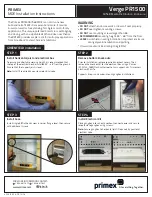
STEP 1
GREENFIELD Installation
STEP 3
STEP 4
Install horizontal joist and electrical box
To ensure a comfortable working height it is recommended that
the top of the electrical box be installed 36” - 48” from the ground.
Ensure that the support joist is level.
Note:
Install if required by your local electrical code.
Remove bottom knock outs
Prior to installation, remove required knockout covers. Then,
remove the knockout(s) for the electrical box using a Primex
(P/N: 125-1683) flush cutter tool to trim support ribs. Trim excess
plastic with knife.
Supports drop-in and under-mount gangbox installations.
Install Electrical Kit
Place gangbox into cut out knockout, connect power and secure
receptacle to gangbox using screws.
Note:
Secure gangbox to horizontal joist if required by your local
electrical code.
STEP 2
Install base
Install single #8 flat head screw in corner flange, level, then secure
with additional screws.
The Primex PR1500 Allfield MDE is an all-in-one new
build and retrofit WiFi transparent enclosure. It mounts
in-wall, on-wall or free standing for single or multi-family
applications. The unique, patented Smart Lid is self-aligning
and closing with an adjustable depth and clean aesthetics.
The PR1500 provides ample room for multi-play applications
from broadband to smart home installations.
PRIMEX
MDE Installation Instructions
Verge PR1500
Allfield Media Distribution Enclosure
WARNING
• DO NOT
stretch enclosure walls or lid won’t seat properly.
• DO NOT
over tighten mounting screws.
• DO NOT
use mounting screws larger than #8.
• RECOMMENDED
mounting height, 36” - 48” from the floor.
• LEAVE
paintshield in during installation to protect enclosure
during drywall installation and painting.
* On-wall maximum load rating: 10kg (22lbs)